
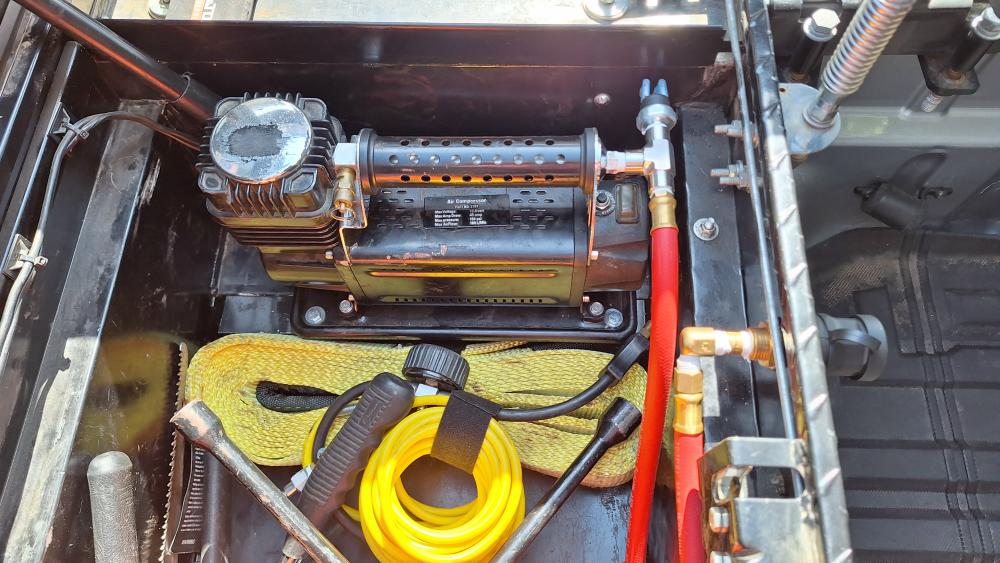
Smittybilt 2781 Air Compressor Modifications
The Smittybilt 2781 is a bulky 15-pound compressor, and pulling it out of my truck’s toolbox every time I need air isn’t the most convenient solution. Once it’s out, I still have to pop the hood and connect it directly to the battery. After using it, the compressor gets hot enough that I usually feel the need to let it cool down before putting it back in its nylon storage bag.
Despite those inconveniences, it’s a fantastic air compressor. With a rated output of 5.65 CFM, it’s more than capable of airing up the tires on my Ford Ranger. My only other complaints are that it doesn’t accept standard air hoses and accessories, and it lacks a pressure switch for automatic operation.
This page will show you how I permanently mounted my Smittybilt 2781 compressor, added a pressure switch, and installed an air coupler so it can be used with standard air hoses and accessories.
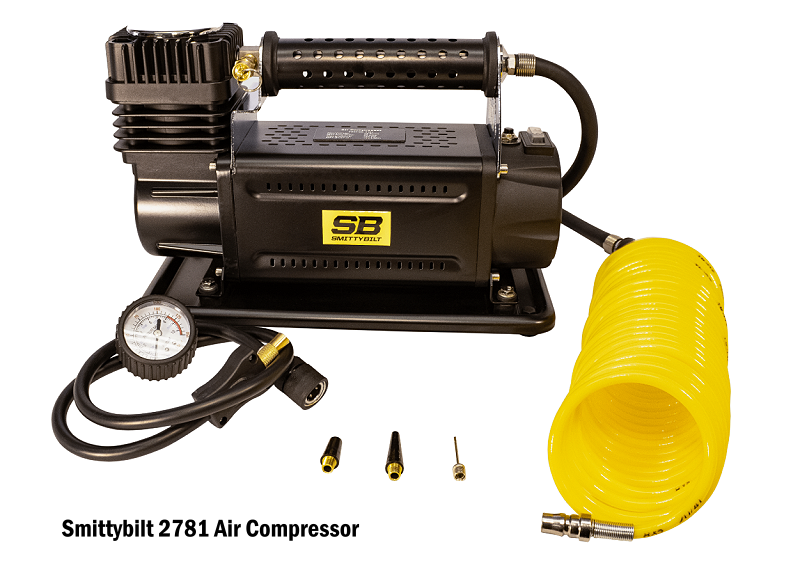
Smittybilt 2781 Primary Features
- Universal Application
- Quick-release 24′ coil hose
- Powerful 12V Motor
- 150 PSI maximum output
- Smittybilt Advantage Warranty
- Heavy-Duty Easy Clip Connectors
- 5.6 CFM maximum output
- Maximum Voltage: 13.8 volt
- Maximum Amperage Draw: 45 amp
- 10′ Power Cord
- Nylon Carry Bag
Understanding How It Operates
I know what you’re thinking; ‘It’s an air compressor. It blows air. What’s to know?’
Well actually, there are some important facts you need to understand before you modify one of these compressors.
No Pressure Switch
Unlike most compressors, the Smittybilt 2781 does not have a pressure switch to shut itself off. This is why the black leader hose coming from the compressor has an open air fitting and not a closed air coupler. If you attached an air coupler to the end of the black leader hose attached to the compressor it would blow the air safety relief valve open. The hose and attachments are designed to allow excess air pressure to pass through them.
This is why the instruction manual states ‘DO NOT change the air hose fittings. This compressor requires the use of open style quick connects and air chucks.’
The Black 2-Foot Rubber Leader Hose
Ever wondered why the yellow air hose attaches to the 2-foot black rubber hose and not the compressor? The Smittybilt is a powerful compressor pumping out 5.6 CFM /150 PSI of air. Air heats up when it is compressed. When the compressor is attached to an air tank the air cools down in the tank before reaching the air hose. Since the Smittybilt doesn’t have an air tank, you’re getting all of that hot air straight from the compressor. If you attached the yellow polyurethane hose straight to the air compressor, the hot air would eventually cause the hose to overheat, fail, and possibly burst. In fact, some off-roaders have stated that the yellow hose can still melt or split right at the brass compressor fitting during extended use.
The leader hose is there to help dissipate heat before it reaches the yellow polyurethane hose, and it also helps absorb vibration. Understanding the purpose of the leader hose and the lack of a factory pressure switch is important because both of these factors need to be addressed when modifying the compressor to work with standard air couplers and accessories. Simply adding a closed air coupler without a pressure switch can cause the safety relief valve to open, which some have reported sounds like a gunshot.
Parts Used
Parts Used With Compressor
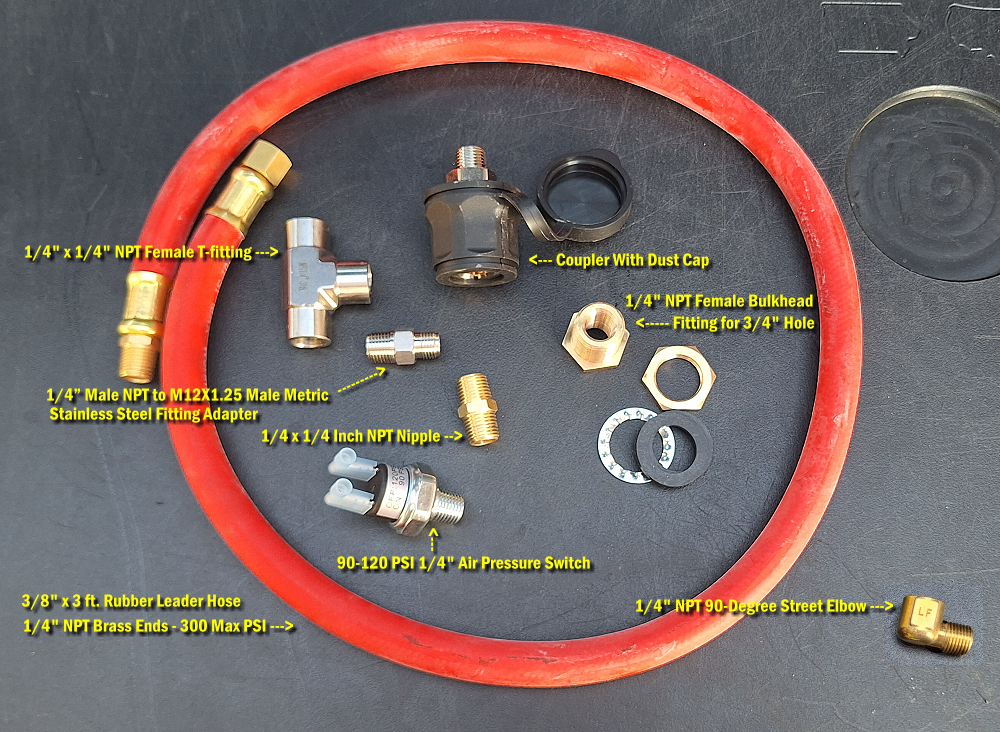
1/4” Male NPT to M12X1.25 Male Stainless Adapter (Product Link)
1/4″ x 1/4″ x 1/4″ NPT Female Stainless T-fitting (Product Link)
90-120 PSI 1/4″-18 NPT 12V Air Pressure Switch (Product Link)
3/8″ x 3 ft. Rubber Leader Hose – 1/4″ NPT Brass Ends – 300 Max PSI (Product Link)
1/4″ Brass Street 90 Degree Elbow 1/4″ NPT Male x 1/4″ NPT Female (Product Link)
1/4 in. MPT X 1/4 in. D MPT Yellow Brass Nipple 1-1/2 in. L (Product Link)
1/4″ NPT Female Brass Bulkhead Fitting Fit for 3/4″ Hole (Product Link)
Air Compressor Hose Coupling With Dust Cap (Product Link)
Teflon Tape (also known as PTFE tape or plumber’s tape)
Parts Used With Air Hose
1/4” NPT Brass Hose Barb to 1/4” NPT Male Thread (Product Link)
1/4 in. x 1/4 in. Male to Female Air Plug (Product Link)
Teflon Tape (also known as PTFE tape or plumber’s tape)
Hard Mounting The Compressor
The Smittybilt instructions state:
“This compressor may be hard mounted in a dry location. Be sure to use proper size wiring for your application. For best performance and longevity, mount compressor upright and use the vibration dampening feet. This is normally done by removing compressor form the mounting plate, drilling holes into mounting plate in desired location and bolting mounting plate to location, then re-installing the compressor.”
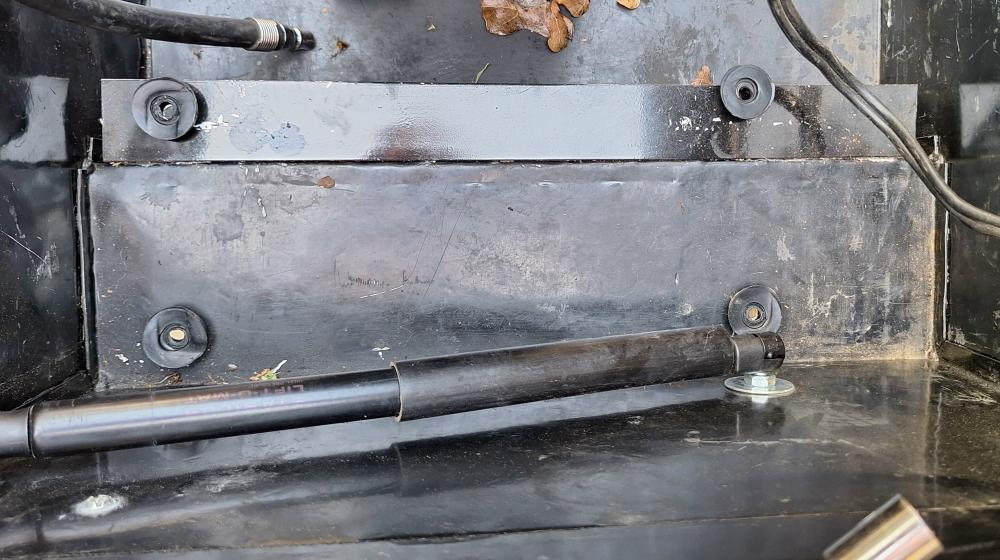
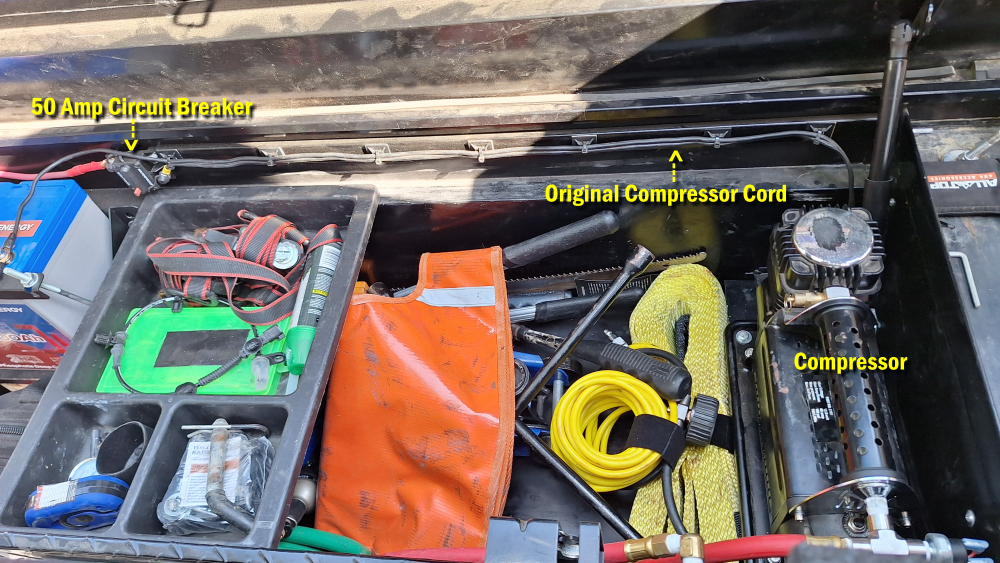
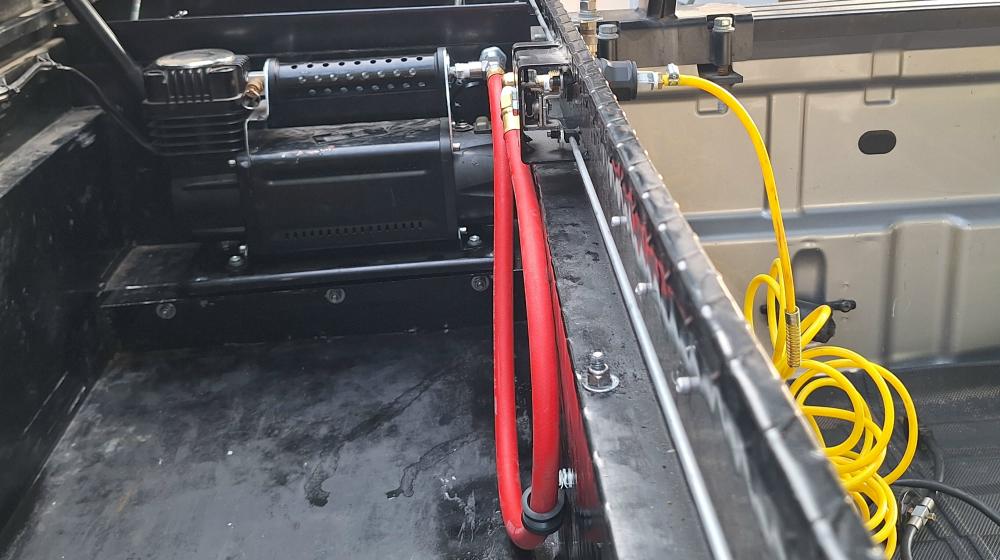
I mounted my compressor on a ledge inside the toolbox in my truck bed. I had to bolt a piece of angle inside the box to create a surface wide enough for the air compressor to sit on.
I mounted my compressor on a ledge inside the toolbox in my truck bed. The ledge wasn’t quite wide enough for the compressor mounting plate, so I bolted a piece of aluminum angle inside the toolbox to create a wider mounting surface.
Then I simply unbolted the rubber feet, inserted 1/4″ bolts down through the holes in the mounting plate and rubber feet and secured the compressor to the toolbox.
Powering The Compressor
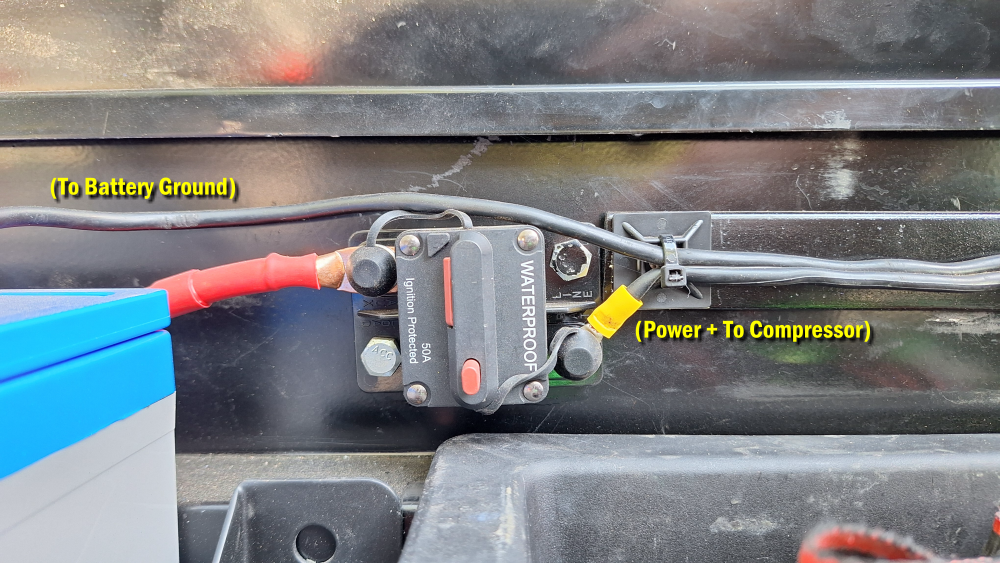
My Ranger is equipped with an auxiliary 100Ah LiFePO4 lithium battery and DC/DC charger mounted inside the toolbox. Since the battery is only a couple of feet from the compressor, I was able to use the compressor’s original power cable. I secured the cable to the wall of the toolbox and routed it to a 50-amp circuit breaker connected to the auxiliary battery. The ground (-) wire connects directly to the battery’s negative (-) terminal.
If you hard mount your compressor, it’s important to use the proper gauge wire for the length of the run. Because my compressor is located so close to the battery, the factory cable was more than adequate and I simply cut off the excess length.
If I had chosen to run power all the way to the truck’s main battery, I would have needed a much larger cable. In my case, that would have meant using 4 AWG wire.
I can’t tell you exactly what size wire you’ll need for your installation because it depends on both the current draw and cable length. However, we do have a page that explains how to select the proper wire size for your application.
Adding An Air Pressure Switch
You can’t add a coupler and standard air hoses and accessories without first adding a pressure switch. Otherwise, the compressor’s safety relief valve will pop open.
Start by removing the four Allen bolts that hold the end cover in place. This is the cover that houses the on/off switch, circuit breaker, and relay.
You’ll also need to remove the black rubber leader hose, fitting, and chrome fitting cover so the chrome end bracket can be removed. The bracket covers the end cover and prevents it from being removed.
While disassembling the compressor, I noticed the original leader hose was already showing signs of wear and had developed a split.
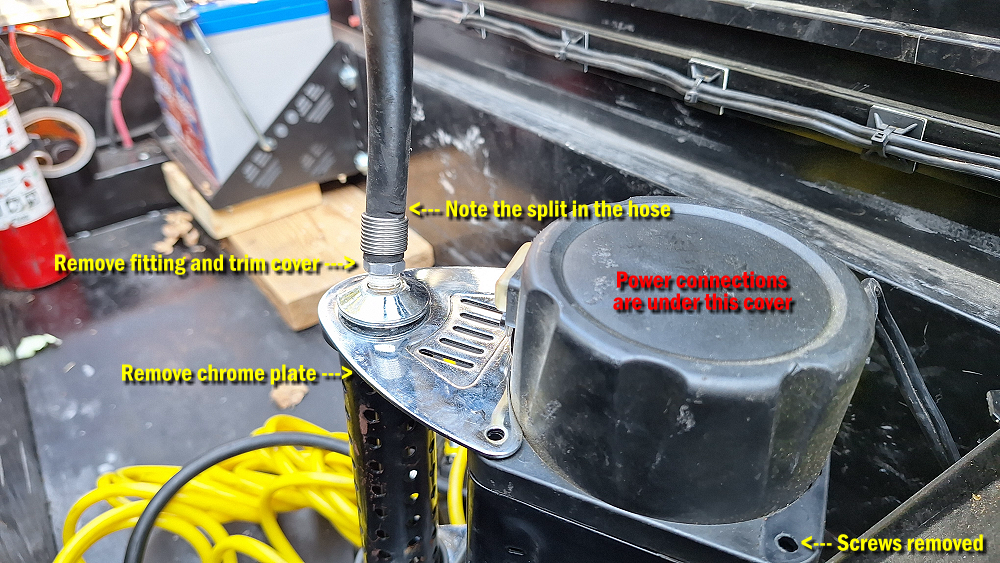
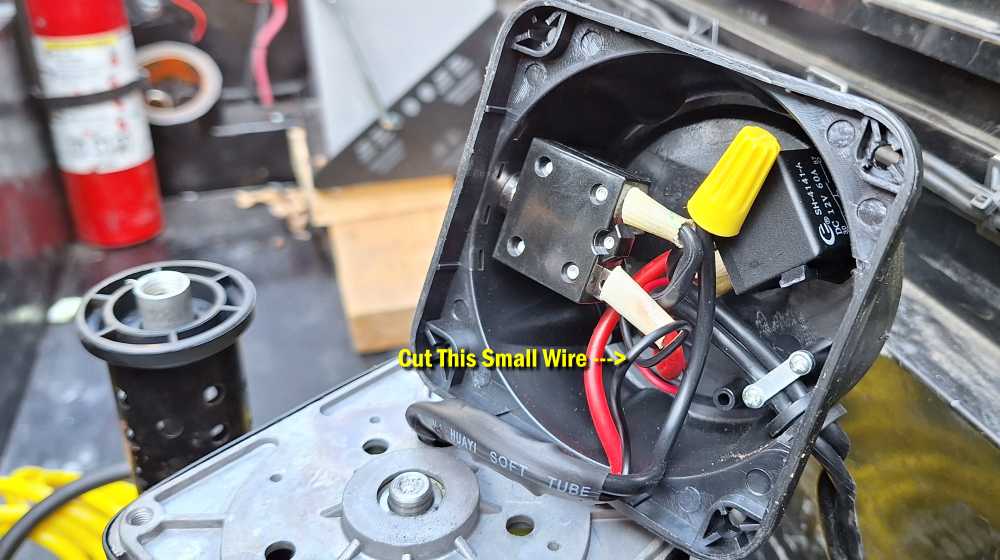
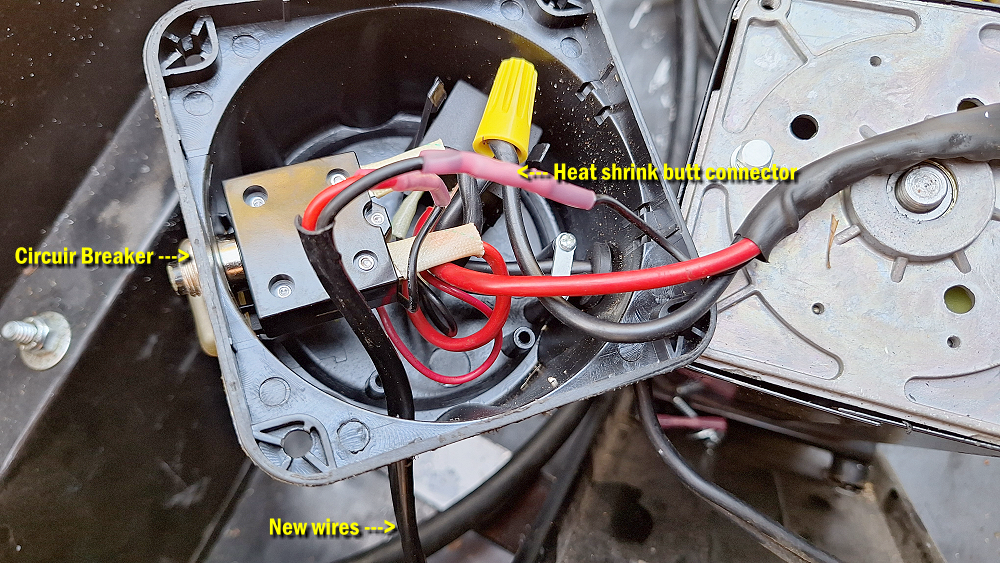
With the cover removed, you’ll see that it houses a 12V relay, circuit breaker, and on/off switch. You’ll also see a wiring tube containing three wires that run to the compressor motor: a large red wire that supplies power, a large black wire that provides the ground connection, and a small black wire that is part of the compressor’s low-current control circuit.
The pressure switch is added to this low-current control circuit by cutting the small black wire and installing the pressure switch in series between the on/off switch and the compressor’s internal thermal overload protector. This allows the pressure switch to automatically control when the compressor runs, while the factory thermal overload protector remains in place to shut the compressor down if the motor overheats.
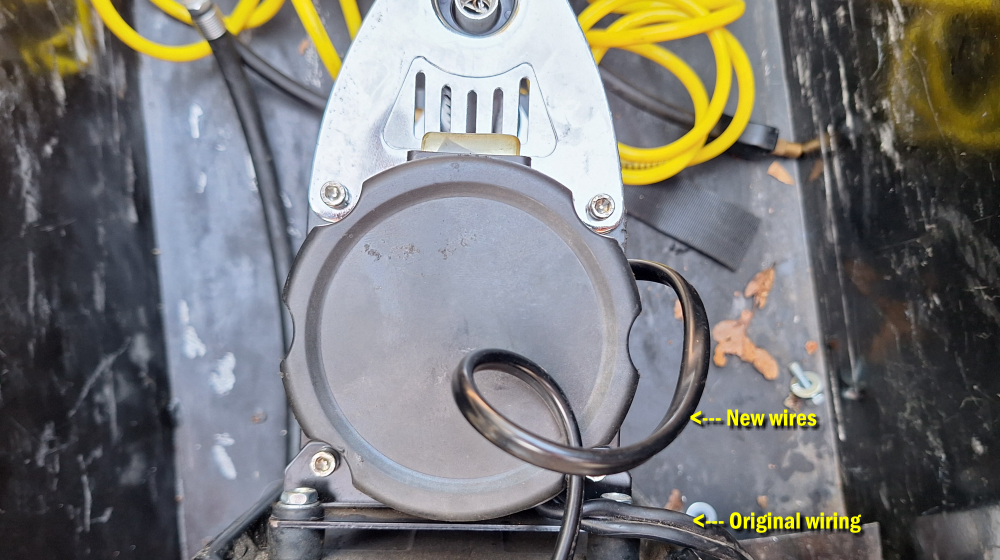
I had some leftover wire from another project that already had a red and black wire inside a plastic tube, so I drilled a hole in the top right of the cover just large enough for the wire to pass through. I located and cut the small black control wire, then connected one side of the cut wire to the new red wire and the other side to the new black wire. The color of the new wires is not important; they are simply extensions that allow the pressure switch to be mounted outside the compressor housing.
I used 18-22 GA heat shrink butt connectors to make the connections. I like the heat shrink connectors because after you crimp them and heat them with a heat gun, they not only seal the connection from moisture, but they also help prevent the connector from loosening due to vibration.
With the connections made, I reinstalled the black plastic end cover and chrome end bracket.
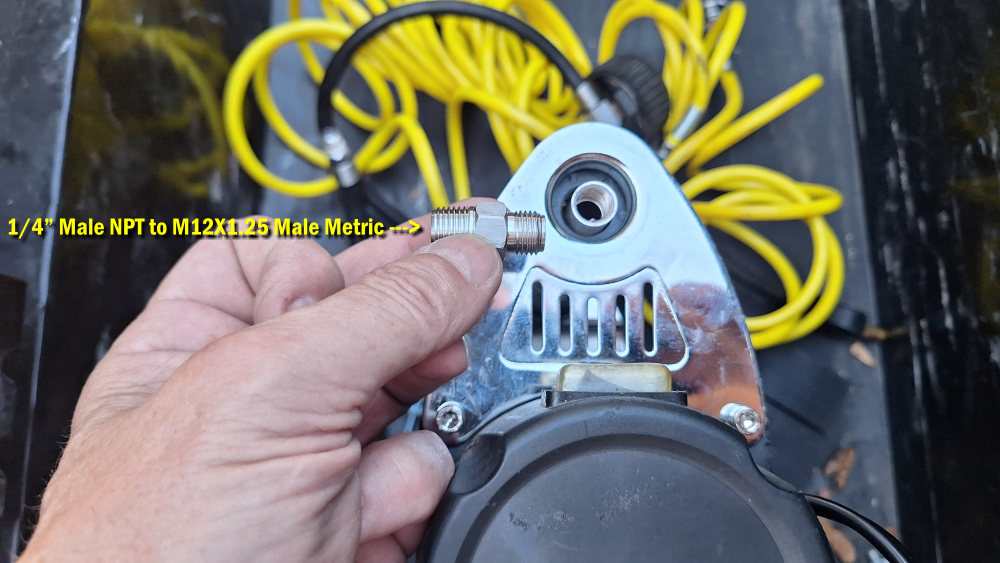
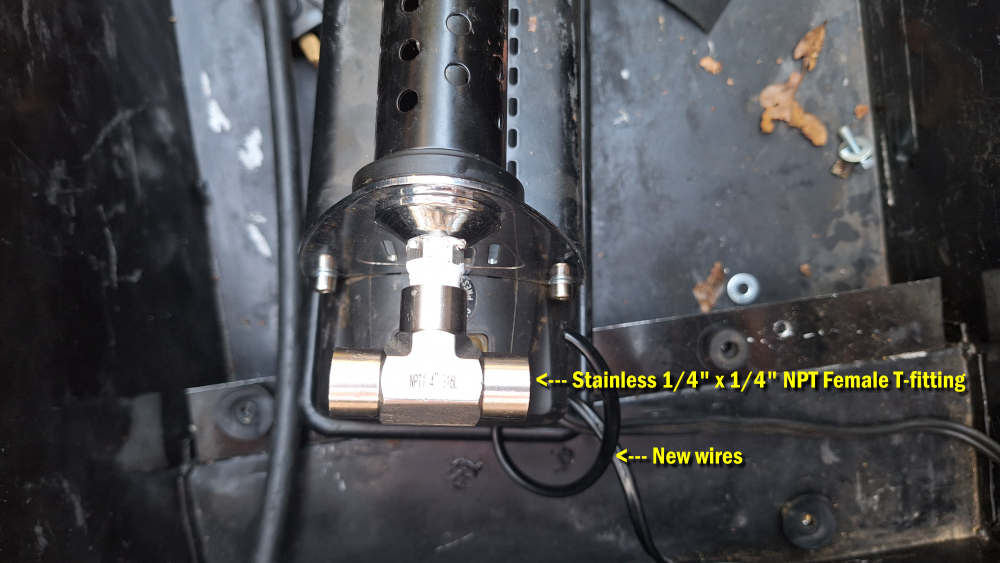
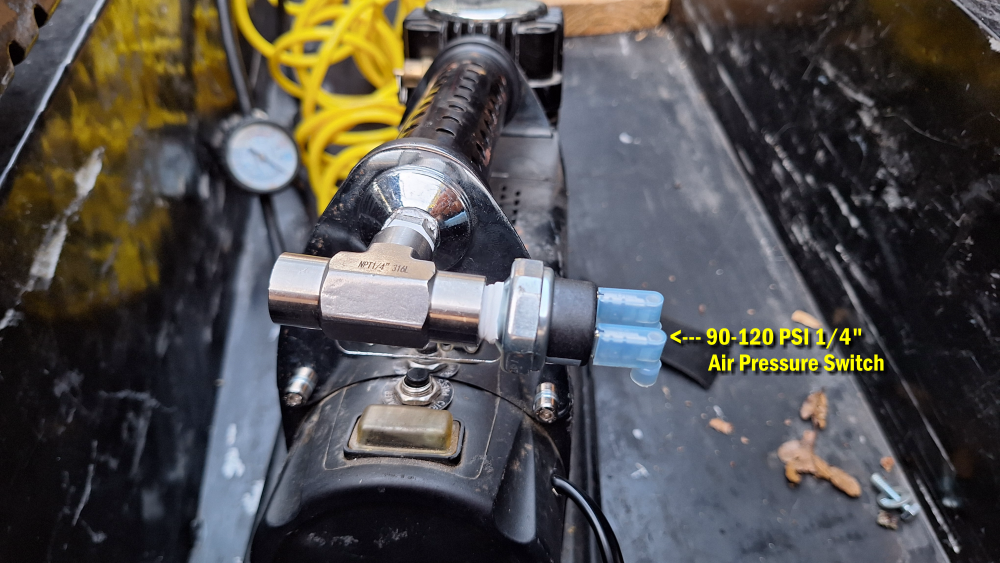
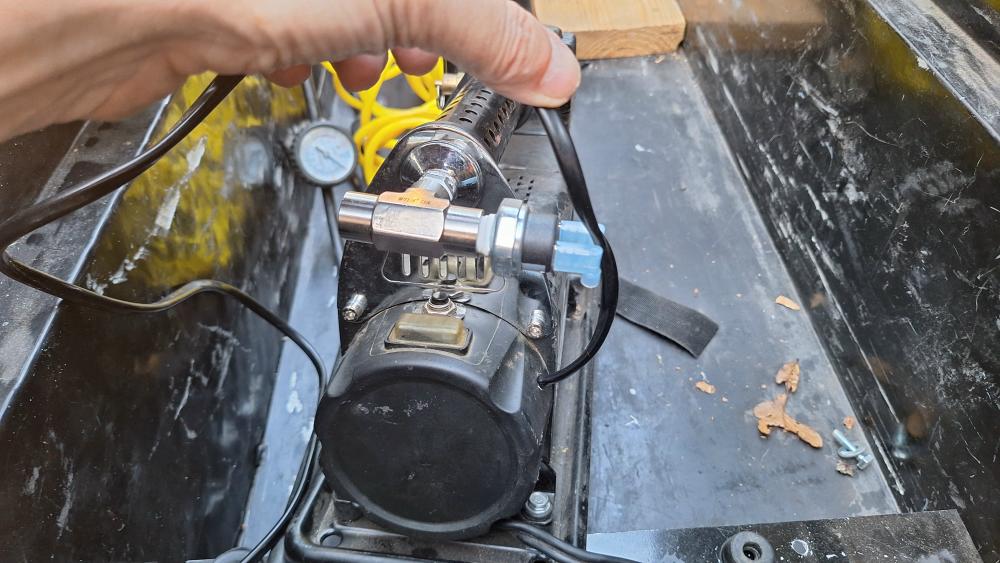
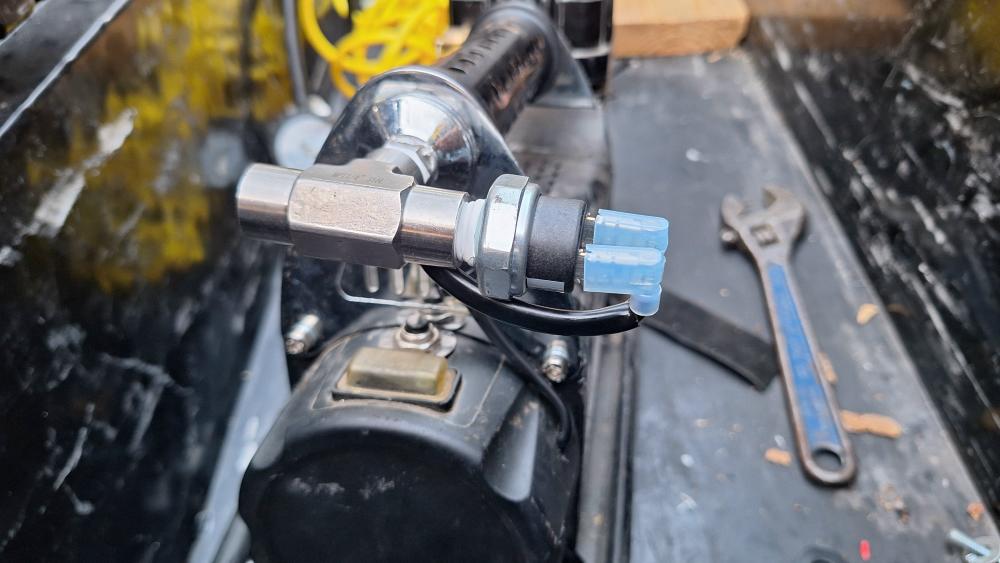
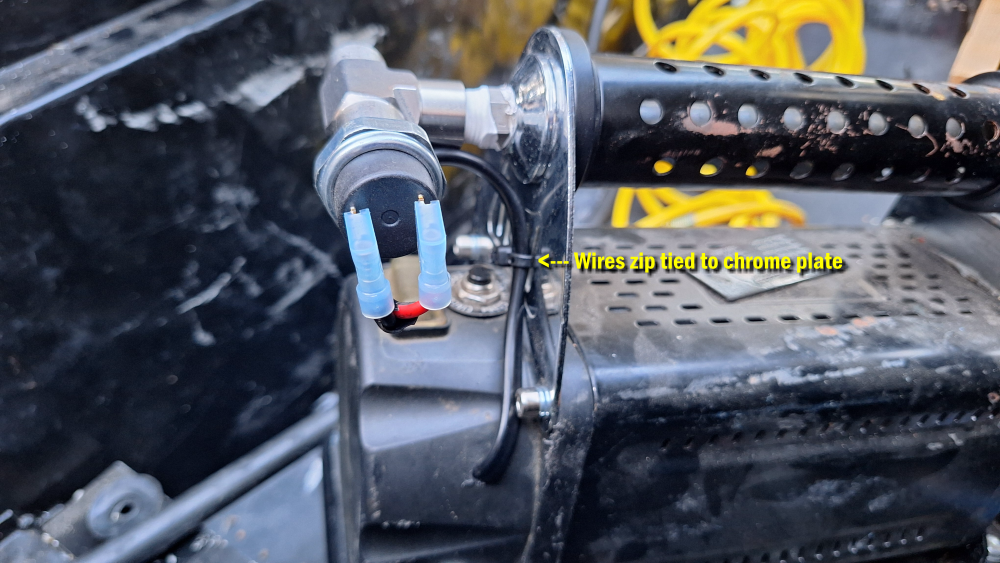
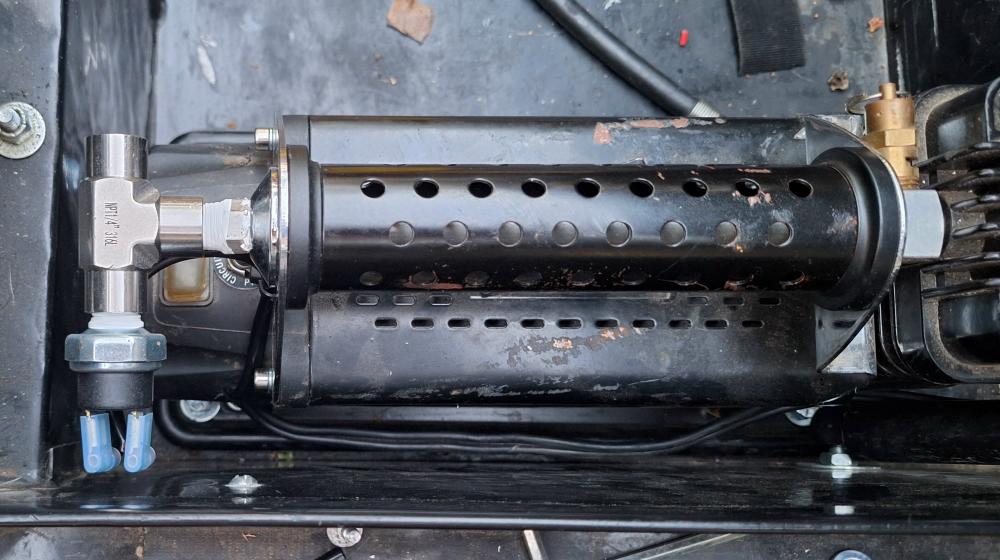
Next, I installed the chrome fitting cover and a new 1/4″ male NPT to M12x1.25 male adapter, followed by a 1/4″ x 1/4″ x 1/4″ NPT female T-fitting. With the T-fitting installed, I attached a 1/4″ NPT 90-120 PSI 12V pressure switch. All threaded connections were sealed with Teflon tape.
I cut the new wires to length and connected them to the pressure switch using right-angle spade connectors. I then secured the wiring to the chrome end bracket with a zip tie to keep it close to the compressor and prevent it from catching on anything and being pulled loose.
Installing A Leader Hose & Coupler
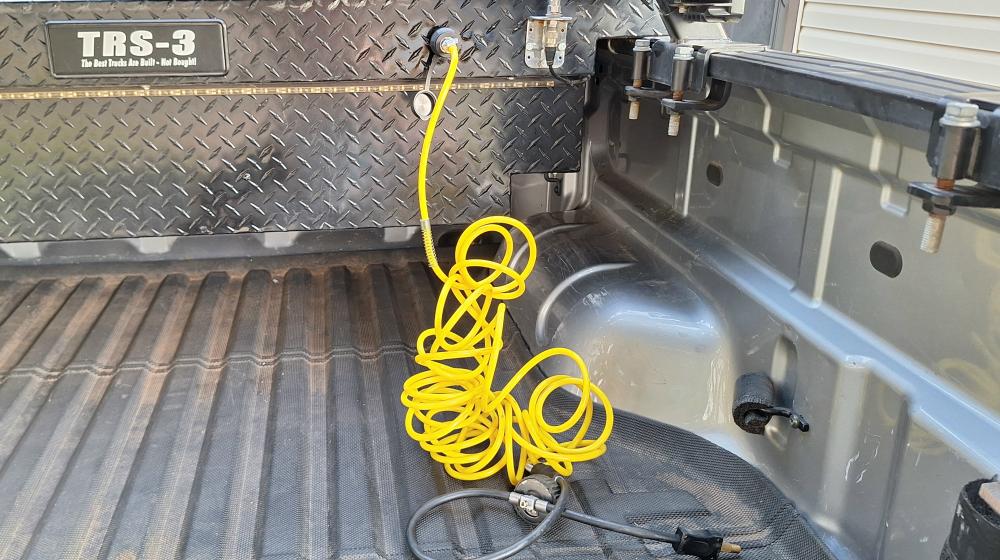
I didn’t want to attach a coupler directly to the end of the new 3-foot leader hose. With the compressor mounted in the toolbox, the hose would be long enough for the coupler to hang over the side of the truck where it could rub or bang against the bed. Instead, I decided to mount a coupler directly to the outside of the toolbox.
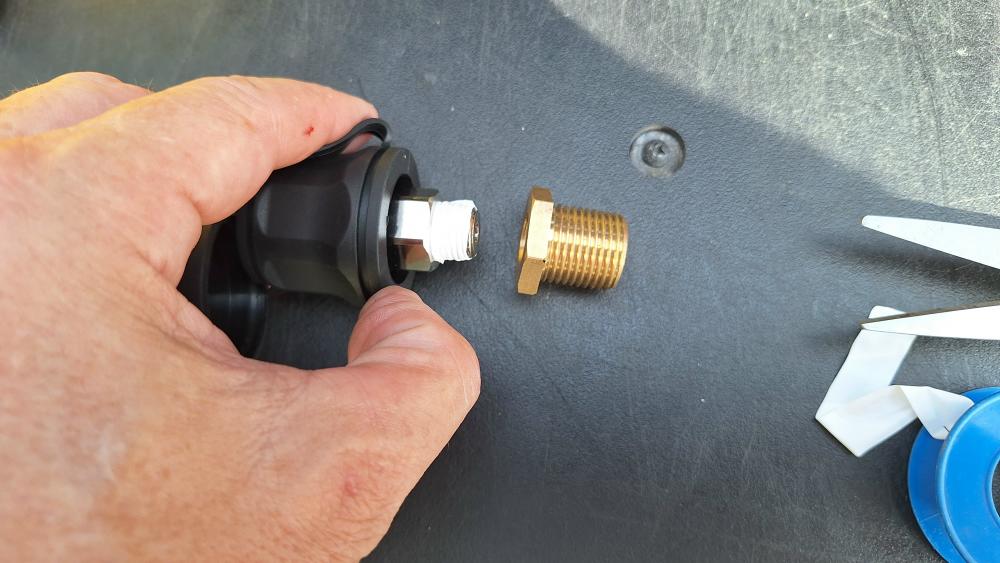
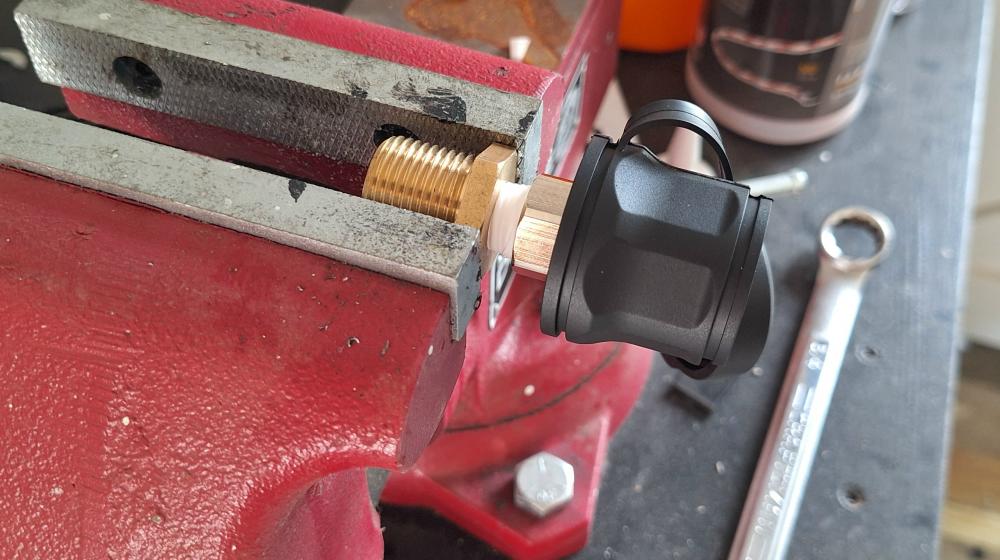
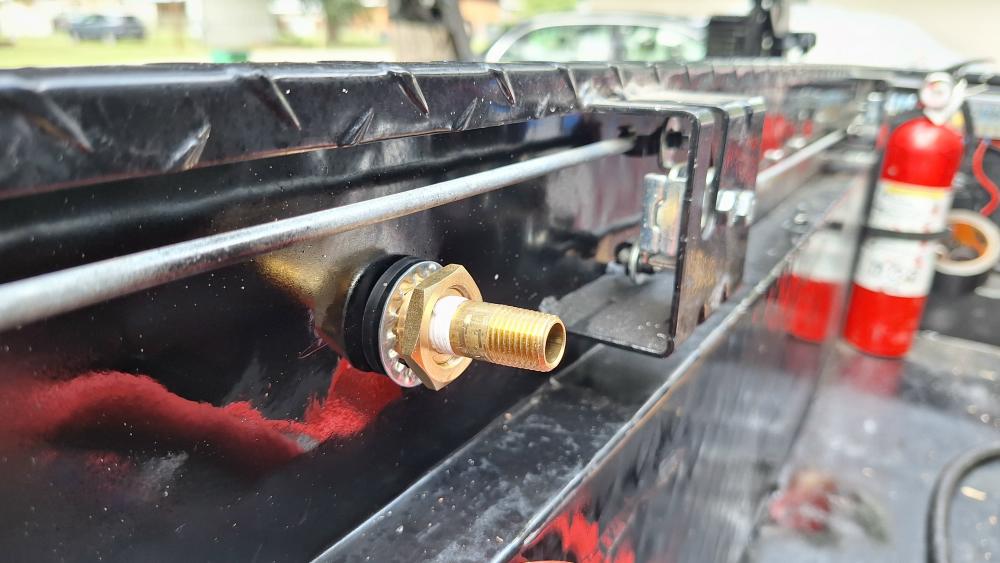
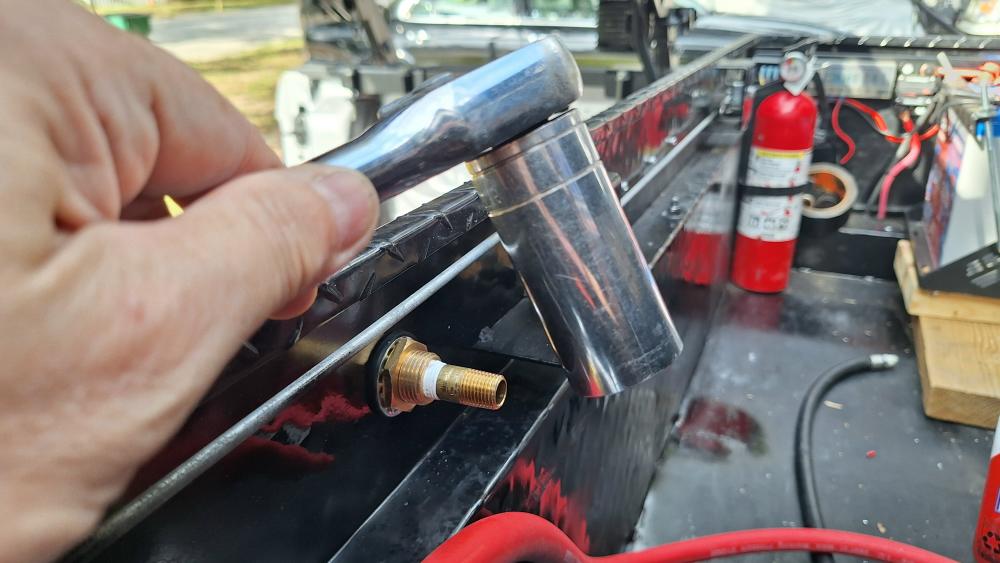
I purchased an air compressor coupler with a rubber cover and dust cap, along with a 1/4″ NPT bulkhead fitting designed to fit a 3/4″ hole. I found it easiest to clamp the bulkhead fitting in a vise while threading the coupler onto it.
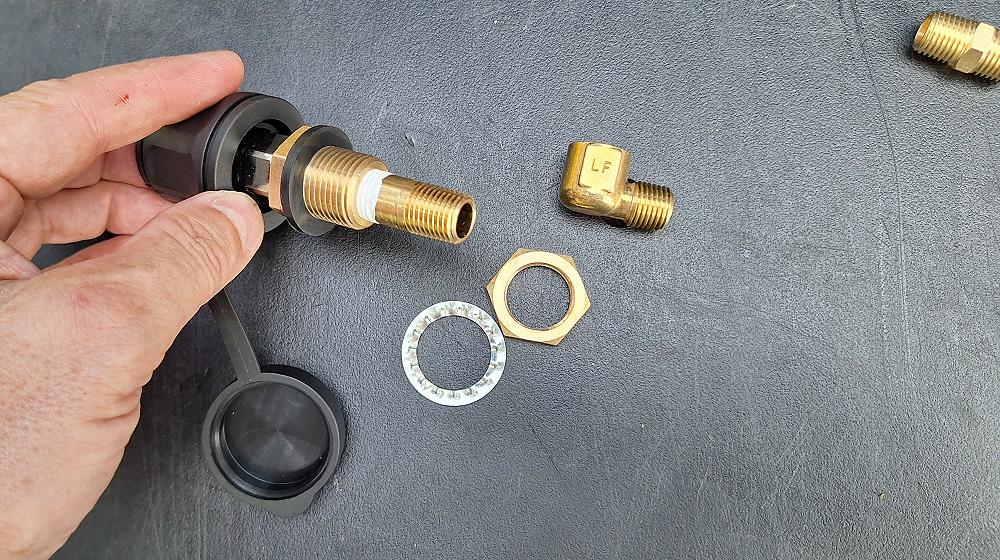
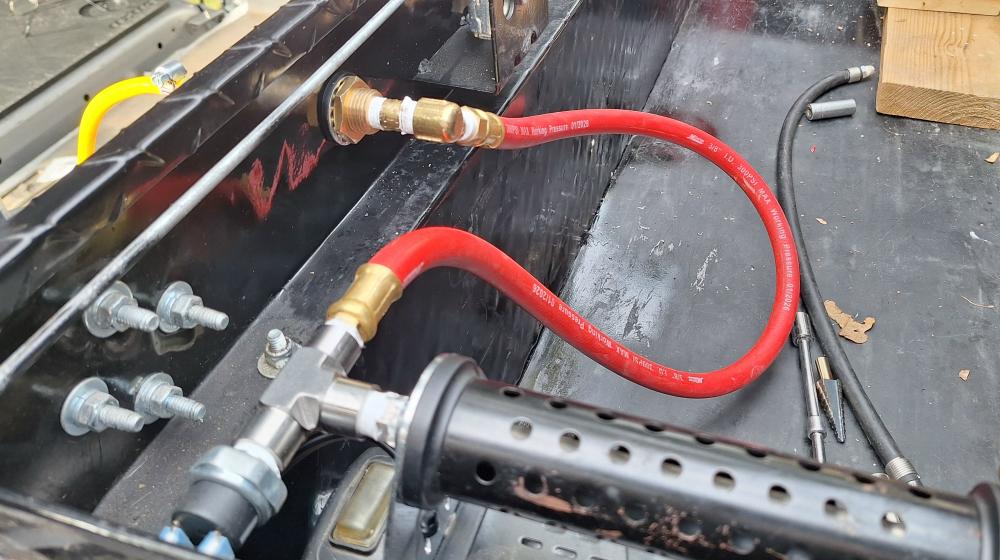
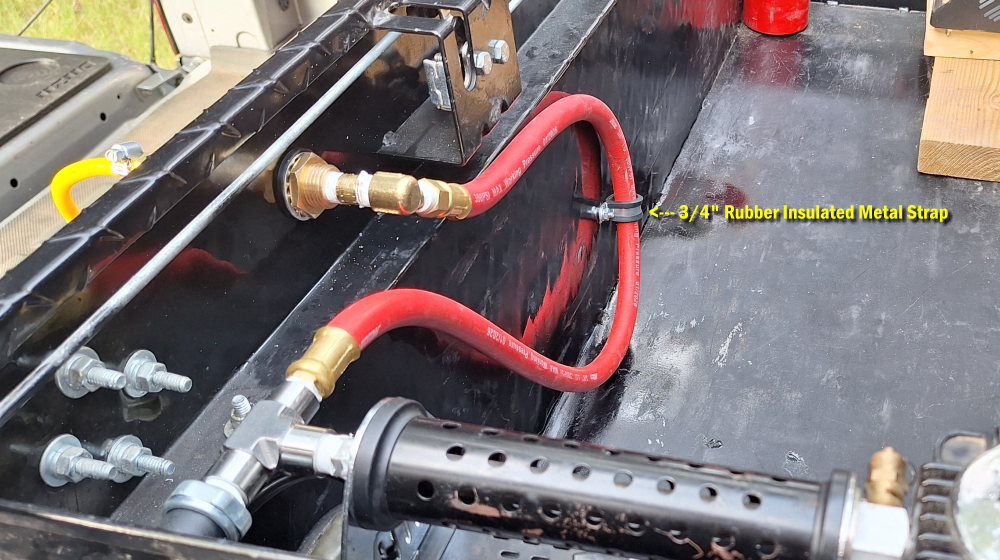
After drilling a 3/4″ hole in the side of the toolbox, I installed the bulkhead fitting and attached a 1/4″ x 1-1/2″ NPT nipple to the back side. I then connected a 3/8″ x 3-foot rubber leader hose to the nipple using a 1/4″ NPT 90-degree street elbow. The opposite end of the leader hose connects to the remaining port on the T-fitting.
I didn’t want the leader hose hanging loose inside the toolbox where it could become tangled with the jack, lug wrench, and other equipment I keep stored there, so I secured it to the toolbox wall with a 3/4″ rubber-insulated metal strap.
The new 3/8″ x 3-foot leader hose is both larger in diameter and longer than the original 1/4″ x 2-foot hose. The additional length and surface area help dissipate heat before the compressed air reaches the coupler.
Modifying The Smittybilt 24′ Coil Hose
I eventually plan to replace the Smittybilt 24-foot yellow coiled air hose, but I had a hard time throwing away a perfectly good hose. Instead, I decided to modify it so it would work with my new coupler setup.
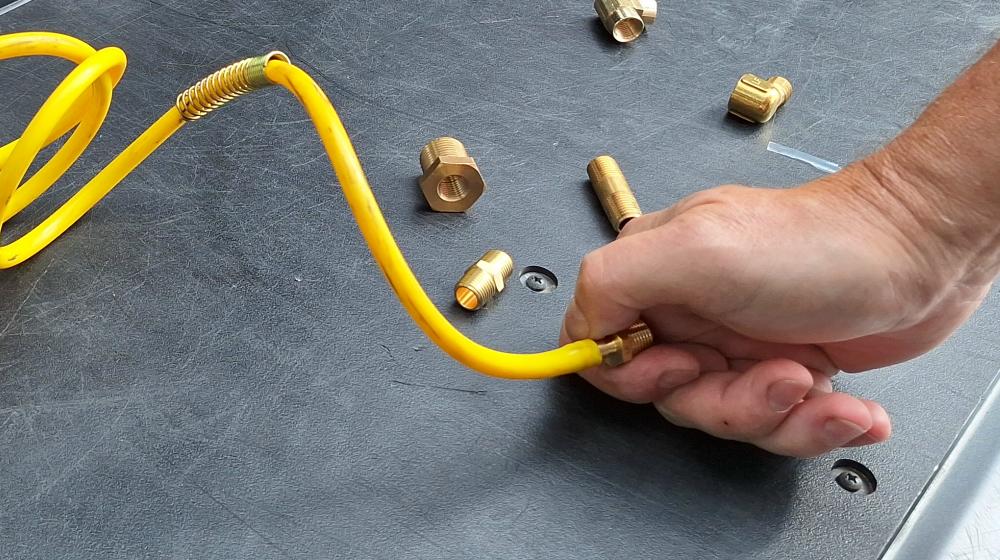
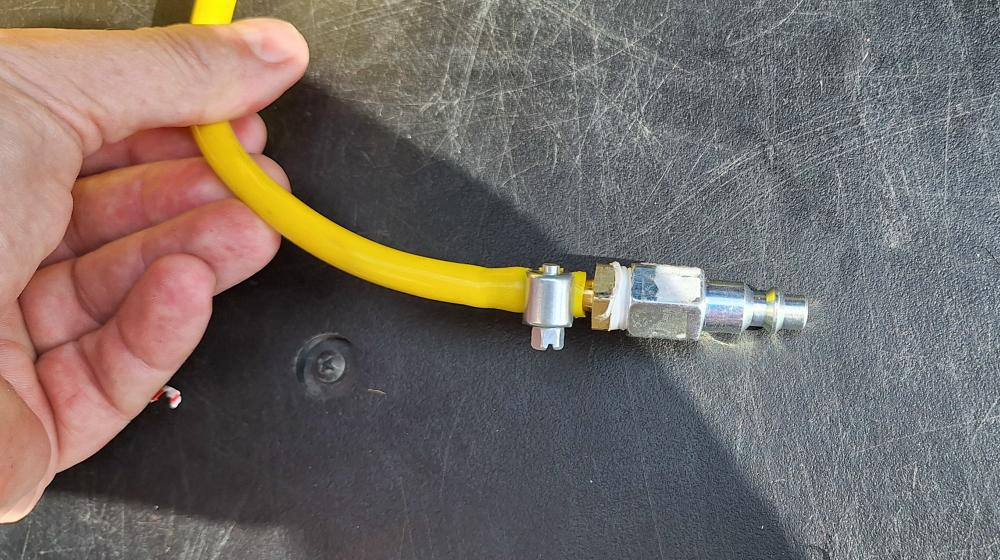
I left the original fitting on one end so it would still accept the Smittybilt tire hose with the tire chuck and pressure gauge. On the opposite end, I cut off the factory Smittybilt fitting and installed a 1/4″ barbed x 1/4″ NPT male fitting. Although the barbed fitting was an extremely tight fit and difficult to install, I added a small hose clamp for extra security and trimmed the excess strap. I then attached a 1/4″ male air plug to the fitting so the hose could connect directly to the new air coupler.
Since I already had a spare air plug in my shop, the only additional part I needed to purchase was the barbed fitting.
Conclusion
With all of the connections finished I plugged the yellow air hose into the coupler and turned on the air compressor. If the pressure switch was installed properly, the compressor will kick off as soon and I unplug the air hose. Remember, this Smittybilt hose is designed to allow air to pass through it since the compressor doesn’t come with a pressure switch. If the pressure switch doesn’t work, the pressure relief safety valve will pop open on the compressor.
With the compressor running and the air hose unplugged, the compressor immediately shut off.
With all of these mods completed, I now have a true onboard air system that will allow me to use standard air hoses and attachments including my new 4-tire inflation system.
Video
Related Articles
Smittybilt 2780 & 2781 Instructions
On Board Air – Options & Reviews
On Board Air From Ford A/C Compressor
Onboard Air From Sanden A/C Air Compressor
On-Board Air From York Compressor
York Compressor Service Manual
1993 Ford Ranger On-Board Air Using A/C Comp
Inflate / Air Down Four Tires At Once
About The Author

Jim Oaks is the founder of TheRangerStation.com, the longest-running Ford Ranger resource online since 1999. With over 25 years of hands-on experience building and modifying Ford Rangers — including magazine-featured builds like Project Transformer — Jim has become one of the most trusted authorities in the Ford Ranger off-road and enthusiast space.
Since launching TheRangerStation.com, Jim has documented thousands of real-world Ranger builds, technical repairs, drivetrain swaps, suspension modifications, and off-road adventures contributed by owners worldwide. TheRangerStation.com has been referenced in print, video and online by enthusiasts, mechanics, and off-road builders looking for practical, and experience-based information.