
The Sanden air compressor used with the Ford Ranger air conditioning isn’t the best choice for an onboard air compressor (York is the better choice), but it is possible. The problem is that the Sanden compressor is lubricated by the refrigerant / refrigerant oil, and the York compressor has a separate oil reservoir. When you remove the refrigerant and start compressing air, the compressor is no longer being lubricated.
Because the oil is mixing with the air in your Sanden compressor, you need to be able to add oil oil to the system and separate it from the outgoing air. This can be done with an oil fog lubricator (or oiler):

(Oil fog lubricator)
The oiler would be placed between the air filter and the compressor to lubricate the air coming in to the compressor.
Obviously when hooking everything up, you need to know which port sucks air, and which port discharges it. You’ll be able to tell by looking for labels cast in to the case:

So to put this all together, you need to have an under standing of how it all works.
Components:
An onboard air system will need these key components:
-
Compressor
-
Air Tank
-
Oiler
-
Intake filter
-
Air Filter
-
Inline Filter (to remove moisture)
-
Pressure Switch (15-25 PSI less than your safety relief vale)
-
Safety Relief Valve
-
Check Valve
-
Switch
-
Wire, Lines, Fittings & Couplers
-
Regulator (recommended to control air for air tools)
Operation:
With power switched on and flowing to the pressure switch, the pressure switch will turn the power on and off to the compressor depending on how much air pressure is in the system. You can control this based on the pressure settings in the switch you buy. When the compressor is activated, air is drawn through an air filter and then passes through the oiler and in to the compressor. The air exits (now heated from being compressed) and passes through an inline filter (to remove water) and then a check valve. The check valve keeps the air from the tank from leaking back in to the compressor and escaping. The air passes through the pressure switch and continues on to the tank. The tank needs to be fitted with a safety relive valve that’s rated 15-25 PSI higher than the switch, but not higher than what the tank is rated to hold. This keeps you from exploding the tank or air lines if the compressor fails to shut off. From the tank, the air continues to a coupler where it waits for a connection to be used.


| Item | Description | Item | Description |
| 1 | Air Filter | 11 | 1/4″ NPT Pressure Gauge |
| 2 | Air Tool Lubricator | 12 | 1/4″ NPT Close Nipple |
| 3 | 1/4″ NPT Brass Nipple | 13 | L Bracket |
| 4 | 1/4″ – 1/2″ NPT Elbow | 14 | 1/4″ NPT 125 PSI Pressure Relief Valve |
| 5 | 1/2″ NPT – 1/4″ NPT Fitting | 15 | 1/4″ NPT Brass Nipple – 1/2″ Length |
| 6 | Sanden Compressor | 16 | 2-Gallon Tank |
| 7 | Air Oil Filter | 17 | 3/8″ O.D. 300 PSI Air Hose |
| 8 | 1/4″ NPT T-Section | 18 | Barbed Hose Fitting |
| 9 | Check Valve | 19 | Hose Clamp |
| 10 | Pressure Sensor Switch | 20 | Quick Disconnect |
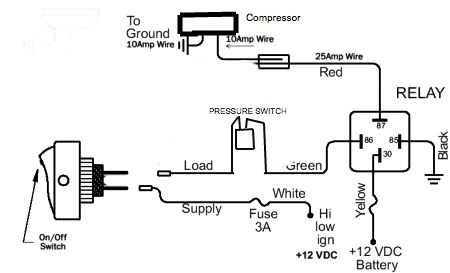
Wiring:
To wire up a switch for your onboard air, take a wire from a fused ignition switch ‘on’ source to an on/off switch at the dash. From there, connect a wire from the switch to the pressure switch to turn it on/off from the cab. Then you continue a wire off of the pressure switch to a relay that’s feed by a fused wire coming off of the battery. The other connections on the relay will be ‘ground’ and 12-volt power going to the compressor.
Making The Connections:
The Sanden air compressor has a couple different sized fittings on the ports:
Sanden 508 (8 CFM) – 7/8″ fitting on the ‘Suction’ port of the compressor, and 3/4″ fitting on the ‘Discharge’ port.
Sanden 510 (10 CFM) – 5/8″ fitting on the ‘Suction’ port of the compressor, and 5/8″ fitting on the ‘Discharge’ port
Sanden 709 (9 CFM) – 7/8″ fitting on the ‘Suction’ port of the compressor, and 3/4″ fitting on the ‘Discharge’ port.
You can usually identify a Sanden compressor by its label:

Once you have this figured out, it’s simply a matter of mounting all your components and connection everything with air lines.
This first photo shows the intake side of the compressor:
(3) is the air filter
(4) is the air tool lubricator
The air filter is a crankcase filter. The air tool oiler can be bought at harbor freight.

The next photo shows the fitting used on the suction and discharge ports of the compressor:
(5) is a 1/4″ NPT elbow
(6) is a 3/4″ to 1/2″ NPT (female to female) fitting
(7) is a 1/2″ to 1/4″ NPT (male to female) fitting

This is what’s needed after the discharge port:
(8) is the oil/air filter
(9) is the check valve
(10) is pressure gage
(11) is pressure sensor switch

Below you can see where the hoses run to an air tank mounted under the vehicle. Note the pressure relief valve on the right side of the tank.

Here’s another photo showing connections to the air compressor.

This next photo shows 3/4″ to 3/8″ pipe reducers on the input and output of a Sanden compressor.

This photo shows some blue monster tape and a pipe reducers with an inline air tool oiler. The oiler draws air tool oil straight into the compressor.


(Oiler)
This check valve keeps the air from flowing back into the compressor from the system and tank. Make sure you get one that has ALL metal internals. The air coming out of the compressor for the first couple of feet is over 200 degrees.

Some people use copper lines to handle and disperse the heat in the air coming out of the compressor.

Here are some components used by forum member abaryth.


(120 PSI Pressure Switch)

(Oil Separator with spring loaded check valve)

(Gauges)


(Air Intake Filter)

(Oil Separator with spring loaded check valve)

(120 PSI Pressure Switch)

(Lubricator)
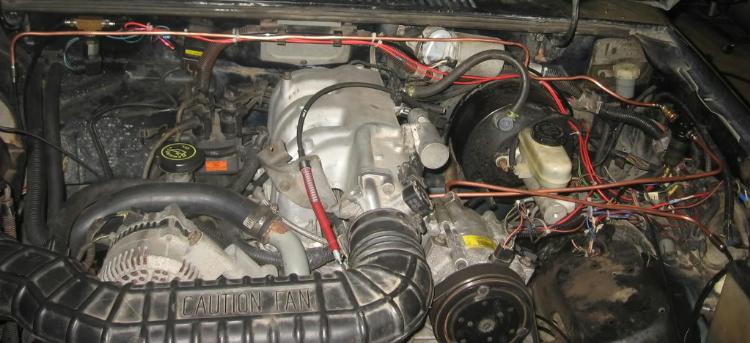
(Ford Ranger Engine Bay)

Other Images:

A Few More Notes:
Don’t put the inline oiler, air filter, or anything plastic directly on or close to the compressor. It will melt under heavy use.
Using copper tubing on the compressor discharge will dissipate heat from the air line and hold up better than rubber or plastic line.
Try to mount your air intake outside of the engine compartment to decrease the air temperature.
Although it’s been mentioned in the article, 3/8″ lines will be better suited for this project than 1/4″ lines.
Use a regulator to control the pressure coming out of your quick disconnects.
Oil?
We’ve heard of people running air tool oil, Slick-50, Valvoline 25-50W, and other motor oils in their compressor. We’ve also heard of people using transmission fluid. There doesn’t seem to be anything that’s recommended more than anything else.
Still Want More?

About The Author
Jim Oaks is the founder of TheRangerStation.com, the longest-running Ford Ranger resource online since 1999. With over 25 years of hands-on experience building and modifying Ford Rangers — including magazine-featured builds like Project Transformer — Jim has become one of the most trusted authorities in the Ford Ranger off-road and enthusiast space.
Since launching TheRangerStation.com, Jim has documented thousands of real-world Ranger builds, technical repairs, drivetrain swaps, suspension modifications, and off-road adventures contributed by owners worldwide. TheRangerStation.com has been referenced in print, video and online by enthusiasts, mechanics, and off-road builders looking for practical, and experience-based information.