
Building a Custom Bed Rack for a Ford Ranger
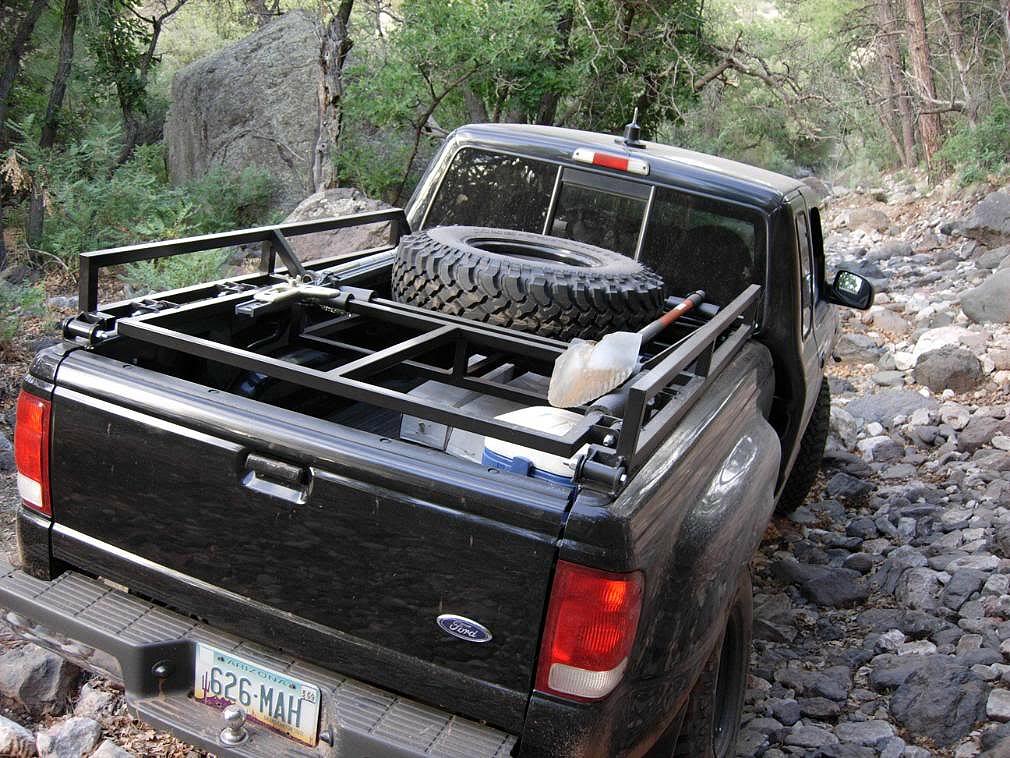
A custom bed rack can make a Ford Ranger more useful for overlanding, adventure travel, and off-road trips by providing a place to carry a full-size spare tire and other gear without taking up valuable space in the cab. Rather than buying a rack that may not fit your truck or your needs, you can build one around your bed dimensions, equipment, and plans for the trail.
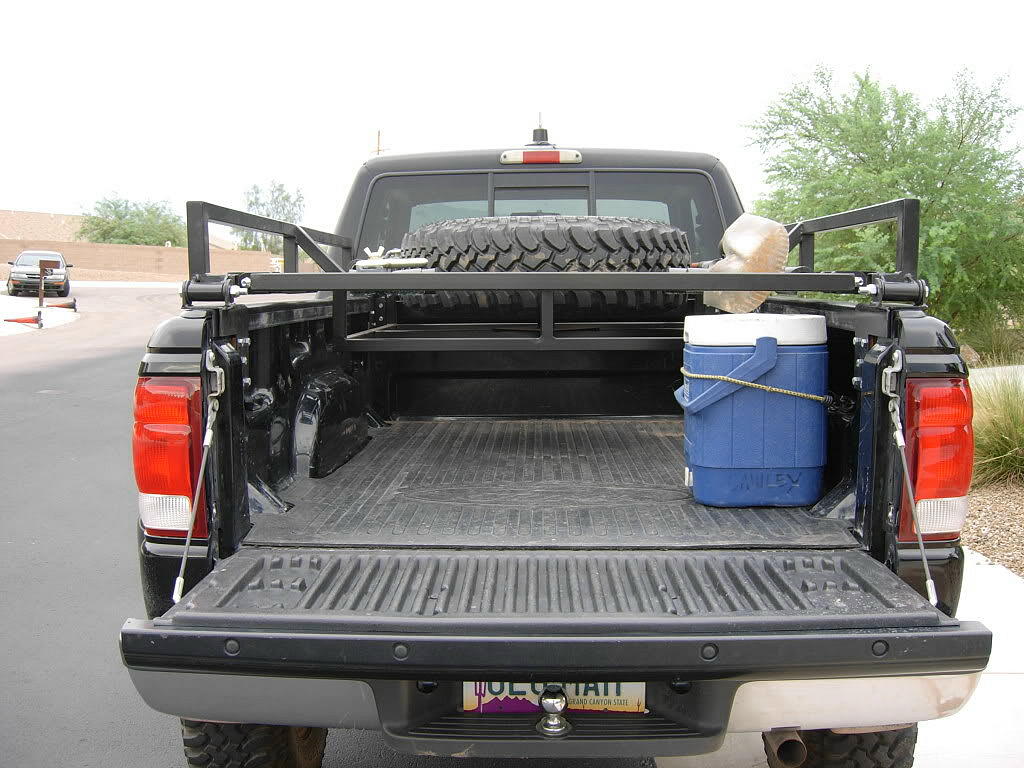
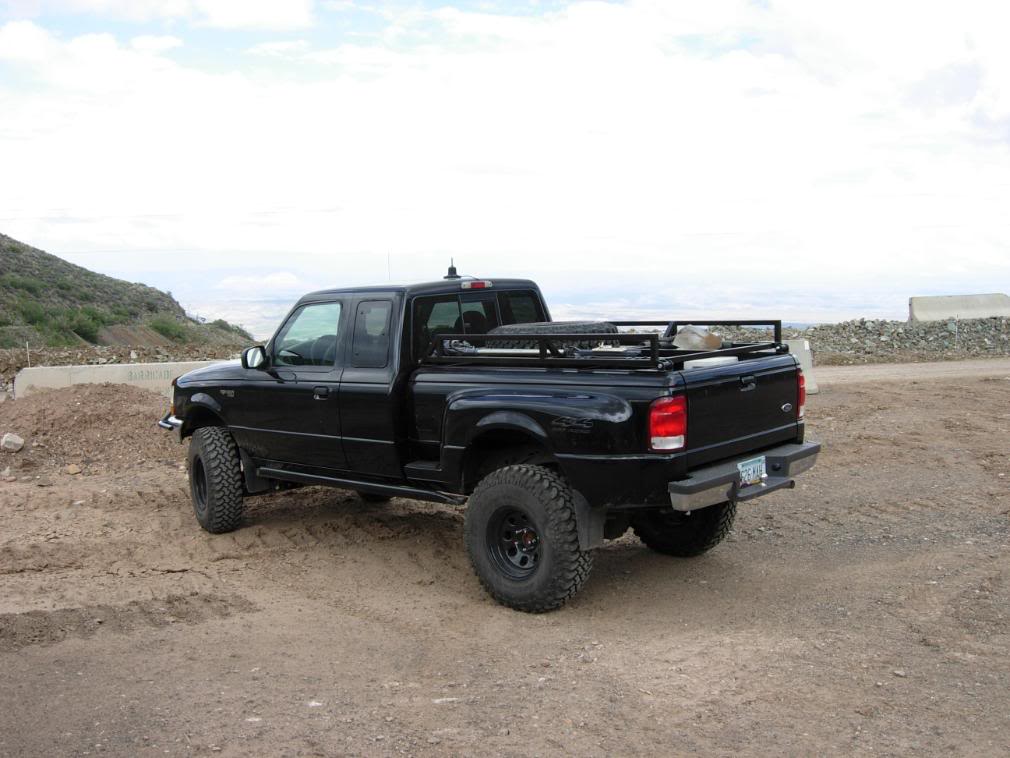
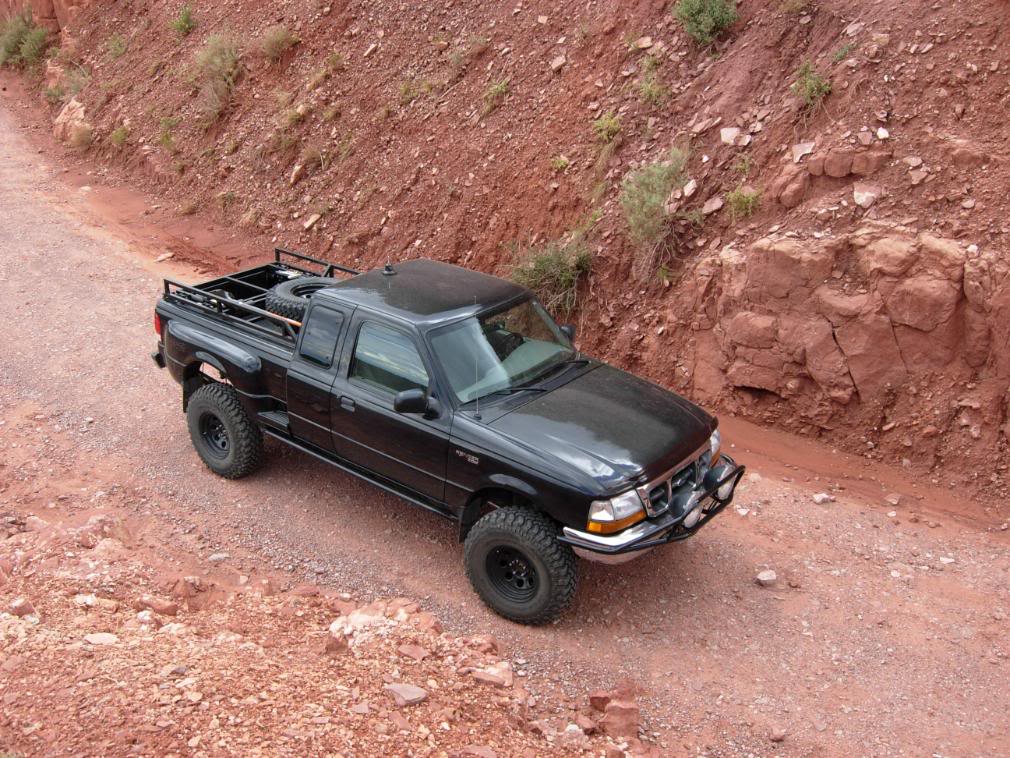
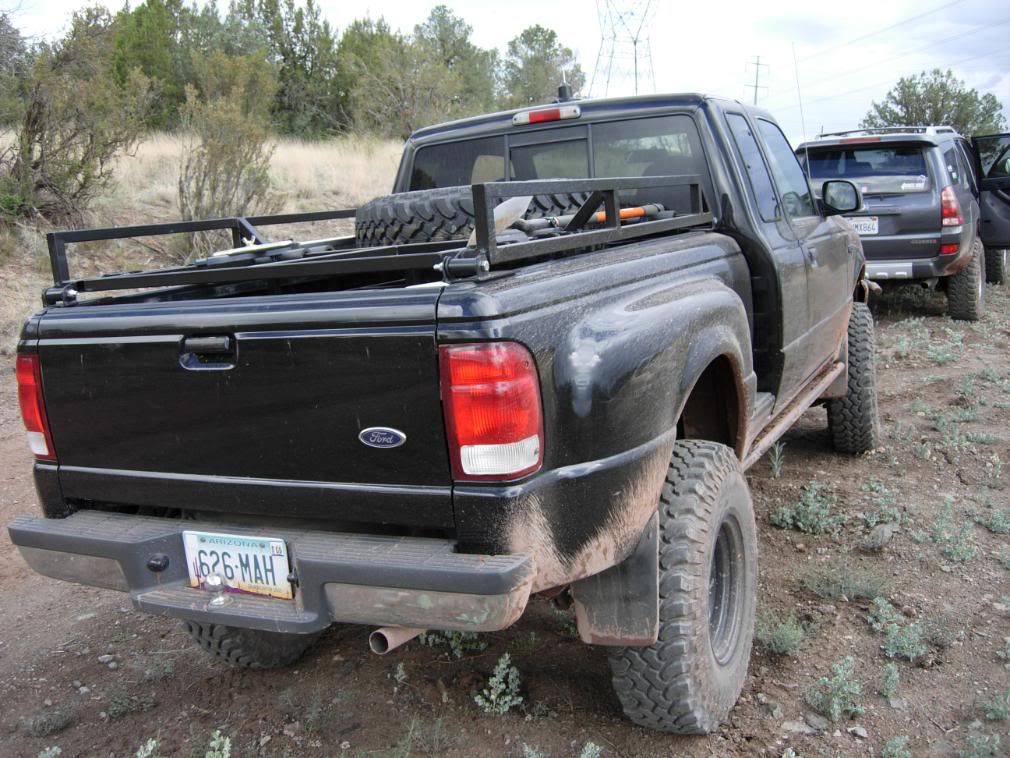
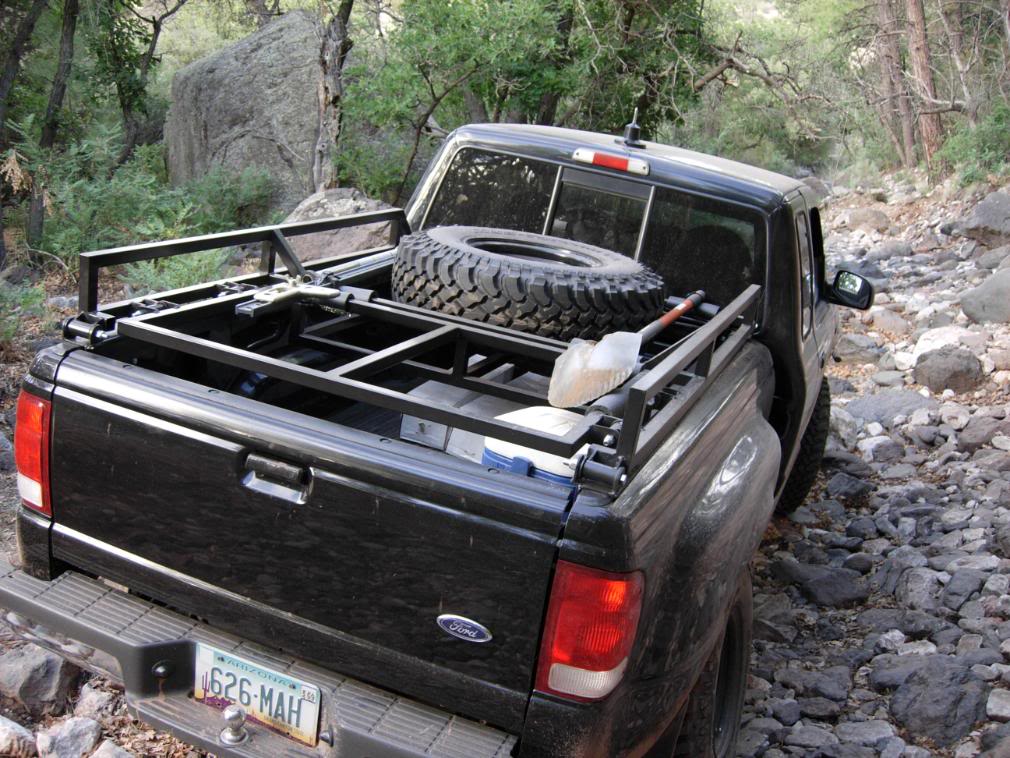
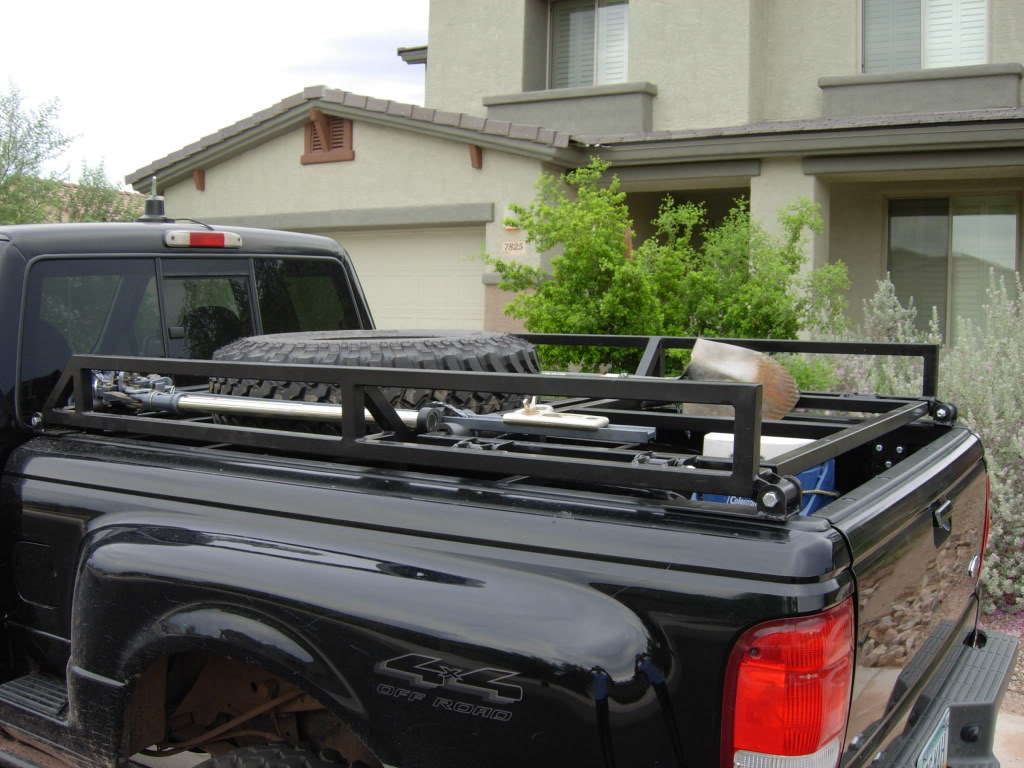
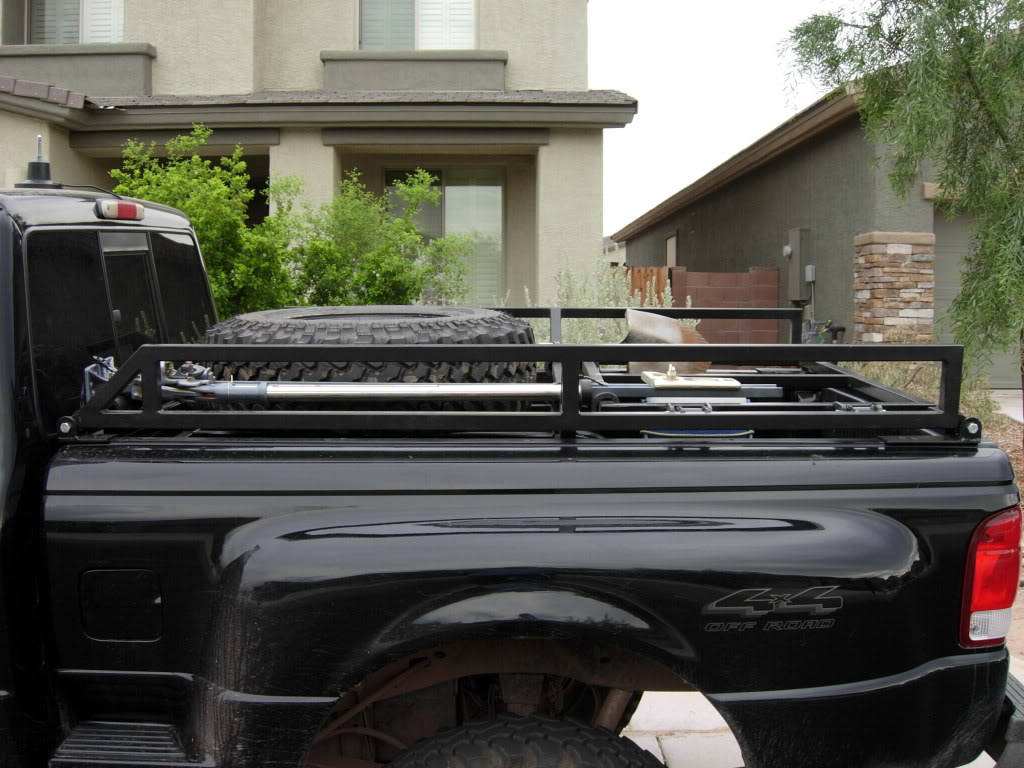
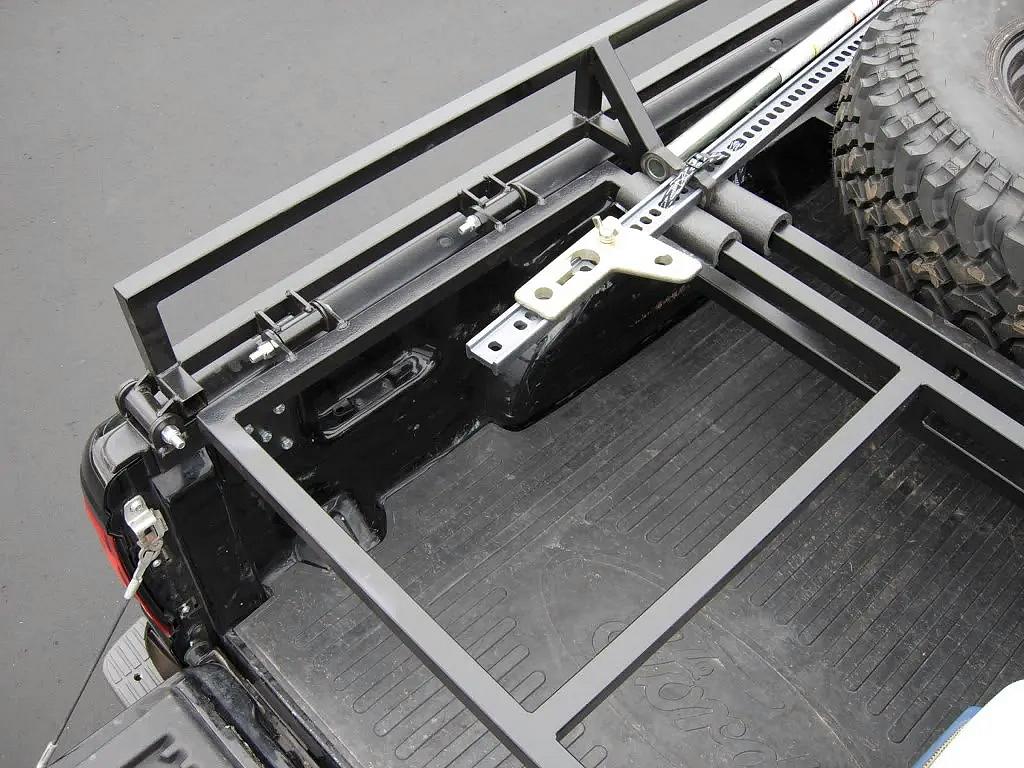
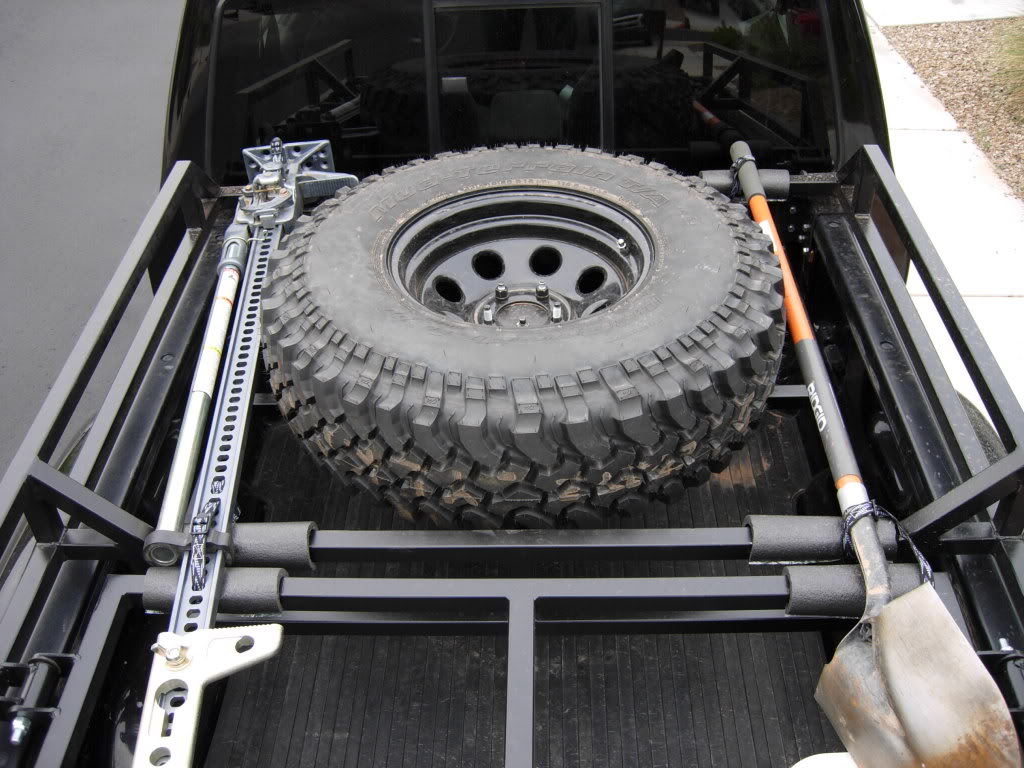
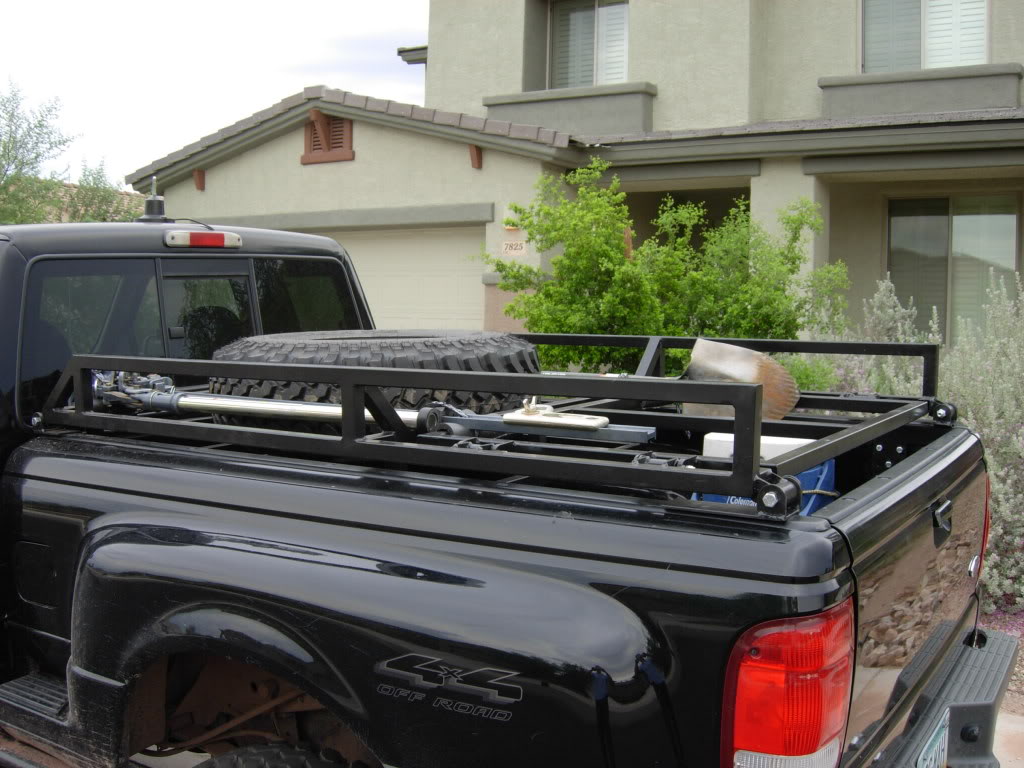
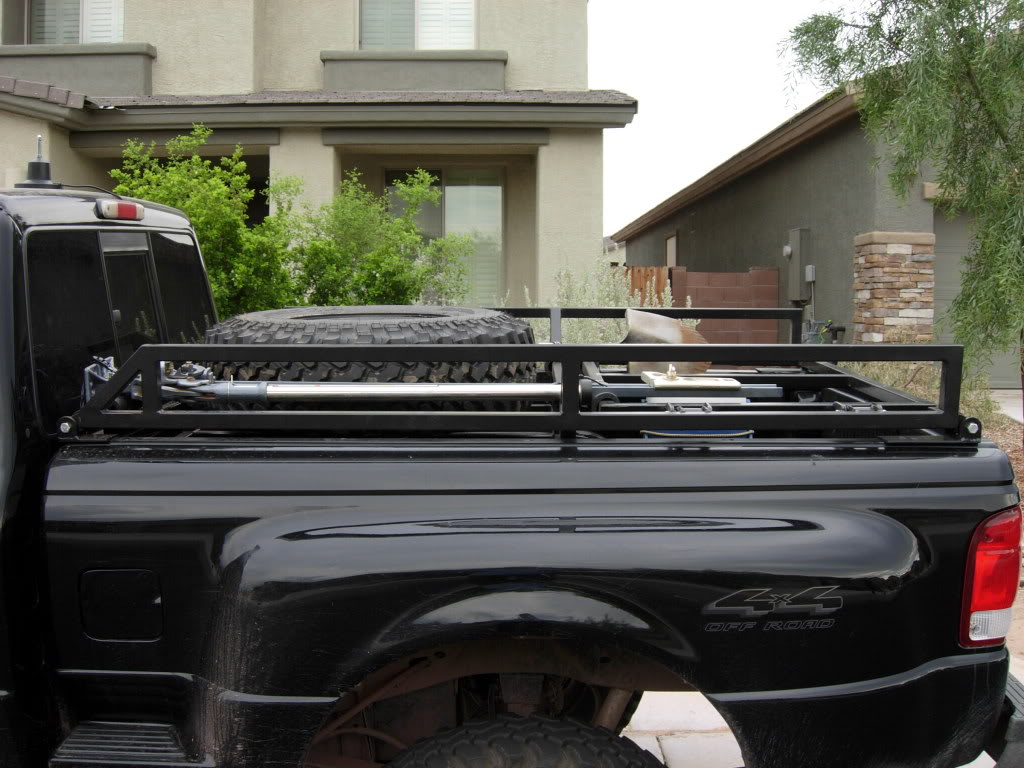
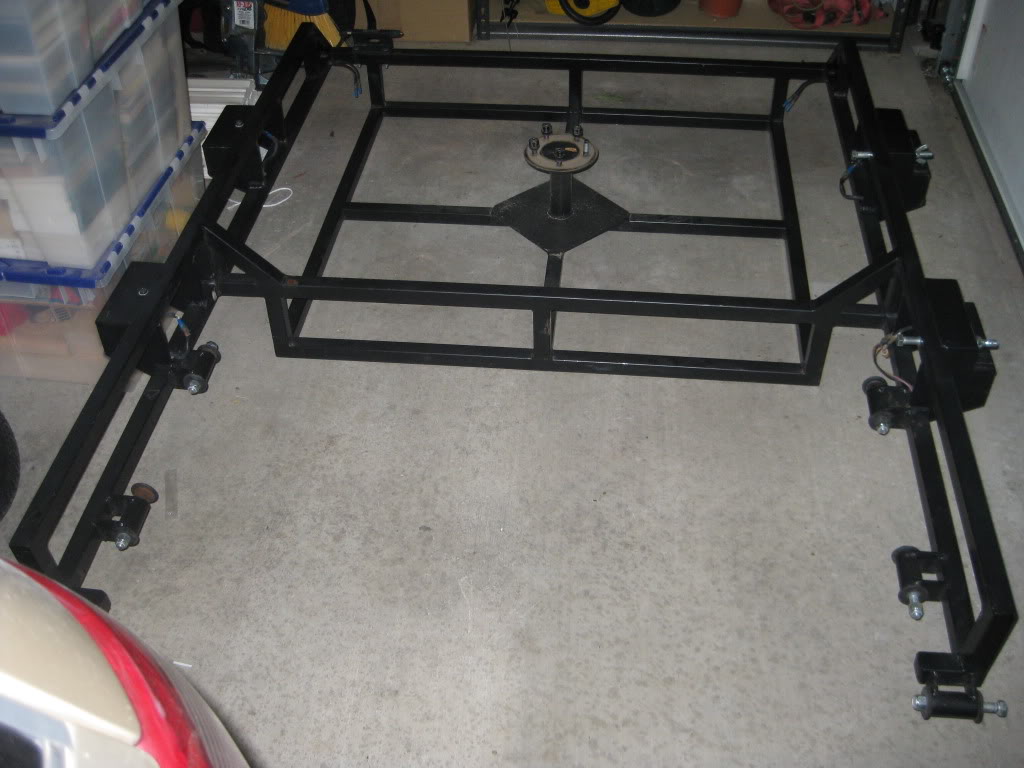
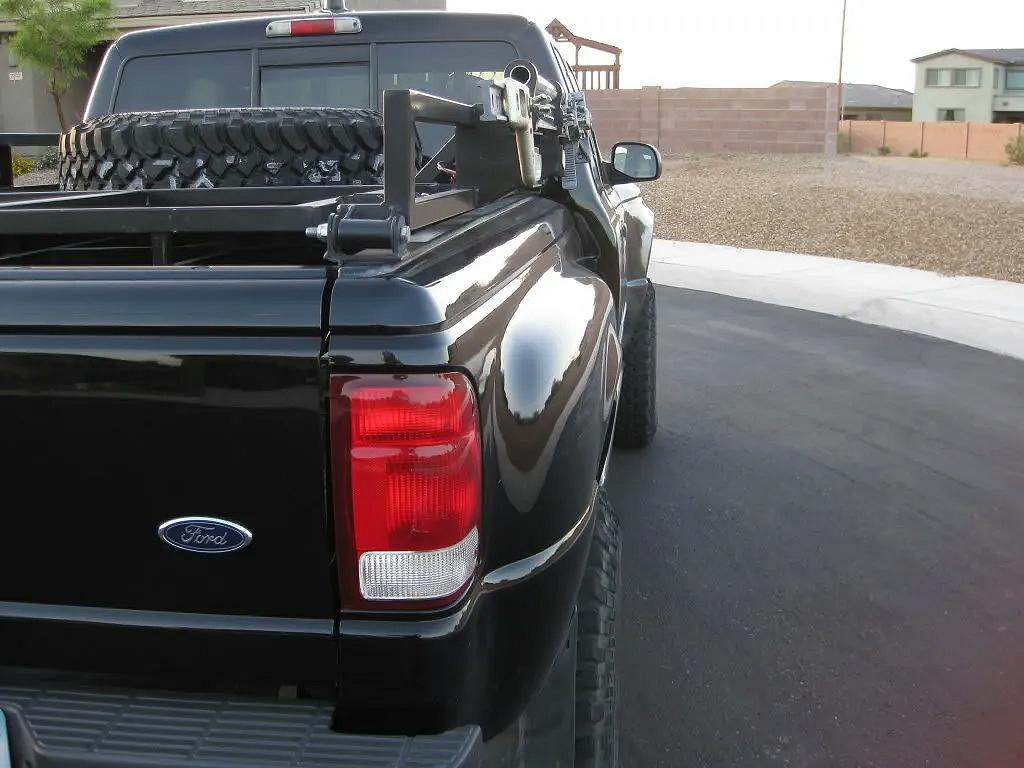
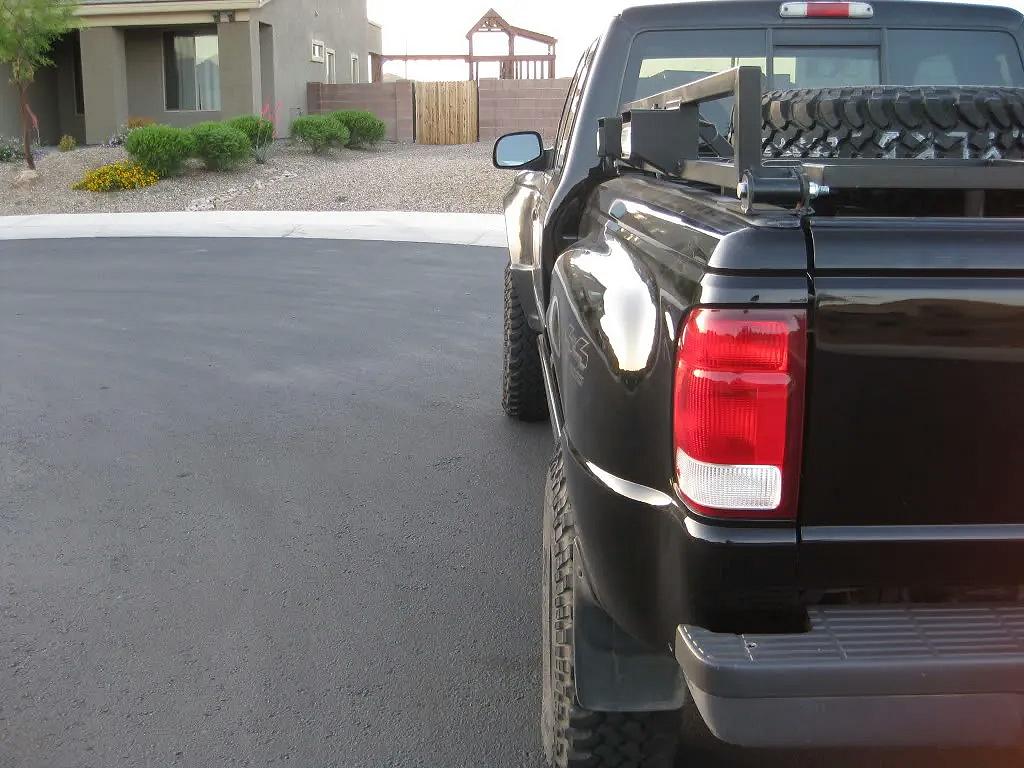
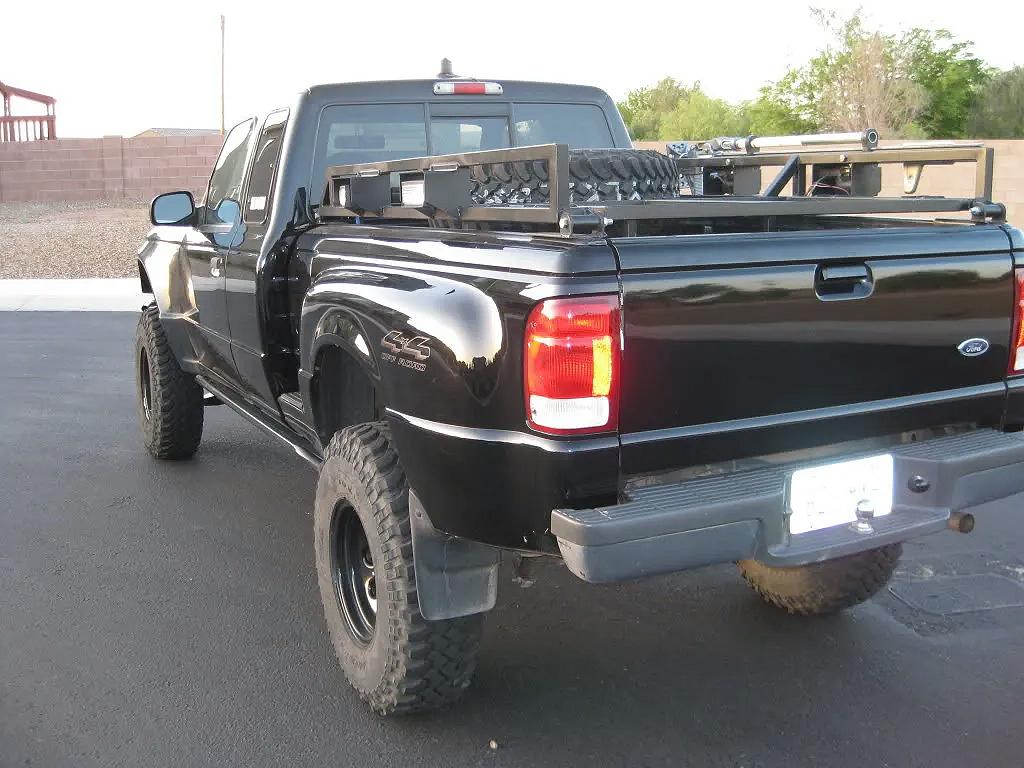
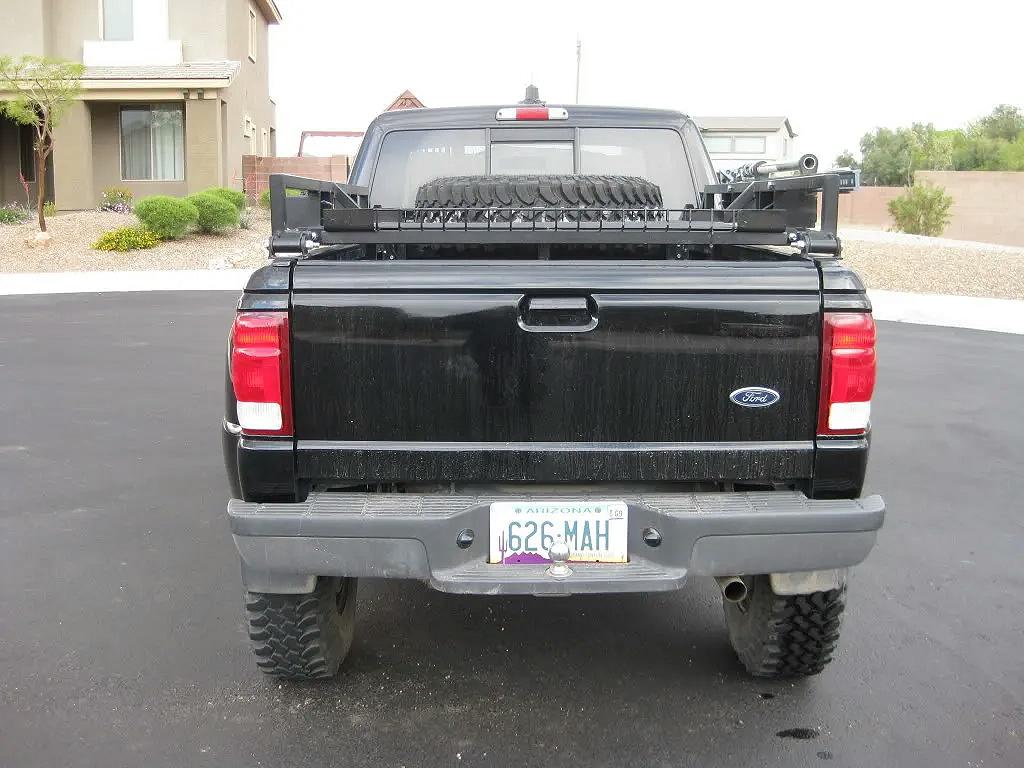
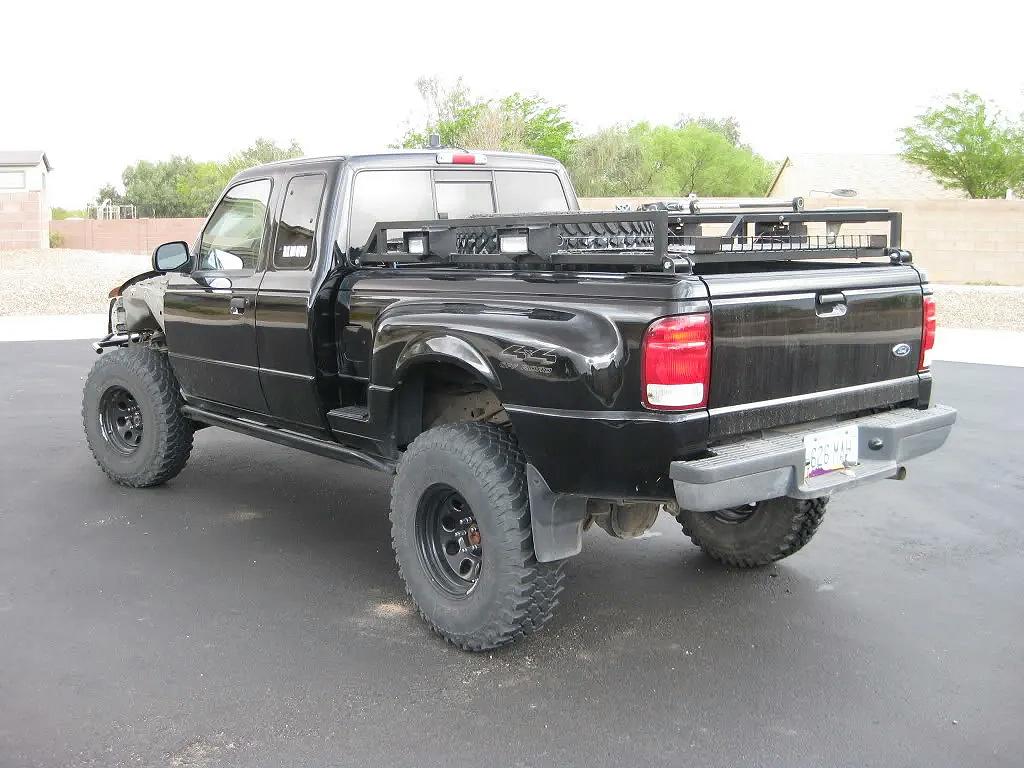
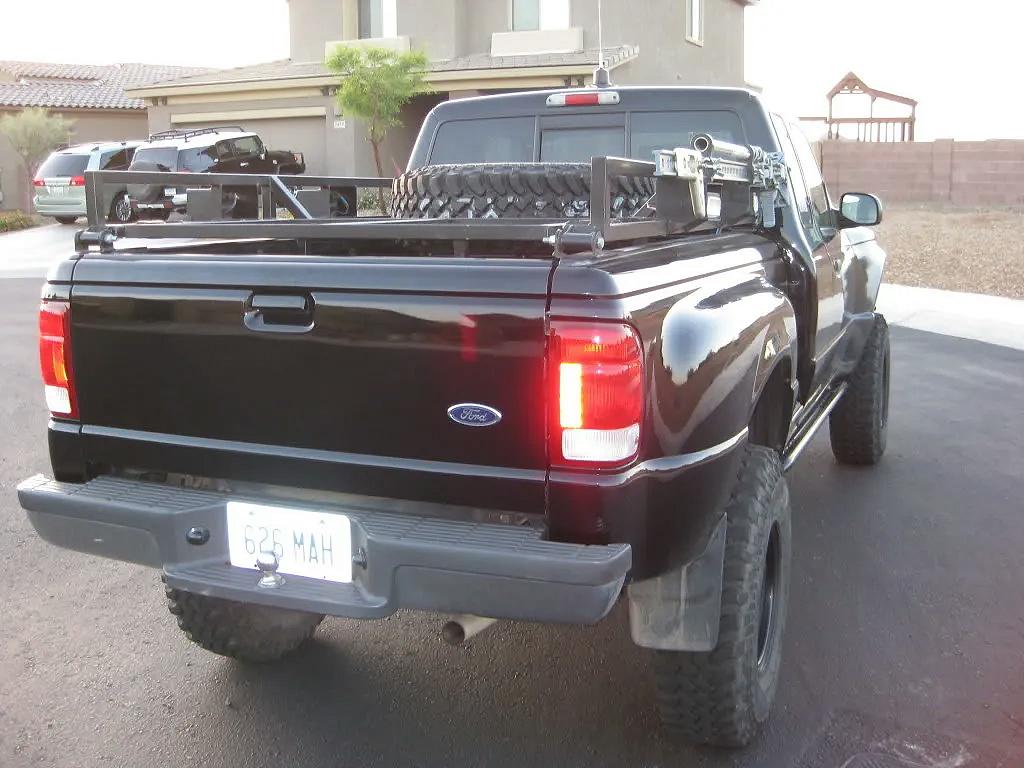
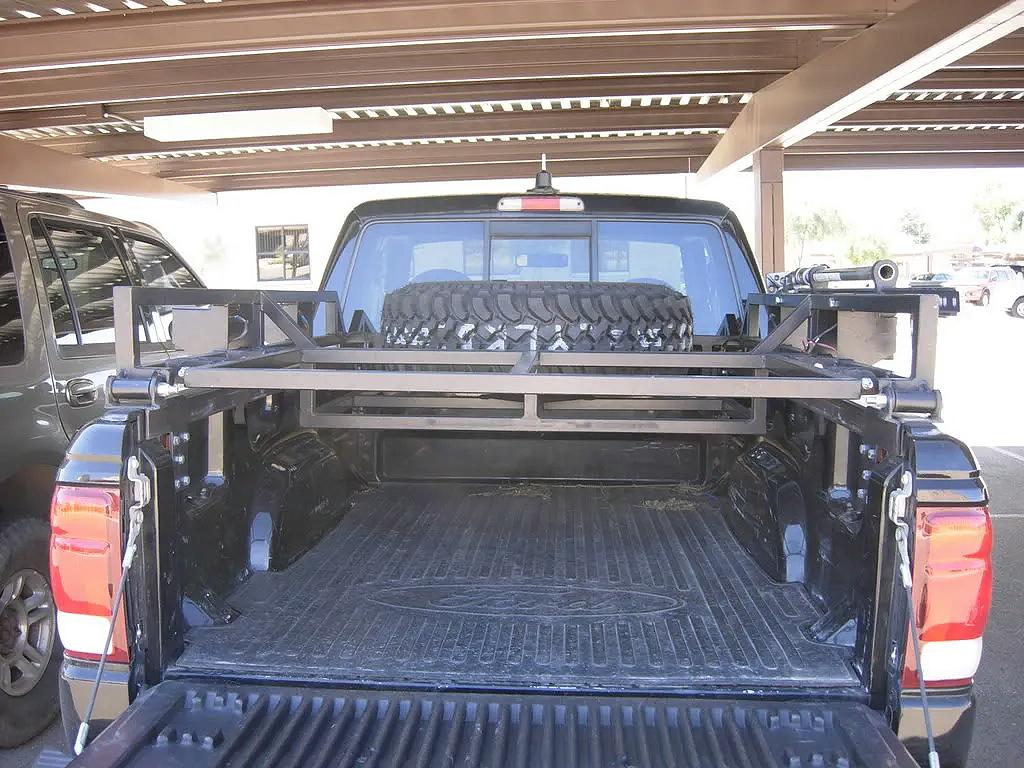
Quasi242 designed a custom rack for his 2000 Ford Ranger Flareside (Stepside) after lifting the truck and installing 33-inch tires. The larger tires meant his spare no longer fit beneath the bed, so he designed a rack that would carry the spare above the bed rails while keeping it recessed as far as practical. He created the design in CAD and had a local welding shop fabricate it.
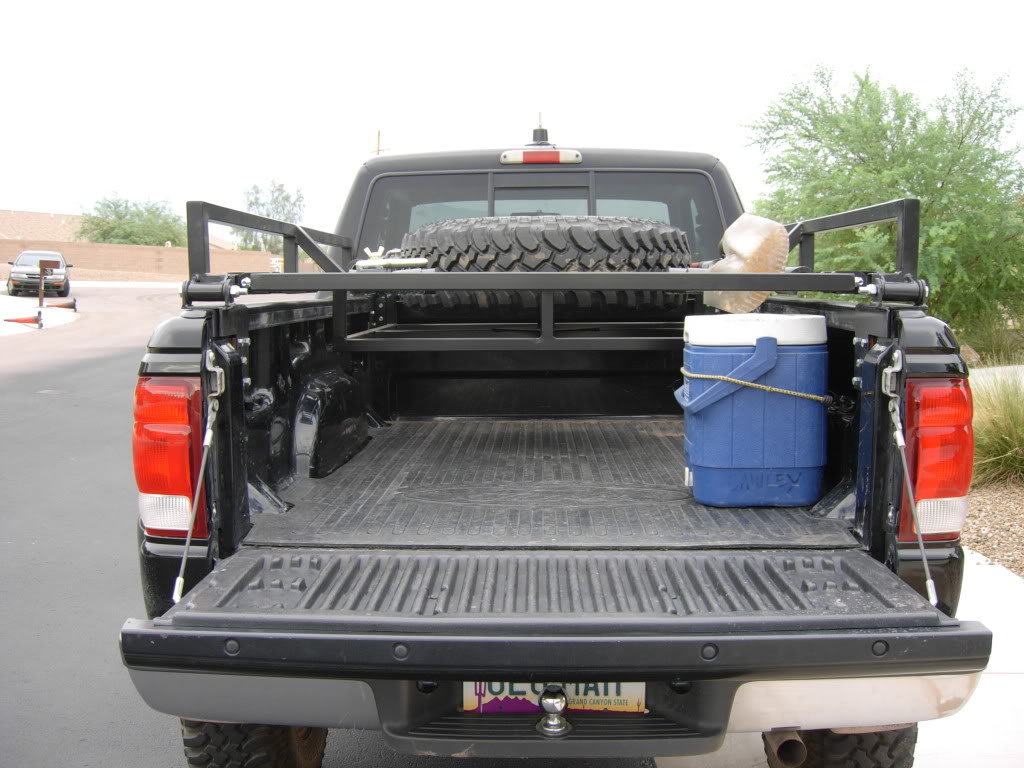
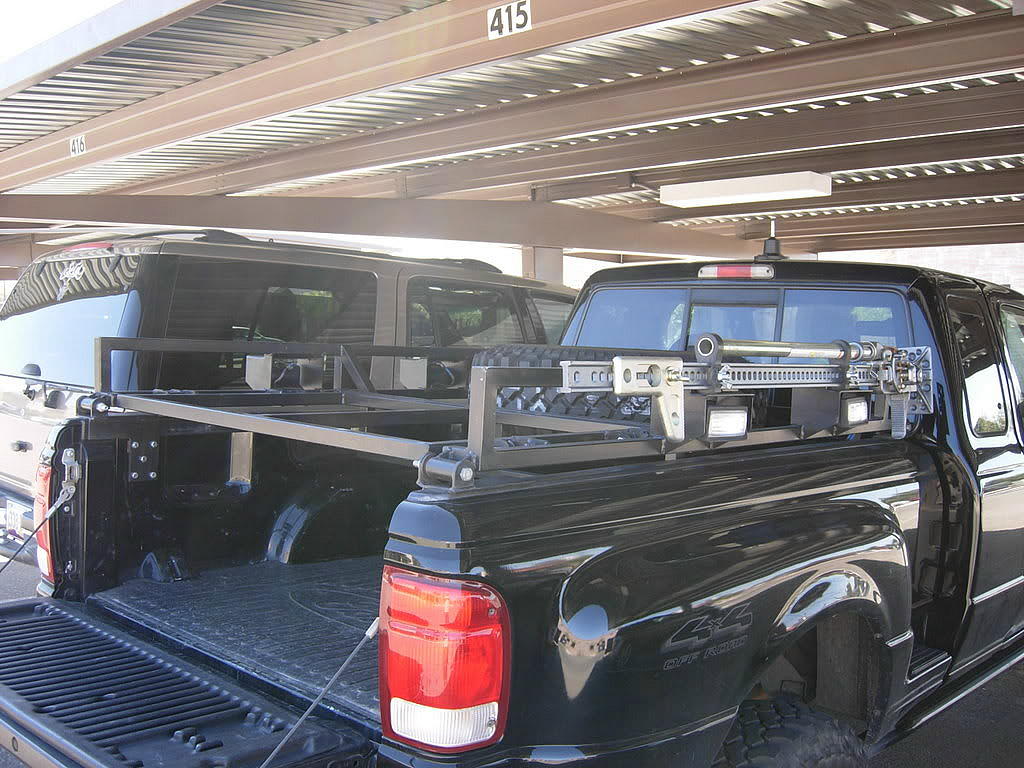
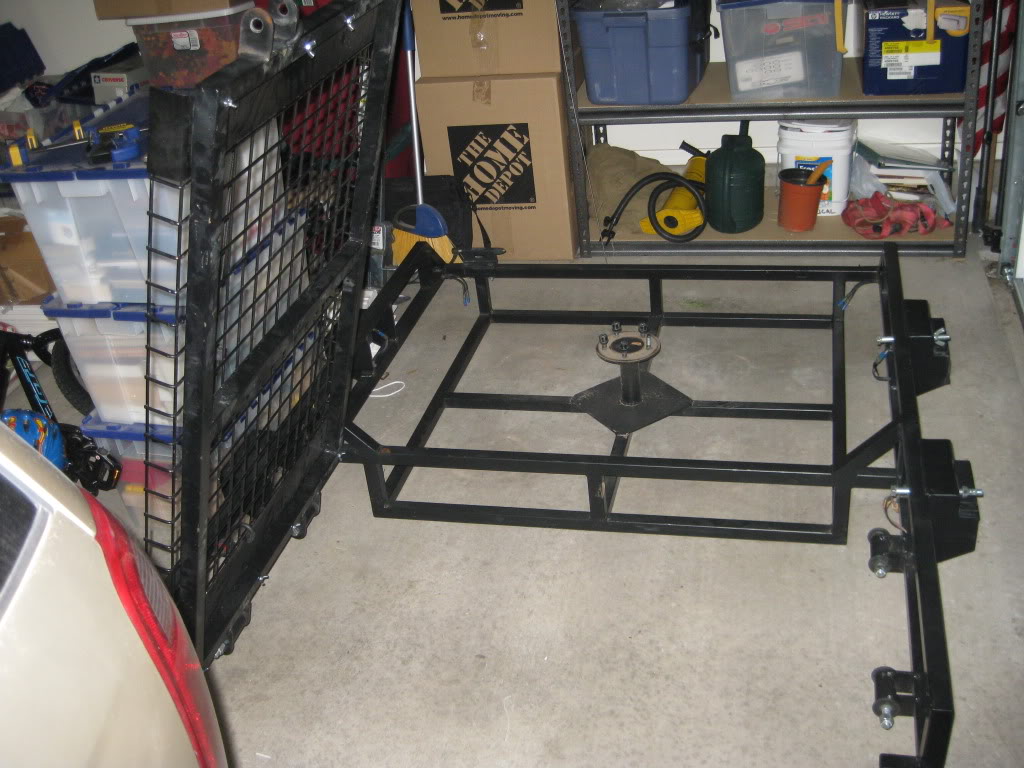
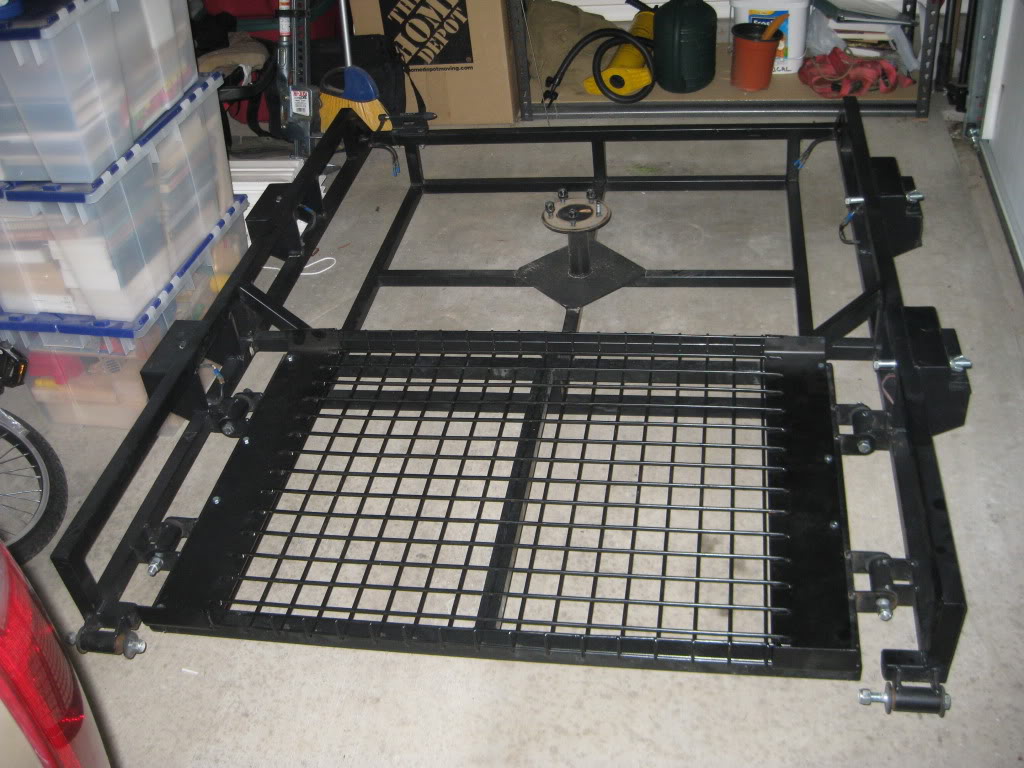
The resulting design included a recessed spare-tire basket, side rails for carrying equipment, and a removable section to improve access to the bed. His design also provides a useful starting point for anyone considering a similar rack, although the dimensions and mounting arrangements need to be adapted to the truck and equipment being used.
Designing the Rack Around Your Truck
Before cutting steel, measure the truck and decide what the rack needs to carry. The dimensions of the bed rails determine the rack’s overall width, while the spare tire’s actual dimensions determine the size and placement of its basket.
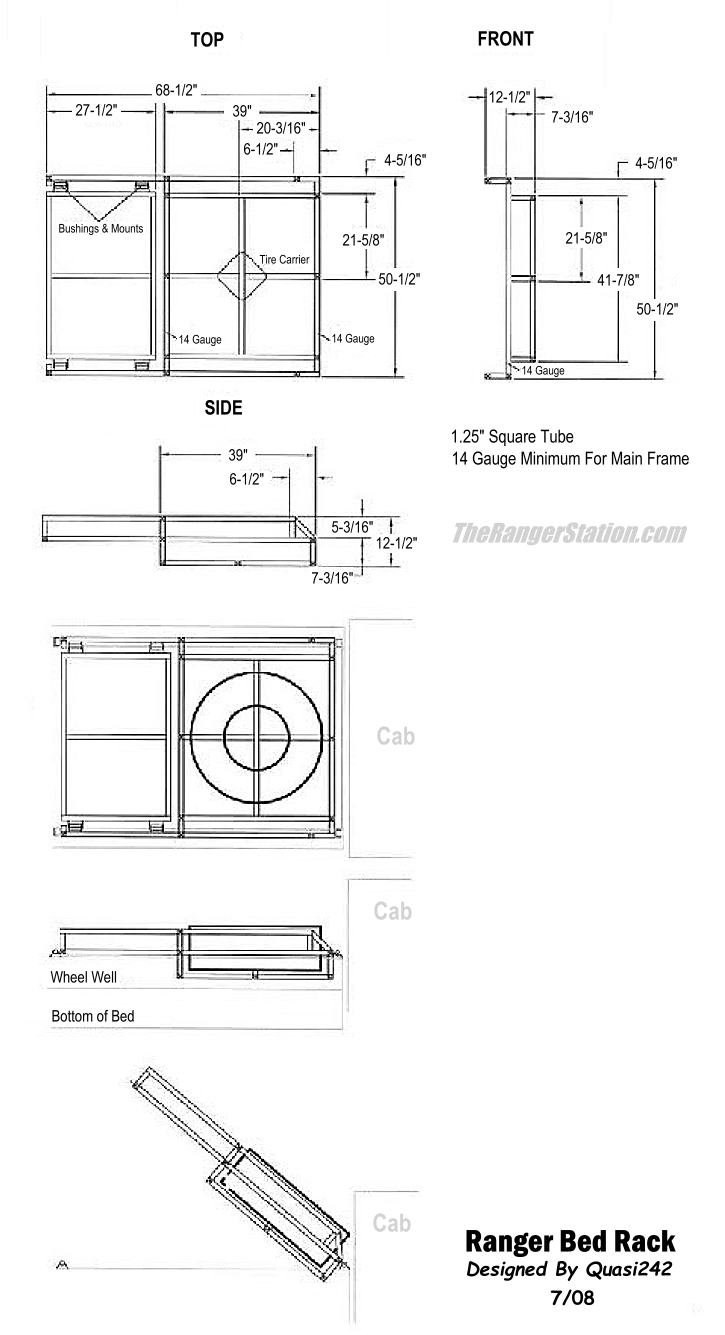
Quasi242’s drawing specifies a rack width of 50-1/2 inches. That dimension is important because the rack sits on top of the bed rails. The width must match the truck’s rail spacing and provide the correct fit for its mounting brackets.
Flareside vs. Styleside Bed Width
The original design was made for a Flareside bed. The more common Styleside bed has a wider spacing between the bed rails, which means the rack cannot simply be transferred from one bed style to the other without changing its dimensions.
| Measurement | Flareside bed | Styleside bed |
|---|---|---|
| Inside width between top bed rails | 45-13/16″ | 54-5/16″ |
| Difference | — | 8-1/2″ |
The Styleside bed is approximately 8-1/2 inches wider between the top bed rails. That is a substantial difference when designing a rack that rests directly on those rails.
The drawing’s 50-1/2-inch rack width is specific to the original design. Do not simply add 8-1/2 inches to every dimension on the drawing. Instead, measure the actual rail spacing on the truck and adjust the rack’s overall width, crossmembers, mounting brackets, and any associated components as necessary. Some parts may retain their original dimensions, while others will need to change to maintain proper fit and support.
Measure the specific truck before fabrication, even if it is the same model year and bed style. Check the locations of the bed rails, mounting surfaces, cab clearance, and any accessories that could interfere with the rack.
Planning for a Full-Size Spare Tire
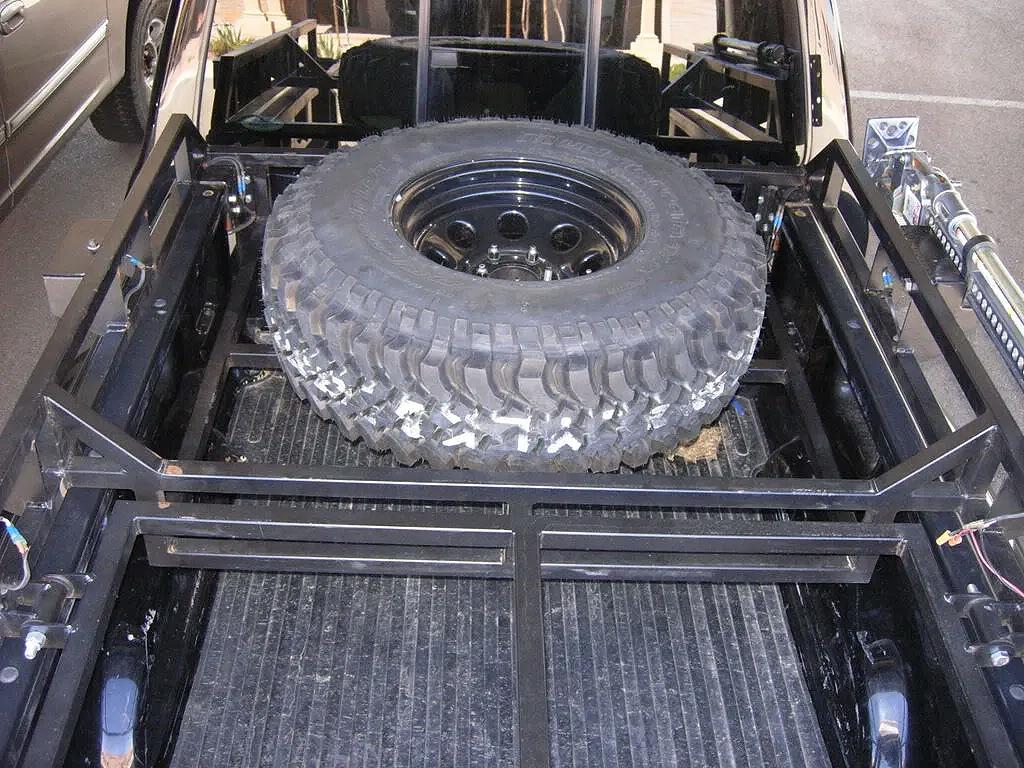
Quasi242 designed the recessed tire basket to accommodate a 35×12.50 tire. His existing 33×10.50 tire did not rest on the bottom of the basket, leaving additional room for the wider tire he intended to carry.
The basket was recessed approximately six inches into the bed. This allowed the spare to sit lower than it would on a flat rack, reducing how high the tire extended above the rack.
When designing a similar basket, measure the actual spare tire rather than relying exclusively on its advertised size. Tire diameter and width can vary by manufacturer, model, and wheel width. Allow enough clearance to load and remove the tire, secure it against movement, and accommodate any differences between the tire you carry now and one you might use later.
Consider the basket’s bottom support and how its weight will be transferred into the rack frame. The tire must remain securely supported when the truck encounters rough roads and trails, not just when the vehicle is parked.
Materials and Hardware
The following list covers the primary materials and tools needed to fabricate a rack based on this design. Exact tubing lengths, bracket dimensions, and fastener quantities should be determined from the final measurements and a detailed cut list.
Parts and Materials
- Steel square tubing for the main frame, crossmembers, and side rails. The original drawing identifies 1-1/4-inch square tubing.
- 3/16-inch steel plate for the four bed-mounting brackets.
- Additional steel plate or flat stock for gussets, reinforcement, and the recessed spare-tire basket.
- Steel for the basket’s bottom support and tire-retention hardware.
- Four mounting brackets, with suitable bolts, nuts, and washers.
- Reinforcement plates or backing hardware where needed to distribute loads into the bed structure.
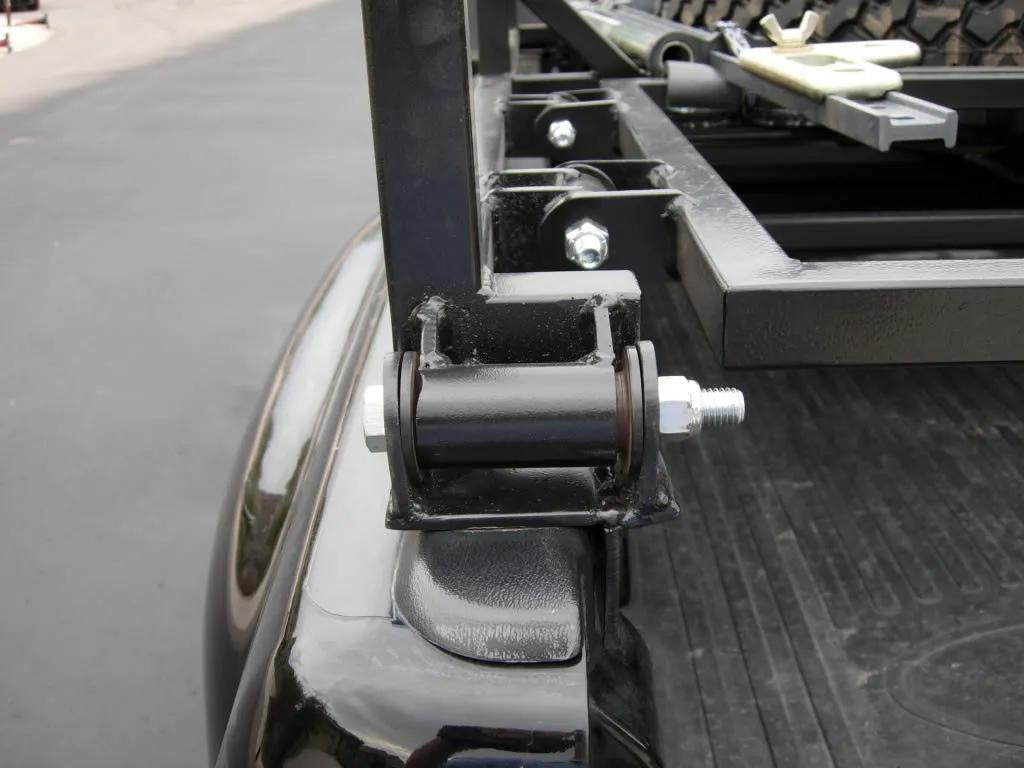
- Three-inch-long polyurethane bushings with a one-inch outside diameter, as specified in the original design.
- Appropriate pivot hardware, removable pins, and locking hardware for the removable rack section.
- Spare-tire securing hardware.
- Brackets for accessories such as a Hi-Lift jack, shovel, or axe, if desired.
- Expanded metal or wire mesh for basket or rack sections, if desired.
- Optional auxiliary-light mounting tabs and wiring.
- Optional gas struts if the final design incorporates a supported lift-up section.
- Primer, paint, or another suitable protective coating.
- Welding consumables, cutting discs, grinding discs, and other shop supplies.
The original drawing specifies a minimum 14-gauge material for the main frame. Treat this as a reference to the original design, not as a substitute for evaluating the loads the rack will carry. Tubing size, wall thickness, bracket geometry, welds, and fasteners all need to be appropriate for the intended application.
Tools
- Tape measure, steel rule, combination square, and angle finder.
- Calipers for checking tubing, plate, and hardware dimensions.
- Marker, scribe, center punch, and measuring tools.
- CAD software or graph paper for laying out the design.
- Chop saw, bandsaw, or suitable metal-cutting tool.
- Angle grinder and deburring tools.
- Drill press or heavy-duty drill with suitable bits.
- Welding equipment appropriate for the steel being used.
- Welding table, vise, clamps, and suitable fixturing.
- Socket and wrench set, pliers, and a torque wrench.
- Appropriate safety glasses, hearing protection, welding protection, gloves, and other personal protective equipment.
Fabricating the Frame and Spare-Tire Basket
Lay out the frame using measurements taken directly from the truck. Confirm the width and mounting locations before cutting all the crossmembers, and test-fit the main components before completing the welds.
The recessed basket needs to fit the intended tire while maintaining adequate clearance around the frame. Its depth, support structure, and location will affect how the tire sits in the bed and how the rack’s load is distributed. Check that the tire can be installed and removed without damaging the bed or requiring the entire rack to be dismantled.
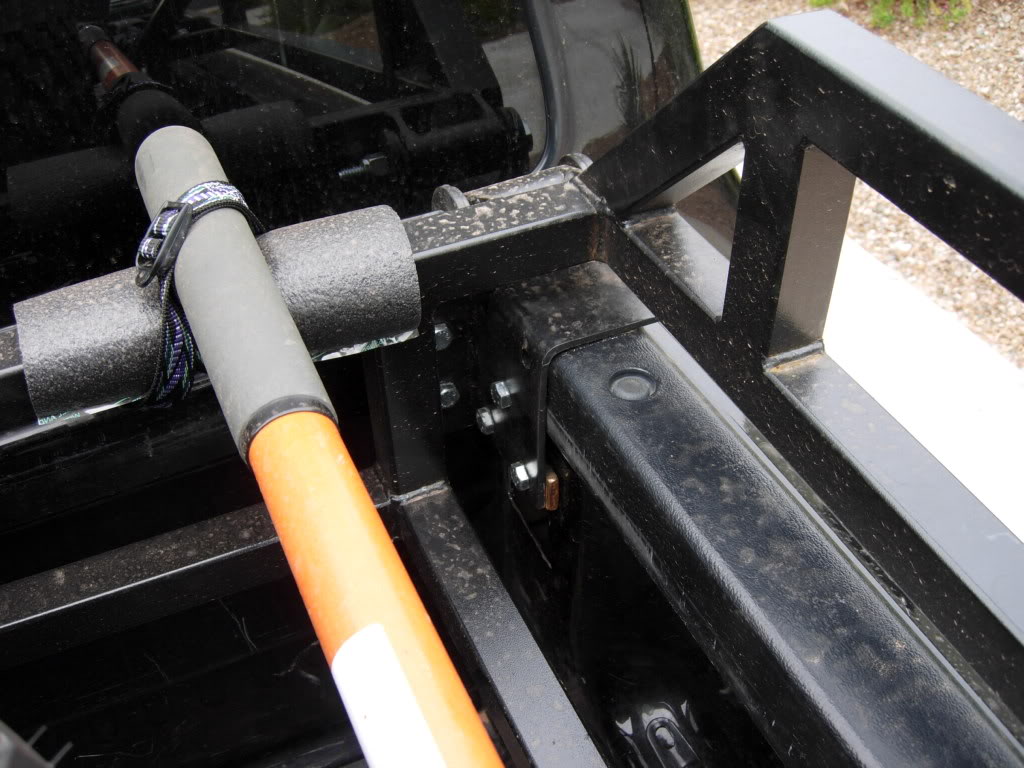
The side rails can provide mounting locations for trail equipment such as a Hi-Lift jack and shovel. Plan these mounts around the equipment’s actual dimensions and ensure that everything is restrained against movement. Accessory mounts should not obstruct the spare tire, removable section, or rack fasteners.
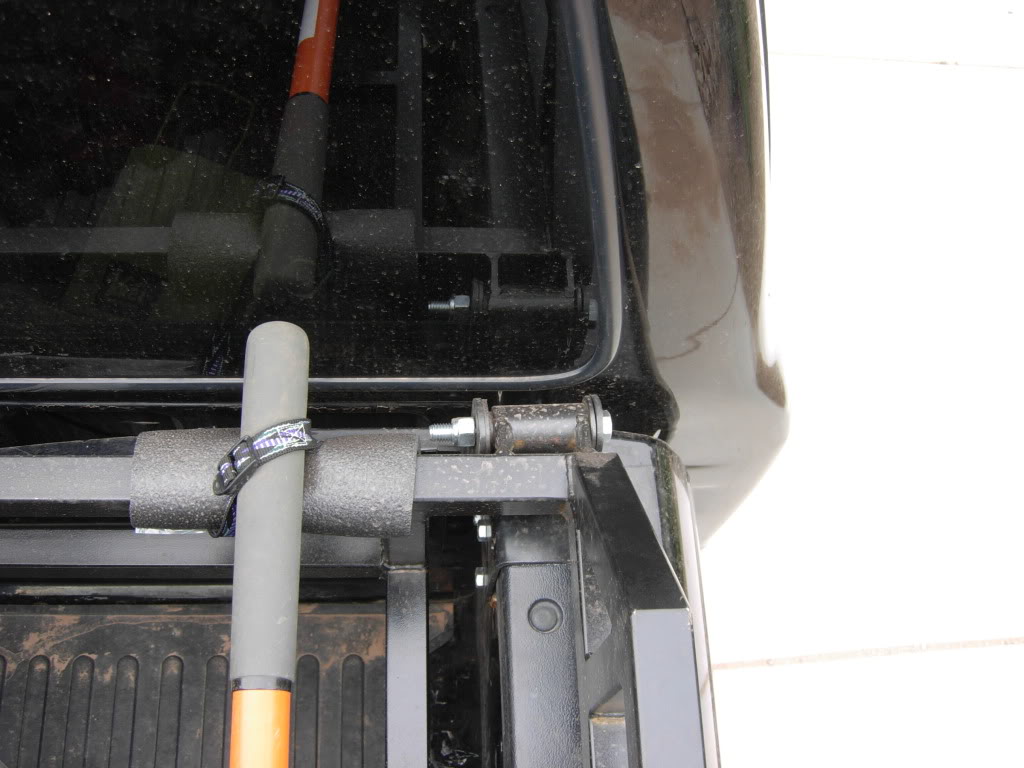
Quasi242’s design included a removable section to make the bed more accessible. If you incorporate a similar feature, make sure the attachment points are properly aligned and that the section cannot work loose under vibration. Any hinge, pin, latch, or locking arrangement needs to be suitable for the loads it will experience.
Mounting the Rack to the Bed
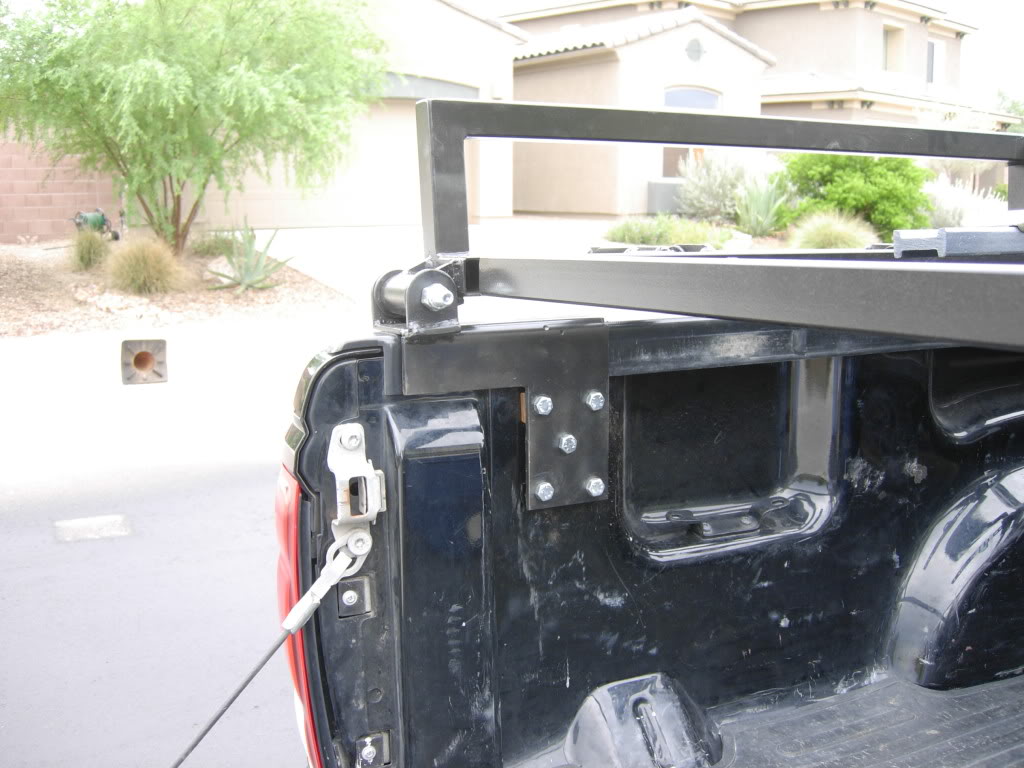
The mounting brackets are one of the most important parts of the design. Quasi242 reported using four substantial brackets made from 3/16-inch steel plate, with multiple bolts attaching each bracket to the bed. The front mounts fastened to both the side and front of the bed rather than attaching to only one panel.
He described the mounts as quite stout and said the rack did not move, but he also acknowledged that the design needed to be tested over time. That is an important distinction: a rack that feels solid when stationary still has to withstand vibration, braking, cornering, and the repeated impacts of rough roads and trails.
When adapting the mounting arrangement, examine the structure behind the bed sheet metal and consider how the weight and forces will be transferred through the brackets and fasteners. Use suitable reinforcement where needed, and do not assume that thicker brackets alone will prevent the bed sheet metal from deforming or tearing.
The rack should be checked for movement and interference before it is loaded. Verify that all fasteners are secure, the removable section locks positively, and the spare tire and accessories are restrained. Reinspect the mounts and welds after initial use, particularly after driving on rough roads.
Expect to Refine the Design
Quasi242 recognized that his was a first-generation fabrication project and expected to find details that needed improvement. That is typical of custom fabrication: a design can look right in CAD and still need adjustments during test-fitting or after it has seen real-world use.
The accompanying drawing documents the basic layout and dimensions of his rack. Its original measurements were given in decimal feet and have been converted to inches for easier reference. The converted dimensions should be checked against the original drawing and the actual truck before any material is cut.
Use the drawing as a design reference rather than a guaranteed, ready-to-build blueprint. Confirm the bed-rail spacing, spare-tire dimensions, mounting locations, material thicknesses, and load requirements before fabrication. A rack designed for a Flareside bed will need changes to fit a Styleside bed, and either design must be checked against the specific truck on which it will be installed.
Photos
About The Author
Jim Oaks is the founder of TheRangerStation.com, the longest-running Ford Ranger resource online since 1999. With over 25 years of hands-on experience building and modifying Ford Rangers — including magazine-featured builds like Project Transformer — Jim has become one of the most trusted authorities in the Ford Ranger off-road and enthusiast space.
Since launching TheRangerStation.com, Jim has documented thousands of real-world Ranger builds, technical repairs, drivetrain swaps, suspension modifications, and off-road adventures contributed by owners worldwide. TheRangerStation.com has been referenced in print, video and online by enthusiasts, mechanics, and off-road builders looking for practical, and experience-based information.