
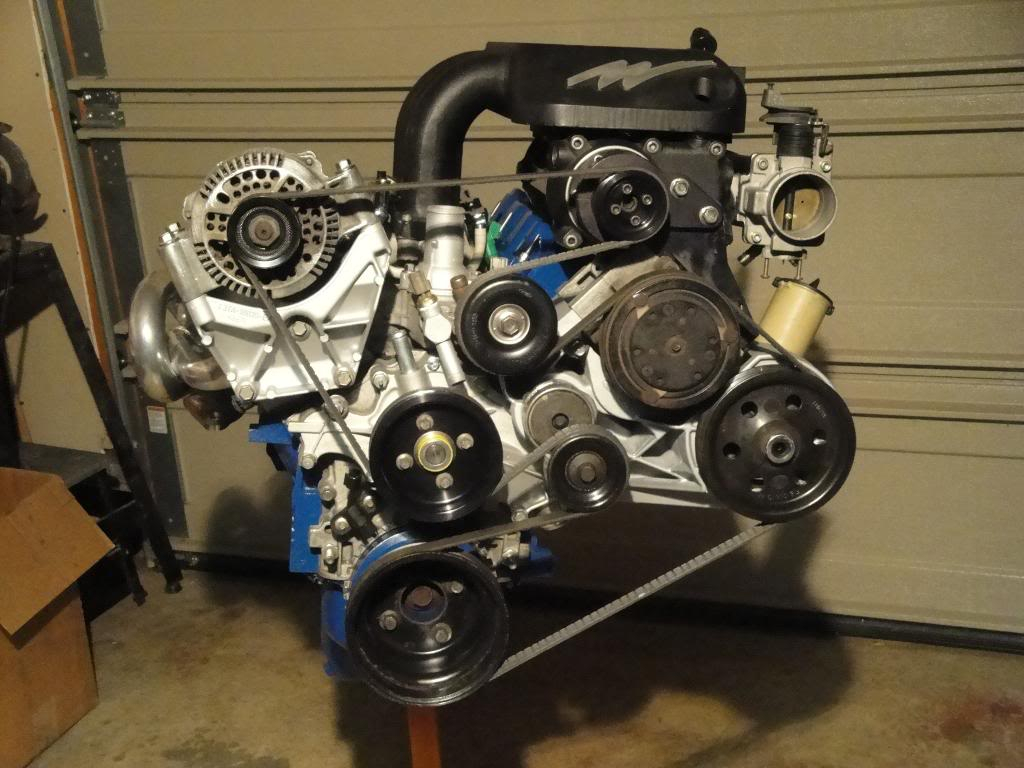
Supercharging the Ford 3.0L Vulcan
The Ford 3.0L Vulcan V6 has been jokingly called the “3.Slow” for years.
It’s easy to understand why. The 3.0L was never the performance engine in the Ranger lineup. Depending on the year, Ranger versions produced roughly 145 to 155 horsepower, while the 4.0L V6 made considerably more torque and, later, considerably more horsepower. If you wanted a Ranger that was quick from the factory, the 4.0L was the obvious choice.
But the 3.0L has another reputation.
It’s simple. It’s an iron-block, pushrod V6 that Ford produced in enormous numbers, and it has earned a reputation for going a very long time without needing much attention. The Ranger Station’s 3.0L reference page documents the engine’s Ranger production from 1991 through 2009 and notes that it’s common to find Vulcans with 300,000 miles or more.
So maybe the 3.Slow deserves another look.
Can you actually make a 3.0L Ranger fast?
More importantly, can you supercharge one without spending a fortune?
That’s a question Ranger Station members have been discussing for years.
The 3.0L Vulcan
The 3.0L Vulcan wasn’t originally designed for the Ranger. Ford introduced the cast-iron, pushrod V6 for the 1986 model year in the Ford Taurus and Mercury Sable. It later found its way into several other Ford vehicles, including the Ranger beginning with the 1991 model year, where it replaced the 2.9L Cologne V6 as the Ranger’s base V6. The Vulcan remained available in the Ranger through the 2009 model year.
It’s important to distinguish the Vulcan from Ford’s other 3.0L V6, the Duratec. The Duratec was a completely different DOHC engine that joined the Taurus lineup in 1996. For several years, Ford offered both the Vulcan and Duratec 3.0L engines in the Taurus, so simply referring to a “3.0L Taurus engine” can be confusing.
The engine discussed in this article is the 3.0L Vulcan—the cast-iron, overhead-valve V6 used in the Ranger.
The Vulcan displaces 183 cubic inches and uses a 60-degree V6 configuration, with a 3.504-inch bore and 3.15-inch stroke. Ranger versions used a compression ratio of approximately 9.3:1.
Ford continued developing the engine during its long Ranger run. The 1991 version received lower-friction pistons, a strengthened block and a roller camshaft. A more substantial update came in 1998, including a revised intake manifold, changes to engine management and cam timing, bringing output to roughly 155 horsepower and 185 lb-ft of torque in the updated configuration. A plastic upper intake manifold appeared in 2001.
Depending on the model year, Ranger 3.0L output varied, but the engine was never known for making impressive numbers from the factory. That’s where the “3.Slow” nickname came from—and it’s also what makes the idea of forcing more air into one so interesting.
Ranger horsepower varied by year:
| Ranger Year | Horsepower | Torque |
|---|---|---|
| 1991–1995 | 145 hp | 165 lb-ft |
| 1996–1997 | 147 hp | 162 lb-ft |
| 1999 | 145 hp | 178 lb-ft |
| 2000–2001 | 150 hp | 190 lb-ft |
| 2002 | 146 hp | 180 lb-ft |
| 2003–2004 | 154 hp | 180 lb-ft |
| 2005–2009 | 148 hp | 180 lb-ft |
These numbers help explain the “3.Slow” nickname, but they don’t tell the whole story.
Why Is It So Slow?
The Vulcan wasn’t intended to be a high-performance engine.
Its two-valve, pushrod design is relatively simple, and the factory combination was designed around the needs of a mass-produced passenger car and light truck engine rather than maximum horsepower per cubic inch.
That doesn’t mean the engine can’t breathe better.
The Ranger Station has long documented modifications to the 3.0L, including cylinder-head work and other performance improvements. Our Ford 3.0L Build and Cylinder Head Porting resources provide more information for anyone interested in improving the engine’s airflow.
That’s important when talking about supercharging.
A supercharger doesn’t magically make an engine efficient. It forces more air into the engine. The engine still has to move that air through the intake ports, combustion chambers and exhaust system.
The better those parts can handle the additional airflow, the more useful the boost can become.
The Idea of Supercharging a 3.0L
The idea is pretty simple.
Instead of trying to get more power by making the naturally aspirated 3.0L breathe harder, put a compressor on it and force additional air into the engine.
The difficult part is making everything work together.
You need a way to physically mount the supercharger. You need an intake manifold or adapter. You need enough fuel. You need appropriate engine management and tuning. You need to control intake temperatures and detonation. And you need an engine that is in good enough condition to handle the additional cylinder pressure.
This is where things get interesting.
Can You Supercharge a 3.0L Cheaply?
In May 2015, a TRS forum member started a thread titled “Supercharge your 3.0 Vulcan for cheap.“
He wasn’t just talking about the idea. He had designed an Eaton M90 intake adapter using Mastercam and was working toward having it machined.
At the time, he estimated that an existing commercial M90 adapter, combined with the other parts required, could approach $1,000 before all of the supporting modifications were considered. His goal was to design something that would use readily available parts and bring the cost down.
His proposed combination used an Eaton M90 Gen V supercharger with a bypass valve, Taurus 3.0L fuel rails and a custom intake adapter. He had found used supercharger and fuel-rail components for around $300 or less and estimated that the complete basic supercharger installation could potentially be assembled for under $1,000.
There was an important qualification, however.
That was the projected cost of the project—not a proven, completed $1,000 supercharger kit.
The builder still had to have the adapter machined, verify clearances and alignment, and determine what supporting modifications would actually be necessary. He specifically mentioned upgrading the injectors, fuel pump and ignition system.
That’s an important distinction when looking back at an old forum thread.
The project demonstrated that a low-cost 3.0L supercharger installation was conceivable. It did not establish that somebody could simply spend $1,000 and have a reliable, finished, tuned supercharged Ranger.
M62 or M90?
One of the more interesting discussions in the thread involved whether an M90 was actually the right supercharger for a 3.0L.
Don4331 ran the numbers for approximately 6 psi of boost using a 150-hp 3.0L as his starting point. At sea level, 6 psi of boost gives a pressure ratio of about 1.42.
Using an estimated M90 efficiency of 77.5 percent at the airflow and pressure ratio he expected from the 3.0L, he calculated an ideal temperature increase of about 55°F and an actual increase of roughly 71°F after accounting for compressor efficiency. That worked out to an estimated air-density ratio of about 1.25.
From there, the theoretical horsepower calculation was:
150 hp × 1.25 = 187.5 hp
That represents a theoretical gain of 37.5 hp from the additional air.
But the supercharger has to be driven by the engine. Don estimated that the M90 would consume about 15 hp to produce that level of boost:
37.5 hp gain − 15 hp to drive the blower = 22.5 hp net gain
That would put the theoretical result at roughly 172–173 hp at the flywheel.
He then ran the numbers for an Eaton M62. His calculation indicated that the M62 would require about 10 hp to drive at this boost level and would be operating in a more efficient part of its range. His conclusion was that the M62 could provide roughly 5 percent more usable power than the M90 in this particular low-boost application.
These were forum calculations, not dyno results, and they depend on assumptions about airflow, compressor efficiency, temperature and parasitic loss. They shouldn’t be treated as definitive numbers for every 3.0L combination.
But the exercise illustrates an important point:
Bigger isn’t automatically better when choosing a supercharger.
A supercharger needs to move the amount of air the engine can actually use, while doing so efficiently. An M90 has considerably more capacity than an M62, but that doesn’t automatically make it the better match for a relatively small engine running modest boost. The blower’s size, operating speed, pulley ratio, efficiency and the amount of power required to drive it all matter.
Stmitch offered a different perspective based on his own Whipple-supercharged 3.0L. He felt Don’s horsepower estimate was conservative, noting that a general rule of thumb is roughly 10 horsepower per pound of boost. He also pointed to the Ford Racing/Whipple 3.0L combination, which produced substantial gains at roughly 8–10 psi.
That doesn’t settle the M62-versus-M90 question, but it shows why the intended boost level matters. A blower that makes little sense at 6 psi may make more sense if the combination is designed to run considerably more boost.
For general information about Eaton’s M62, M90 and M112 superchargers, see our Eaton M62, M90 & M112 Superchargers article.
What About Pulley Size?
A positive-displacement supercharger is driven from the engine by a belt, and the ratio between the crank pulley and supercharger pulley determines how fast the blower spins.
A smaller pulley on the supercharger spins it faster. A larger pulley slows it down. Changing pulley size therefore changes the amount of air the blower can move and, ultimately, the boost it can produce.
The 2015 project was initially targeting around 6 psi, but the discussion later turned to whether the combination should instead be designed around approximately 10 psi.
This is also why the M62/M90 choice can’t really be separated from pulley selection. A blower that looks oversized at one operating point may behave differently when spun at another speed, and there is a point where simply spinning a Roots blower faster produces more heat without giving you the efficiency you want.
The important thing is to select the blower and pulley combination together rather than picking a supercharger first and figuring out the pulley afterward.
How Much Boost?
This is where you have to be careful with internet supercharger discussions.
There is no universal horsepower number that comes from a particular boost pressure.
Six psi on one engine does not automatically produce the same result as six psi on another engine.
The actual result depends on airflow, compressor efficiency, intake temperature, volumetric efficiency, ignition timing, fuel mixture, engine condition, exhaust flow and many other factors.
The pulley combination is a big part of that equation. Changing the ratio between the crank pulley and supercharger pulley changes blower speed, which changes how much air the supercharger can move and how much boost the engine can potentially produce.
That’s why the intended boost level should be established before choosing the pulley combination.
The 2015 project initially discussed approximately 6 psi, while later discussion considered whether the combination should be designed around approximately 10 psi. Those aren’t just different numbers on a boost gauge—they represent different demands on the supercharger, fuel system, cooling system and engine.
The old rule of thumb that “one pound of boost equals 10 horsepower” is useful for a quick conversation, but it isn’t a reliable way to predict the output of a particular engine.
The real question isn’t simply how much boost can you make?
It’s how efficiently can you make it, and how much power can the engine actually use?
Heat and Detonation
One of the biggest concerns discussed in the thread was heat.
A positive-displacement supercharger compresses air, and compressing air raises its temperature. Higher intake temperatures make detonation more difficult to control.
Stmitch, who had already built and driven a Whipple-supercharged 3.0L Ranger, specifically warned that the supercharger would produce significant heat and suggested incorporating charge-air cooling into the proposed M90 installation.
Don4331 also worked through the intercooling question. In his calculations, he estimated that an air-to-water system could be roughly 50 percent effective in the particular configuration he was considering, while an air-to-air system could approach 70 percent but would require more ducting. Those were his estimates for the proposed installation, not universal efficiency figures for every intercooler system.
This is one of the areas where the project becomes much more than simply bolting a supercharger onto the engine.
Boost, fuel, ignition timing and intake temperature all have to work together.
Don also suggested that a 160–180°F thermostat could be part of an approach to controlling detonation. A thermostat is only one part of the cooling system, however, and isn’t a substitute for proper tuning and charge-air cooling.
Fuel System
The stock fuel system shouldn’t simply be assumed to be adequate for a boosted engine.
As the amount of air entering the engine increases, the engine needs additional fuel to maintain the appropriate mixture.
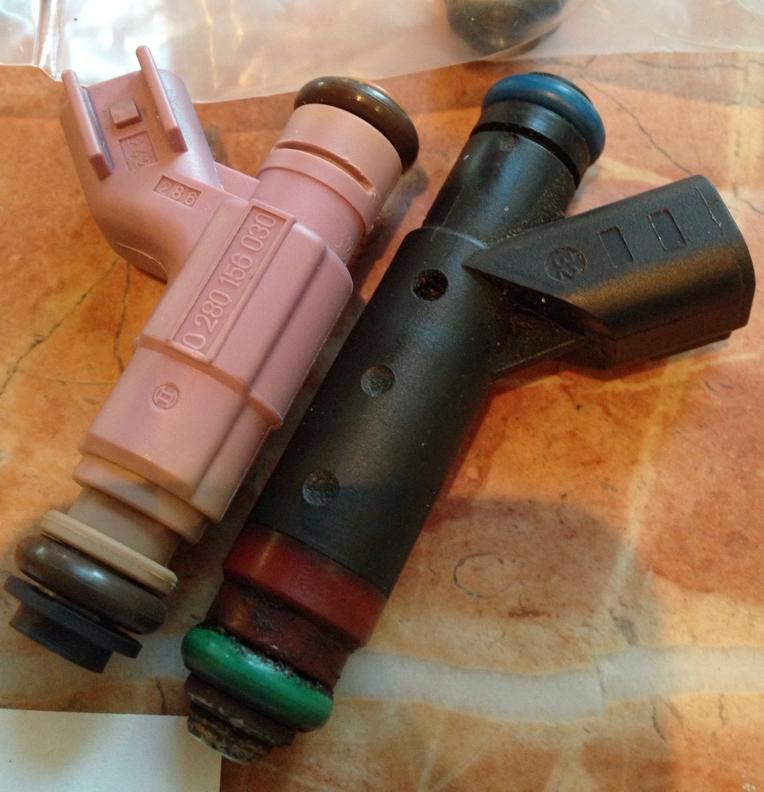
During the M90 project, the builder upgraded to 52 lb/hr high-impedance EV6 injectors. He chose the shorter injectors partly because they allowed him to lower the fuel rails to accommodate the installation. He also planned to use a larger fuel pump.
Those parts were chosen for the particular project and intended power level. They shouldn’t be interpreted as a universal injector or pump requirement for every supercharged 3.0L.
The important lesson is that fuel capacity has to be matched to the engine’s actual airflow and power target.
Tuning
Tuning is probably more important than the supercharger itself.
Adding boost increases cylinder pressure and changes what the engine requires from its fuel and ignition systems. Simply installing a blower and retaining a stock calibration isn’t a sensible approach.
The discussion in the TRS thread repeatedly returned to ignition timing, detonation, fuel mixture, intake temperature and tuning. Experienced members pointed out that there are multiple ways to control detonation, including controlling charge temperature, improving combustion-chamber surfaces and providing appropriate fueling.
A member with substantial experience running a Whipple on a 3.0L also recommended using an experienced tuner and a wideband setup.
That’s good advice regardless of which supercharger you choose.
Building the Intake
One of the most interesting parts of the thread is that oodannyboyoo didn’t just talk about bolting a supercharger onto the Vulcan—he actually started designing the adapter required to make it happen.
The intake adapter was drawn in CAD/CAM and was intended to mate the Eaton M90 to the 3.0L intake.
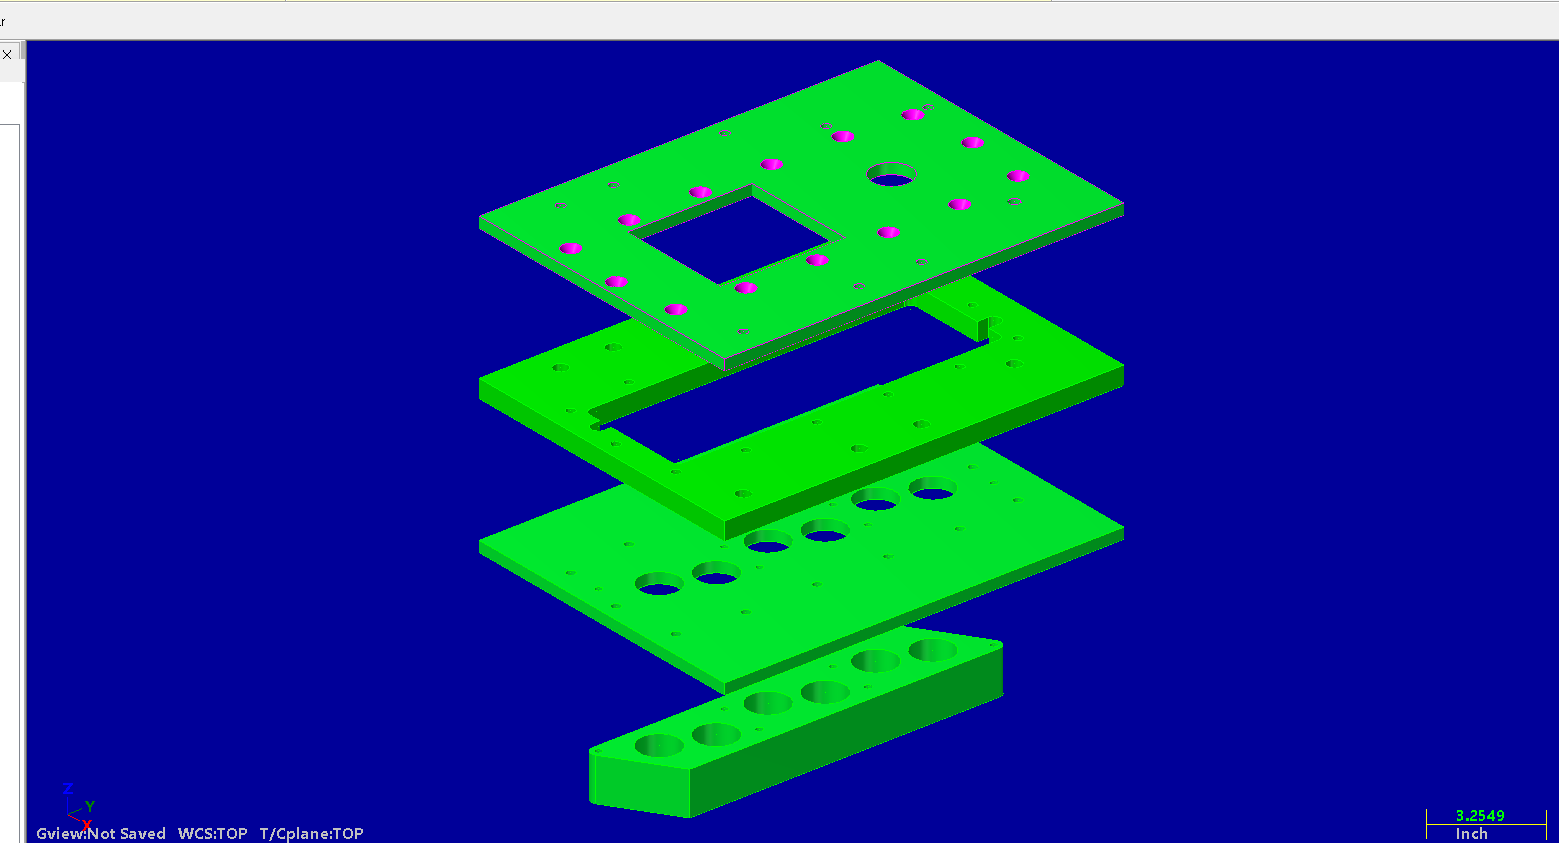
An initial prototype was built, but it didn’t work out. The prototype revealed problems with fitment and serpentine belt alignment. The thread includes photographs showing the prototype and the problems encountered during the process.
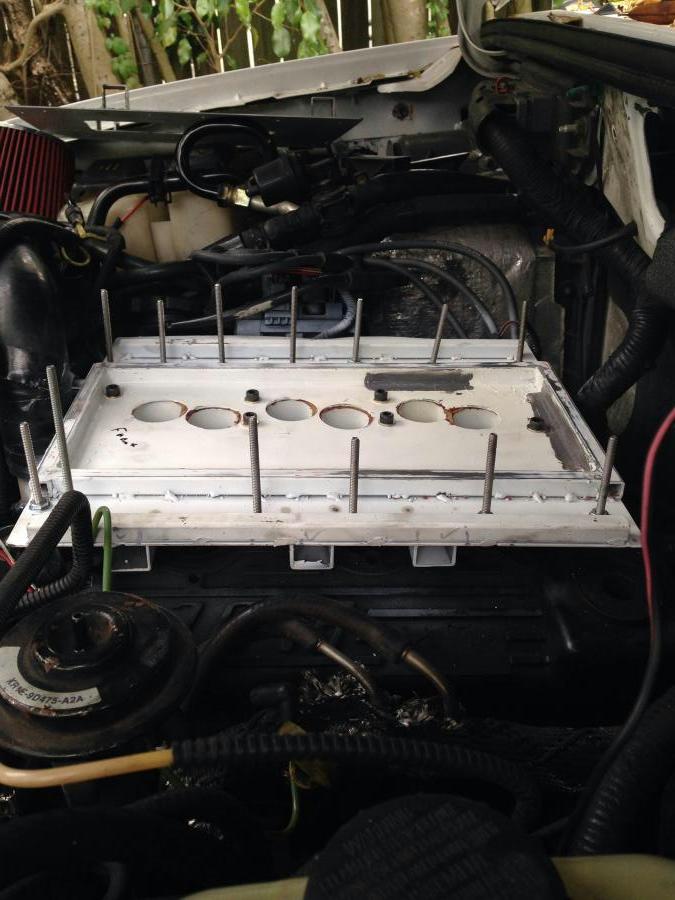
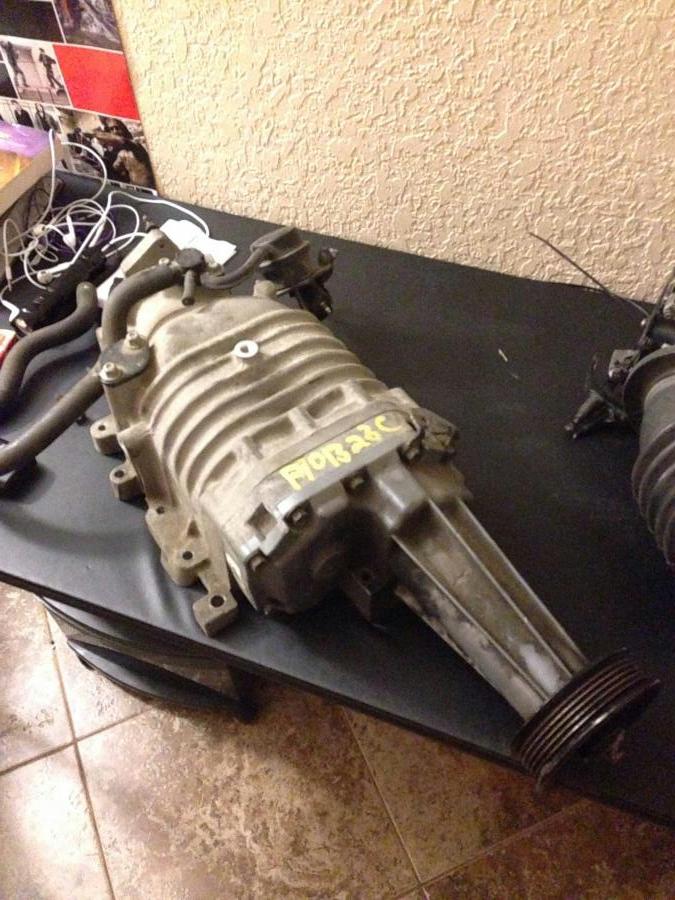
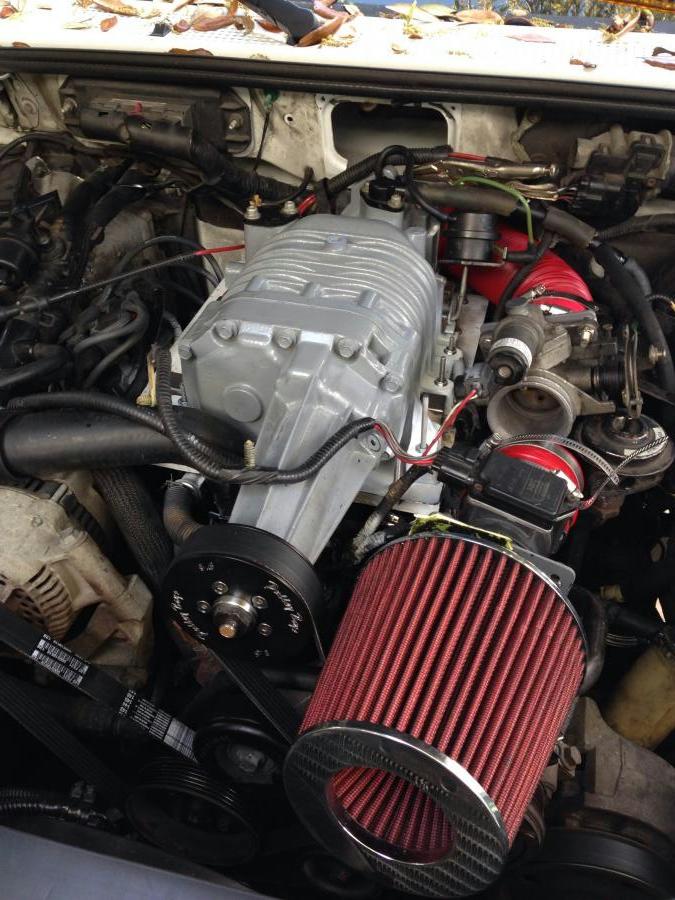
Rather than abandoning the project, oodannyboyoo went back to the drawing board. He continued refining the design, creating stencils and checking alignment, tolerances and clearances before committing to the final machining.
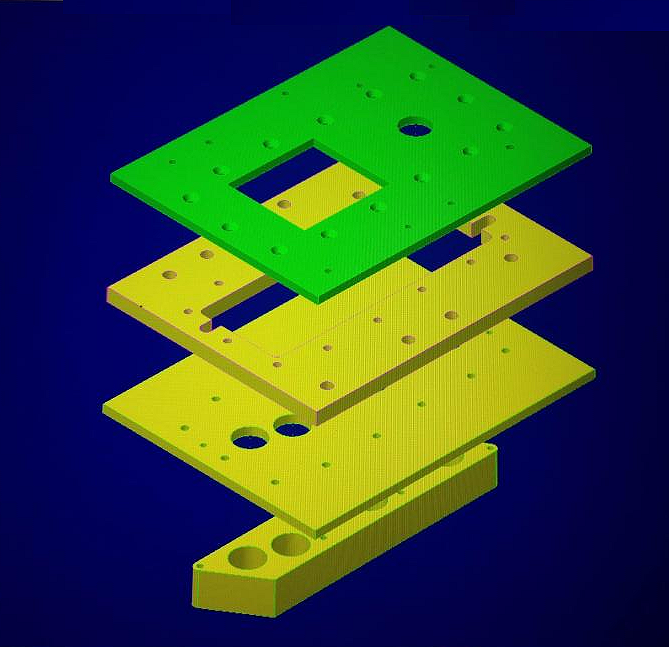
Eventually, he released the final intake drawing so that others could use it as a starting point for fabrication.
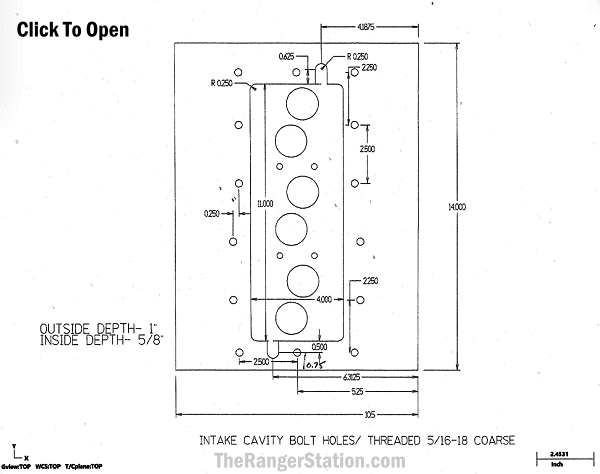
The drawing doesn’t turn this into a bolt-on kit. It still requires someone capable of fabricating or machining the part and verifying the fit on their particular engine and supercharger combination.
But having a usable design eliminates one of the biggest hurdles in attempting a project like this.
Finding a cheap supercharger is one thing. Figuring out how to mount it correctly is another.
Cylinder Heads and Exhaust Flow
The forum discussion also touched on something that makes sense from an airflow standpoint: the rest of the engine needs to be able to use the additional air.
Stmitch’s actual Whipple build is a good example. His engine received ported and polished heads and lower intake, 1.8-ratio roller rockers, stiffer valve springs, ARP head studs, ceramic-coated headers and a Gibson exhaust.
That doesn’t mean those modifications are mandatory for every low-boost 3.0L.
It does demonstrate that a serious supercharged build can benefit from addressing the engine’s airflow rather than treating the supercharger as an isolated component.
Our Ford 3.0L Build and Cylinder Head Porting resources provide additional information for anyone wanting to explore that side of the engine.
A Real Supercharged 3.0L Ranger
If you want to see what a supercharged 3.0L Ranger actually looks like, you don’t have to imagine it.
TRS member stmitch built one.
His 2000 Ranger eventually received a Whipple supercharger along with a substantially modified 3.0L. The engine received ported and polished heads and lower intake, 1.8 roller rockers, upgraded valve springs, ARP head studs, 42 lb/hr injectors, a Cobra fuel pump and supporting modifications. The truck was also converted from an automatic transmission to a 5-speed manual during the project.
The build took years and included plenty of problems along the way, including valve-cover clearance, wiring, cooling and tuning issues.
It is a much more involved project than the inexpensive M90 concept discussed above.
But it is also valuable because it actually happened.
You can see the truck and follow its build in our feature:
Stmitch’s Supercharged 3.0L 2000 Ford Ranger
What About the 4.0L OHV?
This is where I started wondering whether the 3.0L might actually be an interesting engine for forced induction.
The 4.0L OHV has an obvious advantage: displacement.
Four liters will move considerably more air than three liters, all else being equal. If the goal is simply to make more power, the 4.0L starts with a significant advantage.
But that doesn’t automatically answer the question of which engine is better suited to a supercharger.
The 3.0L has a 9.3:1 compression ratio in the Ranger, while the 4.0L OHV is commonly listed around 9.0:1. The 3.0L also has its reputation for durability and its simple pushrod design.
On the other hand, the 4.0L has more displacement and considerably more factory torque.
There are also known durability concerns with the 4.0L OHV, particularly its sensitivity to overheating and the potential for cylinder-head damage when an engine has been overheated. That doesn’t mean the 4.0L OHV can’t handle boost—it clearly has been used successfully in boosted applications—but cooling and engine condition become especially important.
So I don’t think we can honestly declare the 3.0L or 4.0L OHV the “better” supercharger engine based on the information available here.
What we can say is that the 3.0L’s reputation as the slow Ranger engine doesn’t necessarily tell us how good it could be as a forced-induction platform.
That’s a question that deserves more real-world testing.
What Happened to the Cheap M90?
The inexpensive M90 project is an interesting example of how difficult it can be to turn a good idea into a finished product.
The builder continued working on the design through the summer of 2015, bought the larger injectors and continued working on the intake adapter. By June, he was sending stencil files to his machinist so he could physically check how the supercharger would sit in the truck and verify clearances, alignment and tolerances.
By July, the machining still hadn’t happened. The builder began considering whether to purchase his own CNC router and eventually said the project was on hold because his machinist was difficult to reach and he couldn’t find another machinist willing to match the original $600 quote. School also became a major time commitment.
In August 2015, he reported that the supercharger project was postponed while he concentrated on school and experimented with a wet nitrous system instead. He specifically said he had not abandoned the supercharger project, but the thread never documented a completed, running M90 installation.
That doesn’t make the thread a failure.
In fact, it’s one of the reasons the thread is so useful.
It documents the questions that have to be answered before someone attempts a project like this: How do you mount the blower? How much air does it need to move? How much power does the blower consume? How much fuel is required? How do you deal with heat? How do you tune it?
Those are the same questions anyone considering a custom supercharger installation would have to answer today.
So, Is the 3.0L Underrated?
Maybe.
Not because the 3.0L suddenly becomes a powerhouse if you bolt a supercharger onto it. It doesn’t.
And not because a 3.0L will automatically outperform a 4.0L. Displacement still matters.
But the “3.Slow” nickname tends to reduce the Vulcan to one characteristic: its relatively low factory power output.
There’s more to the engine than that.
It’s a simple 183-cubic-inch pushrod V6 with a long production history, a reputation for durability and an enormous supply of engines and parts. It isn’t difficult to understand, and it doesn’t take exotic technology to make it breathe better.
That makes it an interesting engine to experiment with.
The TRS forum thread shows that enthusiasts have been looking for an inexpensive way to supercharge one for more than a decade. Stmitch’s Ranger shows that a supercharged 3.0L can be built and driven. What we don’t have is a simple, inexpensive, bolt-on recipe that turns every 3.0L Ranger into a high-performance truck.
Maybe that’s the real lesson.
The 3.0L may not be the engine most people would choose for a performance Ranger. But that doesn’t mean it’s the wrong engine to experiment with.
And for an engine that’s spent decades being called the 3.Slow, that’s pretty interesting.
Related Articles
1991-2008 Ford Ranger 3.0L V-6
1999 Ford Ranger V6 3.0L FFV Head Gasket Replacement
Eaton M62, M90 and M112 Superchargers
Vortec 4.0L Supercharger Installation Instructions
Supercharging A Ford Ranger 4.0 OHV V6
Moddbox 4.0L SOHC Supercharger Installation
About The Author

Jim Oaks is the founder of TheRangerStation.com, the longest-running Ford Ranger resource online since 1999. With over 25 years of hands-on experience building and modifying Ford Rangers — including magazine-featured builds like Project Transformer — Jim has become one of the most trusted authorities in the Ford Ranger off-road and enthusiast space.
Since launching TheRangerStation.com, Jim has documented thousands of real-world Ranger builds, technical repairs, drivetrain swaps, suspension modifications, and off-road adventures contributed by owners worldwide. TheRangerStation.com has been referenced in print, video and online by enthusiasts, mechanics, and off-road builders looking for practical, and experience-based information.