
What Is Overlanding?
The word overlanding originated in Australia in the early 1900s.
In Australian usage, an “overlander” was someone who drove livestock (especially cattle or sheep) long distances “over land” to market — often across remote interior terrain. It had nothing to do with recreational travel at first. It was agricultural and commercial.
By the mid-20th century, the term began evolving to describe long-distance, self-reliant vehicle travel across remote regions — particularly in Australia and parts of Africa.
One of the earliest modern recreational influences was the 1955–1956 Oxford & Cambridge Far Eastern Expedition, which crossed Eurasia in two Land Rovers. Vehicles like the early Land Rover Series I became closely associated with “overland” travel.
Today “overlanding” is typically defined as ‘self-reliant travel to remote destinations where the journey is the principal goal. Typically, but not exclusively, it is accomplished with mechanized off-road-capable transport (from bicycles to trucks) where the principal form of lodging is camping, often lasting for extended lengths of time (months to years) and spanning international boundaries.’
My Personal View & Definition
I see it like this:
Off-Roader: If you go to a specific area and spend the day or weekend off-roading that area, you’re an ‘Off-roader’.
Overlander: If you like to go off-road, explore, and camp in a different area each night along your journey and be self-sufficient, then you’re an ‘Overlander’.
Rocklander: If you like to go off-road, climb over big rocks that you can get hung up on that a normal 4×4 wouldn’t be able to crawl over, explore, and camp in a different area each night along your journey and be self-sufficient, then you’re a ‘Rocklander‘.
I think the difference between camping and overlanding is that people generally go to a specific area, set up camp, and stay in that area when camping, whereas overlanders travel and cover a lot of distance spending most of their time off pavement and camp along the way. When we travelled from Texas to Colorado we slept in a different area of the country every night, there was a large distance between campsites, most of the trip was spent on forest roads or trails, and we were completely self-sufficient. We didn’t have reservations and were prepared to sleep wherever we had to.
Most of all, overlanding should be about connecting with nature and our environment. Some of the most beautiful places to go are remote and not always easy to get to.
American Influences
I believe the Camel Trophy and The Turtle Expedition gave many Americans their first look at adventure travel / overlanding across foreign continents and being self-sufficient. These early adventures predated the internet and would have been covered in magazines during the 1980’s & 1990’s. These stories found their way to the internet around 1999. In 2005 the Expedition Portal website was launched followed by the creation of Overland Journal Magazine in 2007. Overland Expo was started in 2009, and more and more overlanding events seem to pop up every year.
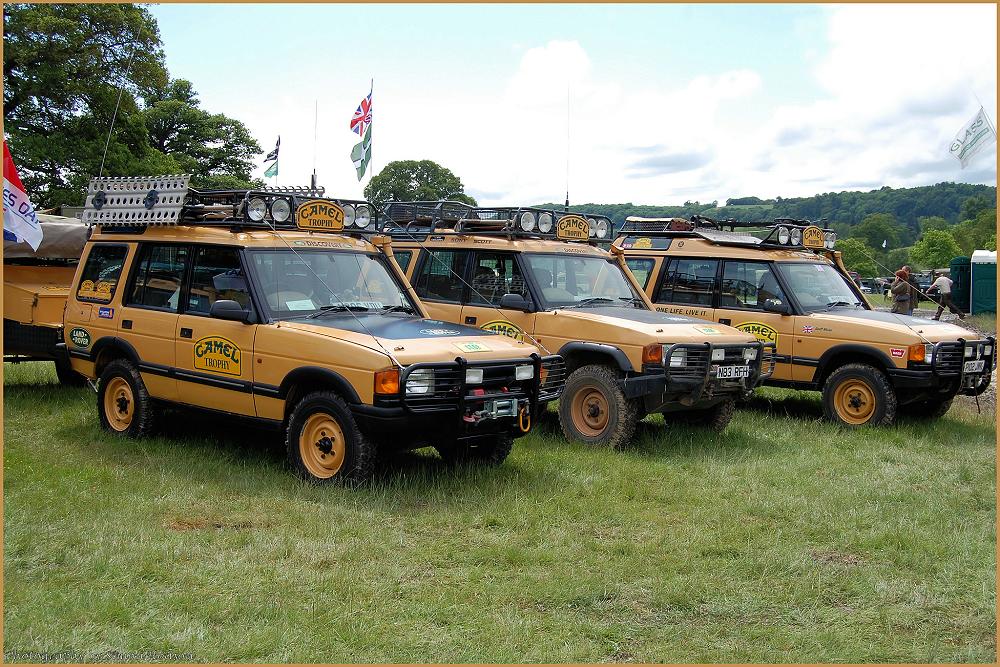
From 1980 to 2000 the Camel Trophy used fairly stock Land Rovers to traverse harsh terrains. The main emphasis of Camel Trophy was more toward testing human endurance and adaptability than pure competition. These vehicles were equipped with a snorkel, winch, recovery gear, roof rack for carrying supplies, auxiliary lights, and 2-way radios for communication.
Is It Expensive – What Do I Need?
Don’t run out and start buying a lot of crap.
Don’t become an overlander because you think the vehicles look cool.
The word ‘Overlanding’ is like the word ‘Wedding’. If you attach those labels to anything the price seems to instantly go up. There are a lot of companies out their targeting overlanders with the latest greatest expensive must have items. Do you need a $90 electric pump to go on your water jug? No. If you think you do, then you’ve lost touch. Overlanding should be about connecting with nature and our environment. Not about who has the coolest stuff.
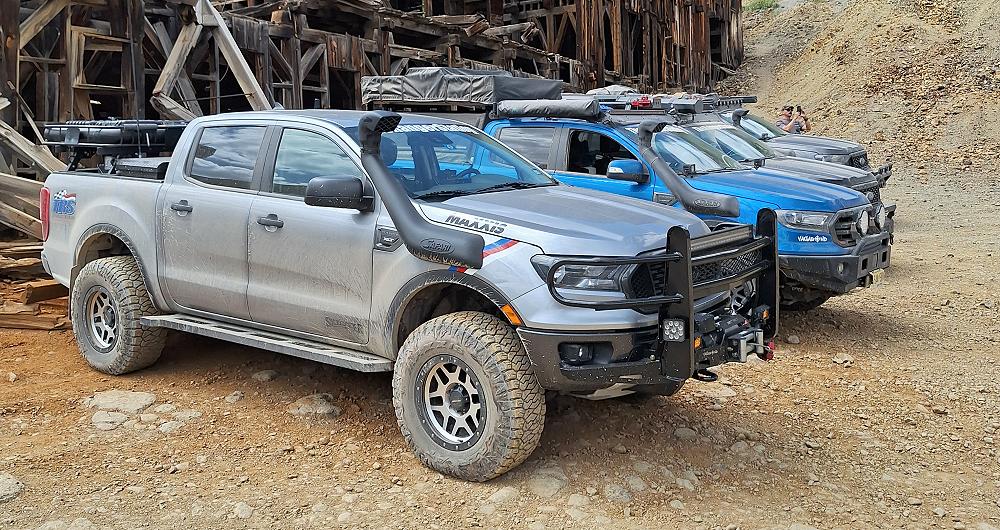
There are a lot of businesses, overlanding events, and people on social media that want you to think you need a lot of expensive equipment to go overlanding. You don’t. In our Vagabond overlanding group here at TRS, our trucks range from a 1985 Ford Ranger 4×4 with a camper shell and sleeping platform in the back to a 2023 Ford Ranger Tremor with a roof top tent. Some of us prefer ground tents and one of us sleeps in a hammock that he hangs off the front of his Ranger.
The reality is that it doesn’t need to be expensive at all.

Evaluate Your Realistic Needs
One of my greatest adventures involved nothing more than my truck, a ground tent, sleeping bag, air mattress, lantern, portable charcoal grill, cooler, a 5-gallon water jug, and a folding camping chair. Each morning, I looked at a paper atlas (map), looked at where I was, and decided where I wanted to travel to. I would suggest starting out simple and then expanding your gear based on your realistic needs.
To go on an overland adventure all you really need is a vehicle, camping gear / place to sleep, food, and a means to navigate.
While planning for your overlanding adventure ask yourself:
- How long will I be gone?
- Where will I sleep?
- What will I eat, and how will I prepare it?
- How will I bath myself?
- How will I navigate and know where to go and not get lost?
- Do I have a first aid kit and fire extinguisher in case of emergency?
- What might break or fail on my truck, and will I need to take tools or parts to fix it?
- What will I do if I get stuck / stranded?
- How will I communicate with people if I do get stranded?
- Will the area be so remote that I might need extra fuel?
When you ask yourself those questions, you’ll know how to prepare your truck for the journey.
Safari Pacific Inspiration
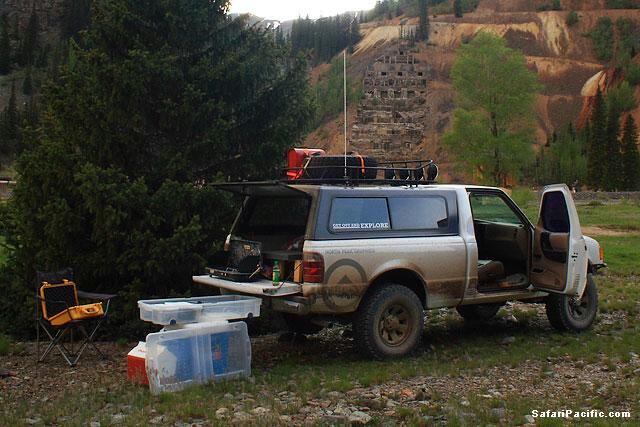
In 2007, TRS forum member Travis Schanafelt departed in his 2WD 2001 Ford Ranger on a solo journey through North America covering over 22,000 miles in ten weeks. Travis traveled from Key West, Florida, the southernmost point in the U.S., north to Prudhoe Bay, Alaska, the northernmost point of the United States. He was self-sufficient and slept in the back of his Ranger.
Setting Up Your Vehicle
I think it’s important that you understand what overlanding is about and not get caught up in buying “stuff”. The reality is that a stock Ford Ranger and some basic camping gear can be an overlander. But what about those that want to take a more serious approach? Here’s a look at what you might need or want.
Reliability
Reliability is the most important thing to consider when modifying your Ranger. The closer it is to stock, the more reliable it will be. That V8 swap might be cool until it starts puking engine coolant crossing a desert or climbing mountains.
Less Can Be More
I’ve seen people overload their trucks with gear that killed their gas mileage, caused the engine to run hot climbing long grades, and put a lot of strain on the drivetrain and brakes. Know the Payload Capacity of your Ford Ranger and don’t overload it. Heavy duty bumpers, winches, rooftop tents, and gas and water cans all deduct from the payload capacity.
Building For Off-Road
If you’re going to do any serious overlanding, then you’re going to find yourself on some rough roads and trails that may or may not be maintained. I’ve been on forest roads that were more like difficult trails at an off-road park, encountered numerous water crossings, muddy ruts, and even snow in the summer at high elevations. A good overlanding vehicle should also be capable of moderate off-roading. Most importantly, know the limitations of you and your vehicle.
Instead of suggesting how to build for off-road, I suggest you check out:
2019-2023 Ford Ranger Off-Road Builders Guide
1983-2011 Ford Ranger Off-Road Builders Guide
These Off-Road Builders Guide provide a deep dive into suspensions, axles, gears, and lockers.
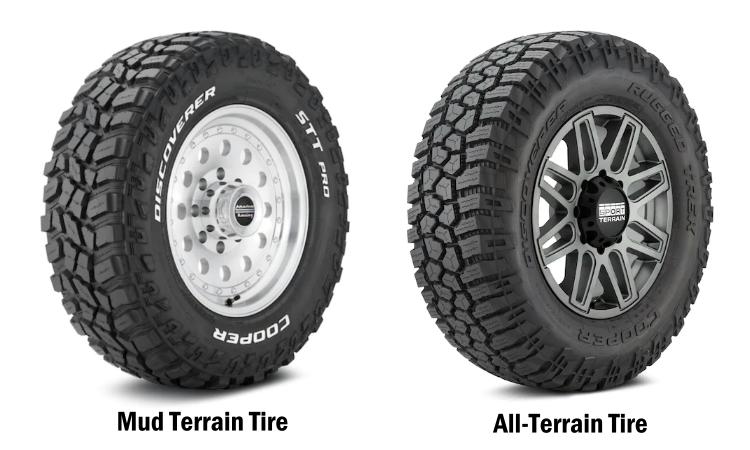
Off-Road Tires
A good tire is important to make sure that your Ranger can get traction on unmaintained roads or trails. I suggest either a good set of all terrain or mud terrain tires. You’ll get more mileage out of a good all terrain than a mud terrain. Many manufacturers now offer a ‘Rugged Terrain’ which is a more aggressive all terrain. Make sure you have a matching full-size spare and a good lug wrench and jack capable of lifting the truck high enough to get the wheel off of the ground. For more information on picking a tire, check out:
Choosing An Off-Road Tire For Your Ford Ranger
Air Compressor / Tire Repair
Speaking of tires, it’s a good idea to have an air compressor or compressed air tank to air your tires up if you aired them down for a rough trail. They’re also nice for inflating air mattresses and blowing the dust out of your trucks air filters after a long day on dusty roads. I personally carry a Smittybilt 5.65 CFM Portable Air Compressor. A tire repair kit is another great thing to have so you can plug a hole in your tire along the trail.
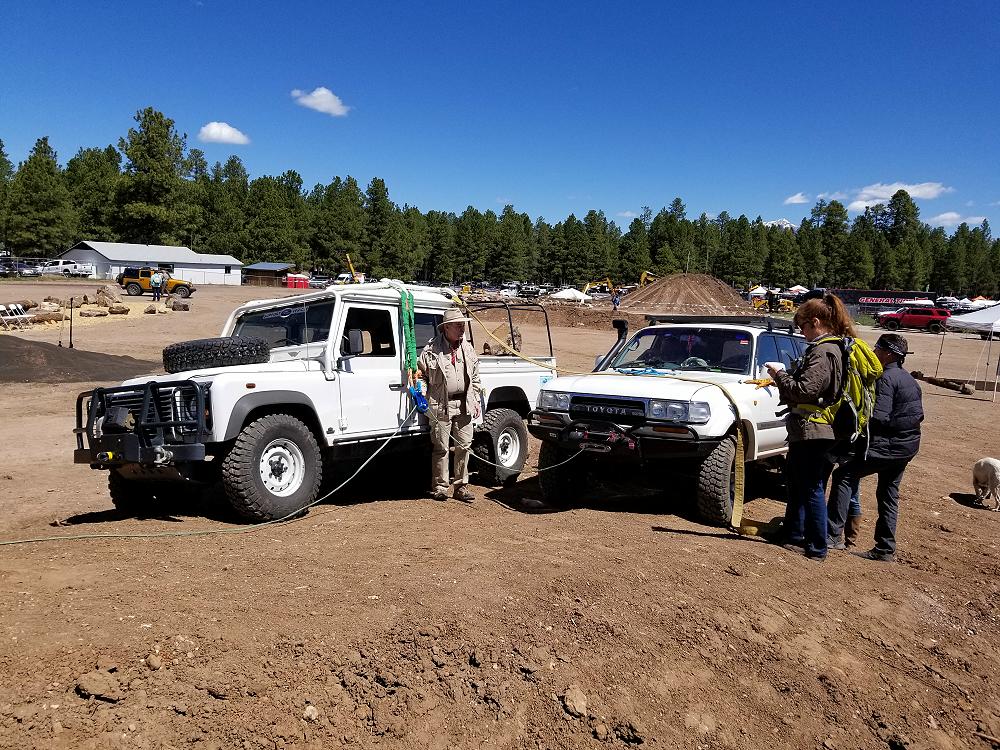
Recovery Gear
You should always be prepared for the possibility that you could get stuck somewhere. This means having frame mounted tow hooks on the front AND rear of your Ranger for someone to connect a tow strap, recovery rope, or winch cable to. With that said, make sure you also have a 20,000 lb. or 30,000 lb. tow strap and two shackles with a Working Load Limit (WLL) that is at least 1.5 to 2 times your vehicle’s Gross Vehicle Weight Rating (GVWR). Don’t expect the person that’s going to rescue you to have an appropriate tow strap and shackles. Traction boards are a good tool to carry as well. A winch is a great investment especially if you’re traveling alone. I’ve used a Smittybilt 9.5K Winch for years and it’s affordable. Don’t overlook a Hi-Lift Jack. A Hi-Lift jack can not only get you unstuck but can also function as a hand winch. Check out: Winching With A HiLift Jack
What Size Winch?
To calculate the required winch size, you take the gross vehicle weight rating (GVWR) and multiply it by 1.5.
- The 2019-2023 Ford Ranger has a GVWR of 6,050 lbs.: 6,050 GVWR x 1.5 = 9,075 lbs. I’d use at least a 9,500 lb. winch.
- The 1983-2011 Ford Ranger can have a GVWR of 4,500-5000 lbs.: 5,000 x 1.5 = 7,500. I’d use at least a 8,000 lb. winch.
For a guide on choosing a winch, recovery gear, and recovery points check out:
Choosing A Winch, Recovery Gear, and Recovery Points
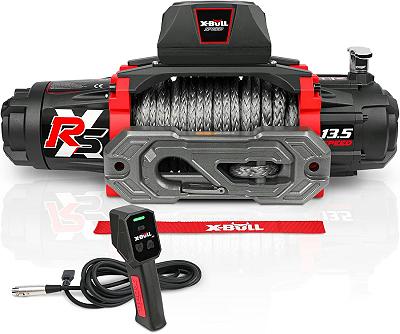
(X-Bull 13,500 WInch With Synthetic Rope)
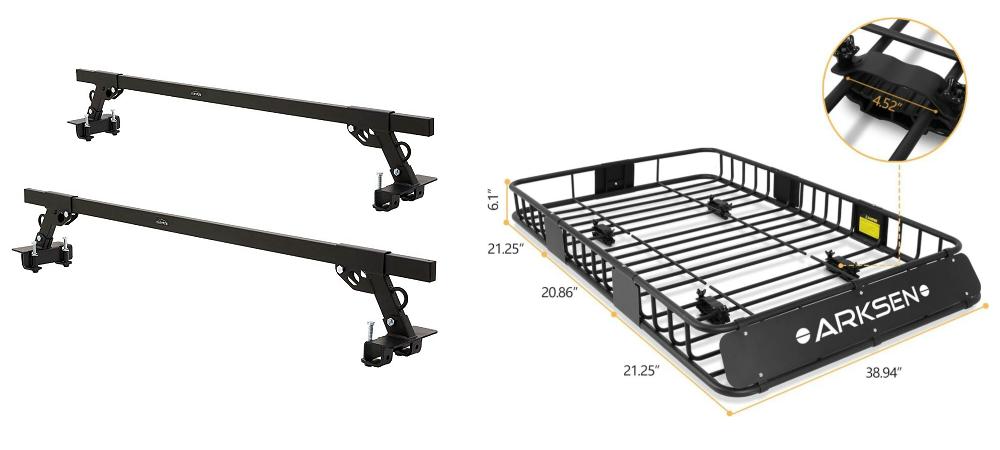
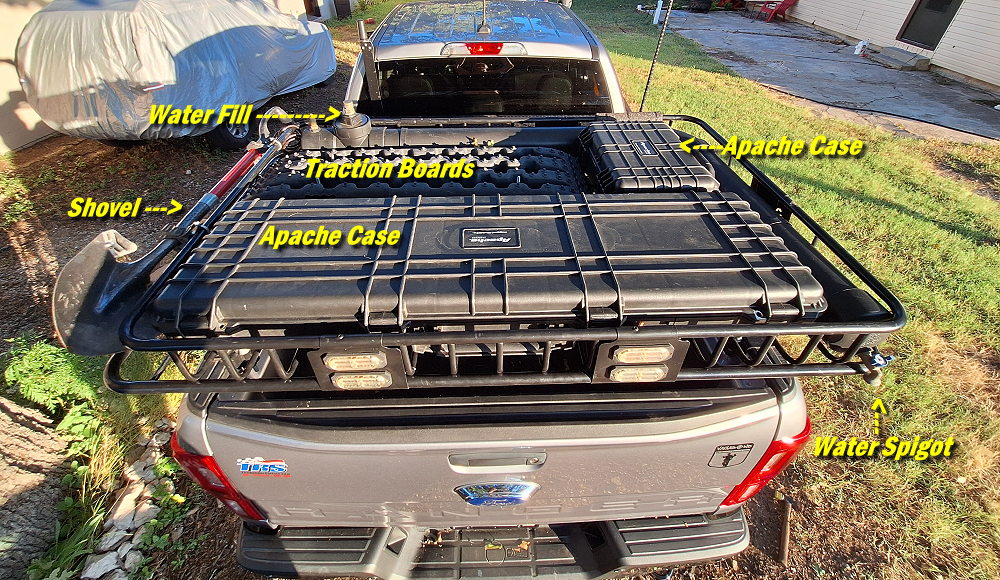
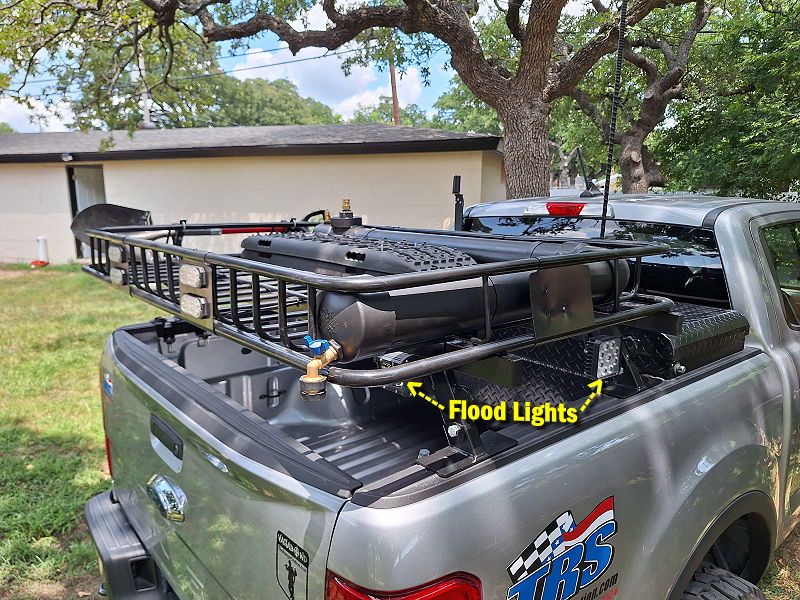
Bed Racks & Roof Racks
A rack over your bed or camper shell will allow you to carry more gear. A bed rack will be necessary if you want to install a roof top tent.
You don’t have to spend a ton of money on a bed rack and basket either. Below are the bed rack and basket on my 2021 Ford Ranger FX4. I spent $300.00 on that setup. I started by buying a set of Elevate Outdoor Truck Bed Crossbars for $150.00, and then an Arksen 64″x39″ Universal Heavy Duty Roof Rack for another $150.00.
I don’t currently use a roof top tent (I have in the past) and instead use the rack to carry 7-gallons of water in a DIY PVC storage container, a shovel, a pair of traction boards, and some weatherproof Apache storage cases from Harbor Freight.
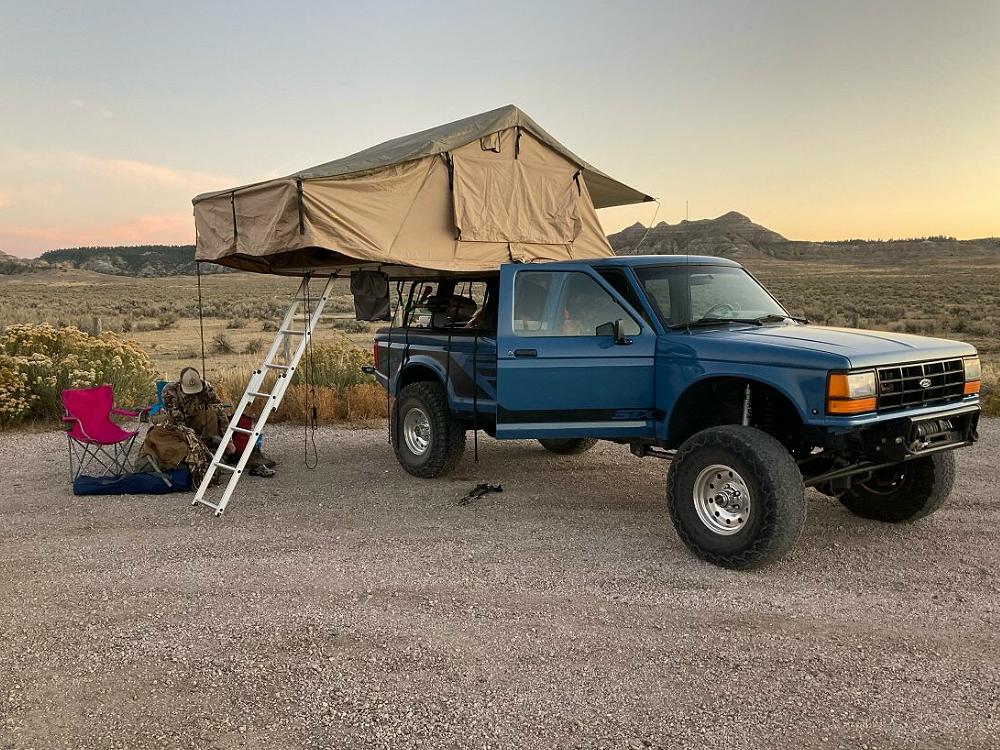
Roof Top Tent & Ground Tents
Roof Top Tent
A roof top tent is great for setting up camp quickly at the end of a long journey. You don’t have to worry about finding a place to set up your tent that’s flat, dry, and free of sticks and rocks, and you’re up off of the ground if it rains. You’re also up off the ground from animals, rodents, and snakes.
The downside is that you can’t use the vehicle when the tent is setup and you can only camp where the truck is parked. A roof top tent usually weighs 100 lbs. or more than a ground tent, adds quite a bit of weight up high on your truck, and may affect fuel mileage if mounted above the cab.
Ground Tent
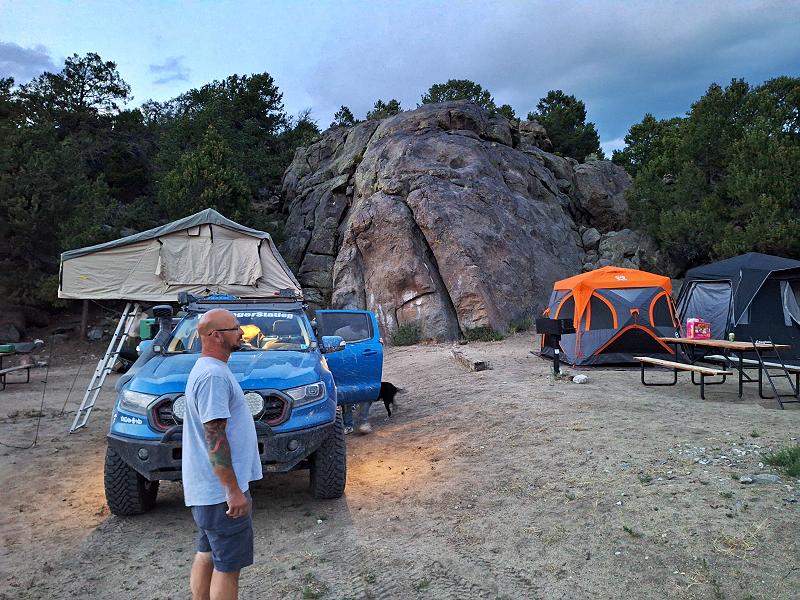
A ground tent will allow you to set up a base camp and still leave your vehicle free to go off and explore in. It also gives you more control over where you camp. On our Colorado trip, a few of us had ground tents and some had roof top tents. Those with roof top tents had to park is designated parking areas in some of the National Forest campgrounds. Those with tents were camped under the trees. Strong winds came through in the middle of the night and the trees helped break up the winds. Trees can also act as an umbrella. Those with roof top tents were in open spaces unprotected by the trees and took the brunt of those winds.
The Gazelle T4 has become a very popular tent. It’s a rugged tent with built in poles that allows you to put it up and take it down quickly. It has a 210 denier Oxford weave polyester shell and a 300 denier Oxford weave polyester floor. It’s 94″ x 94″ x 78″ tall setup, but it’s 67.5″ long when packed up. It has a packed weight of 30 lbs.
I recently got a Caddis RapidTent. It has a 190-denier polyester shell with a 210-denier polyester floor and is 96″ x 96″ x 72″ setup but only 50″ long when packed up. It has a packed weight of 20 lbs. 8 oz. My concern was the amount of space the Gazelle T4 tent was going to take up in my bed and that it was going to be too long to fit in the basket on my bed rack.
The Gazelle is definitely the better tent if you have the room to carry it, but the Caddis was a better fit for the space I had and I like its light weight.
Another point of consideration as that the Gazelle and RapidTent are $300.00 tents where a good roof top tent is going to cost you over $1,000.00. Don’t be discouraged though. If you check your local Facebook marketplace, you’ll likely find some used roof top tents for sale. I’ve seen people sell lightly used ones for as little as $650.00.
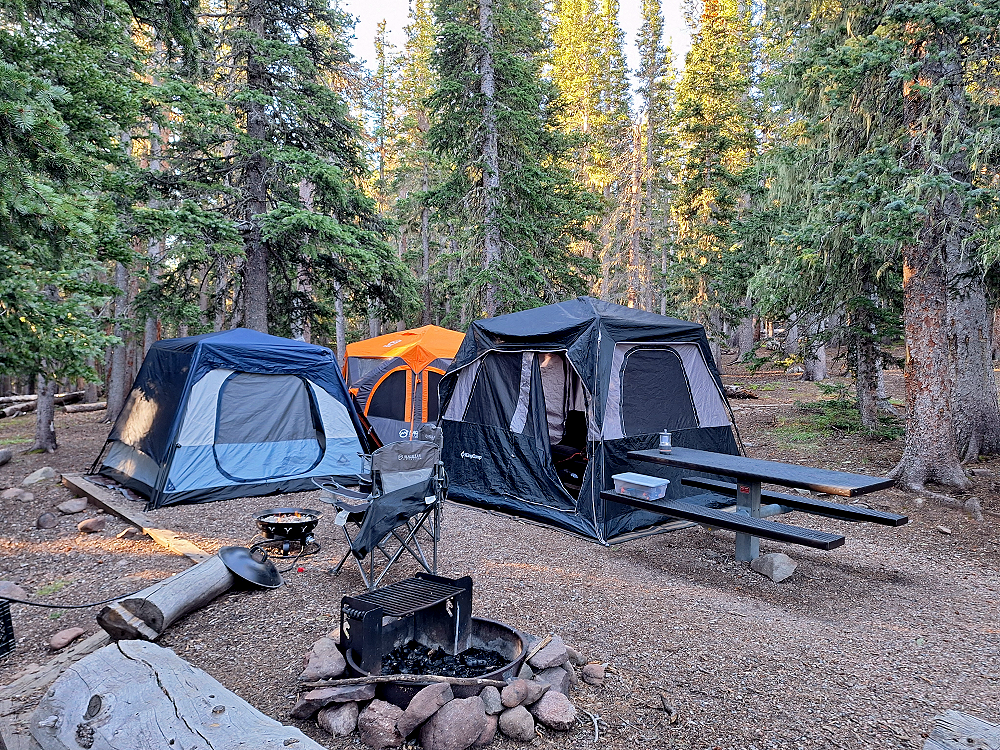
Camping together in Colorado under the shelter of the trees
Roof Top Tent vs Ground Tent
To get more insight into the pros and cons between them as well as a deeper look into the different styles of roof top tents, check out:
Should You Use a Ground Tent or Rooftop Tent?
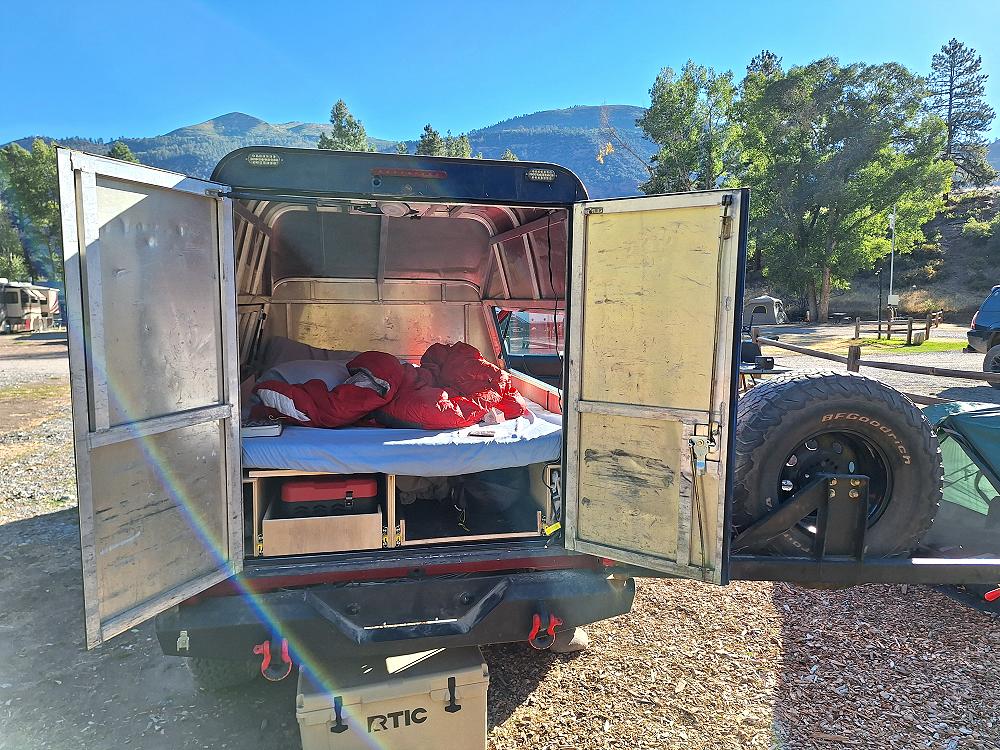
Camper Shell / Sleeping Platform
I really like the idea of a camper shell and a sleeping platform. Typically, the platform would be level across the bed with storage under it. In the 2001 Ford Ranger Overlander below, the owner lowered his sleeping area to the floor and added storage along the side of the bed. He stated that when the platform was higher, he felt like he was in a coffin.

In the next example this 2003 Ford Ranger Overlander uses a Leer Commercial Cap and built a sleeping platform with a slide out drawer and storage underneath. An RV style vent with a fan was added to the roof for more ventilation. If you worry about getting eaten by a bear in the woods (don’t take food into your tent) then this should definitely make you feel more secure.
Auxiliary Lighting
You’re going to find yourself setting up camp and cooking dinner in the dark. You may even find yourself stuck on a trail in the dark. Be prepared for it. You will probably find yourself on a forest road after dark even though you didn’t plan on it. Sometimes it can take longer to traverse a section of road or trail than you think, and you find yourself still on the trail after the sun sets. I have experienced all of these things, and I will tell you that it gets really dark in a forest at night. This is when you really appreciate a good quality light.
Ditch Lights
Ditch lights are the lights you see people put up by their windshield posts. They’re supposed to point off towards the sides to light up the edges of the road, or the ‘ditches’. I did that once. I hated it. The light reflects off of the hood and becomes annoying after a while. My ditch lights are now mounted on the sides of my grill guard.
I DO NOT mount any lights above the roof or hood. Not just because of glare, but also because they will sometimes whistle in the wind.
Forward Facing Off-Road Light(s)
There was a time when people use to mount a pair of 100-watt 6-inch halogen off-road lights on the front of their rig. Those that really knew what they were doing mounted one spot, and one flood light. You chose how bright of a light you had based on its ‘watts’.
Today the halogen off-road light has been replaced with a LED light. These lights usually come as a spot / flood combo and put out a much brighter light (lumens) while using a fraction of the watts.
I like to use either an LED lightbar or a pair of round LED off-road lights. It’s nice to be able to flood the entire area in front of you with light when you find yourself on a rough trail at night. The 30-Inch LED bar on my grill guard puts out 24,800 lumens of light and is extremely bright.
For more information on watts, lumens, and choosing an off-road light, check out:
How To Choose An Off-Road Light
Fog Lights
I have a pair of fog lights on the front of my truck, but not for fog. I use them on dusty or wooded trails to help off-road vehicles spot me coming from the other direction.
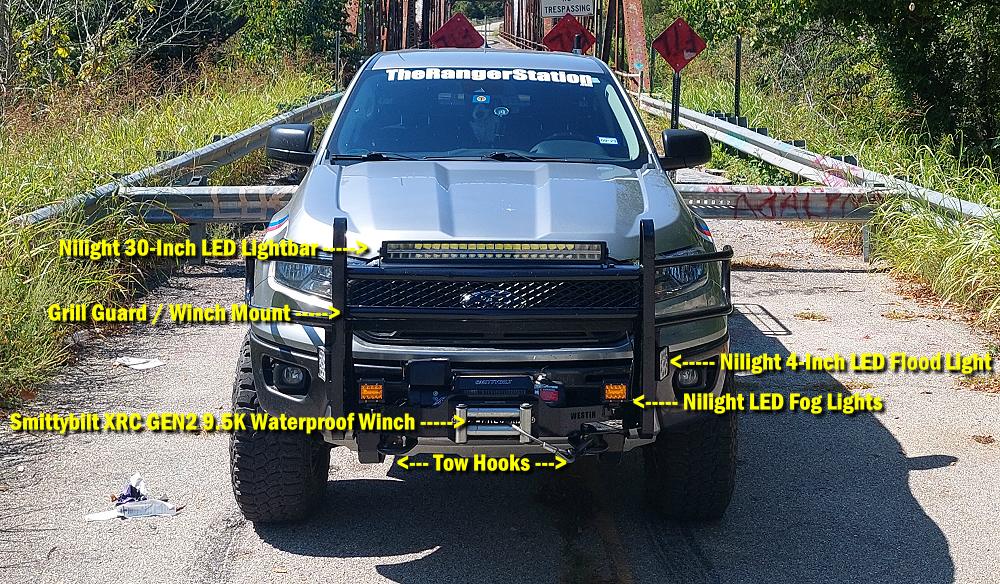
Above you’ll see:
- Nilight 30-Inch LED Lightbar (LINK)
- Nilight 4-Inch LED Flood Lights (LINK)
- Nilight LED Fog Lights (LINK)
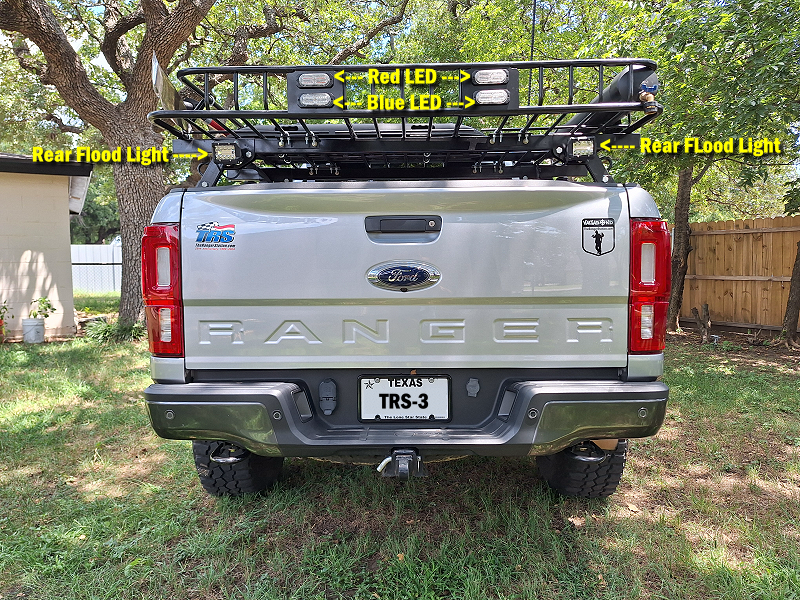
Rear Flood Lights
Rear flood lights are handy when you’re setting up camp at night, backing up on a dark trail, or repairing or recovering a vehicle in the dark. These are controlled by a dash mounted switch and can still be used when the truck is off.
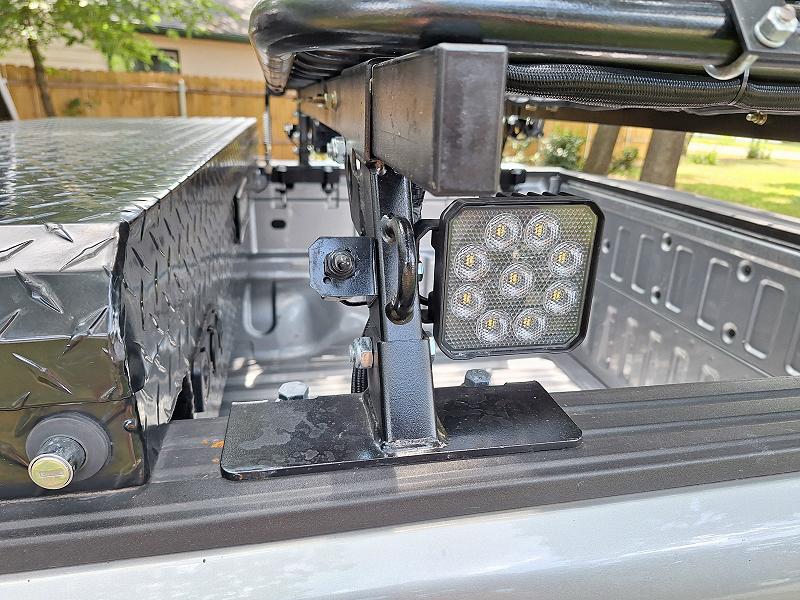
Side Flood Lights
I have a LED flood light on both sides of the bed rack to light up the area to the side of the truck. The lights are controlled by a waterproof toggle switch mounted next to the light. I’ve used these while setting up camp in the dark. They’re also useful if you need to light up something along the side of the road or trail at night.
Red / Blue LEDs on The Rear
This doesn’t have much to do with setting up for overlanding, but I figured I’d address it if anyone is wondering. The red LEDs are connected to the brake lights since the rack can block the third brake light on the cab. The blue LEDs are to help people spot the truck when they come up behind it in a dusty off-road park.
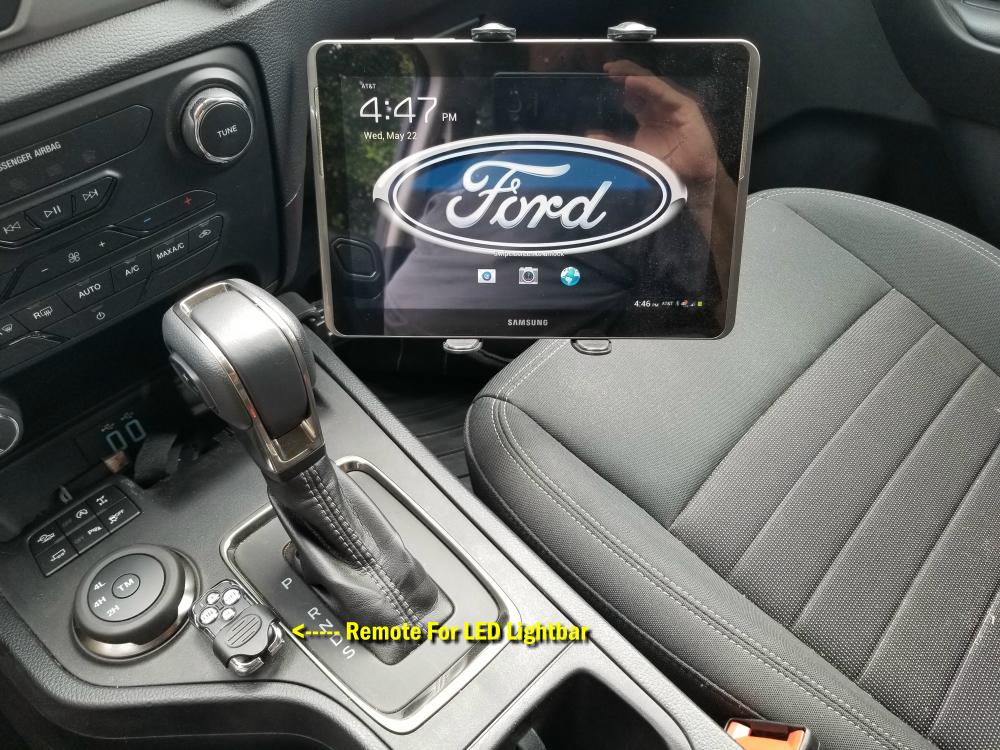
HELPFUL TIP: Get a wiring harness for your LED lights that also includes a remote (See HERE). The remote allows me to turn the lights on and off while I’m outside of the truck. This can be a nice feature if you hear something moving around outside of your tent at night. A remote also enables you to add lights without having to run any wires and switches into your cab if you don’t want to.
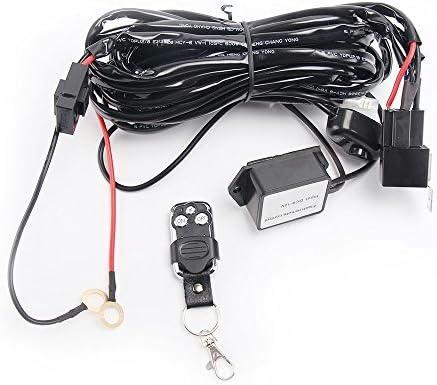
When Ford loaned me the ‘Loan Ranger’ I used one of these harnesses to operate the lightbar I mounted above the front bumper and used Velcro to mount the remote onto the center console. When I wanted to turn on the light, I just pushed the button on the remote.
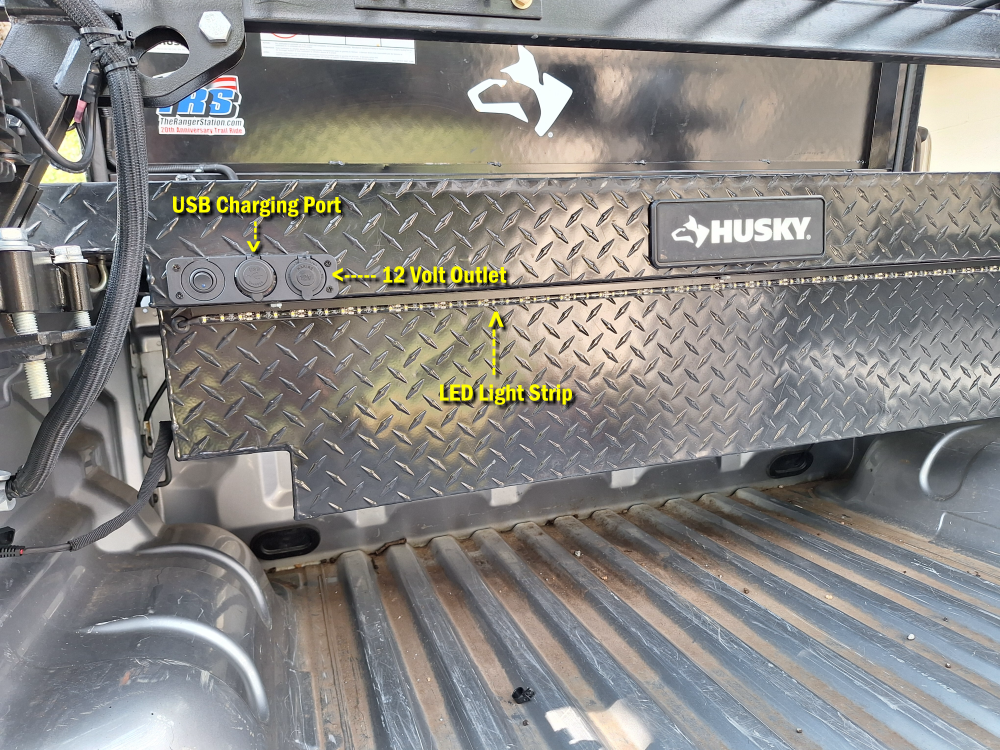
Auxiliary Power Outlet In Your Bed
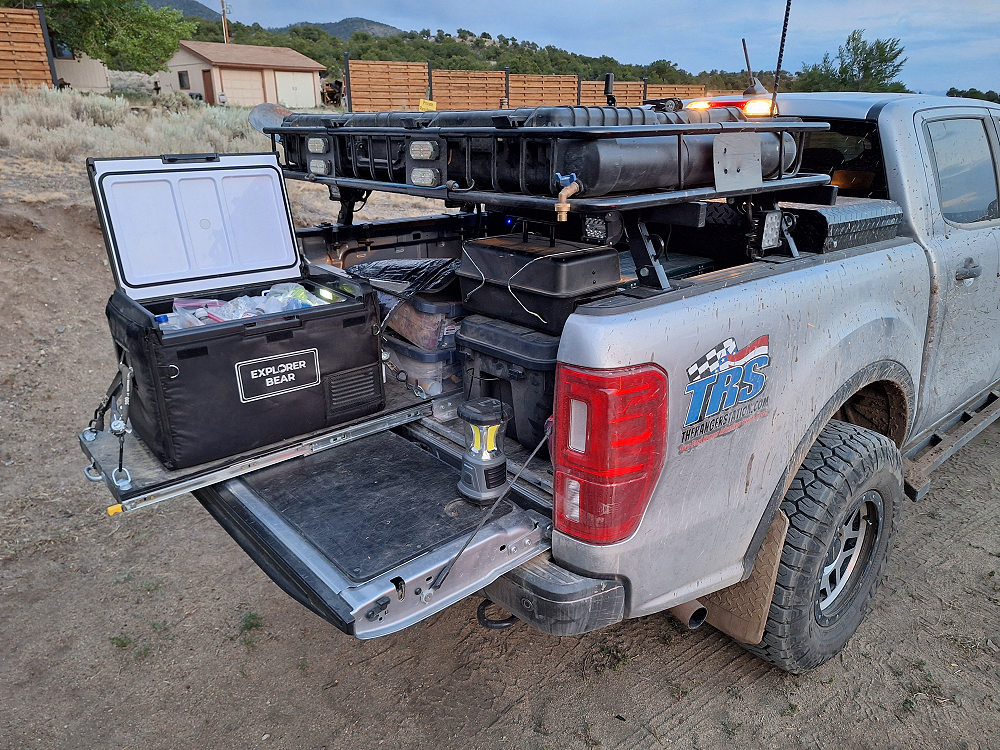
Consider adding an auxiliary power outlet in your bed. If you use a 12V refrigerator, you’ll need it. Otherwise, it’s just nice to have a place to plug things into while camping with having to enter the truck.
I purchased this 12V Outlet / USB Outlet / On-Off Switch Combination from Amazon for less than $15.00. The USB actually has dual 3.0 quick chargers, and the on-off switch allows me to turn the power off to the outlets when I’m not using them. I mounted it to the face of my toolbox so I wouldn’t have to worry about it being blocked by the camping gear loaded in the bed.
Check out: Adding a 12V Power Point to the Bed of A 2019-2023 Ford Ranger
Extra Battery
In 2025 I added a 100 AH lithium battery to my toolbox and use a DC-DC charger to charge it. I set up the outlet (see above) with a switch that lets me switch between the truck’s main battery, and this auxiliary battery. While driving the outlet is set on the main battery. Once I set up camp, I switch the outlet to the auxiliary battery so that my fridge is running off of it instead. This battery will easily power my 12V fridge for an entire weekend.
Check out: Adding An Auxiliary Battery To A 2019+ Newer Ford Ranger

Communications
If you plan to overland with other people, trail communications are a vital tool.
CB Radio use to be the go-to radio for communications off-road. Today GMRS (General Mobile Radio Service) and 2-Meter ham radios have become extremely popular. You’ll need a license to operate a ham radio which requires that you pass a test. GMRS requires a license but it’s only a fee, there’s no test. Another nice thing about GMRS is that you can get portable radios (walkie-talkies) at a pretty reasonable cost that makes communicating with spotters and other people outside of the vehicle much easier. Check out:
GMRS Dash Install 2019-2023 Ford Ranger
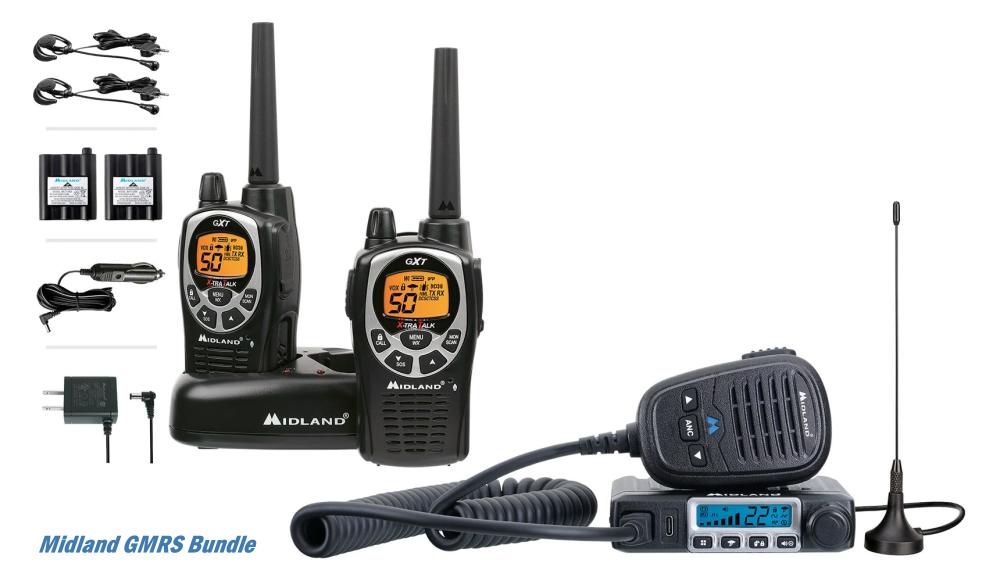
GMRS Mobile and Handheld Radios
GPS Navigation Apps
You’re going to need a good GPS navigation app like GAIA GPS or ONX OFFROAD. There are a lot of overlanding routes out there, but to find them you’ll need a good GPS app for your phone or tablet. I would recommend a tablet so that your phone is free if you need it. When you decide on an adventure, you can go online and get the GPS tracks to load into your GPS app. There are numerous websites and Facebook groups out there that will have GPX files that you can download into your GPS app to navigate these adventures.
In the photo below you’ll see that even though I have the factory navigation in the dash, I have GPS app loaded on a tablet. It’s hard to see, but there is a red triangle near the highest point on that blue line that represents my vehicle / location. All I have to do is follow that blue line. This photo was taken when I was navigating the Trans America Trail.
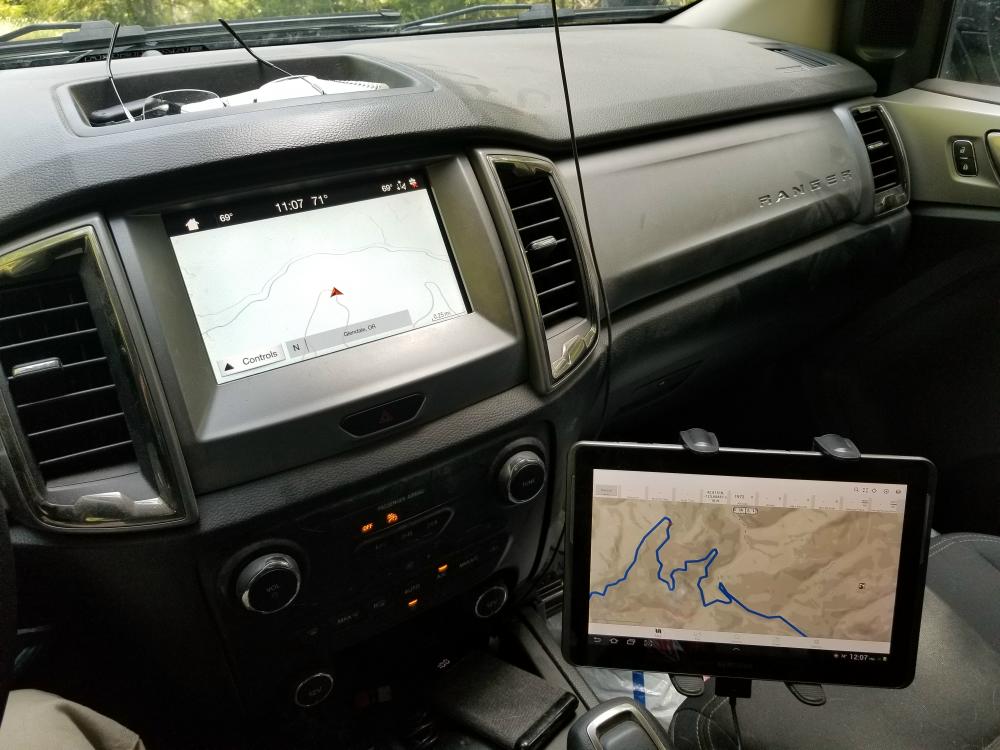
A GPS app can also help you discover trails. Google Maps might show you that something is a road, but a good GPS app like GAIA GPS or ONX OFFROAD will show you whether it’s actually a road, or a two-track trail.
Carrying Extra Fuel
Everyone thinks you need to carry extra fuel to be an overlander. I carried an extra 5-gallons when I did the Trans America Trail and never needed it. I found myself in some remote areas with long stretches in between towns, but every time I got to a town, I topped off my fuel tank. Having a few extra gallons is nice insurance, but don’t get carried away. 5-gallons of gas weighs 30.5 lbs. When we did our Colorado trip, we topped off our tank in Salida, Colorado. I didn’t want to take a chance on getting to Lake City and not being able to get gas or having to pay a lot since it’s so remote. From Salida, we crossed Marshall Pass, Las Pinos Pass, Cebolla Creek Road, Cinnamon Pass, Hurricane Pass, Corkscrew Gulch, and didn’t get fuel again until Ouray, Colorado.
I’m not saying you shouldn’t carry extra fuel. I think it depends on the trip and how often you’ll be passing through an area with a gas station and whether you trust that the gas station will be open when you get there.
When I do carry fuel, I carry it in a 5-gallon Scepter gas can secured inside of my bed.
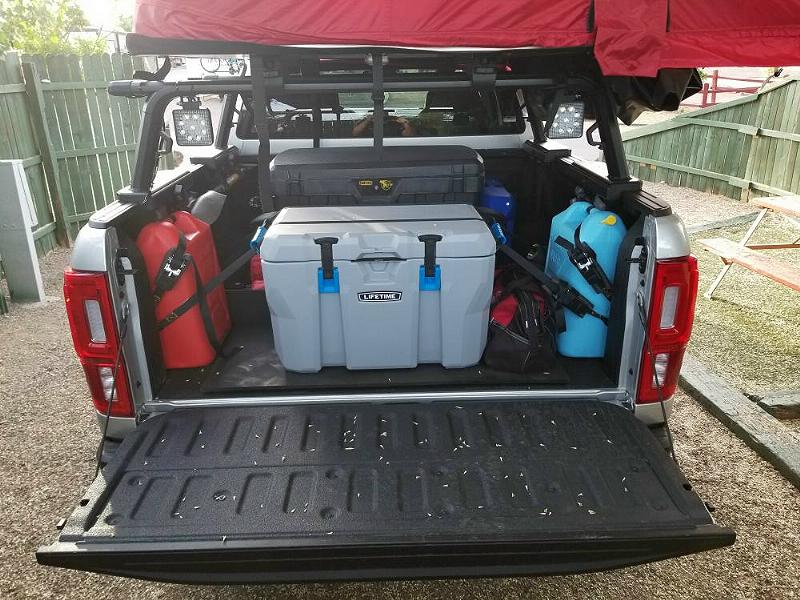
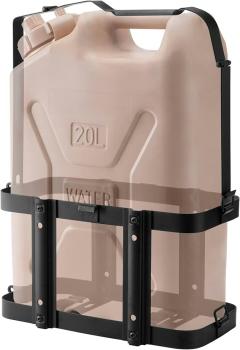
Carrying Water
Water is one thing you can’t go very long without. I carry at least 6-gallons with me on my adventures. For general camping, a standard rule of thumb is to carry 1 to 2 gallons of water per person per day to cover drinking, cooking, and light cleaning.
Below you can see how I secure my 6-gallon Igloo water jug in the bed of the Ranger.
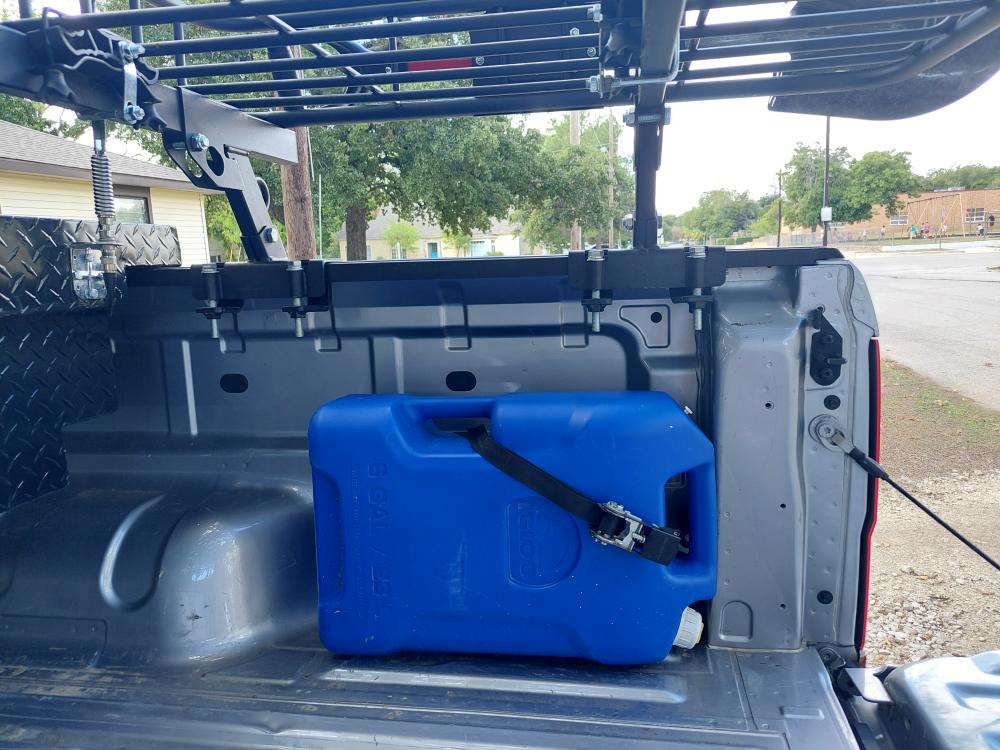
I secure them with the factory tie-downs and a ratchet strap.
You may want to invest in a Jerry Can holder. If you want to use the Rotopax style cans you can get mounts for those as well.
Cooler
You’re going to need a cooler or a 12-volt fridge for any food products that need refrigerated. Make sure that whatever you keep your food in is bear proof if you’re going to be camping anywhere there may be bears. I have used a Lifetime 55-Quart Cooler for my refrigerated items. I freeze a few water bottles to help keep it cold and make the ice last longer and marinate and freeze any meats that I know I won’t be using for a few days. You do plan your meals, right?
For 2025 I upgraded to an Explorer Bear 12V refrigerator and I love it! I no longer have to worry about topping off my cooler with ice when I’m out for for a week or more. See more on my fridge at: Explorer Bear 42-Quart Fridge Review
Food Storage
Make sure you don’t store any food in your tent or leave any open food in your truck. Keep your food in secure storage containers.
Fire Awareness
Be aware of any fire restrictions. A fire restriction is a temporary ban on open flames, especially recurrent when there are drought conditions. This means no campfires, open fires, or barbeques, regardless of whether or not you are in a commercial campground. However, burn bans can mean different things depending on the location. It could mean no wood-burning, no open flame, no charcoal burning, no bio-fuel stoves, or others, so it is best to check in with local authorities or do your research before heading to the area.
Stage 1, Stage 2, and Stage 3 fire restrictions are implemented due to fire danger and the risk of catastrophic wildfire.
Stage 1 (High):
Designated Campgrounds: Wood and charcoal fires (including wood-burning stoves) are prohibited in South Fork Campground. All fires and stoves are allowed in all other campgrounds.
Wilderness: Wood and charcoal fires (including wood-burning stoves) are prohibited below 6,000 feet. Year-round elevation/site-specific wilderness fire restrictions also apply. Refer to the Minimum Impact Restrictions. Gas, propane, alcohol (with and without a shutoff valve) and tablet/cube stoves are permitted.
Stage 2 (Very High):
Designated Campgrounds: Wood and charcoal fires (including wood-burning stoves) are prohibited. Gas propane, alcohol (with and without a shutoff valve) and tablet/cube stoves are permitted.
Wilderness: Wood and charcoal fires (including wood-burning stoves) are prohibited below 6,000 feet. Year-round elevation/site-specific wilderness fire restrictions also apply. Refer to the Minimum Impact Restrictions. Gas, propane, alcohol (with and without a shutoff valve) and tablet/cube stoves are permitted.
Stage 3 (Extreme):
Designated Campgrounds: Wood and charcoal fires (including wood-burning stoves) are prohibited at all campgrounds. Gas, propane, alcohol (with and without a shutoff valve) and tablet/cube stoves are permitted.
Wilderness: Wood and charcoal fires (including wood-burning stoves) are prohibited at all elevations. Gas, propane, alcohol (with and without a shutoff valve) and tablet/cube stoves are permitted.
Propane Fire Pits
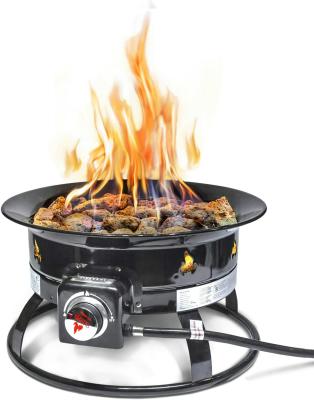
Many overlanders use a propane fire pit and propane stove instead of wood and charcoal fires based on the information above. These fires are easily extinguished do to their shut off valve and don’t render sparks like a wood fire which could lead to a forest fire.
Get Trained
Overland Expo is not only an excellent event to see what’s new and what’s happening in the overlanding world, but they also offer classes that can help those that are new to off-roading as well as experienced off-roaders. In fact, Overland Expo offers over 175 classes.
You can learn advanced winch techniques:
How to pick a line and be a spotter (I jokingly called this class ‘Relationship Building’ because there were a lot of married couples)

And so much more.
More Inspiration
Want to learn more about the Ranger below and see other overlanding Ford Rangers, check out our Overlanding Ford Ranger Featured Vehicles.
About The Author
Jim Oaks is the founder of TheRangerStation.com, the longest-running Ford Ranger resource online since 1999. With over 25 years of hands-on experience building and modifying Ford Rangers — including magazine-featured builds like Project Transformer — Jim has become one of the most trusted authorities in the Ford Ranger off-road and enthusiast space.
Since launching TheRangerStation.com, Jim has documented thousands of real-world Ranger builds, technical repairs, drivetrain swaps, suspension modifications, and off-road adventures contributed by owners worldwide. TheRangerStation.com has been referenced in print, video and online by enthusiasts, mechanics, and off-road builders looking for practical, and experience-based information.