
Introduction
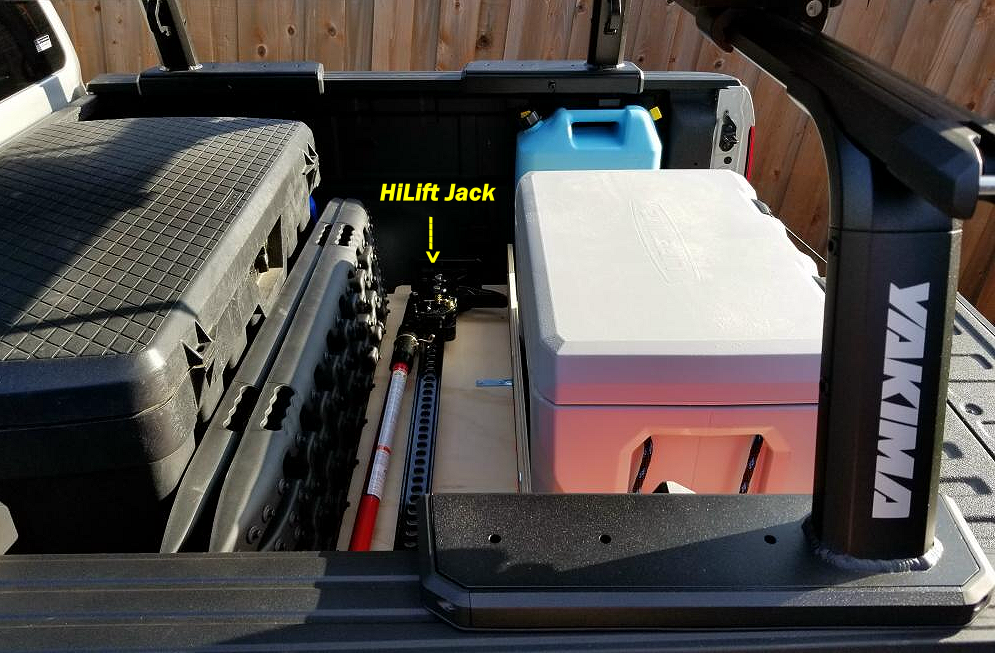
When I did the Trans America Trail in 2019 with the 2019 Ford Ranger FX4 that Ford loaned me (Loan Ranger) I wasn’t able to add a winch to it, so I mounted a Hi-Lift jack in the bed. Not only is the Hi-Lift capable of lifting the truck up, but it can also serve as a winch. I’ve actually used one to hand-winch a Ford Ranger once.

Hi-Lift’s Jack Instructions
Hi-Lift actually includes instructions for using the Hi-Lift jack to winch in their Instruction Manual.
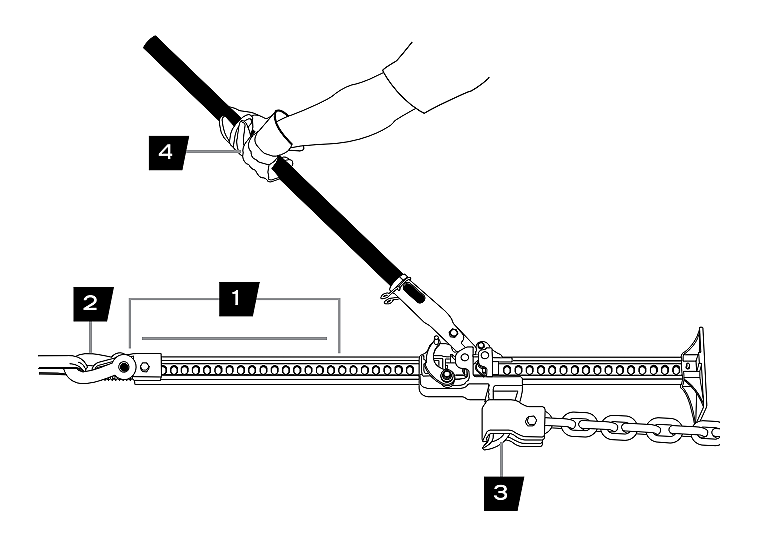
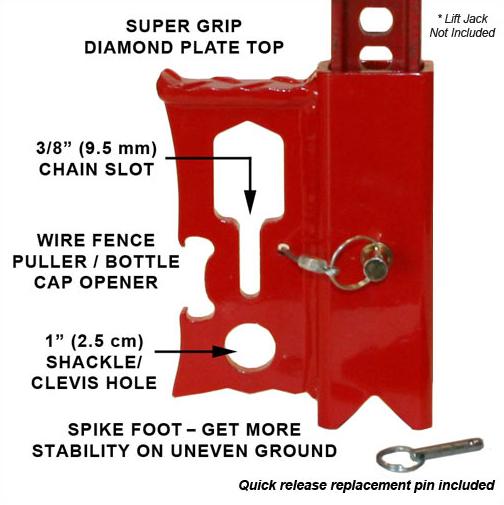
Step 1. Make sure the top clamp-clevis is in line with the steel standard bar.
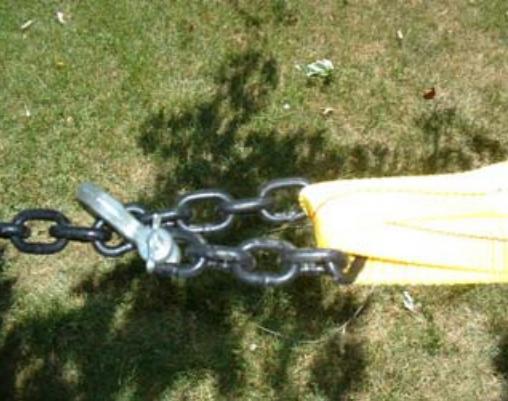
Step 2. Install one end of a chain or tow strap securely to the object to be winched. Securely attach the other end of the chain or tow strap to the top clamp-clevis of the jack.
NOTE: Use a shackle if the chain or tow strap will not fit through the top clamp-clevis of the jack.
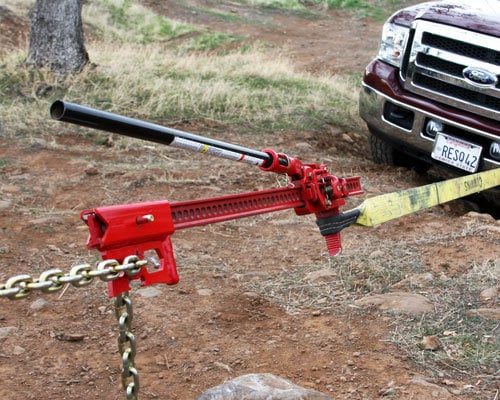
Step 3. Take another chain or tow strap and secure one end to a fixed, stable object. Attach the other end of the chain or tow strap to the large runner on the jack (do not attach chain or shackle to bottom hole of the large runner on the jack). If the fixed object is a tree, follow “Tread Lightly” principles and use a tree strap.
Step 4. Operate the jack as you would for raising a load.
Hi-Lift Jack Off-Road Kit Instructions
Hi-Lift also gives ‘Winching Steps’ in their Off-Road Kit Instructions.
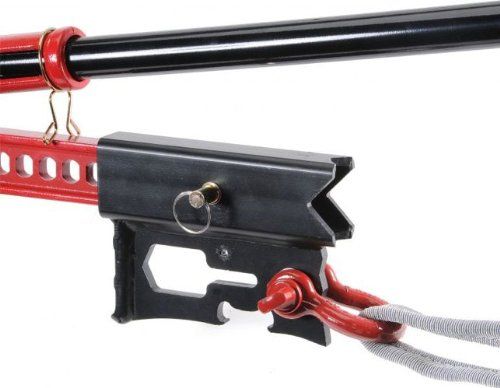
Step 1: Remove foot-piece cotter pin and foot-piece. Attach Winch Tensioner using 1/2″ Bolt and Nut. Re-attach foot-piece using included quick release pull pin (for easier removal of the foot-piece). *Reaming the hole in the foot-piece may be required using a 1/4″ drill bit.
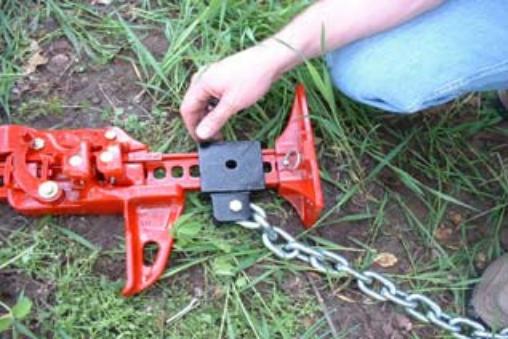
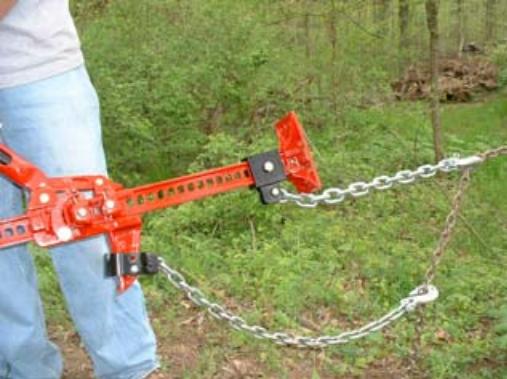
Step 2: Attach Winch Jack Attachment Bracket over the Hi-Lift Jack lifting nose. Secure using 5/16” Bolt and Nut.
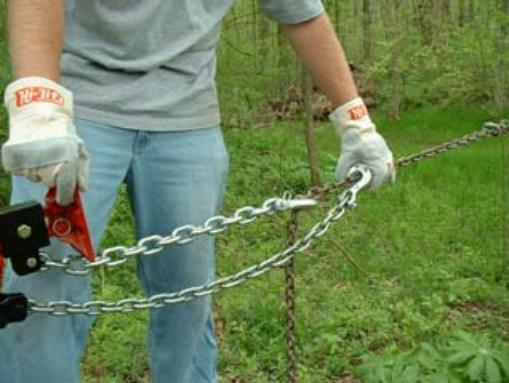
Step 3: Wrap the Tree Strap around the stable/sturdy tree or stationary object. Bring both of the looped ends of the tree strap together. Pull your 3/8” chain (not included) through the two loops of the Tree Strap and secure the 3/8” chain to itself (Grab Hook suggested). Always use Tread Lightly principles when winching off-road.
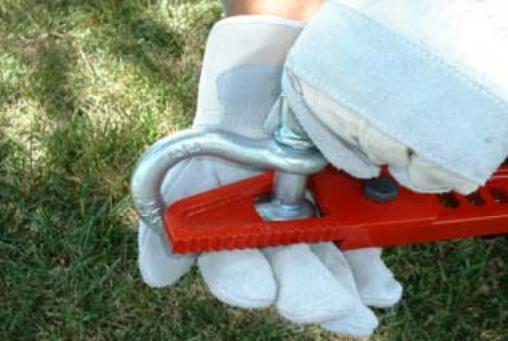
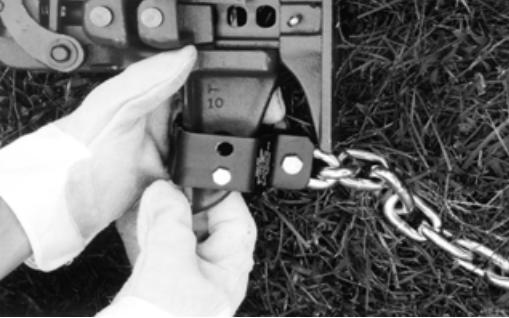
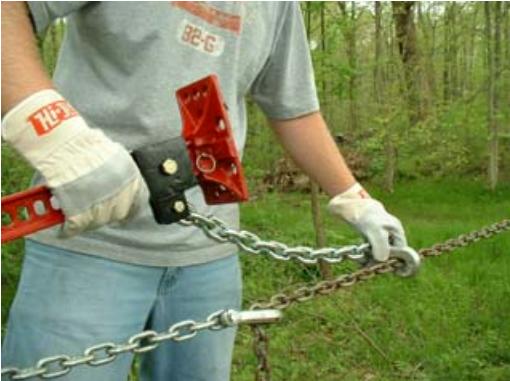
Step 4: Ensure that the Hi-Lift Jack Top-Clamp is in line with the Hi-Lift Jack Steel Bar before attaching the D-Ring Shackle. Place the D-Ring Shackle through the Hi-Lift Top-Clamp and secure it with the D-Ring Shackle Bolt.
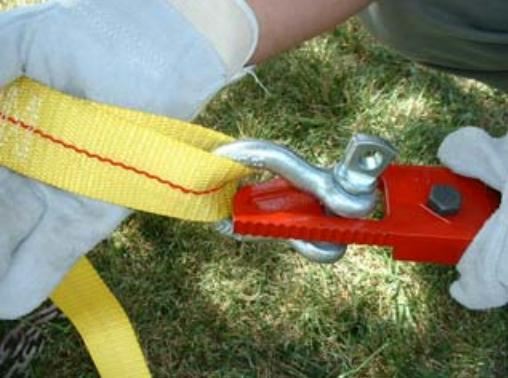
Step 5: Attach one end of your 3/8” chain or tow strap (not included) to the vehicle to be winched. Slip the opposite end of your chain/tow strap through the D-Ring Shackle and secure.
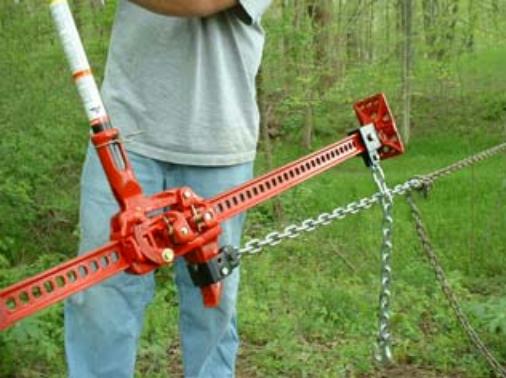
Step 6: Attach the Winch Jack Attachment Bracket to the 3/8” chain (not included) securing with the Winch Jack Attachment Bracket Grab Hook. You can tighten the rigging by “choking” the chain (shortening it) and connecting the hook to an appropriate link.
Step 7: With all the pieces attached/secured and the Hi-Lift Jack Reversing Latch in the “up” position, begin operating the Hi-Lift Jack Handle. This will begin tightening the chains/tow straps and winch the vehicle. Continue winching the full length of the Hi-Lift Jack Steel Bar (one full winching cycle).
Step 8: Attach Winch Tensioner Grab Hook to the 3/8” chain beyond the Winch Jack Attachment Grab Hook.
Step 9: Reverse the Hi-Lift Jack Reversing Latch to remove tension from the Winch Jack Attachment… transferring the tension to the Winch Tensioner. Return the Hi-Lift® Jack Running Gear toward the base of the Hi-Lift Jack. The full tension is now on the Winch Tensioner.
Step 10: Re-attach the Winch Jack Attachment Grab Hook beyond the Winch Tensioner Grab Hook. Reverse the Hi-Lift Jack Reversing Latch to begin winching cycle again. This removes the tension from the Winch Tensioner transferring it back to the Winch Jack Attachment.
Steps 7 through 10 may need repeated several times before vehicle recovery is complete. Once out, go back and repair the trail damage, replace the rocks and log pieces off the trail.
Operational Safety Information
WARNING! The working load of each chain, tow strap, or attachment device must be greater than the winching strength of the Hi-Lift Jack (5,000 lbs.). If a chain or tow strap breaks while winching, the load could shift or the chain or tow strap could snap back. When used as a winch, the Top-Clamp will support up to 5000 lbs. (2273 kg). If you go over this limit, the Top-Clamp could bend or break, causing the load to shift or the chain or tow strap to snap back. If that occurs, it could result in damage, injury or even death.
Maintain and operate Hi-Lift Jack per instructions provided with it. If you do not have a copy of the Hi-Lift Jack instructions, please visit our website at www.hi-lift.com to view/download a copy of the instructions, or call 1-800-233-2051.
• Always inspect winch equipment and Hi-Lift® Jack before performing any operations to insure safe condition.
• The vehicle will begin to move as you jack/winch. Be careful it doesn’t roll over you and watch closely the tires and steering, keeping it aligned to where you want to go.
• Always chock vehicle when jack and winch equipment are under load.
• When winching vehicle keep everyone at a safe working distance from the equipment & vehicle.
• All user supplied equipment must MEET or EXCEED Hi-Lift Jack rated capacity (4660 lbs/2267 kg).
• Winch Jack Attachment capacity: 5000 lbs/2273 kg
• 2-inch Nylon Tree Strap capacity: 5000 lbs/2273 kg
Accessories
HiLift Off-Road Kit:
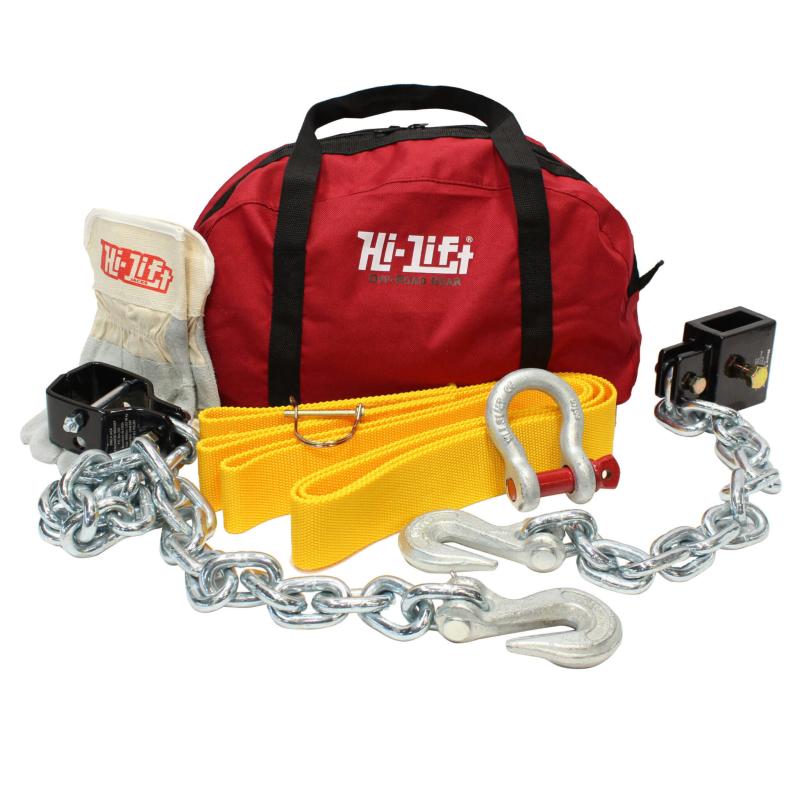
The Hi-Lift® Off-Road Kit provides several items that make winching with a Hi-Lift® Jack simpler and more efficient. Use the Off-Road Kit to turn your Hi-Lift Jack into a winch and make it even more versatile! This kit keeps all of the needed parts for winching at arms reach.
(Depending on each individual situation, some additional items may be needed for winching.)
Download HiLift Jack Instructions (PDF)
Download Off-Road Kit Instructions (PDF)
Off-Road Kit Includes:
- 1 ea. Winch Jack Attachment Bracket
- 1 ea. Winch Tensioner Attachment Bracket
- 2 ea. 3/8” Grab Hook w/ Clevis Pin
- 1 ea. 3/8” G40 Chain (26-link)
- 1 ea. 3/8” G40 Chain (15-link)
- 1 ea. ½” Bolt and Nut
- 1 ea. Quick Release Pin (Replaces cotter pin that secures Hi-Lift Jack base plate)
- 1 ea. 5/8” D-Ring Shackle
- 1 ea. 2” Nylon Tree Strap (8’ length)
- 1 ea. 5/16” Bolt and Nut
- 2 ea. 3/8” Bolt and Nut
- 1 pr. Hi-Lift® Gloves
- 1 ea. Hi-Lift® Gear Bag
Items Not Included in Off-Road Kit: 3/8” Chain with Holding Hooks (Approx 25 ft.)
Rescue42 JackMate:
I have one of these JackMate’s in my off-road recovery gear so I can use my HiLift as a jack if I need to.
Rescue42 JackMate at 4WheelParts
Video
Related Articles
What Most People Don’t Know About Winching
Last Updated:
About The Author
Jim Oaks is the founder of TheRangerStation.com, the longest-running Ford Ranger resource online since 1999. With over 25 years of hands-on experience building and modifying Ford Rangers — including magazine-featured builds like Project Transformer — Jim has become one of the most trusted authorities in the Ford Ranger off-road and enthusiast space.
Since launching TheRangerStation.com, Jim has documented thousands of real-world Ranger builds, technical repairs, drivetrain swaps, suspension modifications, and off-road adventures contributed by owners worldwide. TheRangerStation.com has been referenced in print, video and online by enthusiasts, mechanics, and off-road builders looking for practical, and experience-based information.