Skyjacker 3.5-Inch Lift kit Installation / Strut:
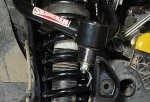
Once the strut is removed you have to mark the pieces of the assembly with a paint pen to make sure they all line up when it goes back together.
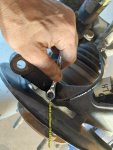
Then compress the coil spring with a strut spring compressor to relieve the tension from the strut top. I stuck it in my vice to make disassembly and reassembly easier.
You can see that with the strut spring off I marked an alignment mark before removing the lower spring seat.
With all of the parts removed I installed the
Skyjacker Strut Ring Spacer and then began reassembling the strut.
Making sure all of the alignment marks line up when reassembling.
I like that the Skyjacker spacer has studs welded into it where-as some kits require you to install the studs and pull them through tight when you tighten the nuts down.
Below you can see the new strut spacer sitting on the strut. Since there are (3) studs and they have to be opposite of the factory studs to be able to sit on the strut, this will mean that the strut will be positioned backwards from its original position when installed.
Here's the strut spacer installed. I ended up using a ratchet strap going under the strut with the hooks up on the spacer to pull it down enough to get the center nut started.
Skyjacker 3.5-Inch Lift kit Installation / Upper Control Arm:
Time to remove the upper control arm. Remove the upper control arm from the frame using an 18mm socket \ wrench and a 21mm socket \ wrench.
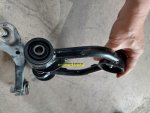
The factory upper control arm is replaced with this
Skyjacker beefy control arm made from steel tubing. Note the welded gusset for added support.
Install the new upper control arm with the factory hardware. Do not tighten it until the lift kit is installed and the truck is sitting on the ground with the full weight of the vehicle on it.
Install the upper strut mount and secure it with the new nuts using a 15mm wrench
Install the lower strut mount with the factory nuts and an 18mm wrench / socket.
Re-installed the steering knuckle while making sure I guided the axle through the hub.
When installing the upper ball joint you have to use the extra thick spacer that comes with the kit and goes on before the castle nut.
Then install the lower ball joint.
Installed the axle nut. I'll tighten it up when the wheel is on the ground just like I loosened it.
Re-installed the rotor and brake caliper. Use the supplied thread locker on the caliper bolts.
Reinstalled the ABS sensor wire and brake line brackets. Also reinstalled the ABS sensor in the knuckle.
Re-install the hose clips into the new upper control arm.
Re-installed the upper sway bar link.
Reinstalled the steering tie rod. Also
Passenger Side Installation:
The passenger side is a repeat of the drivers side.
Here you can see where I'm installing the strut with the lower control arm already attached.
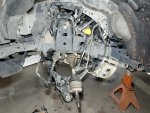
Skyjacker 3.5-Inch Lift kit Installation / Front Differential:
The instructions come with templates to cut out and use as a guide, so you know where to cut the factory front differential mounts.
I placed a floor jack under the differential for this part of the install.
Above you can see the mount on the passenger side of the truck and below you can see where I cut it off.
This new 3/16"
Skyjacker bracket will bot in its place.
Here's where it gets interesting. Notice in the photos below from the instructions that this bracket has a nut welded at the top of it. Mine did not. I thought this was something they missed when they welded the bracket, but the Skyjacker photo of the kit components below those photos show the new part without the nut welded to it. Skyjacker supplies a bolt, a dished style washer, and a lock washer, but no bolt. Fortunately, I had a nut to fit it.
You use a factory hole for the upper bolt, and then drill out the lower bolt hole with a 7/16" drill bit as shown in the photos above. I did not fully tighten the very top bolt with the nut I supplied until I completed the next step below.
I removed this factory bracket from the (passenger) side of the driver side differential mount.
Removed the long bolt holding the differential in the mount, and then cut this side of the mount using the supplied template.
Then fought to drill the two required holes using the marks in the template. This was a pain in the ass. I ended up drilling them from the back (passenger) side. It would have been so much easier if I would have drilled these when the drivers side lower control arm was off.
This new bracket bolts on to the passenger side of this mount.
Here's the new bracket installed on the drivers side of the differential mount after it has been cut.
Here's the other side with everything bolted up.
From here I tightened up the top bolt in the first bracket that I installed earlier (the one where I supplied the nut).
With all of this tightened up I put the wheels and tires back on so I could set the truck on the ground and tighten the axle nuts through the removed center caps using a 36mm socket and breaker bar.
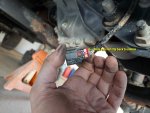
Then I reconnected the (3) Electronic Power Assist Steering (EPAS) plugs to the steering assembly.
Then eventually reinstalled the skid plates.