RedArc Tow-Pro Liberty Brake Controller:
About a month ago I purchased a
Tow-Pro Liberty Brake Controller from RedArc for my 2021 Ford Ranger. Although I don't have a trailer anymore, my girlfriend had wanted to move a horse trailer and I like for my trucks to be setup to do anything I could need them to do.
I like the Tow-Pro brake controller because you only see a small knob to adjust it when it's installed unlike the more traditional brake controllers that sit under the dash. The controller seems to be very popular with the 2019 and newer Ford Ranger owners, but it's not the only option. You can still use a more traditional style brake controller and mount it under the dash, but I like this one because it takes up very little space.
Difference Between TowPro Liberty & TowPro Elite:
RedArc offers a Tow-Pro Liberty and Tow Pro Elite. It's not clearly evident what the differences are but after reading the manuals for both of them I found that the Elite has a ‘User Controlled Mode’ for all terrain conditions.
User Controlled Mode: In User Controlled Mode, the Tow‑Pro Elite will apply the trailer brakes to the level set by the user on the gain control knob. The control knob setting, 0 to 10, will set the brakes from Zero to Full trailer brake application. Simply put, the trailer will brake to the level set by the control knob (regardless of how hard the vehicle brakes). This mode is often preferred for off road or precision use and may require frequent attention from the user.
Both controllers come with the Proportional Mode.
Proportional Mode: In Proportional Mode, the Tow‑Pro Liberty & Elite will apply the trailer brakes at a level proportional to the vehicle deceleration. The control knob setting, 0 to 10, will set the brakes from a lighter to a heavier trailer brake application. Simply put, the harder the vehicle brakes are applied, the harder the trailer will brake. This mode is designed for highway traveling or everyday use and requires minimal input from the user whilst traveling.
Manual Brake Over-ride: This was something I wanted to clarify and make sure the Liberty has. The Liberty and Elite BOTH have this feature. Pressing the control knob whilst driving will apply the manual override brake. The manual override brake will apply the trailer brakes only; if wired correctly it will also apply the trailer brake lights and will turn the LED indicator a shade of RED. Depending on the vehicle wiring it may possibly also apply the vehicle brake lights. The manual override is designed to be used when the trailer brakes need to be applied without the vehicle brakes, such as correcting trailer ‘sway’ whilst travelling. The manual override will apply the trailer brake to a level equivalent to ‘light’ vehicle braking, which is sufficient to pull the trailer back into line. The braking force can be adjusted by turning the control knob, either higher or lower, even whilst applying the manual override brakes
I chose the Liberty because I don't see any use for the User Controlled Mode for all terrain conditions. The Liberty is also $85.00 cheaper than the Elite.
Components:
Both the Tow-Pro Liberty and the Tow-Pro Elite come with the components you see in the photo above. These consist of:
1) Remote Head Assembly
2) Main Unit
3) Remote Head Knob
4) Remote Head Nut
5) Remote Head Bezel
6) Remote Head Cable 3'3"
NOTE: Take note that there IS NOT a harness to connect the brake controller to the trucks wiring.
In order to install this brake controller, I had to order a
Universal Pig-Tail Brake Controller Harness P/N TPH-025.
I also ordered a
Tow-Pro Universal Mount P/N TPSI-001. I didn't like the look of just a knob without anything labeling what it was.
Note About The 3rd Brake Light:
You may read people online stating that you have to wire the controller to the 3rd brake light. The kit that you buy from Ford requires that. These basic Liberty and Elite kits do not. The Ford Ranger comes with Automatic Emergency Braking (AEB) as part of the Pre-Collision Assist feature.
The Pre-Collision Assist feature uses camera technology to detect a potential collision with a vehicle or pedestrian directly in front of yours during day or nighttime driving. If a potential collision is detected, an alert sound is emitted and a warning message displays in the message center. If your response is not sufficient, Automatic Emergency Braking (AEB) will precharge and increase brake-assist sensitivity to provide full responsiveness when you do brake. If you don’t take corrective action and a collision is imminent, brakes can apply automatically.
Basically this kit isn't going to automatically apply your trailer brakes if you're not paying attention and the Ranger has to engage the Automatic Emergency Braking. You should probably being paying close attention to what you're doing if you're towing a trailer.
") Installation:
Installation:
installation isn't that difficult.
1) First I figured out where I was going to mount the Remote Head Assembly / knob. I chose to mount it on the console below the 4WD switch.
2) Once I decided where the Universal Mount for the switch was going to go, I used a trim panel tool to lift up the panel to gain access to the underside. This was to make sure I wasn't going to drill into anything and so I could install the Remote Head Assembly / knob.
You don't have to remove the whole panel. Just pull up the rear of it far enough to install the Remote Head Assembly under it.
I used painters tape to mark where I wanted to drill the mounting hole.
3) I used a step drill bit and drilled a 7/8-inch hole.
This isn't how RedArc tells you how to do it. Their instructions tell you to use their template, drill (2) 5/32-inch holes, and then use a 1-inch hole saw in the lower pilot hole.
I've had experiences in the past where the hole is slightly to big and whatever I mount in them is loose. With the hole drilled I used a piece of sandpaper and gradually opened the hole up until the mount fit inside of it.
Then I shaped the hole until it fit properly.
4) Once the Universal Mount was snapped into place, I attached the Remote Head Cable to the Remote Head Assembly and stuck it in through the bottom of the hole. It's held in place by the supplied nut (3).
The knob (4) is installed by turning the shaft fully counterclockwise (left), aligning the '0' on the knob with the level marker, and pressing it on to the shaft.
I was able to feed the cable down through the bottom of the console and out from under the side panel. Then I pulled it towards the dash and stuffed the cable back up under the side panel so it was exiting at the rear of the console under the dash.
5) With the cable connected to the control head, I ran it up under the dash and found a place to mount the Main Unit.
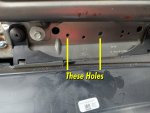
6) I lowered the panel from under the dash that covers the fuse panel, and found the two holes you see below.
I was able to secure the Main Unit to the other side of this panel using some #8 screws, nuts, washers, and lock washers.
The Tow-Pro Liberty can be mounted in any orientation as long as the installation is secure and the main unit cannot move or change orientation once installed. A change of orientation will affect the system calibration
7) With the Main Unit screwed n place, I routed the wiring harness down under the dash making sure that I wasn't pulling it over any metal corners that could eventually wear the insulating off of the wires.
Connecting The Wires:
1) Disconnect the negative battery cable. The Yellow/Orange (Red) 12-volt power wire has constant power going to it. You don't want to short anything out in the process of connecting to it.
2) Identify the RedArc wires.
The RedArc harness has (4) wires:
Black: 12-Volt power in
White: Ground
Red: Wire to brake signal from the brake pedal
Blue: Power output to the trailer brakes
3) Locate and identify the trailer brake wires under the dash. Look up under the dash next to the driver side kick panel. You'll see some wires with blue tape around them.
When you remove the tape you should find the following wires:
Blue (2019 models might be Green/Black): Wire Out To Trailer Brakes
Yellow/Orange (Red): 12-Volt Supply
White: Ground
Violet: Brake Light Signal
4) Cut off the wire ends, strip off the end of the wires, and make the following connections:
Ranger Wires - Brake Control Harness
Blue (Green/Black) - Blue (Power out to trailer brakes)
Yellow/Orange (Red) - Black (12-volt power)
White - White (Ground)
Violet - Red (Signal from brake pedal)
5) With the wires all connected, re-attach the negative battery cable.
Manuals:
Tow-Pro Elite Manual
Tow-Pro Liberty Manual
Known Problems:
I've read people talk about there not being any power to the brake pin on the trailer plug when the brake pedal is applied. I saw this on my 2016 Ford F-150. These newer Ford trucks sense when a trailer has been connected. The truck will not send a signal to the brake output in the connector unless it senses that a trailer is connected. This is why you're not getting any voltage when you put a voltmeter on the pin.