• Welcome Visitor! Please take a few seconds and Register for our forum. Even if you don't want to post, you can still 'Like' and react to posts.

Workshop plans


I would talk more with the pole barn people. I thought they had large insulating blankets that are white on one side for the large spans in pole barns?

Only if you opt to pay for it. The kit I bought had that. But it's fairly thin. I was going to add Styrofoam panels and then sheath with OSB.
 
I agree that insulating the ceiling or at least just sheathing the ceiling is more of a priority than the walls but both are definitely important... Especially in a pole barn, they almost always have a lot of gaps to leak heat just because of how they are constructed. And uninsulated walls will sweat... It's especially bad if you use an invented heater.
Ha! Yeah, I agree.I will do both. And I will cover the walls and overhead with OSB. I want a regular-looking "room" with walls that I can hang sh*t on.
 
I would talk more with the pole barn people. I thought they had large insulating blankets that are white on one side for the large spans in pole barns?
He did mention something like that and talked about the reflective qualities of the material that kicked the heat back. So yes, thanks for bringing that up. I kind of dismissed at the time, but will look into it more now.
 
The pole building insulation is just a 2" blanket that goes under the siding, so doing that after the fact would be a pain in the rear... I know, I just built a pole building with the blanket insulation on the roof and walls... I wish I'd gone with insulated doors but I'll just add the insulation...
 
Only if you opt to pay for it. The kit I bought had that. But it's fairly thin. I was going to add Styrofoam panels and then sheath with OSB.
It would probably be a option for the walls? You could use the blow-in on top of OSB like you said for the ceiling. That blow in stuff makes a mess, but it sure does work good.
 
It would probably be a option for the walls? You could use the blow-in on top of OSB like you said for the ceiling. That blow in stuff makes a mess, but it sure does work good.
For pole buildings, everything is an option. Want insulation? Opt for it and pay more. Want a rollup door? Opt for it and pay extra. Extra wall height? Option. Extra windows and doors? Options.

you may start with s basic size. But everything is a la carte after that.
 
For pole buildings, everything is an option. Want insulation? Opt for it and pay more. Want a rollup door? Opt for it and pay extra. Extra wall height? Option. Extra windows and doors? Options.

you may start with s basic size. But everything is a la carte after that.
You are right about that. At the time it was built, I think '02, we were a little strapped for cash, but needed a place to put things. We went as big as we could. Didn't even think about insulation of the outside with Tyvek or similar. We were just happy to have it. 40x60 vinyl sided.,Then started adding options: two roll up doors, one entry door and 10 foot inside ceiling height. I think it was about $22G. We moved everything from the two storage units we were renting so that helped out in the long run.

The weather is holding so hopefully tomorrow...
 
I didn't have a pole barn built because the company wanted 18k for just the building... No dirt work, concrete, doors, windows etc. I ended up building a stick frame shop myself for about 30, and that was fully wired and insulated. I'm sure glad I'm not building this year, the cost of lumber would have killed me!
 
I wrote some concrete specs for Jim’s place and I think for Scott. Read those sections. Basically, if you add fiberglass to the concrete (fibercrete), you can eliminate most of the rebar. Maybe use some 10x10 10gage mesh. Must be set at the right level and flat. Also, never use “run of the plant” mix. It’s 2000-2500 psi slop. It’s a few pennies more for spec 3000 or 4000 psi Mix, and it’s not a little bit better, it’s in a whole different league. Tell them your going to slump test it on site, and they’ll control the mix quality tightly.

Level the space for 4”. 4” is plenty if you don’t cross with a crawler. Where your posts will sit, dig it down 8-10” (4-6 lower than the floor, for 2’x2’. Do a tic tac toe board with rebar where the center square is a 14” square under the posts, but legs extending 2’ past the 2x2 turn down. Dig an 8” deep rut under these extensions. Pour it all a once.

Ditto this under anything else that may get tugged or pushed, under something like a paint shaker or air compressor. Think of every conceiveable place you may want water, air, drain, electric, control wires, etc, put it all down, make a sketch with dimensions, and take pictures.

I also sloped mine to the middle and put in a small catch basin that drains outside. I could wash a car and not wet all the stuff.

If you send me a sketch showing where you want to put stuff, I can sketch up the details.

& I have a 4” I beam hanging off some home made 2x4 trusses on 24” centers with 3/8” carriage bolts. A dolly with a 1-1/2 ton chain fall. It creaked a little when I pulled a 460w/transmission, but no worries.

& I have double duplex outlets everywhere, far more than the code allows, but I have them on 4 circuits, and I rarely use two items at once.

Hope this helps, and I'm happy to help, I can do this stuff in my sleep!!
 
Last edited:
I wrote some concrete specs for Jim’s place and I think for Scott. Read those sections. Basically, if you add fiberglass to the concrete (fibercrete), you can eliminate most of the rebar. Maybe use some 10x10 10gage mesh. Must be set at the right level and flat. Also, never use “run of the plant” mix. It’s 2000-2500 psi slop. It’s a few pennies more for spec 3000 or 4000 psi Mix, and it’s not a little bit better, it’s in a whole different league. Tell them your going to slump test it on site, and they’ll control the mix quality tightly.

Level the space for 4”. 4” is plenty if you don’t cross with a crawler. Where your posts will sit, dig it down 8-10” (4-6 lower than the floor, for 2’x2’. Do a tic tac toe board with rebar where the center square is a 14” square under the post, but legs extending 2’ past the 2x2 turn down. Dig an 8” deep rut under these extensions. Pour it all a once.

Ditto this under anything else that may get tugged or pushed, under something like a paint shaker or air compressor. Think of every conceiveable place you may want water, air, drain, electric, control wires, etc, put it all down, make a sketch with dimensions, and take pictures.

I also sloped mine to the middle and put in a small catch basin that drains outside. I could wash a car and not wet all the stuff.

If you send me a sketch showing where you want to put stuff, I can sketch up the details.

& I have a 4” I bean hanging off home made 2x4 trusses on 24” centers with 3/8” carriage bolts. A dolly with a 1-1/2 ton chain fall. It creaked a little when I pulled a 460w/transmission, but no worries.

& I have double duplex outlets everywhere, far more than the code allows, but I have them on 4 circuits, and I rarely use two items at once.

Hope this helps, and I'm happy to help, I can do this stuff in my sleep!!
Thanks very much Rick! I did get 4000 psi mix with rerod. Unfortunately, i wasn't able to use all the specs as the pour was that day. But the other ideas are definite;y on the board. Existing structure was already wired, but there's a ton of room in the box for more circuits and a 220 is is in the plans as well. Drain was done in the existing area. Water is also in the existing structure.
The job went pretty smooth. No hiccups and the weather was perfect. Pics later, but they won't be very exciting :D:D
 
You’re quite welcome!

Last thought, if it is 20’ x 40’, it’s probably still going to crack. The simple solution is simply to saw cut it where you would want it to crack. If you post a sketch showing where the posts are and where your lift posts are going to be, I can sketch you the cut pattern. You only have to cut a half inch or 3/4 inch deep, which you can do with a good Skil saw and a diamond blade. Basically, you are creating a straight weak spot/line, where it will fail & crack.

You still have to caulk those cuts as soon as you seal it, about 3-4 weeks from now. Seal, then caulk.

Good luck!
 
Last edited:
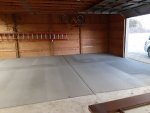
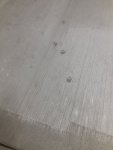
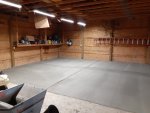
Here are some pics of the final. I'm assuming the "cut lines" are the grooves in the concrete? On the other previously poured side, there were actual cut lines made with a saw --- it still cracked in other places but whaddya gonna do.

As the previous concrete contractor told me: "There are two guarantees with concrete. It will get hard and it will crack."
20210319_193625.jpg 20210319_193630.jpg

20210319_194311.jpg

F'n cat :p
 
You need more junk...

I will bring you a couple loads I've been tripping over for years if ya want?
 
There's 3 ways of doing control joints that I've heard:
-cut with a saw at 15-20 thicknesses apart and about 1/3 thickness deep
-I don't remember what it's called, but they take a stick of some form and while skreeting push the agregate down/away causing a weak spot
-Then what you got, a formed line like a sidewalk...

You can fill that in some after it cures, there's some rope style stuff that you put down then heat with a weed burner that would likely work pretty good, for the saw cuts which is what I got and what you got last time, it looks like they aren't filled in, if you want to fill them in there's stuff called "Siki Flex Pro Self Leveling" in a yellow tube at Home Depot/Lowes in the concrete section, make sure you get the tube for "horizontal surfaces", it's pretty cool.
 
You need more junk...

I will bring you a couple loads I've been tripping over for years if ya want?
Ha! You can't see what's behind me:ROFLMAO::ROFLMAO::ROFLMAO::ROFLMAO::ROFLMAO:
 

Sponsored Ad


Sponsored Ad

TRS Events

Member & Vendor Upgrades

For a small yearly donation, you can support this forum and receive a 'Supporting Member' banner, or become a 'Supporting Vendor' and promote your products here. Click the banner to find out how.

Recently Featured

Want to see your truck here? Share your photos and details in the forum.

Ranger Adventure Video

TRS Merchandise

Follow TRS On Instagram

TRS Sponsors


Sponsored Ad


Sponsored Ad


Amazon Deals

Sponsored Ad

Back
Top