• Welcome Visitor! Please take a few seconds and Register for our forum. Even if you don't want to post, you can still 'Like' and react to posts.

'85 Bronco II Paint & Body Thread


On mine I cut the rivets and reinstalled with bolts. It wasn't too bad, and I think it's worth the trouble.
I used a file to square the holes, and used stove bolts:
View attachment 67005
(sorry it's so blurry)

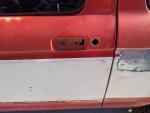
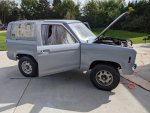
This makes for a finished look on the outside:
View attachment 67006

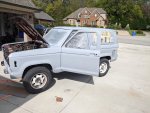
And this is how it's mounted from the inside:
View attachment 67007

If I recall (shit! it's been 12 years since I painted 'Ole Blue) I used a die grinder and cutoff wheel to grind away the rivets from the inside.

Keep us posted on how you're doing on this. Just keep beatin' on it, and don't get discouraged. Good luck!

Thanks for the pictures Robbie.

I'll end up removing them.

What about the lock cylinders? I could see what looked to be a rivet for it too?

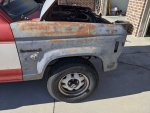
Also I picked up a junk yard passenger fender today for $50, it has some surface rust, but it's solid. A couple of dings, but I got it pretty straight.

I also found a snorkel for the intake for the air cleaner. My was rotted out, but luckily I've got a yard with an 85 still in it with the same exact drivetrain.

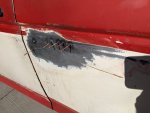
I also tried my best attempt at the stud welder from harbor freight. It actually works pretty well. I pulled my worst dent from behind the driver's door.
 

Attachments

  • PXL_20211015_192912011.jpg
    PXL_20211015_192912011.jpg
    161.7 KB · Views: 126
What about the lock cylinders? I could see what looked to be a rivet for it too?

The lock cylinders are easy; they're held in by a clip. Look at the rear of the open the door and you'll see a tab beside where the cylinder is. Pull this tab towards the rear (needle nose pliers work well) and slide the clip out to release the cylinder. Push the clip back in to reinstall the cylinder.

I also found a snorkel for the intake for the air cleaner. My was rotted out, but luckily I've got a yard with an 85 still in it with the same exact drivetrain.

Let me know if ever see another one these. I haven't found one for my '84.

That's awesome having the stud welder. I hate drilling for stuff like that.
 
The lock cylinders are easy; they're held in by a clip. Look at the rear of the open the door and you'll see a tab beside where the cylinder is. Pull this tab towards the rear (needle nose pliers work well) and slide the clip out to release the cylinder. Push the clip back in to reinstall the cylinder.


Let me know if ever see another one these. I haven't found one for my '84.

That's awesome having the stud welder. I hate drilling for stuff like that.

The guy at the junk yard said he had 3 bronco 2's. I only walked up to the 85. If I need more parts I'll take a look around when I get back out there. They're the only yard with older vehicles that I've found.

Thanks for the tips on the lock cylinders. That's next on my list to pull.
 
Definitely pull the lock cylinders and door handles! The locks are very easy to get out, door handles are just two rivets. I used 5/16 elevator bolts to put mine back on (same thing as carriage bolts but flat.)

I used 3M two part self leveling sealer on my drop rails but the Lord stuff is good too. I used 3M because the applicator gun was cheaper and for no other reason.

Other body seams got sealed with a 3M 1k product in a squeeze tube. I was slightly hesitant to use a 1k product there but it ended up being fine.

Do you have links to what you used?

3M Self-Leveling Seam Sealer, 08307, 200 mL Cartridge


3M Manual Cartridge Applicator, 08571, 200 mL https://www.amazon.com/dp/B002QWYG1O/?tag=959media-20

This look right?
 
That's the seam sealer I used. Different applicator tool though. I got this one and it worked great:

 
Was able to get door handles and lock cylinders off today.

Not to bad of a job. I found it easiest to just drill the rivets out. I actually used a center punch and was able to drive the rivet out, then stepped up in bits until I had it drilled out.

I also fitted my junkyard fender. It's pretty straight, couple of minor dents. Much better than my original one.

A day at a time. Primer is coming up soon.
 

Attachments

  • PXL_20211018_143706679.jpg
    PXL_20211018_143706679.jpg
    134.5 KB · Views: 114
  • PXL_20211018_144302669.jpg
    PXL_20211018_144302669.jpg
    218.2 KB · Views: 118
The work continues. I'm hoping to be able to spray primer tomorrow. I'm definitely close.
 

Attachments

  • PXL_20211021_171409513.jpg
    PXL_20211021_171409513.jpg
    250.9 KB · Views: 138
Looks great. Don't forget to do the inside of the gas door. Otherwise, every time you get gas you're going to be mad at yourself.
 
Looks great. Don't forget to do the inside of the gas door. Otherwise, every time you get gas you're going to be mad at yourself.

Yep I'm on it! I'll prop it open while I spray.

I already took the filler neck loose and got it out of the way.
 
So, to add more to your plate, are you painting your door jambs too?
 
Looking good!

I removed my doors when I painted my cab so that I could do the jams. I made "doors" out of cardboard that I taped to the weather stripping. You could probably do something similar to keep overspray out of the inside, just in "window" shape instead.
 
Thanks for all the encouragement. I'm sure it would be a better paint job by removing fenders and doors, but I don't have that much patience anymore lol.

I sprayed my first coat of epoxy primer today. Went all well, I've got some stuff to learn, but I got good coverage and can begin the rest of the body work now. I have more primer left to do more coats and my final sealer coat.

Primer job looks great from 10 ft, but I have some screw ups to fix, but this is supposed to be very easy to sand so we shall see.
 

Attachments

  • PXL_20211022_184158317.jpg
    PXL_20211022_184158317.jpg
    215.4 KB · Views: 124
  • PXL_20211022_184211428.jpg
    PXL_20211022_184211428.jpg
    224.6 KB · Views: 131
You're going to loose a lot more patience. Take your time sanding priming sanding priming... Watch some youtubes on sanding and prepping for paint if you haven't already.

Trust me when I say, "you will see every blemish once the color is put on." Take your time and don't rush. I have 4 blemishes, one clear coat run on dr. front fender corner, one small blue overspray spot on door, and 2 gnats that gave all for my clear coat.

Remember, you're not ready to paint until you dream of saying, "I hate bodywork".
 
I should have my body filler here in the next couple of days. I ordered the 3M version.

I also have the durablock kit from Amazon.

Now comes the fun part of filler, sand, filler, sand, repeat.
 

Sponsored Ad


Sponsored Ad

TRS Events

Member & Vendor Upgrades

For a small yearly donation, you can support this forum and receive a 'Supporting Member' banner, or become a 'Supporting Vendor' and promote your products here. Click the banner to find out how.

Recently Featured

Want to see your truck here? Share your photos and details in the forum.

Ranger Adventure Video

TRS Merchandise

Follow TRS On Instagram

TRS Sponsors


Sponsored Ad


Sponsored Ad


Amazon Deals

Sponsored Ad

Back
Top