Disappointing, but don't get discouraged.
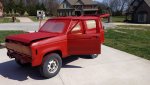
It looks like the paint went on too dry, or as mentioned the gun was moving too fast. I'm sure that you were following the paint manufacturer's thinning instructions, and don't guess- do use measuring cups* or a marked jigger to get the mix exactly right. Even then the paint mix can need to be "tweaked" sometimes. The roof makes a good "test panel", as it's the least visible and lets you check the mix and get your technique dialed in before doing the hood, sides and hatch.
(* DO NOT get caught by the Mrs., or just play it safe and buy your own at the Dollar Store).
If you have to sand let the paint dry as much as you can. I think the fresh or uncured paint will gum up sandpaper pretty bad, so wet sanding may be better, along with as much drying time as you can afford. If sanding is needed, I would just level out the just-sprayed paint versus trying to remove it all down to the primer.
Does the place you got the paint from have any kind of customer support? If so it'd be worth it to reach out to them for advice, specifically for the product that you're using.
Main thing is, don't get bummed out over it. It's just another bump in the road. You've done a damn good job on resurrecting that old truck so far, so just keep beating on it.
Determination and taking your time will get you through to the finish line.