• Welcome Visitor! Please take a few seconds and Register for our forum. Even if you don't want to post, you can still 'Like' and react to posts.

MY build thread...'88 Bronco II Desert Rat Patrol Edition: MAJOR update 2/23/2025


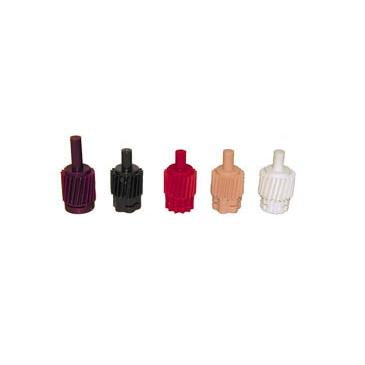
Thanks @Jim Oaks for his speedometer correction tech article:


Looked like I needed a green gear according to my math...ordered it from Amazon for $5.25 shipped, swapped it out in seconds and it's now within 1 MPH of GPS...which means it ain't getting any better!

Doesn't sound like a big deal but it being off pretty huge at between 5-7 MPH was driving me crazy!
Awesome man, I didn't know at all about this. I changed from the 265 to the 235 several years ago. I learned from a couple tire sites it was a 7% decrease in miles and MPH but never thought about swapping the gears to acquire the proper speedometer readings
 
In this day and age, with chips in everything, wireless connection everywhere and endless apps, something like a simple stone-age mechanical speedometer fix is almost like magic or sorcery. Refreshing, ain't it?

You're doing a great job on that B2; keep beatin' on it!
 
I finished up another @Jim Oaks special and got the rear view camera mounted to my spare tire carrier, along with wiring in the plate illumination to the parking lights. The license plate bracket itself has a quick disconnect and all I need to deal with making sure I don't wreck my wiring is to have an 11mm wrench and flat blade screwdriver handy, which will go in the tool kit.

Jim's how-to is HERE.

IMG_3720 - Copy.jpg


IMG_3721 - Copy.jpg


IMG_3719 - Copy.jpg


IMG_3722 - Copy.jpg


I originally mounted the camera directly below the plate illumination but it largely blocked it so I moved it to the bottom of the plate. I ran the wires in a loom that I zip tied along the tire carrier and brought them in under the lower corner of the taillight which worked out nicely...

I also got the rear window wiper reservoir fixed after the previous owner jackwagon had drilled a hole through the sheetmetal in the rear taillight assembly (likely when they went to run the wiring for the Gawd awful roof lights which I promptly removed as soon as I got it!)...which went directly into the reservoir. I slapped some of that as seen on TV tape and it's holding the fluid and the wiper/pump work great.

I obviously have a lot of work to do on the interior but during the week when I only have a few hours with everything else going on I like to knock out little stuff like this and feel like I got something done! 🥵
 
If anyone has ever dealt with a power window motor issue on these older Rangers/BIIs, you know what a pain the back side it is to get the motor out.

I, however, was NOT aware until my driver's side failed (in the down position) and started watching YouTube videos. Fortunately, at some point in time over the last 35 years someone had already dealt with the driver's side and had drilled 3 holes in the sheetmetal to easily access the mounting bolts for the motor.

It was wishful thinking they had done likewise for the passenger's side, which stopped working a few weeks ago, but today I took a template from the driver's side and applied it to the passenger's side and it was good enough for government work as they say!

Motor was fine, just a bad connection which I remedied with some contact cleaner and dielectric grease.

Here's a pic, don't mind the gnarly holes...they worked! 🤣

IMG_3727 - Copy.jpg
 
I'm really enjoying working on the interior now that I'm past the mechanical stuff...at least for now!

It is ROCK solid on the interstate and with my gearing and tires now that my speedometer is corrected it's really happy singing along at 65-70 MPH. Dead stable and driveable with a finger. Speeding up to 75-80 to pass someone is fine, I just wouldn't wanna linger there with the revs that high, which is no good for MPGs either. And before anyone gives me any :poop: about mileage, my other vehicles are a Gladiator Mojave and Challenger Hellcat so I don't own anything that will get over 20 MPG on a good day! 🤣

I got the new windows in/tinted and replaced the wipes and weatherstripping. The glass I got was a lil thicker than the factory and the wipes and weatherstripping were too which made it a bit of a chore, I'm sure everything will settle down and hopefully not smoke either the power window motor or trash the (ceramic) tint in the process!

Since the door panels are off and all that other stuff was getting done it was the perfect time to add some sound mat/deadening to the doors and with near 5 full sheets it definitely added some heft to the doors. I'm more certain now than ever that all the time I spent soundproofing, in addition to the insulation for the carpet and headliner which is coming up soon, are gonna make the cabin both quieter and cooler...

IMG_3730 - Copy.jpg


I got the wiring for the powered subwoofer cleanly run and got it mounted to my homemade board. I wanted to eliminate as much resonance as possible; when I was testing it, it was bouncing off the sheetmetal and sounded janky AF. I decided to mount the subwoofer to a piece of plywood, that I likewise covered with soundmat and then wrapped with speaker carpet. I put some industrial strength Velcro strips on the bottom and will have corresponding strips on the cargo mat and the carpet underneath in case I remove the mat. That oughta keep it in place and when I did a test run with it just sitting on the soundmat covered floorpan it POUNDED with zero resonance. I only have the 3.5-inch Infinity Reference speakers in the dash right now as the JBLs I have for the side panels aren't installed yet and it's ridiculous how loud and clear it is with just the Alpine headunit pushing the lil speakers. It won't win any dB drags but I'll be able to stream music and make Bluetooth phone calls...real 2023 type stuff that wasn't around back in the day/1988!

IMG_3731 - Copy.jpg


IMG_3732 - Copy.jpg
 
Took advantage of the long holiday weekend yesterday (not that it matters when you're retired...but anyway!) to put some labor in on the Bronco (see what I did there?!)...

I knew the door project was going to be a chore but I underestimated exactly how much. I spent about 10 hours total, including getting the doors prepped for the Raptor liner, removing the old weatherstripping and dealing with that mess and scuffing the surface, etc. I then cut in along the entire edge of the weatherstripping with flat black Testor's model paint to make sure there wouldn't be a thin line of the factory red paint still visible, knowing it would blend well, color wise, with the Raptor liner.

Once the activator/hardener is added to the Raptor liner you have an hour to work with it according to the instructions, in reality it's less than that from my experience. I thought 20+ minutes per door was reasonable, and it was...kind of!

I had previously mocked up the door panels and THOUGHT I knew how far I needed to cut in to make sure that no red paint was going to be visible once the door is closed. The Raptor went on fine with a 2-inch foam roller with a 1-inch foam brush for detail areas.

When I went to re-mock up the door panel on the passenger side I realized that I had not cut in enough, which was somewhat attributable to the door panel being slightly cockeyed...but it was clearly my fault regardless. I took that as an opportunity to redo both sides with an additional second layer, which didn't hurt as there were definitely areas where the factory red paint showed through under direct lighting.

I used the Coverlay door panels shown HERE. I paid about half of what the factory charges and got them along with their dash cover so I know they'd match. I do like the color and it compliments the other tans/browns/camel/saddle colors in the interior. That being said I went into buying them knowing they are what they are for the price; they ain't perfect but they'll get the job done, which is all I needed because my factory ones were absolutely trashed!

I'd like to blame it on the fumes but I was wearing a respirator so I can't but I managed to mount the passenger side panel and forgot to put in the 3 inserts in the door panel that support the arm rest which I did NOT realize until I got to the driver's side for some apparent reason. Also, no matter how I did it, as soon as I put ANY pressure on the Christmas tree push pins, the paint flaked off. I decided to wipe off the remaining paint with some lacquer thinner, figuring the black wouldn't look bad, since the door frame was now going to black.

End result is a major improvement to the interior. I give it about a solid 90/100...if my technique and detail was better I might be able to squeak a lil more but I'm happy with the overall result and once the exterior is Raptor lined and the door jambs likewise sprayed, it'll really look good and be super tough!

IMG_3736 - Copy.jpg
IMG_3737 - Copy.jpg
 
That looks good. Nice touch, masking the driver door compliance sticker so that it's still readable.

I've heard bad reviews on the Coverlay panels but yours look good.
 
Yeah my door panels were...disgusting actually. The passenger side handle was broken off and I couldn't find replacements anywhere. The material was trashed/sun faded and otherwise just gross. I could have used the metal shell as the foundation to rebuild new ones but I already made a trip to the local upholstery shop and I'm still getting over the shock of his quote...! If you're going for a restoration than these Coverlays are a poor choice but in my case to get the interior freshened up and functional, they'll do just fine! Big part of my reasoning was they sold a matching dash cover too and I paid WAY less than retail, nearly half that if I recall correctly...
 
Come do my door work and coverlay panels please.

Looks good...
 
Been toiling away at the interior. Before laying the carpet I had to run the wiring for my powered subwoofer and rear view camera to the dash area. The subwoofer has a separate volume knob which is nice, so I'll mount that in a natural location on the dash with some double-sided tape. As far as the rear view camera screen goes, I'm gonna take @Uncle Gump's advice and figure out a Ram Mount for it most likely; if I use the suction cup mount on the windshield it will get (1) HAMMERED on by the sun and (2) make using the sun shade to protect the interior that much more inconvenient.

My daughter helped me get the carpet in after I unpackaged it let it breath for a few days. I found that it was molded pretty accurately, about 90%-ish, which is fine for what I'm doing, and generously cut so there was definitely trimming to do. We had to take the shifter apart to get the carpet over it, bonus points for taking the slop out of it when it was reassembled; that was something that was bothering me and apparently the main bolt attaching the shifter rod to the transmission linkage was loose/sloppy. It still "reads" kind of goofy in the gear indicator, but that's fine...

IMG_3756 - Copy.jpg


While the carpet was pre-molded it was not pre-cut for the innumerable holes required for the seat brackets, interior molding, etc. which made sense, it was just time consuming. I did end up over cutting in one place near the shifter (probably the worse possible place from a visibility standpoint) but I'll fix that with some spray adhesive and black spray paint.

The backside of the carpet was mostly insulated although it wasn't in all areas, and since it was glued to the carpet it definitely made things interesting when driving bolts/screws through the carpet; I had to pull it away so they wouldn't catch and get their threads all gunked up, which happened more than once of course!

I installed new door sills since although the ones in there were relatively fine, they were trashed and since they were pretty cheap and would be visible every time you open the door, I figured it was worth it. With the molding piece for the tailgate I just cleaned it up as it was fine, just scratched a little as to be expected.

My wife helped me get the Kryptek Highlander camo seat covers that I scored off eBay installed on the seats. They're specifically fit and are another 90+% win, especially considering how relatively inexpensive they were.

IMG_3766 - Copy.jpg


IMG_3767 - Copy.jpg


I topped off the carpets with some "Motor Trend" universal floor/cargo area mats that I scored off Amazon. They're trim to fit and likewise...90+% fit and relatively inexpensive...I'm sensing a pattern here!

IMG_3765 - Copy.jpg


With the exception of the 4 largest interior trim pieces I started repainting them Satin Nutmeg as @Jim Oaks had previously mentioned was an excellent color match/compliment to the interior. The only issue I had was several times I had a completely different color, which looked like redwood, inexplicably shoot out. It was bizarre and it wasn't for a lack of shaking them vigorously before use! Not matter I fixed it with another coat. I was also surprised, especially given the high temperature (near 90) in my garage that the atomization of the paint could have been better/lighter as it ended up spraying so heavy in some areas that it began to drip. I ain't no professional as they say and as long as I'm staying in the 90%-ish range I'm pretty happy!

IMG_3762 - Copy.jpg


All I have left for the interior is to paint those last 4 biggest pieces and then tackle the headliner...WHEW!
 
Last edited:
More interior work...

I bought some universal fit seat belt sleeves from LMC Truck. I wasn't too concerned about the color because I figured I was going to paint them to match the other interior parts I'm painting with the Rustoleum Satin Nutmeg...but they were a pretty gross almost peach-like color, which they described as tan.

They wouldn't work with the rear belts which was fine, it was more critical for the front because the stock ones were completely shredded:

IMG_3776 - Copy.jpg


Pulling the old belts out I discovered that at Ford, quality is job one, as witnessed by these inexplicable blue seat belts...! :ROFLMAO:

IMG_3777 - Copy.jpg


After painting and trimming them to fit (the passenger side is longer because of the seat bracket configuration, after mocking them up they weren't going to fit without notching them which was easily done with a utility knife. They now stay in position at the edge of the seat and don't fall to the floor requiring me digging around to fish them out...

IMG_3779 - Copy.jpg


IMG_3780 - Copy.jpg


I also got the freshly painted center console back together, which would have been a whole lot easier if I had just taken a quick picture of two of the hinge and how the catch for the latch is supposed to be configured. 🤦‍♂️

IMG_3781 - Copy.jpg
 
Got the rest of the interior pieces painted today, I figure the longer they sit/cure in this heat the better they'll be to handle once I'm ready to put them back in!

IMG_3787 - Copy.jpg


Headliner recovering is up next. I found this video on YouTube from the Fractured Rooster Garage channel on how he did it (and a whole bunch of other work he did on his Bronco II). I sincerely hope it's as easy as he makes it look, you know how that goes...!

 
Can you get a picture of the coverlay dash cover? I'm curious how well it fits around the vents.
 

Sponsored Ad


Sponsored Ad

TRS Events

Member & Vendor Upgrades

For a small yearly donation, you can support this forum and receive a 'Supporting Member' banner, or become a 'Supporting Vendor' and promote your products here. Click the banner to find out how.

Recently Featured

Want to see your truck here? Share your photos and details in the forum.

Ranger Adventure Video

TRS Merchandise

Follow TRS On Instagram

TRS Sponsors


Sponsored Ad


Sponsored Ad


Amazon Deals

Sponsored Ad

Back
Top