• Welcome Visitor! Please take a few seconds and Register for our forum. Even if you don't want to post, you can still 'Like' and react to posts.

MAB3L, the most reasonable truck on the road!


One caution on the plates underneath. Pull them off every so often to clean out the accumulated dirt and what not so they don't become a moisture trap, causing hidden corrosion issues. Even skid plates can cause that issue. So, while worth while to do, just keep in mind that there is going to be some additional maintenance that needs to be done that people forget about.
 
One caution on the plates underneath. Pull them off every so often to clean out the accumulated dirt and what not so they don't become a moisture trap, causing hidden corrosion issues. Even skid plates can cause that issue. So, while worth while to do, just keep in mind that there is going to be some additional maintenance that needs to be done that people forget about.

Thanks for the reminder, my hope was to set them up to be taken on and off relatively easily while still being secure.

Up where I live very few stock plastic undertrays survive long in part due to road conditions, but mostly due to the winter. Between snapped plastic clips and corrosion underneath the vehicle I see a car that's either missing or actively has a dangling undertray at least once a day.

Hell the Hyundai I had started ejecting its undertray within my first year of ownership with basically 0 hard driving, just regular winters and pizza delivery.
 
Lots of the Ecomodder guys use coroplast as it's cheaper, lighter, and can be shaped/installed more quickly than other materials.

It's election season down here in the States, and an intrepid individual could probably source big sheets of it from campaigns for nothing.

You can also buy large sheets of it from sign shops or on this here interweb.

I actually work in local politics, I know one of the folks I worked with isn't going to be running again next election, so I may ask to grab some of the old lawn signs for this part of the project.

I could probably also use it for the grill blocks too...
 
I wonder how effective a "slide in" design could be at least for the center section, something like fabricated rails that let me slide in long continuous sheets and are secured by effectively clamping them down. Given that I'll be removing the tray with some frequency for maintenance, other work and probably in the winter it'd be nice to be able to slide them off tool-less.

Looking at how other folks go about it is pretty eye opening/a bit daunting:

1714053427668.png

1714053446723.png

I don't have a lot of fab experience, and given the truck's driveline I don't think it'll be entirely feasible for the center section, but I'm sure somebody on Ecomodders has figure it out.

I may actually be able to get enough of the large lawn-sign type coroplast sheets to have spares cut to shape just ready to go when one gets damage...

I was just told they had over 1000 24x48 signs, and god knows how many smaller ones available.

Shit I'm gonna become a hoarder aren't I....
 
I wonder how effective a "slide in" design could be at least for the center section, something like fabricated rails that let me slide in long continuous sheets and are secured by effectively clamping them down. Given that I'll be removing the tray with some frequency for maintenance, other work and probably in the winter it'd be nice to be able to slide them off tool-less.

Looking at how other folks go about it is pretty eye opening/a bit daunting:

View attachment 110035
View attachment 110036
I don't have a lot of fab experience, and given the truck's driveline I don't think it'll be entirely feasible for the center section, but I'm sure somebody on Ecomodders has figure it out.

I may actually be able to get enough of the large lawn-sign type coroplast sheets to have spares cut to shape just ready to go when one gets damage...

I was just told they had over 1000 24x48 signs, and god knows how many smaller ones available.

Shit I'm gonna become a hoarder aren't I....
Perhaps even a partial covering would help.
 
I wonder how effective a "slide in" design could be at least for the center section, something like fabricated rails that let me slide in long continuous sheets and are secured by effectively clamping them down. Given that I'll be removing the tray with some frequency for maintenance, other work and probably in the winter it'd be nice to be able to slide them off tool-less.

Looking at how other folks go about it is pretty eye opening/a bit daunting:

View attachment 110035
View attachment 110036
I don't have a lot of fab experience, and given the truck's driveline I don't think it'll be entirely feasible for the center section, but I'm sure somebody on Ecomodders has figure it out.

If I were looking for ways to easily and securely mount panels without tools, I think I'd investigate places to mount aerodynamic hood pins:

514QeBlL4FL._SX522_.jpg


If I were looking for ways to easily and securely mount panels without tools, I think I'd investigate places to mount aerodynamic hood pins:

514QeBlL4FL._SX522_.jpg


Fastners and attachment is really going to come down to cost, and durability with a side of ease of removal.

Those hood pins look pretty sick, but I'm worried about their longevity/how secure they'd be given rocks and other debris are going to be thrown up into them basically all the time.

I do like the idea of a retained spring though.
 
I wonder how effective a "slide in" design could be at least for the center section, something like fabricated rails that let me slide in long continuous sheets and are secured by effectively clamping them down. Given that I'll be removing the tray with some frequency for maintenance, other work and probably in the winter it'd be nice to be able to slide them off tool-less.

Looking at how other folks go about it is pretty eye opening/a bit daunting:

View attachment 110035
View attachment 110036
I don't have a lot of fab experience, and given the truck's driveline I don't think it'll be entirely feasible for the center section, but I'm sure somebody on Ecomodders has figure it out.

I may actually be able to get enough of the large lawn-sign type coroplast sheets to have spares cut to shape just ready to go when one gets damage...

I was just told they had over 1000 24x48 signs, and god knows how many smaller ones available.

Shit I'm gonna become a hoarder aren't I....

If you leave the tolerances loose enough the sliding part might woŕk.

As far as quick release fasters, I've yet to see anything that would work well under a vehicle for very long in locations north of the rust belt. But everything I've seen is either plastic or on aircraft.
 
all i know is aircraft or plastic too. well, or the 10mm ones used on the bottom of my son's 05 mazda6. his tray isn't going anywhere without a ratchet but i bet the northern mazda6s are a pain to remove that tray on.

on our trucks, you will need a bunch of those signs to make an full under tray. on some unibody cars, they have it easy since the floor is right there already so they just have to cover certain areas. and some manufacturers already made covers for the exhaust and engine bay, like my old bmw. it had an full engine lower tray which connected from the lower radiator to behind the firewall, than it had the complete area where the exhaust was run shielded and had little flaps directing air over the area where the gas tank sat so air didn't get caught there, too.

man, i never realized how much thought the bmw guys put into their aero stuff, and this was on 85 to 91 model 3 series.


luckily, you can try to just run from one frame side across to the other, to start with. make a slot to fit around the leaf springs and maybe you an make it all the way to the rear bumper with just a slot for the leaf springs and the driveshaft?

this actually sounds kind of cool

Short of getting some super high quality zip ties (which would still require me to have extra zip ties and a set of snips for replacement), I doubt I'll be able to figure out a mounting set up that will be durable while still tool-less.

I think with this truck it's gonna be a matter of some sections being pretty easy and others going to be a lot harder.

It'll be best to lower the truck before installing an undertray mostly because it'll give me the most benefit then, and the suspension and drivetrain positions will be more or less in place.

The nice part about using coroplast vs. aluminum or hard abs plastic is that it's super easy to cut and trim. Only thing I'm slightly worried about is the durability and deformation since it doesn't take too much to bend it.
 
For fasteners, what about something like these? You can buy generic ones in packs of 100+ cheap. Quick to remove and replace.
1714145179165.png
 
As far as durability at the attachment points, installing some gromments should do the trick. These would be the gromets like one would use on a tarp or a tent. They just need to be big enough to reenforce the areas the panel is going to be fastened at. Harware stores have complete installation kits in a few different sizes.
 
For fasteners, what about something like these? You can buy generic ones in packs of 100+ cheap. Quick to remove and replace.
View attachment 110092

Not sure how much I'd trust these to hold onto a long, wind battered sheet of plastic.

Maybe I'll just start carrying just bring an electric ratchet, and as many 10mm sockets as possible with me on road trips lol
 
Howdy folks!

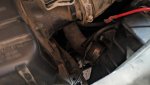
E-fan has been installed! Sorta...

Forgive appearances, things need to be routed, mounted (without double side tape), put into flexible looms e.t.c.

I've read quite a few posts about people using all kinds of different new, and salvaged fan units and shrouds in order to convert their Rangers, at the same time, I found out that 2.3 Rangers generally came with E-Fans, alongside clutch fans. Alongside those posts were folks claiming that these trucks were overcooled, and would get colder sitting at stop lights by noticeable amounts, and other folks would drive with only one or the other fan.

Since all 98+ Rangers (I'm pretty sure) have the same exact radiator, I figured I would just pull the shroud and fan unit from 2.3 ranger in the junkyard, and that oughta do the job! Sure enough, two bolts hold the shroud and e-fan in place, I was even able to salvage the unit without removing the donor's clutch fan with some shimmying.

The only modification necessary to put this on my 3.0 truck was to trim the shroud, since on the 2.3 trucks they encompass 2 fans, and extend further back considering engine is much shorter. I didn't do this super accurately, but I cut down approximately 80mm using my wheel of death, in the truck this thing JUST barely fits after modification, which is good, the longer the shroud extends back, WITHOUT touching any pulleys or belts the better, but you may want to trim some in order to more easily access the belts and pulleys. Here's a poorly shot before and after:
PXL_20240423_234241693.MP.jpg

PXL_20240423_235119702.jpg


This is thermostat/relay kit I used.

1714274235153.png


I went for one of the thermostat/temp sending units with a probe and an adjustable thermostat for experimentation, and ease of installation given that I couldn't find a location to install a 3/8ths unit, nor wanted to buy a inline adapter. I don't know if I'd recommend most to use this unit given the added complexity, and the fact that the thermostat I received was slightly different in design from the one the instructions are for, and I'm pretty sure the dial unit shouldn't even be under the hood. I'm going to run it through to the interior, and create a place under the hood to securely mount things like relays and circuit breakers.

I wired it in by pulling getting ignition activated power via the fuel pump relay, I also connected the AC clutch relay so the fan comes on when the AC does, however, it is only on when the AC clutch is activated. For AC performance, this isn't ideal, for efficiency however, it's better than it running constantly when the AC is. Obviously the fans only turn on when the coolant gets up to temperature, the dial isn't very accurate, but I've been able to find tune it to allow for the highest safe operating temperature.

The temperature unit also allows you to close the circuit manually, so that the fans run always when the ignition is turned on, this could be useful in some applications, like towing, heavy grades with payload, since the transmission cooler is also mounted in front of the radiator.

Here's a bit clearer of a picture of the whole thing:

PXL_20240428_024039743.jpg


PXL_20240428_024050726.jpg


Performance:

We did a small test drive, a little bit of highway, but mostly some parking lot/drive-thru idling to make sure that the truck would in fact stay cool. It was a cool day (10-13C) and quite humid, but cars can still overheat at -20C, so we can at least have a little confidence that the truck is being cooled sufficiently.

Cooled sufficiently is exactly what we got! I actually had to adjust the thermostat to be closer to where the dash temperature indicated with the clutch fan installed.

Some things I noticed:
  • Power steering is lighter! I wasn't expecting this, but it's nice to notice less drag even in the other accessories.
  • The truck doesn't sound like a vacuum cleaner! There's so much noise that is no longer generated, even when the e-fan isn't running, I can actually hear my engine while I drive!
  • It's all placebo I'm sure, but I think it might actually be a tiny bit faster and more responsive.
No data yet! I'll be sure to keep you guys posted.

I'll also keep you guys updated on reliability should anything come up.

Thanks for info as always!
 

Attachments

  • PXL_20240428_024100409.jpg
    PXL_20240428_024100409.jpg
    82.4 KB · Views: 69

Sponsored Ad


Sponsored Ad

TRS Events

Member & Vendor Upgrades

For a small yearly donation, you can support this forum and receive a 'Supporting Member' banner, or become a 'Supporting Vendor' and promote your products here. Click the banner to find out how.

Recently Featured

Want to see your truck here? Share your photos and details in the forum.

Ranger Adventure Video

TRS Merchandise

Follow TRS On Instagram

TRS Sponsors


Sponsored Ad


Sponsored Ad


Amazon Deals

Sponsored Ad

Back
Top