• Welcome Visitor! Please take a few seconds and Register for our forum. Even if you don't want to post, you can still 'Like' and react to posts.

AJE Ranger K-Member Who's Done It!?


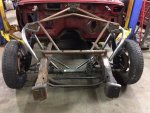
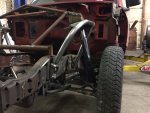
First mock up. The passenger side seems to be in the right place. But really I’m guessing. The upper strut mount seems to line up with holes already in the frame so I’m going off of that. Passenger side needs to come forward a bit but I ran out of time. Not sure what’s going on there. It’s looking like I need to drill holes to mount the
k-member. I had to cut away some of the battery tray. Not something I was anticipating. I emailed AJE again asking for pics or something. I’m literally putting a puzzle together without a picture to reference. I don’t have a clue where to mount the k-member other than what looks right and it being square to the frame.
174DDF59-F1ED-4181-8AF1-EEBB4D211EA7.jpeg
5019E9D2-A5F6-4A9A-8B32-984CE9769AD2.jpeg
A0CD1648-DB6C-4121-8112-E83C04A53A7D.jpeg
 
AJE sent a few pics. Definitely helps. I was told the k-member mounts through an existing hole where a rivet use to be. I plan to work on this tomorrow and hope to get it completely mocked up. After that I need to take it all back off and clean up the rails/cuts. Then re-install for the final time. On Wednesday I have the steering rack coming so that will be nice to get it on the ground and steering again.
 

Attachments

  • 21BA96D1-02A3-42A2-869D-6E2E013FD2E5.jpeg
    21BA96D1-02A3-42A2-869D-6E2E013FD2E5.jpeg
    197.2 KB · Views: 1,661
  • 9E57096D-9600-46EA-ADB7-7BEA7EA35A73.jpeg
    9E57096D-9600-46EA-ADB7-7BEA7EA35A73.jpeg
    172.2 KB · Views: 1,235
This is Kewl(y):icon_hornsup:
 
The pictures from AJE solved this puzzle. The K-member does bolt up to an existing rivet hole. It needs drilled out a few sizes bigger. As does all the holes being used. Once you bolt up the front it will align the rear bracket. Mark the centers and drill the holes. Those are the only holes that need added. When looking for the front K-member hole it's 17.75" from the back of the front body mount. (See pic). AJE was right about leaving all the upper parts loose when getting it all bolted up before the final tightening. I had to fight with the upper shock mounts and support bars that mount to the firewall. I actually had to hit the one side with a 5lb sledge to get that firewall to push back a bit so I could bolt up the passenger side. I also ended up being short on washers. I'm thinking they didn't intend on washers being used on both sides. I'm going to get more so I can have washers on both sides. I would also like slightly longer bolts that attach the upper cross member to the upper shock mount. In order to get them bolted together I had to remove the washer and lock washer. This was as far as I got. Ran out of steam to tear it back down. Mounting the wheels was a chore since I don't have rotors yet. But I really wanted to see it on the ground.

All n all not terribly hard to install. It is basically a bolt on kit once you remove all the factory suspension parts and brackets. This should make the install much quicker for anyone else doing this. I'm not sure why AJE couldn't send a couple pics and minor instructions with it. Really all I needed was those two pics and I figured it out.

I could say more but it's not really about the suspension kit. More about the build overall. I'm tempted to start a build thread on here but at the same time conjuring one up is a bit of work.

Some technical notes: The front could come down another inch if needed. I bet it'll need to come up though once the engine and everything else is installed. The front wheel combo which I'm not using for this build is 17x10.5 et22 with 285/40/17. Personally I think a 18" wheel with 40 series tires will fit better. Which is what I'm doing. The rear for now is explorer springs which gives a good drop.
9.jpg
10.jpg
11.jpg
12.jpg
13.jpg
14.jpg
15.jpg
16.jpg
17.jpg
 
Last edited:
I hadn't heard of this before and really appreciate you sharing. :icon_thumby:
 
Looking at the pic where the crossmember is nearly touching the master cylinder it would clear fine once I smacked the crossmember back on the passenger side. For the last mock up I loosely installed the driver side first which made the passenger side off. Hence I think the stock Master will fit fine once both sides are bolted down.

For anyone not aware this kit uses SN95 mustang spindles and strut assemblies. So Basically now I have upgraded sn95 mustang suspension under the front end.
 
That's a neat kit. I'm sure that's miles better compared to TIB. Forgive my ignorance of the changes between -'95 and 96'- frames, but would it have been possible to cut off the factory dual wishbone from a later junkyard ranger? I can't say I know the most about suspension but in theory wishbone should be better? I guess you would not get the benefit from the crazy bracing your kit has...
 
Probably would have been cheaper. In general Dual wishbone suspension is better than a Macpherson strut assembly. But there's plenty of cars running fast lap times using a Macpherson setup. Plus I also gained rack and pinion steering, coil overs, tons of brake options, and lost weight. And on top of that it was convenient. I get what you're saying though. Really I should have started with a different platform ;missingteeth;
 
By the time you purchase, cut out, and clean up a wishbone setup from a donor truck, then replace all bushings, ball joints, tie rod ends, etc.. You'd probably have the same amount invested as buying one of these k-members I imagine. It'll also help the front/rear weight balance a ton after a larger engine is installed. This truck will handle like it's on rails with the sn95 style parts. It should really make a difference with the ride quality more than anything. The ttb/coil setup rides like complete garbage when you're using 40 series tires.

There's also the added benefit of gaining access to all areas under the truck when working on it. These k-members allow a ton of access.
 
Another note: I'm not sure why the kit doesn't come with washers for both sides of everything. Like the engine mount through bolt, all the lower control arms, and for the rack&pinion. Not sure in total how many extra I ended up needing but it was around the 25-30 range.
 
Last edited:
The manufacturer may be thinking that people will weld the nuts to the inside of the frame once everything is lined up and finally installed..
 
Im glad you have this up. I Literally just bought a frame for my 90 to do this but I was gonna go with the mustang k member and build strut mounts. What had to happen with the steering to go over to rack and pinion?
 
Im glad you have this up. I Literally just bought a frame for my 90 to do this but I was gonna go with the mustang k member and build strut mounts. What had to happen with the steering to go over to rack and pinion?
I haven’t got that far yet. I’ll have to do a complete custom steering shaft with 3 joints in it going through a heim joint on the frame to clear the headers on the v8. But I’m also adapting electronic power steering to the stock ranger column. I could post a pic of the rack installed this weekend. I got the suspension all off and cleaned up the rails/painted them. Plus I now have the rack, bump steer kit and rotors. Hopefully I have time to test fit the motor too
 
You bought a manual rack with it? For the electric conversion...?
 

Sponsored Ad


Sponsored Ad

TRS Events

Member & Vendor Upgrades

For a small yearly donation, you can support this forum and receive a 'Supporting Member' banner, or become a 'Supporting Vendor' and promote your products here. Click the banner to find out how.

Recently Featured

Want to see your truck here? Share your photos and details in the forum.

Ranger Adventure Video

TRS Merchandise

Follow TRS On Instagram

TRS Sponsors


Sponsored Ad


Sponsored Ad


Amazon Deals

Sponsored Ad

Back
Top