• Welcome Visitor! Please take a few seconds and Register for our forum. Even if you don't want to post, you can still 'Like' and react to posts.

'85 Bronco II Paint & Body Thread


Frickin' sweet!!! Yeah, I would use a DA polisher... the one I have is a corded electric one from Harbor Freight. It is one of the rare HF gems that works really well. You can get various foam pads for it (or swap out the velcro backing pad for an adhesive style one.) You can also get what's called an interface pad, it is basically a piece of foam that's about 1/2" thick that goes between the velcro backing pad and your sandpaper - commonly used for Trizact pads, it gives you some cushion for contours on the body and helps prevent sanding through on body lines.

I would be really tempted to try hitting it with rubbing compound on a foam pad first, and then a polishing compound, and then wax. Try that on a small area first before you sand it and see if you are happy with the results.

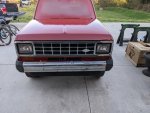
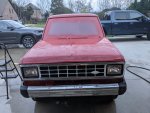
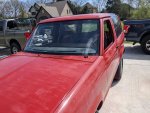
I have a few things I'm going to correct with a nib file... My stupid water separator dripped water from it on the hood!

Anyhow, very small things and a few bugs that decided to show up.

I might wait on the rest and just hit problem areas with 2000 grit. You're right, might not have to do a lot other than polish.

I actually ordered a DA polisher from Max Shine - saw a YouTube video about them that had a discount code. For the DA, 3 pads, and 2 towels it was $76 shipped. Figured that was as good a deal as any.

BTW, that astro paint gun is sweet. Super easy to clean and well made. I felt like it was well worth the price tag.
 
I just keep following along here as I contemplate what I will do with my Bronco II.
 
Looks great! A little wet sanding and polishing and it'll look shiny and new
 
What grit would you recommend starting at? 1500?

Yeah 1500 will work, and then you can hit it with a cutting compound and then a finishing compound. If you want to get it really flat, meaning no orange peel, you could do a round or two of 1500 and then 2000. A standard wood block works, or the hard rubber ones.
 
Yeah 1500 will work, and then you can hit it with a cutting compound and then a finishing compound. If you want to get it really flat, meaning no orange peel, you could do a round or two of 1500 and then 2000. A standard wood block works, or the hard rubber ones.

I've got the soft foam block by 3m and durablocks.

I also have wet paper up to 3000 grit. I'm thinking 1500 and 2000 might be enough. Luckily the Bronco isn't too big. Glass takes up a lot of the panels.
 
I've got the soft foam block by 3m and durablocks.

I also have wet paper up to 3000 grit. I'm thinking 1500 and 2000 might be enough. Luckily the Bronco isn't too big. Glass takes up a lot of the panels.

Durablocks work great, that's what I used on most of my Ranger, especially the more curved sections. 1500 and 2000 with a polish after will work great
 
Did a little assembly today while I wait on my DA polisher to get here.

I'm going to leave everything off of the panels until I cut them and polish them.

I do need to polish to bumpers something awful!

And yes that is a new grille.
 

Attachments

  • PXL_20220320_225920152.jpg
    PXL_20220320_225920152.jpg
    217.8 KB · Views: 125
Started wet sanding tonight after some assembly from over the weekend. I ended up breaking the pivot stud on my vent window, so I'll end up getting a pair from the junkyard I'm sure. I might could fix it, but I don't see it lasting long.

I started at 1500 grit and will do 2000 grit tomorrow, then I'm going to buff with a DA. I'm going to use meguiars M105 and M205, I've heard they have a learning curve, so I'll start on the roof.... No one sees it easily. Lol.

I don't know that the buffing will fix every defect, but it will definitely look great. I didn't want to go below 1500 grit to start.

Wanted to get a lot of parts on the Bronco so I could see most of this done. One step at a time.

New windshield tomorrow!
 

Attachments

  • PXL_20220321_235126949.jpg
    PXL_20220321_235126949.jpg
    180.2 KB · Views: 106
  • PXL_20220321_235135505.jpg
    PXL_20220321_235135505.jpg
    202.4 KB · Views: 117
  • PXL_20220321_235149882.jpg
    PXL_20220321_235149882.jpg
    206.7 KB · Views: 91
  • PXL_20220321_235207953.MP.jpg
    PXL_20220321_235207953.MP.jpg
    186.4 KB · Views: 93
It's coming along nicely! All of your hard work on it is really paying off. Keep on truckin'!
 
Awesome. Should like great after a polish :icon_thumby:
 
Seriously? You painted this outside? In the shade? Not on your driveway I presume, but somewhere out on you lawn? Or did you do this in your garage?
It looks really good. Makes me rethink where and how I will repaint my Ranger.
Again, really looks nice.
 
Seriously? You painted this outside? In the shade? Not on your driveway I presume, but somewhere out on you lawn? Or did you do this in your garage?
It looks really good. Makes me rethink where and how I will repaint my Ranger.
Again, really looks nice.

Drive way in shade. No lawn. I think the paint being easy to spare helped a lot.

I highly recommend Tamco Paints. Prices are pretty good and their products have great reviews.

Thanks for the compliments. I plan on starting the polishing tonight.
 

Sponsored Ad


Sponsored Ad

TRS Events

Member & Vendor Upgrades

For a small yearly donation, you can support this forum and receive a 'Supporting Member' banner, or become a 'Supporting Vendor' and promote your products here. Click the banner to find out how.

Recently Featured

Want to see your truck here? Share your photos and details in the forum.

Ranger Adventure Video

TRS Merchandise

Follow TRS On Instagram

TRS Sponsors


Sponsored Ad


Sponsored Ad


Amazon Deals

Sponsored Ad

Back
Top