• Welcome Visitor! Please take a few seconds and Register for our forum. Even if you don't want to post, you can still 'Like' and react to posts.

Project Fordzuki


pickuptrucker

New Member
Solid Axle Swap
Joined
Jan 21, 2009
Messages
219
Reaction score
0
Points
0
Location
corvalis or/woodenville wa
Vehicle Year
1997
Make / Model
ford
Engine Size
2.3 baby!
Transmission
Manual
this build is awsome! looking good with the new motor. it sounds knarley what exhaust is on it in the vid?


Loanranger

Member
Joined
Aug 6, 2007
Messages
842
Reaction score
4
Points
18
Age
43
Location
Puyallup, Wa
Vehicle Year
1989/
1972
Make / Model
Ford/
Fordzuki
Engine Size
2.9/2.3
Transmission
Manual
this build is awsome! looking good with the new motor. it sounds knarley what exhaust is on it in the vid?
Thanks. :icon_thumby: It's running open header in the vid, I have it dumping under the rig now as you can see in the pics, but I still need to throw a muffler on it.

I played around a little on it last night, got the brakes bled, and the steering column mounted in the firewall. I still need to finish rocking the steering box down, and get the column mounted to the dash, as well as tie the top of the pedal bracket to the dash too. I had to take tonight off, just got home from an I-car class.
 

doorgunner

Lab Rat for V.A. hospital
U.S. Military - Veteran
V8 Engine Swap
MTOTM Winner
2009 Truck of The Year
TRS Banner 2010-2011
TRS Banner 2012-2015
Joined
Oct 22, 2008
Messages
12,784
Reaction score
516
Points
113
Location
New Orleans (8' below sea level & sinking)
Vehicle Year
1934/1989
Make / Model
Ford Ranger
Engine Type
V8
Engine Size
350+1
Transmission
Automatic
2WD / 4WD
2WD
Total Lift
N/A
Total Drop
3/4
Tire Size
23570R15
My credo
JESUS Loves Ya!
:icon_surprised:

:icon_hornsup:


(I better go work on my little toy truk now :icon_bounceblue:)
 

Loanranger

Member
Joined
Aug 6, 2007
Messages
842
Reaction score
4
Points
18
Age
43
Location
Puyallup, Wa
Vehicle Year
1989/
1972
Make / Model
Ford/
Fordzuki
Engine Size
2.9/2.3
Transmission
Manual
:icon_surprised:

:icon_hornsup:


(I better go work on my little toy truk now :icon_bounceblue:)
Your little toy truck is shinier than mine. :icon_twisted:


So I got the steering done finally. I had to swap pressure lines over too, cause the fittings weren't quite the same, and I could see a little seapage going on when I was filling it. I also added a dayco trans cooler to the P/S return, so it should keep things nice and cool. :icon_thumby:

I got the underdash stuff finished up too, I had to mount the pedal bracket to the dash, as well as the steering collumn. So this is what I came up with.


The original plan was to have sleeves this long, and a through bolt, but I couldn't find any long enough, so I improvised. I welded a nut to either end of the sleeve, and it just has a bolt at either end now. :D


Clearance now. I'm way happier about this than an 8th inch.


Started figuring out how many different panels I'm gonna need. :D


Still need to find a place for this too. I'm thinking right under the pcm, under the dash.


So tomorrow it's trans tunnel time. Hopefully I can get the gas pedal mounted up too....
 

Loanranger

Member
Joined
Aug 6, 2007
Messages
842
Reaction score
4
Points
18
Age
43
Location
Puyallup, Wa
Vehicle Year
1989/
1972
Make / Model
Ford/
Fordzuki
Engine Size
2.9/2.3
Transmission
Manual
I made some headway on the trans tunnel yesterday and today, it's going alot slower than I'd like it to, but I also want to make the work halfway presentable too, so I'm taking my time. Basically, the drivers side is done, except for the ONE piece that I need in there to mount the gas pedal.


This is for access to the reverse sensor...


And this one is for the clutch bleeder.

Bending the first piece for the passenger side.

Which turned out to not quite fit because of how the floor sits. :annoyed:


I can invision the passenger floor looking like a cluster f$#@, but I'll do my best to make it look good.

I also got the welds around the perimeter of the firewall ground down and polished, I'm still toying with the idea of running the intake into the firewall, I'm not sure if I even have room to run the conventional airbox... everythings definately coming along though, I can see possibly wrapping up loose ends this weekend, I have friday off for the 4th. :icon_confused::yahoo:

Pat is also coming back on the 5th, and I still need to finish putting his rig back together so hopefully we'll have a trip planned for the 11th or so... not to get the carriage before the horse.. :icon_twisted:
 

Loanranger

Member
Joined
Aug 6, 2007
Messages
842
Reaction score
4
Points
18
Age
43
Location
Puyallup, Wa
Vehicle Year
1989/
1972
Make / Model
Ford/
Fordzuki
Engine Size
2.9/2.3
Transmission
Manual
If only cardboard and masking tape were structural..... :icon_twisted:

I got some more done tonight, I'm waiting for another piece of 18 guage large enough for the passenger side, so till tomorrow it sits in cardboard. I did get the piece made so I can finally mount the gas pedal, and the starter piece for the passenger floor. I'm hoping to get the rest of the floor made in two pieces, and the whole passenger side of the trans tunnel made from one piece, then it's just the top and it's done. :yahoo:


The floor starter


The last bellhousing cover piece.


And that's it for tonight.
 

Loanranger

Member
Joined
Aug 6, 2007
Messages
842
Reaction score
4
Points
18
Age
43
Location
Puyallup, Wa
Vehicle Year
1989/
1972
Make / Model
Ford/
Fordzuki
Engine Size
2.9/2.3
Transmission
Manual
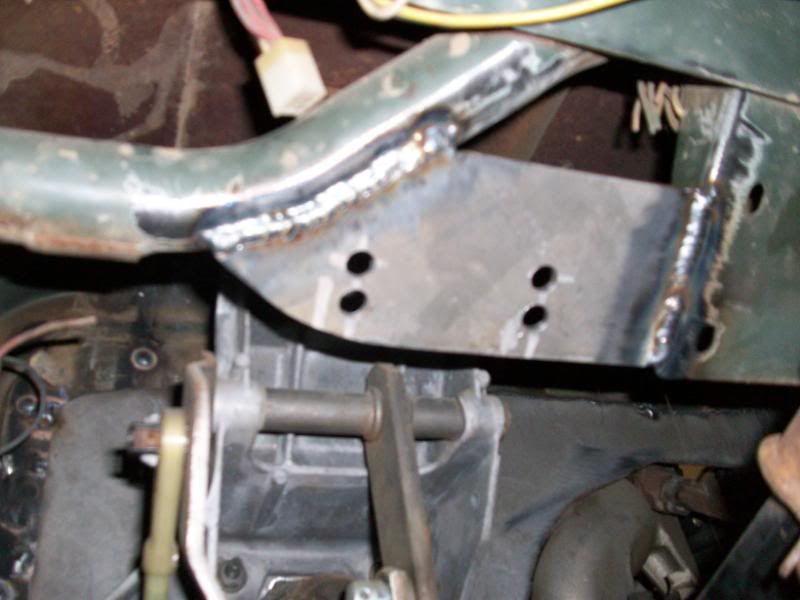
Getting real close now. My supplier brought some more 18 guage today, so I was able to make the passenger side piece.


"Close enough for the chicks I go with" :D


All welded in.


On a side note:
Since there are no gaps involved, I'm welding it in as I go, basically just to make the clamping easier. I don't want a bunch of screw holes to weld up. If this were say, a rear body panel, where the quarter to decklid gap was a concern, I would clamp it all up and then weld. :icon_thumby:

Aside from the top cover around the shifters, I think 3 more pieces will do the trick. After i get the one on the upper part of the tunnel made, and the floor piece that attaches to the firewall made, I'm going to take a break on the welding and grinding and prep the outside of the firewall for paint. Which reminds me AGAIN, I need to make the little shelf that the right apron attaches to on the outside of the firewall. But after I get it painted, I can hang all the wiring back up, find the routing of it, and start wrapping it back up. That and hang the front clip back on it, (which obviously needs to be done before the wiring) so I can hang the P/S cooler, and run the winch cables back through.


So what's left:
-Sheetmetal work (Bracket dude, bracket) :icon_rofl:
-Prime, seamseal, and paint
-Hang front clip
-Mount P/S cooler
-Rewire winch
-Gas pedal
-air cleaner
-rewrap and install wiring harness
-rewire ignition
-Buy fuel pump and wire it
-wire in tach
-wire in headlights and taillights
-run a return line to the fuel cell
-reinstall seats
-shifter boots
-bleed brakes and clutch
-Wheel the piss out of it. :D
 

mornin151

New Member
Joined
Mar 1, 2009
Messages
145
Reaction score
0
Points
0
Vehicle Year
1984
Make / Model
ford
Transmission
Manual
nice build up... i have a few questions though... new to this stuff... on the rear end you hiems on a bar with gas shocks and on the front you used leafs with a tab welded on it with a bolt that turned... why did you use a hiem or something else there? i would think that would wear out rather fast and be a hard pivot....
 

Loanranger

Member
Joined
Aug 6, 2007
Messages
842
Reaction score
4
Points
18
Age
43
Location
Puyallup, Wa
Vehicle Year
1989/
1972
Make / Model
Ford/
Fordzuki
Engine Size
2.9/2.3
Transmission
Manual
:icon_confused: From reading your post, I assume you are talking about the third pivot in the rear shackles?

For some reason I can't find the picture that's posted here of the old one on photobucket, but here is one of the new ones, before welding it up, it also has two half circle gussets to support the two tabs on the bottom of the square tube.

But basically, as you can see, the bottom most piece is actually the stock front leaf eyes, with a couple inches of spring sticking out. The eyelet gets bolted to the housing via two tabs. Then at the middle pivot, it sandwiches plate/spring eye/plate. These are welded to the box tube above, and gussetted like I said. Yes, the third pivot is a high friction joint, but it was free, unlike another "heim".

I ran it like that for the last two years, and finally bent the two tabs that stick down from the box tube, and also caved the bottom wall of the box tube. When I pulled it apart, the threads had barely worn off the bolt. I replaced the bolts when I replaced the shackles, but I'm still running that design. When I build a new rear housing it might get changed, but it works, and works well for this rig. :icon_thumby:
 

mornin151

New Member
Joined
Mar 1, 2009
Messages
145
Reaction score
0
Points
0
Vehicle Year
1984
Make / Model
ford
Transmission
Manual
oh... i thought all the stress and force on that bolt would cause it to wear rather fast...
 

Loanranger

Member
Joined
Aug 6, 2007
Messages
842
Reaction score
4
Points
18
Age
43
Location
Puyallup, Wa
Vehicle Year
1989/
1972
Make / Model
Ford/
Fordzuki
Engine Size
2.9/2.3
Transmission
Manual
On a heavier rig, yeah it'd probably wear a little faster, but the bushing and spring take up most of the vertical load, and the joint only twists by maybe 20*. With how light the rig is, there are alot of things that work on it, but wouldn't on a heavier rig.
 

mornin151

New Member
Joined
Mar 1, 2009
Messages
145
Reaction score
0
Points
0
Vehicle Year
1984
Make / Model
ford
Transmission
Manual
oh... cool... what do they do when they get to the heavy ones then... sorry for soo many questions...
 

Loanranger

Member
Joined
Aug 6, 2007
Messages
842
Reaction score
4
Points
18
Age
43
Location
Puyallup, Wa
Vehicle Year
1989/
1972
Make / Model
Ford/
Fordzuki
Engine Size
2.9/2.3
Transmission
Manual
You could use a johnny joint, or a greasable sleeve. You basically just look at the forces at play, and find materials to suit those needs.
 

Sponsored Ad


Sponsored Ad

Staff online

Today's birthdays

Member & Vendor Upgrades

For a small yearly donation, you can support this forum and receive a 'Supporting Member' banner, or become a 'Supporting Vendor' and promote your products here. Click the banner to find out how.

Latest posts

Truck of The Month


Mudtruggy
May Truck of The Month

Recently Featured

Want to see your truck here? Share your photos and details in the forum.

Follow TRS On Instagram

TRS Events

25th Anniversary Sponsors

Check Out The TRS Store


Sponsored Ad


Sponsored Ad

Sponsored Ad


Amazon Deals

Top