• Welcome Visitor! Please take a few seconds and Register for our forum. Even if you don't want to post, you can still 'Like' and react to posts.

Need guidance on removing wires, etc. for duraspark convert? Pictures.


Doug Burgoyne

Well-Known Member
Joined
Oct 3, 2023
Messages
69
City
Oregon
Vehicle Year
1984
Transmission
Automatic
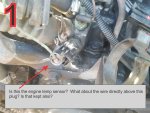
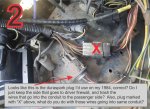
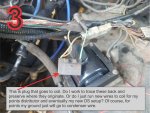
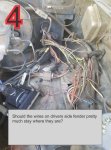
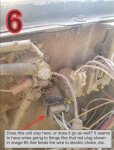
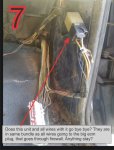
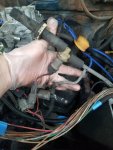
The write ups (which I've read many times) makes it seem so simple. Just rip out 95% of the wires and flip over the fender. Doesn't seem so simple though, when I go to do it. Lot's going on in there, and I don't want to remove something that will cause issues later...trying to go more scalpel than hatchet on this. Any help is appreciated. I understand on my non a/c truck, I need to find and preserve wires for choke, oil sender, engine temp sensor, alternator. But I'm sure other wires in that engine bay must also be left. FIRST...let me tell you I will be doing Duraspark version later after the core I have is rebuilt. In the meantime I'm putting in a points distributor from 74 Mustang II and non feedback carb. So I want to keep things in there I'll need for my 1984 truck DS conversion down the road. Going old school for now. I took some pictures of areas I hope to get some feedback on, and wrote my questions on each picture. I numbered them so you can reference appropriate image # in any replies. See images and provide any suggestions on what can go, and what to leave...and best practices there. Thanks in advance! ,
 

Attachments

  • 1.jpg
    1.jpg
    154.4 KB · Views: 148
  • 2.jpg
    2.jpg
    189.9 KB · Views: 159
  • 3.jpg
    3.jpg
    182.1 KB · Views: 138
  • 4.jpg
    4.jpg
    127.3 KB · Views: 133
  • 5.jpg
    5.jpg
    143.5 KB · Views: 138
  • 6.jpg
    6.jpg
    121.4 KB · Views: 137
  • 7.jpg
    7.jpg
    124.4 KB · Views: 132
#1. That’s temp sensor for the ECU. The one above it (single wire) is temp gauge and the one you want to keep.
#2. Don’t unplug it, cut the wire after the connection leaving enough to splice onto. So when done you can disconnect your new system without cutting wire. Remove all the black casing covering the wires. The second plug may have wires you need to save so trace alt , oil pres, temp, choke and tag them with tape at the plug so you know which wires to keep.
#3. Don’t need. ADI feed to ECU.
#4. Yes
#5. The is the ECU port for the code reader. Don’t need it. You will also find a single wire close to that and it as well is part of the ECU port. I cut the choke wire off and later sliced it to a 12v source
#6. No. It can go.
#7. It can go as well.
 
@tw205 is spot on on your specific questions.

In case it helps, here's what I removed from my '84 for Duraspark (not including carb & distributor):
Duraspark removed parts a.jpg


And here's the modified new harness that went back in:
Duraspark new harness.jpg


The new harness plugs back into the two connectors shown in your second picture.
.
 
Could one you fine gentleman tell me where oil send unit is on 2.8? Sure I could find...but so dirty around block, would be nice to have starting point. Thx again, you guys are the best!
 
Could one you fine gentleman tell me where oil send unit is on 2.8? Sure I could find...but so dirty around block, would be nice to have starting point. Thx again, you guys are the best!

Driver's side of the front of the engine, down low.
 
Another way I have done this, go in the interior and find the ECM behind the pass side kickpanel. Unplug the large wiring plug. You will also find a relay near it, this is the EEC power relay. Unbolt it also. You will find the odd wire or two that may feed the EEC relay and possibly another relay out under the hood. You will usually just have to cut the single power wire and tape it off. You will have to do this regardless of how you clean up the wires.

But to continue, take the large ECM wiring plug, kink it to the side tightly and push it through the large hole in the firewall. There is a large hole with a grommet there. Once you get the large wiring plug through the firewall, start gently pulling an tracing everything hooked to it. Besides one or two hot wires, everything else is going to leave that is hooked to this harness. Distributor wires, wires to the carb, to all the sensors, etc. Once this harness becomes free, you are done.

I saw you were talking about the electric choke. This will have to be re-wired. Originally it was fed by a odd relay mounted over near the starter solenoid. The computer controlled the relay, and the relay sent the choke 12v. I re-wired my choke to the white/black wire on the back of the alternator. This is only about 7v, but it seems to work ok and only sends voltage when the engine is running. Another way to do it would be to get a different oil pressure switch and wire it to a relay so when you have oil pressure, it sends 12v to the choke.

Since you are running the duraspark II system, I am assuming you will be using the DSII ignition box? If you do, you will need to find the proper plug on the driver's side inner fender and plug it in. That is so you can use the original resistor wired in the harness. The harness is already wired for DSII, since they used the same harness for the 4 cylinder trucks and they used the DSII system originally. The v6 used the TFI ignition that does not use the resistor. What I did was use a DSII distributor, but used a GM HEI ignition module. The HEI does not require a resistor, so I was able to use the original white/blue wire that fed the TFI coil, and was able to use the TFI square coil also.
 
take the large ECM wiring plug, kink it to the side tightly and push it through the large hole in the firewall. There is a large hole with a grommet there.

Looks like this:
ECM conn 2.jpg


The big connector will go through the hole., you just gotta work the right angles on it as you worm it through the firewall.

I lucked out and had a blank rubber grommet in my junk collection that fit the hole perfectly. Or you could cut a piece of sheetmetal and glue/putty it in place, or use screws or pop rivets, to cover the hole.

Whenever you do wiring (or "unwiring"!) like this, disconnect the battery.
 
Awesome addition RobbieD...what would I do without you guys? How about this silly looking squid? Has Vac line to black box on driver side behind grill, another that looks to go to back of intake port, big one to old feedback carb, wires, etc . Hope it can go too! If so, do things need to capped off, etc? Thanks!
 

Attachments

  • 20231019_181508.jpg
    20231019_181508.jpg
    129 KB · Views: 100
Last edited:
Awesome addition RobbieD...what would I do without you guys? How about this silly looking squid? Has Vac line to black box on driver side behind grill, another that looks to go to back of intake port, big one to old feedback carb, wires, etc . Hope it can go too!
That is your evap system for the carb. It hooked to that large nipple on the front of the carb, and when the ignition is off, that solenoid with the red wire opened, and let gas fumes from the carb go down the pipe to the box on the frame which is the charcoal canister. You have a line also from the fuel tank. When the fuel in the tank expands, instead of breathing into the atmosphere it breathes into the charcoal canister.

There is some more piping in the system with another solenoid, when conditions were right, the computer would activate this other solenoid and let the engine suck the fumes stored in the canister into the engine to be burned. Called the purge valve.

You can get rid of some of this stuff or try to keep it. The China knock-off carb I used didn't have the large nipple on the carb, so that part was left off. I did keep the fuel tank hooked up, and then I put the purge line on a constant vacuum. I used one of the left over very small plastic lines to restrict how much it purged. Didn't want too big of a "leak" through the purge system.

You can keep that red wire hanging around under the hood from the carb evap solenoid. It's a good fused ignition on source if you need it for something else.
 
You can keep that red wire hanging around under the hood from the carb evap solenoid. It's a good fused ignition on source if you need it for something else.
EVAP solenoid power wire is the one I use for 12v to electric choke. 👍
 
Franklin2, I like that idea! What did you guys do for new hot wire to coil? With duraspark box, ect., I assume that supplies power to coil...but with my initial setup with points dizzy, will any key on hot work? Suggestions on that? On evap, I'd like to cobble together some simplified version as well. For tank at the least...my new carb doesn't have port for fuel bowl either. Man, you guys are life savers...I propped up the hood, grabbed my wire cutters, looked around and thought oh sh!t. Like the guy in the proverbial movie trying to defuse the bomb, and not knowing what wire to cut!
 
Last edited:
The cleanest way to power the coil is to use the original coil power wire. If your using a points distributor, you should use a resistor on the "run" power, and full 12v power on the "start" power. You can do this at connector C102.

Take a look at these two 1984 Ranger schematics. The "EEC" diagram is what you have now; the "MCU" diagram is how the '84 4 cylinders were wired. See how the factory uses a resistor wire on the Red/L Green "run" wire on the MCU systems?

84 EEC (2).JPG

84 MCU (1).JPG


C102 is the gray connector in your second picture in your first post. On the cab side of C102 is the Red/L Grn wire and the Brn/Pnk wire. Get a coil ballast resistor, and run the Red/L Grn through it. Connect the other side of the resistor to Brn/Pnk, AND to the coil (+). Now you have a full power in "start" and reduced power in the "run" switch position.

Here's what the ballast resistor looks like, and the C102 connector that I described to get the Red/L Grn and Brn/Pnk wires. This is my '84 when I Durasparked it.

ballast resistor.jpg


You don't need to cut any wires to remove the unneeded wiring, and you shouldn't be cutting wires. Just unplug and remove the unneeded wiring. It's honestly easier and cleaner, and it eliminates your cutting a wrong wire by mistake.

Only the Red/L Grn at C102 needs to be cut, in order to add the resistor inline.
 

Sponsored Ad


Sponsored Ad

TRS Events

Member & Vendor Upgrades

For a small yearly donation, you can support this forum and receive a 'Supporting Member' banner, or become a 'Supporting Vendor' and promote your products here. Click the banner to find out how.

Recently Featured

Want to see your truck here? Share your photos and details in the forum.

Ranger Adventure Video

TRS Merchandise

Follow TRS On Instagram

TRS Sponsors


Sponsored Ad


Sponsored Ad


Amazon Deals

Sponsored Ad

Back
Top