• Welcome Visitor! Please take a few seconds and Register for our forum. Even if you don't want to post, you can still 'Like' and react to posts.

Jballard81's 1994 super cab 4.0 4x4 Restore


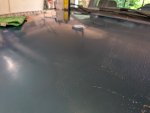
Had the day off from work today and did bodywork from 9am-4pm. I got the bed sides sanded down to 2000 grit in hopes of just clear coating them, but now I'm on the fence if I should paint the spots where I burned through to primer.

Will have to think on that. Here's a couple pics. I'm open to opinions
1000013971.jpg

1000013969.jpg


Still need to finish sanding the roof, fill the gap at the top of the windshield and sand the upper doors.

I was hoping to just paint the roof, hood and maybe tops of doors but I filled a spot on my door as well.
1000013973.jpg


I read that I will need to let the color cure for about a week before spraying the 2k clear coat I got. Maybe able to paint tomorrow or Sunday.
 
I was taught by an old timer for just a little bit. I am not a pro in no way. He would clear right after he painted. I have always done the same thing too and no problems. If you let it dry a week and then clear coat, you will need to scuff the paint for the clear to mechanically bond to the paint. If you clear after painting, it will chemically and mechanically bond.

You will be surprised at what a difference in the same paint to 20 year old paint has faded to. That is where they blend old paint to new paint. I really don't know how to do that. I have seen videos on it and they tend to go to body lines, so the eye doesn't really catch the difference. One reason I paint the whole truck; plus the projects I get they all need repainted.

Just so you know, when you do lay down fresh paint, if using basecoat/clear coat, don't worry about how the paint looks. It will look really dry and flat. Clear is what gives it that wet look. I tend to lay down 4-5 coats of clear as I have a real problem with orange peel. With the extra layers of clear, I am able to wet sand the orange peel off.

I was scared of my first paint job. Just what I have seen you done, I am thinking you will have to paint the whole truck just because trying to blend is not as easy as it sounds for me. I tried it one time, and to me it was obvious of old and new paint. I just use a Harbor Freight paint gun. It works great for me. My first several paint jobs were with a 20 gallon compressor. By the time my paint cup ran out, and I was filling my gun it would build up pressure. You know where all the damages are so you will notice them more than anybody else

If you are going to use a spray gun, get a pressure regulator at the gun. That is where you will get the pressure set at correctly. To get the proper air pressure, have the trigger fully pulled to adjust the pressure. From the hose, get those disposable desiccant water traps. Depending on your humidity, you may need to change disposable with each fill up of paint. Otherwise you will get water dripping off of the end of the gun. Water dripping is not a problem on doors and bed side, the vertical panels. It is an issue when painting your hood and roof as the water will drop on the surface. Ask me how I know lol,
Thanks for this Terry!
The Dupli-color is an acrylic lacquer and i got this Spray max USC 2k clear coat. It says it for use over all base coats, but i also read some reviews that the 2k clear can cause a reaction and that you would be better off to wait 5 or 6 days.

What you said makes sense to me, paint, then clear, all in one session.

I also agree that my 30 year old Cayman Green will undoubtedly look different from the new stuff coming out of the can. I'm going to use all the skills YouTube has taught me to attempt to use body lines to 'break' the eye from it. I don't know how successful I will be. Like you said, I will always notice the blemishes b/c i worked on it, and it's still going to look better than it did.

I only have a 10gal compressor right now so i've been doing research on LVLP spray guns for future paint work. The disposable desiccant water trap is new to me and i wouldn't have thought to get something like that. Learning a lot about body work and paint. appreciate it!
 
It will look better then it did. You may find it rewarding, it does take patience and energy, but paint can make a truck that look like junk to something really nice. Paint really isn't the hard part, it is all the steps getting to it. Any questions you may have ask and I will help where I can. I have painted about 20 trucks in my time. Not a pro but if you seen what they looked like in the past, it only helped them. My truck is getting repainted this fall or winter. I got caught in 2 hailstorms, yea!!!
This is how I do my spray guns to eliminate water. You will go thru quite a few desiccant dryers. HF has them a lot cheaper than other places.
IMG_4217.jpeg
 
Last edited:
@Terrys87
What's the gauge on your gun used for?
I'm guessing to control pressure at the gun instead of at the compressor?
(I say that because I have a similar gauge on the my compressor and it seems like it would make more sense to have the pressure reading at the gun for a more accurate reading).
 
@jballard81 I was searching rear view mirror upgrade andsee you did the 99 Tahoe upgrade. You mind expaling more about it?
 
@jballard81 I was searching rear view mirror upgrade andsee you did the 99 Tahoe upgrade. You mind expaling more about it?
Sure! I found a write up for it somewhere, but mainly just needed to grab the mirror and as much if the wiring pigtail that's connected to the mirror (pull back the headliner and you'll see there's plenty). You really ultimately need the power line and the input line from the sensor.

The sensor is clipped to front of the radiator, near the middle. And grab some of the wiring for that as well if it's easy to grab.

I ended up still using some speaker wire to extend it to the mirror pigtail. I hardwired the power wire into the fuse box and the mirror itself is a direct fit for the little metal peg deal already on the windshield.

Found the article https://www.therangerstation.com/tech/compass-temperature-mirror-install/#gsc.tab=0
 
Last edited:
Well, mistakes may have been made. Mainly due to my impatience 😂

"Finished" sanding everything to 320 got it masked off and started spraying. I severely underestimated the amount of paint needed after I decided to spray more than I originally thought. 2 cans didn't get me very far, ordered 4 more but can't get them until tomorrow.

6448.jpg

6450.jpg


I think the color will end up pretty close. All the reading I did to prep for painting said sand everything to 320.
As I was tossing the empty cans I just happened to check the instructions and it definitely said to sand to 600 😱

I can definitely see my sanding marks still, maybe a couple more layers of paint will bury them, maybe not. Going to send it and clear coat it tomorrow either way. Will make for a good story and lesson learned.
 
Thanks for the link, I have looked all over the place for it and knew there probably was information on it somewhere. I still stumble into things and still learning how to use the sight.

I have seen 320 used as a finish sanding, sometimes it works and other times it does show. So now I finish off with 600 and not had any issues with scratch marks. It will look better than it did, and you will notice the flaws more than anybody else as you know where they are. Most people are worried that painting their truck or sanding it is going to melt away. It will still be there when you are done, lol. A few more times under your belt and each will get better. It is amazing what a paint job can do, and I think it is rewarding when you get it done.

For me as a rule of thumb and not counting doing the inside of the bed, 2-3 quarts is needed to do a complete truck. You are getting there.
 
Well, I finished it though I probably should have pulled back and re-evaluated. Sprayed 4 more cans of the dupli-color, probably could have used another 4...

Used a 2k clear coat spray can. First can exploded when I hit the activator button. Second can worked pretty well but obviously wasn't enough. Ran out of time and material. I'm out of town for the next week. It can cure and when I get home I will see if a cut and polish will improve it some.

At this point I'm going to call it a $250 learning lesson that cost me ~30 hours of my life 😂.

I'm hoping the polish will even it out some and I can live with it for a few years. If not, I'm already researching single stage paint systems.

@Terrys87 - what kind of spray gun do you use? I was initially thinking gravity feed, but I watched a guy have really good results with syphon feed.

Overall, it's "better" than it was at least. And again, I learned a lot

6452.jpg

6453.jpg

6457.jpg

6459.jpg

6455.jpg


This last pic shows the part that came out the best. Paint laid down really well on that corner above the taillight.
 
Hey your truck is still there and did not melt away. It survived your first paint job. It does look better then when you started and looks better overall. Your tail light area is probably what it looked liked brand new. It is surprsing what a new paint job can make you feel when it is a really ugly truck and looks new again and to me is rewarding. The guy that taught me bodywork and paint would only use the siphon an he did insurance jobs which is usually about 5 year old cars or newer. He was 75 and had to quit at 80 due to his eyesight.He passed at 82.

I have gotten great results with both. On Primer either gun will not create a fog unless you are priming a whole truck. With either gun, you will have a fog in the whole shop in about 5 minutes when painitng. A siphon gun will fog a lot faster. I will do spot priming with out a mask. Painting, no way, I mask up.

The gravity feed uses a little less paint, but I think I get better results from a siphon feed. That was used for years on show cars. I am comfortable either way with each gun. Once you get the spray pattern set, it is the same for either gun.

You will get trash in your paint and sometimes hear as trash in your paint with either gun. What it is paint particles that go up in the air and settle down in your paint. In my shop I have some $10 box fans at each end of the shop. If you can get the paint fuems out of the shop, it will stop the paint dust or reduce it. Keeping your floor wet witha running water hose can help trap the fumes and dust from going in the air.

On single stage paint I have a bad problem with orange peel. I painted my first truck for $50 as you can get it really cheap and it lasted about 5 years before starting to fade. I dont get orange peel in base coat paint. I orange peel like crazy on clear coat. That is one reason I add a couple of other coats of clear so as I can wet sand it off.

Congratulations on your first paint job. It has taken a lot of your fears away to encourage you on your next paint job and you learned a lot.
 
Last edited:
After 6 or so hours of wet sanding with 800, 1200 and finally 2000. I mainly focused on the hood and the doors and and the very tops of the bed.

Then DA and compound and finally some wax and I'm much happier with how it turned out.
6470.jpg


6472.jpg

6473.jpg

It's definitely not perfect but it's so much better than it was. Didn't even pretend to touch the roof, too hot out.
 

Attachments

  • 6471.jpg
    6471.jpg
    127.7 KB · Views: 14
Looks like a very well preserved factory paint job to me. I'd guess it was low mileage truck always stored in a climate controlled garage.
 

Sponsored Ad


Sponsored Ad

TRS Events

Member & Vendor Upgrades

For a small yearly donation, you can support this forum and receive a 'Supporting Member' banner, or become a 'Supporting Vendor' and promote your products here. Click the banner to find out how.

Recently Featured

Want to see your truck here? Share your photos and details in the forum.

Ranger Adventure Video

TRS Merchandise

Follow TRS On Instagram

TRS Sponsors


Sponsored Ad


Sponsored Ad


Amazon Deals

Sponsored Ad

Back
Top