Switch Panel Installation:
To begin installation, you need to pull the lower trim panels off from both sides. They pull straight back
You'll find a screw of both sides that holds the panel the 12V outlets are in.
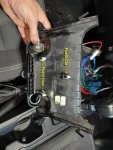
With those removed you can remove the panel by pulling straight back. There are (3) plastic clips that hold it in place. See the photo below.
Next, remove the plugs for the 12V outlets. I used a small screwdriver and pushed down and back on the tab to slide the plug off.
Next, locate the (2) plastic tabs inside of the12V outlets and push them up as you wiggle the socket to get it loose.
Next, side the metal socket out of the front of the outlet, and then remove the outlet cover.
Reinstall them into the new panel in the reverse order. Note that the socket is keyed (notched) to only go in one way.
I used a
Wire Insertion Tool to insert wires through the edge of the rubber boot in the firewall where the wiring harness passes through. I love this tool. Just push the tip through the rubber boot and feed the wire through the handle.
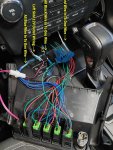
You can see in the pic above that I connected all of the red wires to one wire. That wire runs to the auxiliary 12V fuse block I added on the passenger side kick panel. This wire will provide power to the switches. When the switches are turned on, they send this power to a replay that sends power to the lights.
All of the black wires go to a single black ground wire.
I used the wiring from the left side 12V outlet to power the USB charging port.
All of the blue wires go to a single blue wire that will illuminate the switches when the dash lights are on.
The green wires were labeled with blue painters' tape and connect to individual wires that lead to a relay for that particular light.
You have to re-use the white plastic clips from the factory panel on this new panel.
When installing, make sure the wires clear these clips and none of them are getting pinched anywhere.
I actually struggled a little to get this panel to snap in place. Probably from all of the wire behind it.
The side panels were a pain in the butt to get to snap in place as well.
I love the finished look of it. It looks like it came from the factory like this.
Link:
For anyone interested, you can purchase this panel at:
AIR ON BOARD (AOB) - FORD Panel for Ranger PX2 PX3
It takes the 900 Series Switches forund here:
AIR ON BOARD (AOB) - Toyota Push Switches - Switches - Products
They're labelled as light blue Toyota switches.

")


