NERanger96
New Member
- Joined
- Jun 30, 2023
- Messages
- 2
- Reaction score
- 2
- Location
- New England
- Vehicle Year
- 2006
- Make / Model
- Ford Ranger
- Engine Type
- 3.0 V6
- Transmission
- Automatic
- 2WD / 4WD
- 2WD
- Total Lift
- 0
- Total Drop
- 0
Hi all, as the title says, I recently swapped the frame on my 2006 Ranger with a 2004 sub-frame, and wanted to post my experience, along with any tips that can help out people. I'll try to be as thorough as possible, but may miss minor details. I'll be happy to answer any question that you have. (Disclaimer: usually, the car is lifted with 12 ton jacks around the cab mounts, but due to being on gravel and not having high enough jacks, I did the majority of the repairs with the tires on. It didn't make it harder necessarily, but having the rear axle able to move freely would have sped up the process slightly. I can explain more if needed).
Immense gratitude to RockAuto, my new friend Bobby, and everyone online who was able to help me through this project.
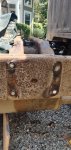
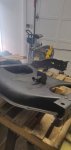
As you can see in the first photo, the rear leaf spring shackles are completely detached from the frame. I had been driving like this for a little over a year before I found a replacement frame locally, and was able to pick it up.

After taking off the bed (all bolts broke), rear tail lights, filler neck, vapor canister, assorted wiring/brackets) I started by taking the leaf springs off. After they were off, I removed the gas tank (definitely be empty when starting, makes the whole process easier; also, take pictures along the way, even if you never look back to check.)
With the gas tank removed, time to start grinding off the rivets. I fortunately had someone with experience working exclusively on Rangers on speed dial, and he recommended to start with a grinding wheel, take off the majority of the material, give it a few taps with a mini-sledge and punch, and then grind more. Not much to add to that, other than wear the appropriate PPE, especially goggles. Buy 2-3 wheels, as when they wear down, they start to become harder to maneuver in tight spaces.
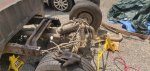
With all of the rivets ground down and punched out, the rear section slides off without issue. (I did the majority of the project by myself, but with proper jack stands/pumps, this can be done with one person).
With the main sub-frame removed, the cross member can be slid/tapped out.
Ideally, prep on the new frame should be done beforehand (wire wheel/brush, rust converter, enamel, etc), but I wasn't able to.
Beginning with the new frame, grind out the rivets the same as before if the place you bought it from cut right on the cab rails. If you need/want to replace the leaf spring hanger or shackles, along with the shock mounts, now would be the time to do that.
Now, the worst part of the entire project: frame prep. With an angle grinder, metal brushes, and wire wheels for a drill, it took roughly 5-6 hours to get the frame, cross member, and exhaust heat shield to a place where I felt comfortable beginning rust-proofing. Harbor Freight has a variety of wheels/discs (the polycarbide disc is very effective, and removes little, if any material other than rust). I tried using a cut off wheel to take the head off of some rivets before grinding, but didn't notice it being easier to punch out. If a rivet was very stubborn, I would take small drill bits and work by through the center of the rivet so that I would have something to set the punch in, and also allow the metal to 'cave in" and push out. I did also use heat, mainly on the cross-member bolts from the new frame. Tip: try not the bend the wings of the cross-member, as when you go to intall, it may create a gap that will close when torqued, but overall makes it harder as the holes do not line up as they should. If they do get bent, do your best to flatten then out before you slide it in the frame.
After everything was wire wheeled, I took acetone and wiped the frame 3-4 times (until the rag was clean) and used a shop vac set to blow to speed up the drying process. After waiting an hour for the acetone to evaporate (overkill, but at this point, what isn't?), I used three cans of Rust-Oleum rust reformer (https://www.amazon.com/Rust-Oleum-Automotive-248658-10-25-Ounce-Reformer/dp/B003HG48AC/ref=sr_1_2?keywords=rustoleum+rust+reformer&qid=1688182821&sprefix=rustoleum+,aps,122&sr=8-2, per Project Farm's recommendation) to base coat the frame, following the instructions on the can.
After waiting a day or two for the paint to dry, I covered the frame with Dupli-Color grey enamel (I chose grey so that I would see the black WoolWax coverage after). For good measure, I also covered all the new hardware I bought with a light coat of the Rust-Oleum and Dupli-Color.
As the paint was drying, I purchased Grade 8 hardware (nuts, bolts, lock washers), making sure to purchase bolts that had shoulders that would clear the washers. A lot of frame repair that I saw online used shorter bolts, and that may be okay short term, but ideally something with a shoulder that isn't digging into the threads will be better for the frame, hardware, and strength long-term.
As per Ford's recommendations, I went to the next size up, 1/16 of an inch, for the bolts (3/8 to 7/16, and 7/16 to 1/2). Spend the extra money and get a drill bit that will not bind in the hole and get dull. This was by far the most nerve-wracking part of the process, as making the holes bigger without a reamer is possible, but requires some level of precision. What worked for me was getting the bit going as fast as possible, touching it lightly to the hole to get centered, and then pushing in with even pressure all around as not to cause it to oval out, as eventually this would cause the oval to widen over time. Out of the 30 or so bolt holes that I widened, only one or two were not "perfect". You will also need to make the holes on the new hardware the same size, which I did by taking the piece, placing it on a piece of wood, stepping on it, and then repeating the procedure (fast bit, even pressure).
Take your time; this is the most important step.
With everything enlarged, I hit it with a quick coat of Rust-Oleum and enamel (one coat before, touch ups after, as they will get scratched during installation.)
Assembly time!
Honestly, the process is reverse of disassembly, but there are a few tips and tricks that knowing beforehand would have helped with.
First, slide the cross-member in first, as getting it in with the exhaust created an unneeded and wanted headache. Second, slide the frame on inch by inch, as not to cause unnecessary twisting. Ideally, someone will help you get it on. After the frame is roughly in the final position, set jacks by the spare wheel area to keep the frame level; this will make aligning the bolt holes a lot easier.
Starting with the cross-member bolts, I did "bolt, lock washer, flat washer, frame/hardware, lock washer, flat washer, hex nut (medium thread locker where applicable, most bolts). I had heard mixed reviews on using lock washers, but with ample shoulder space, it's more of a piece of mind thing; it definitely won't hurt the strength, and costs only a few extra dollars.
If the holes don't line up perfectly, but are within 1/16 or so of each other, use a ratcheting strap to pull the frame where you need it to go before enlarging the hole(s). There was only one hole that I had to enlarge, but it was more of a burr-removal than enlargement. Use a dead blow hammer to coax any stubborn bolts into place as well.
Every bolt except for one went in without interference. If there is interference (in my case, one of the leaf spring hangers didn't allow the upper cross member bolt to go in), install and torque one first, and then slide the next past. Usually the bolt itself will clear, but the hex nut or washers won't; if you push the hex nut against the frame/hardware and then thread through, it will usually go in without issue. I torqued all bolts to 75-85 ft lbs (re-torqued after the first 20 miles of driving post completion).
With the new sub-frame attached, along with any new hardware, the rest is relatively simple. I noticed getting the top of the shock in first, and then pulling the bottom into place, was easier than the other way around. Ideally, your rear axle will be low enough that you won't have to push/pull, but it is doable with the tires on the ground. By putting the shocks on first, you are more or less in the correct position axle/drive shaft/leaf spring wise, and will need very little to no lateral movement to get the leaf springs into the hangers.
To install the leaf springs, I started with the front and worked towards the back. Refer to the pictures you hopefully took earlier, or watch YouTube videos, to ensure that brake lines/wires are in the correct position (if any are incorrect in the photos I took, they were moved to the proper position before test-driving).
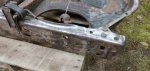
Leave the u-bolts attaching the leaf spring to the axle semi loose, enough to manipulate the end of the leaf spring into the correct position when installing. Again if the truck is jacked up using 12 ton jacks in the front, this will be easier, but it is possible, as shown in the photos I have uploaded. Once thee front and rear leaf springs were attached, I torqued the u-bolts to roughly 75 ft lbs.
Depending on what time you are doing this work, applying a second light coat of the enamel may be beneficial, specifically if you can let it dry overnight.
With the leaf springs, shocks, exhaust, vapor canister, and brake lines reattached to the frame, all that's left to do is install the gas tank, replace any broken wiring/bulbs, and in my case, replace the u-joint and rear brake drums (separate post).
An empty gas tank makes for an easier install, but I was able to get mine in with around 3 gallons in it; not easy, but not impossible.
With the gas tank in, I waited to reconnect the connections (which were taped off and covered with saran wrap) until after touch ups with the paint.
After touching up and reconnecting the tank, all that's really left to do is put the bed back on. The car, which you can drive at this point, was backed up to the bed, which was upright in the correct orientation, and leaned onto the wheels, and then shimmied back into position. Even if your bed bolts and clips look okay, spend the 30-40 dollars and buy new; if you have to take the bed off again, they will probably not like being loosened a second time. With the bed on, the brakes were reconnected, clips were put back in position, and the tank was refilled; time to test it out!
Overall, this project was 5/10 hard, with the hardest parts being sourcing a frame, prepping the frame, and setting everything into position by myself.
The Ranger, compared to almost every other car and truck, is a breeze to work on. Everything is simple, spacious, readily available, and there is a plethora of forums, YouTubers, and now myself, who can help you through the process.
Feel free to reach out for more detailed descriptions, photos, or general questions, as I now can call myself a true member of the Ranger Danger club
Immense gratitude to RockAuto, my new friend Bobby, and everyone online who was able to help me through this project.
As you can see in the first photo, the rear leaf spring shackles are completely detached from the frame. I had been driving like this for a little over a year before I found a replacement frame locally, and was able to pick it up.
After taking off the bed (all bolts broke), rear tail lights, filler neck, vapor canister, assorted wiring/brackets) I started by taking the leaf springs off. After they were off, I removed the gas tank (definitely be empty when starting, makes the whole process easier; also, take pictures along the way, even if you never look back to check.)
With the gas tank removed, time to start grinding off the rivets. I fortunately had someone with experience working exclusively on Rangers on speed dial, and he recommended to start with a grinding wheel, take off the majority of the material, give it a few taps with a mini-sledge and punch, and then grind more. Not much to add to that, other than wear the appropriate PPE, especially goggles. Buy 2-3 wheels, as when they wear down, they start to become harder to maneuver in tight spaces.
With all of the rivets ground down and punched out, the rear section slides off without issue. (I did the majority of the project by myself, but with proper jack stands/pumps, this can be done with one person).
With the main sub-frame removed, the cross member can be slid/tapped out.
Ideally, prep on the new frame should be done beforehand (wire wheel/brush, rust converter, enamel, etc), but I wasn't able to.
Beginning with the new frame, grind out the rivets the same as before if the place you bought it from cut right on the cab rails. If you need/want to replace the leaf spring hanger or shackles, along with the shock mounts, now would be the time to do that.
Now, the worst part of the entire project: frame prep. With an angle grinder, metal brushes, and wire wheels for a drill, it took roughly 5-6 hours to get the frame, cross member, and exhaust heat shield to a place where I felt comfortable beginning rust-proofing. Harbor Freight has a variety of wheels/discs (the polycarbide disc is very effective, and removes little, if any material other than rust). I tried using a cut off wheel to take the head off of some rivets before grinding, but didn't notice it being easier to punch out. If a rivet was very stubborn, I would take small drill bits and work by through the center of the rivet so that I would have something to set the punch in, and also allow the metal to 'cave in" and push out. I did also use heat, mainly on the cross-member bolts from the new frame. Tip: try not the bend the wings of the cross-member, as when you go to intall, it may create a gap that will close when torqued, but overall makes it harder as the holes do not line up as they should. If they do get bent, do your best to flatten then out before you slide it in the frame.
After everything was wire wheeled, I took acetone and wiped the frame 3-4 times (until the rag was clean) and used a shop vac set to blow to speed up the drying process. After waiting an hour for the acetone to evaporate (overkill, but at this point, what isn't?), I used three cans of Rust-Oleum rust reformer (https://www.amazon.com/Rust-Oleum-Automotive-248658-10-25-Ounce-Reformer/dp/B003HG48AC/ref=sr_1_2?keywords=rustoleum+rust+reformer&qid=1688182821&sprefix=rustoleum+,aps,122&sr=8-2, per Project Farm's recommendation) to base coat the frame, following the instructions on the can.
After waiting a day or two for the paint to dry, I covered the frame with Dupli-Color grey enamel (I chose grey so that I would see the black WoolWax coverage after). For good measure, I also covered all the new hardware I bought with a light coat of the Rust-Oleum and Dupli-Color.
As the paint was drying, I purchased Grade 8 hardware (nuts, bolts, lock washers), making sure to purchase bolts that had shoulders that would clear the washers. A lot of frame repair that I saw online used shorter bolts, and that may be okay short term, but ideally something with a shoulder that isn't digging into the threads will be better for the frame, hardware, and strength long-term.
As per Ford's recommendations, I went to the next size up, 1/16 of an inch, for the bolts (3/8 to 7/16, and 7/16 to 1/2). Spend the extra money and get a drill bit that will not bind in the hole and get dull. This was by far the most nerve-wracking part of the process, as making the holes bigger without a reamer is possible, but requires some level of precision. What worked for me was getting the bit going as fast as possible, touching it lightly to the hole to get centered, and then pushing in with even pressure all around as not to cause it to oval out, as eventually this would cause the oval to widen over time. Out of the 30 or so bolt holes that I widened, only one or two were not "perfect". You will also need to make the holes on the new hardware the same size, which I did by taking the piece, placing it on a piece of wood, stepping on it, and then repeating the procedure (fast bit, even pressure).
Take your time; this is the most important step.
With everything enlarged, I hit it with a quick coat of Rust-Oleum and enamel (one coat before, touch ups after, as they will get scratched during installation.)
Assembly time!
Honestly, the process is reverse of disassembly, but there are a few tips and tricks that knowing beforehand would have helped with.
First, slide the cross-member in first, as getting it in with the exhaust created an unneeded and wanted headache. Second, slide the frame on inch by inch, as not to cause unnecessary twisting. Ideally, someone will help you get it on. After the frame is roughly in the final position, set jacks by the spare wheel area to keep the frame level; this will make aligning the bolt holes a lot easier.
Starting with the cross-member bolts, I did "bolt, lock washer, flat washer, frame/hardware, lock washer, flat washer, hex nut (medium thread locker where applicable, most bolts). I had heard mixed reviews on using lock washers, but with ample shoulder space, it's more of a piece of mind thing; it definitely won't hurt the strength, and costs only a few extra dollars.
If the holes don't line up perfectly, but are within 1/16 or so of each other, use a ratcheting strap to pull the frame where you need it to go before enlarging the hole(s). There was only one hole that I had to enlarge, but it was more of a burr-removal than enlargement. Use a dead blow hammer to coax any stubborn bolts into place as well.
Every bolt except for one went in without interference. If there is interference (in my case, one of the leaf spring hangers didn't allow the upper cross member bolt to go in), install and torque one first, and then slide the next past. Usually the bolt itself will clear, but the hex nut or washers won't; if you push the hex nut against the frame/hardware and then thread through, it will usually go in without issue. I torqued all bolts to 75-85 ft lbs (re-torqued after the first 20 miles of driving post completion).
With the new sub-frame attached, along with any new hardware, the rest is relatively simple. I noticed getting the top of the shock in first, and then pulling the bottom into place, was easier than the other way around. Ideally, your rear axle will be low enough that you won't have to push/pull, but it is doable with the tires on the ground. By putting the shocks on first, you are more or less in the correct position axle/drive shaft/leaf spring wise, and will need very little to no lateral movement to get the leaf springs into the hangers.
To install the leaf springs, I started with the front and worked towards the back. Refer to the pictures you hopefully took earlier, or watch YouTube videos, to ensure that brake lines/wires are in the correct position (if any are incorrect in the photos I took, they were moved to the proper position before test-driving).
Leave the u-bolts attaching the leaf spring to the axle semi loose, enough to manipulate the end of the leaf spring into the correct position when installing. Again if the truck is jacked up using 12 ton jacks in the front, this will be easier, but it is possible, as shown in the photos I have uploaded. Once thee front and rear leaf springs were attached, I torqued the u-bolts to roughly 75 ft lbs.
Depending on what time you are doing this work, applying a second light coat of the enamel may be beneficial, specifically if you can let it dry overnight.
With the leaf springs, shocks, exhaust, vapor canister, and brake lines reattached to the frame, all that's left to do is install the gas tank, replace any broken wiring/bulbs, and in my case, replace the u-joint and rear brake drums (separate post).
An empty gas tank makes for an easier install, but I was able to get mine in with around 3 gallons in it; not easy, but not impossible.
With the gas tank in, I waited to reconnect the connections (which were taped off and covered with saran wrap) until after touch ups with the paint.
After touching up and reconnecting the tank, all that's really left to do is put the bed back on. The car, which you can drive at this point, was backed up to the bed, which was upright in the correct orientation, and leaned onto the wheels, and then shimmied back into position. Even if your bed bolts and clips look okay, spend the 30-40 dollars and buy new; if you have to take the bed off again, they will probably not like being loosened a second time. With the bed on, the brakes were reconnected, clips were put back in position, and the tank was refilled; time to test it out!
Overall, this project was 5/10 hard, with the hardest parts being sourcing a frame, prepping the frame, and setting everything into position by myself.
The Ranger, compared to almost every other car and truck, is a breeze to work on. Everything is simple, spacious, readily available, and there is a plethora of forums, YouTubers, and now myself, who can help you through the process.
Feel free to reach out for more detailed descriptions, photos, or general questions, as I now can call myself a true member of the Ranger Danger club
Attachments
-
 139.8 KB Views: 184
 -
 207.6 KB Views: 187
 -
 124.8 KB Views: 174
 -
 58.3 KB Views: 180
 -
 62.7 KB Views: 178
 -
 151.4 KB Views: 253
Last edited: