• Welcome Visitor! Please take a few seconds and Register for our forum. Even if you don't want to post, you can still 'Like' and react to posts.

The Missing Linc (1987 4WD 2.9 5spd short short)


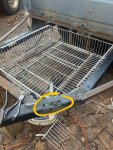
This is how I do Ranger trailers... and others. Note how much frame I left, lots of them have a really short tongue and they track like shit. You want long so you can put a tool box or something on there and generate some tongue weight.

I build a T out of whatever is on hand - 2" square works good. Tack that between the frame, cut pie shapes out of each frame rail near where you put the top of the T and bend the frame in so that it's touching the middle piece. Clean the ends of the frame up so it looks nice, burn it all together and then put a cap of flat strap over the ends of the frame and bend that around. The T also serves as an excellent place to mount a jack but I've done them on the outside that pivot on a swivel deal too.

As I've said before I'm not judging your project, most of mine just focus on two things - (a) the easiest route to my goal and (b) what I feel is the safest. I have no doubt that a Ranger rear frame can handle a reasonable load and not break. In fact the trailer pictured has two complete 351w engines and a 4.0 engine in it, plus a whole bunch of other heavy stuff. I build things so that if I died tomorrow and my wife had to sell all my crap to strangers, I could rest easy knowing that it wasn't going to fall apart on the road.

You can make these look as nice as you want. I spent way more time than usual on this one because I wanted to keep it... it's not done, I am going to build a storage box on the front and make it look a little more elegant like you say.

View attachment 102061

No issue taken, never ever. We all listen to a different drummer, mine just happens to be a five piece band that’s way out in left field.

As you said, shortest distance to your goal. Your goal is obviously a very flexible functional trailer. I’ve realized in hindsight that 90% of my goal was getting out of bed and working through my challenges, great therapy. On the trailer, the goal is to make a matching trailer to the Missing Linc, my 87 Ranger/Lincoln conversion. I’ve already had the vision of calling it the Lincoln “Towncart.” I’ll always have the F250 for anything heavy I do, so these are for light utility use like may be taking a trip, and mostly fooling around.

Keep all the comments coming in, it actually gives me vision. I hope mine always help or at least amuse….

Idea on securing the spare. What about using a hitch pin with a clip to secure it from bouncing around? I’m not sure of the distance you are working with from the box to the spare. So the bolt might be the better solution. You could always drill the end of the bolt to accept the clip as well.

I did the latter for the attachment points on my ramp for the trailer. No tools needed to secure or remove the bolt or pin that way.
 
I haven’t worked out all the details yet.

Right now, it’s just an angle iron sling under the trailer, from back to front (scrap pieces from an old tool stand I built in the 80s, and a piece of bed frame). I don’t think the tire could slide out the sides, but I’m still going to put something on each side to make sure. Just for grins, I’m thinking of doing that with some chain, which will also cause the tire to self center.

And while I said “bolt,“ I’m thinking of some kind of pin, bent 90 at the top inside the box with a hole in it, so I could use a clevis pin or something if I put a little clip inside the bottom of the box. The main thing is, I’m trying to avoid a padlock and chain or anything like that.

I’m also planning on putting a flat plate over the exposed part of the tongue (geez, maybe diamond plate?), just for appearance. I could put a box lock on that with a matching key to the toolbox, but just dreams right now.

I want to strengthen the 2 x 2 frame from the trailer to the coupler a little bit too. So I was thinking of running angles, back and up from the tire sling, and also from the front and up, to create a mini truss situation, that will stiffen the 2 x 2. The 2 x 2 is plenty strong for my use, but I’ve learned putting a couple little struts in will take all the flex out of it, so you don’t run the risk of a fatigue crack in the long run. And they look cool.

Did I mention my five piece band is an experimental jazz band?
 
Last edited:
The new tail lights for the matching trailer came in today. They sure are purty!

IMG_0753.jpeg


I have 4 or 5 pair on the shelf from my scavenging, but they’re all pretty faded, and hard to sand, polish and clear coat. At $27.66 delivered, I can sell the rest as a lot on Craigslist, and have a little profit and new lenses.

Now I have to go scavenge at the pull-a-part to get a couple of Lincoln emblems to stick on to match the Missing Linc,
 
I finally developed a vision for how to do the toolbox and the tongue on the front. I’ve been waiting for my Pintle/lunette ring to come in, but I started working on it again today. I’m going to use an adjustable Pintel ring so I can adjust the height to the truck so they’re both straight.

I’m glad for the pause, because I came to the conclusion that the 185/65/14 tires on the Towncart are just too anemic compared to the 235/75/15 wheels and tires on the Missing Linc, especially since they’ll be painted the same, so I’ve decided to go with the latter. I’ll use the 14s on the Road Raith when I get started with that.

I only have one extra 235/75/15 steelie, soooo, now I have to go find another 15 inch steelie. And I think I’m going to use one of those super skinny 16 inch spare tires as the spare for the trailer. Still under development, but then the spare tire basket doesn’t have to hang so low.

A while back, I picked up some of the old nasty as heck real paint stripper. I’ve done a few little jobs with it, but today I used it to take the pinstripe and the vinyl rock guards off the Towncart. I was just going to test a little spot, but it worked so well, I got the whole pinstripe off in about 10 minutes. But gosh, that’s nasty stuff. It took the blue paint off too!

IMG_0905.jpeg
IMG_0904.jpeg
IMG_0906.jpeg


I washed the residue off with super concentrated soapy water with ammonia.

Progress…
 
Like always, I have to double check my welds, but I think I have the tongue frame the way I want it.

IMG_0911.jpeg


Using the skinny spare brought up the bottom of the spare tire basket about 5 inches. I’m not worried about it hanging too low now. I’m going to use something like expanded metal to make a basket around the tire, which could also a hold a jack and some tools, maybe a small toolbox. I have about a foot between the front of the tire and the support for the basket.

Here it is with the toolbox sitting on it

IMG_0909.jpeg


I’m going to use some free truck box aluminum diamond plate to cover the front of the bed outside of the box. I’m also going to cover the two little triangles on the bottom outside of the box. And once I get my tongue jack figured out, the front will have a diamond plate cover as well. Part of it will come out like a hatch to access the spare tire. And I’m thinking I’ll put a little rail, maybe, and some hooks, if I needed to put something on the sides of the box or in front of the box.

If you look into the bed, that’s a 205/70/14, sitting on top of a 235/75/15. I measured the height from the ground to the bottom of the fender opening on the truck, and it only works with the 235, so I’ll be looking for another. Believe it or not, the bed needs to be 2 inches higher to match the truck. Maybe I’ll add a pool ladder in the back to get in and out.
 
I lost the instructions from the wire shelving manufacturer, so I’m not sure if this is exactly 1000% right. But I think it’s pretty close.

IMG_0925.jpeg
IMG_0924.jpeg


It was under the fine print where it said. “alternate use of shelving material for spare tire, jack, and tool carrier.”
 
And you can always park it over a good bed of coals and grill burgers with it. Outstanding! (y)
 
And you can always park it over a good bed of coals and grill burgers with it. Outstanding! (y)

And it works great for getting groceries!

I only had a couple hours today, but I cut up more of the same toolbox (that I’ve been cutting up for two years) to make the little bottom plates each side of the toolbox:

IMG_0927.jpeg

IMG_0928.jpeg


I was able to use a piece of the long side of the box along the top under the lid. That way it has a double brake under the trailer toolbox that keeps it strong. Might look a little rough, but after I buff the edges, caulk, and paint it, it looked like it was made for it (by someone better than me).

I roughed in some diamond plate for either side of the toolbox on the front of the bed, and it just didn’t look right. Then I remembered I had this real estate sign made out of aluminum. It’s Aluminum that’s a hair thicker than a beer can laminated on both sides of some of that corrugated plastic sign panel stuff. It’s very rigid, and obviously it’s rust proof.

IMG_0929.jpeg
IMG_0930.jpeg


I contoured it to the outside shape of the bed. I’ll rivet it in, and then use caulk around the edge.

And no, I didn’t steal the sign. I stole Michael’s client and he abandoned the sign. I think he wanted it to end up on old the front of a ranger bed trailer project. It’s very on target with his real estate skills…

Forgive me Lord, all in humor….
 
I riveted the face panels on the bed, capped them with a piece of my surplus 1 inch aluminum angle, riveted the tread plates down on either side of the toolbox, and I bolted the toolbox down.

IMG_0933.jpeg


The box is bolted to the face of the bed, and then bolted down to the frame, strengthening the tongue frame.

It was a pain in the butt because some idiot put a whole bunch of wire shelving underneath it, and it was hard as hell to get the nuts in place. I used another one of Rick’s Tips, I put a little bit of that E 6000 goop on my finger tip, and that held the nut steady as I screwed the bolt down from the top.
 
What's your plan for the hole in the top of the frame both sides? That a serious problem if you ever have a heavy load on that trailer. So easy for the frame to buckle there.
 

Attachments

  • IMG_0924~2.jpeg
    IMG_0924~2.jpeg
    269.8 KB · Views: 57
I was aware of that, but I haven’t figured it out yet. I know I have to beef up that whole area. I bought a tongue jack, but not sure how I want to put it in yet, and I still don’t have a Pintle Hitch set up that I like. It’s falling together like I did the Road Ranger trailer. I do have a good understanding of all the stresses and necessary bracing, just haven’t got that far yet. But thank you, more eyes are all better than less.
 
An afterthought on bracing the tongue. Remember that I started out with a harbor freight 4 x 8 trailer frame. As stated before, if I had to do over again, I would’ve just used 2 x 2 or 2 x 3 tubing, using the harbor freight frame actually complicated the work. That’s rated at 1,250 pounds I think with the little axle they put under it. I used a 3500 pound axle.

The Ranger bed itself it is pretty stout, and bolted to the 2x2s, I’m not worried at all about the load carrying capacity up to the front of the bed, up to 2000 or 2500 pounds, but I’ll never load it that heavy. No 57 stone, well, at least not deep.

If you remember on the Road Ranger trailer, I added two little tiny braces that were supposed to be temporary (remembering I was finishing welding it together at 5 o’clock that night before I was supposed to be at the Carlisle 40th, 700 miles away).

IMG_0934.jpeg


Little tiny braces like that, compared to the 2x3 frame member, can take a tremendous amount of stress off the angle joints. While they were temporary, they’re actually an interest point on my creation, and I’ll probably just clean them up and leave them alone. They’re welded to the upright, and bolted straight through the frame. The minuscule amount of motion allowed by the bolt, versus a solid weld, almost doubles the protection of the main corner. The little bit of flex removes a hard break spot where fatigue can develop. I’m not saying it won’t, it’ll just take much longer, and the brace will slip before the joint breaks (hopefully not at the same time). The diamond plate is pinched down by that bolt, the soft aluminum being another buffer

On this trailer, I bolted the toolbox through the frame on the bottom, and then bolted it through the face of the bed. That makes the sides of the toolbox the “braces,” removing a tremendous amount of flex at the point where the frame exits under the bed. The complete box further strengthens the sides as braces.

Of course, that just shifts the flex point up to the front of the box where those two rectangular holes were in the metal I used. Consider that the closer the “week point” is to the hitch, the shorter the “lever arm” and the lower the bending action. Point being, it wouldn’t have to be a very big brace.

The reason I’m saying all this is, although I haven’t figured out the final details up there yet, it will probably be something small and sexy in keeping with my funky super budget building technique.

I reached out to a couple of the really arrogant rude people on Facebook regarding a few Pintle rings, but we live in a self-centered woke world where nobody has manners to respond timely. I’ll still wait it out, because if it works out, it’s to my advantage, and I’m not in a hurry.

Next steps on this trailer are to sand, Bondo, and caulk the bed (a few hours) getting it ready for prime and paint, while simultaneously figuring out the hitch set up and finishing that tongue. Then I’ll paint it all probably in one or two days (Rustoleum takes a good six or eight hours to dry per coat in cool weather). And then I still have the pinstripes, lights and wiring, but that should be one short day.

Just another thought on the little braces. I want to beef up the frame on the Road Ranger trailer (pop up camper frame). I’m thinking of making a tiny little 3” high truss that runs from the front of the axle housing to the step up point, that will also have a couple braces going to the upper deck. I like the truss because I’ll paint it red or Silver or such, and it will be another interest point.

Way back I think I mentioned I’ve got friends down at Georgia Tech, car nuts, and they run some quick numbers for me every now and then. When they ran the numbers on the truss 3 inches tall, I could build it with literally 1/8 inch steel rod, and it would have less flex than the 2 x 3 frame, except of course, for side bracing. Of course, I’ll use something heavier than that, so now I just have to find a bargain on some material that will work. I’ll do it when I reset the upper deck to get it level.
 

Sponsored Ad


Sponsored Ad

TRS Events

Member & Vendor Upgrades

For a small yearly donation, you can support this forum and receive a 'Supporting Member' banner, or become a 'Supporting Vendor' and promote your products here. Click the banner to find out how.

Latest posts

Recently Featured

Want to see your truck here? Share your photos and details in the forum.

Ranger Adventure Video

TRS Merchandise

Follow TRS On Instagram

TRS Sponsors


Sponsored Ad


Sponsored Ad


Amazon Deals

Sponsored Ad

Back
Top