
Introduction
Fords produced from 1983 through 1995 experience problems with the engine dying or failing to start when hot. The engine will usually run again once it cools down. This is caused by the TFI ignition module getting hot. This article discusses relocating the module to keep it cool.
The Ford TFI (Thick Film Ignition) Module
As mentioned above, the problem is caused by the thick film ignition (TFI) modules, a key ignition-system component that Ford installed in more than 22 million vehicles it manufactured and sold in the 1983 through 1995 mode years. The TFI module regulates the electrical current that fires the air-fuel mixture in each of the engine’s cylinders. To reduce costs, Ford installed the TFI on the distributor, one of the hottest locations under the hood. But because the TFI module is sensitive to heat, its mounting location creates an inordinate propensity for the TFI module to fail due to thermal stress. Making the problem even more insidious is its phantom nature. A TFI module can fail on an intermittent basis when hot, then function again when the engine cools, without leaving a trace of physical evidence that the TFI module had failed.
Remote Heatsink
A good way to correct this problem is to mount the TFI module in a remote mount heatsink. Some Fords such as the 1989 – 1995 Mercury 3.8L Cougar and 1986 – 1996 Ford Aerostar vans have the TFI mounted in a heatsink. The 1989 – 1993 Cougar has them mounted on the radiator support bracket. The 1994 – 1995 models have them mounted on the front fender apron. Aerostars have them mounted on the right front inner fender under the hood.
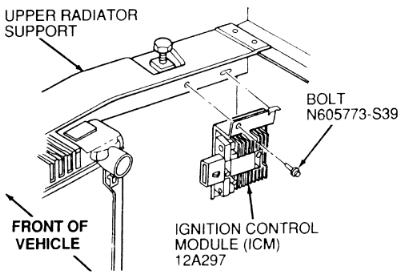
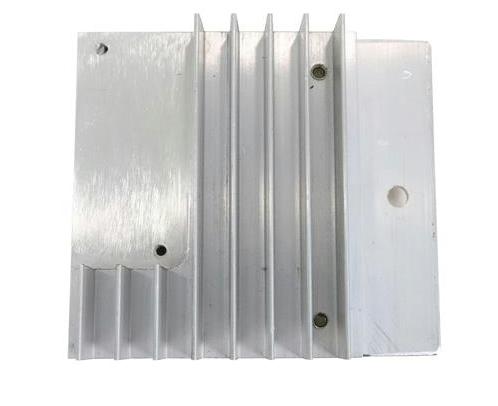
1989 – 1993 Mercury Cougar heatsink/TFI
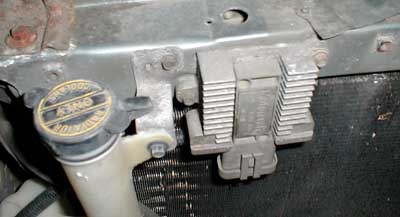
Note all the fins. Some will need to be removed for this project
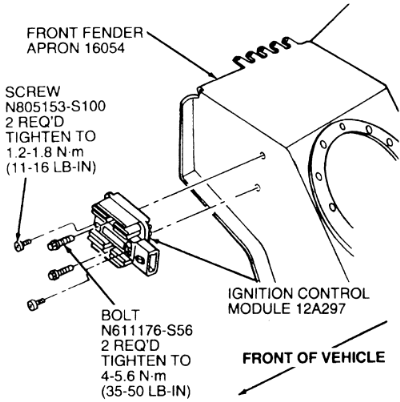
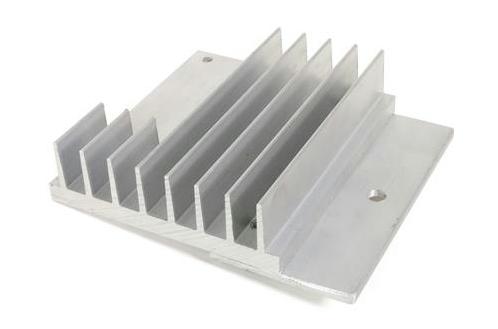
1994 – 1995 Mercury Cougar heatsink / TFI
Modifying The Heatsink
The problem with using the factory heatsink is that they don’t have an opening for the connections on the side of the TFI module. The TFI modules on those vehicles have the PIP wires integrated into the wiring harness. You could rewire the harness if you had a wiring diagram, but we’re just going to show you how to do it with a stock Ranger TFI and harness. People resolve this by cutting some of the fins out of the way.
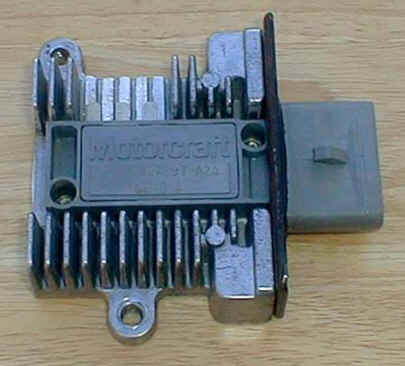
This is what the heatsink looks like off the vehicle (Fins have been removed for the Ranger TFI)
Resist the temptation to paint the heatsink to dress it up when you install it on your vehicle. Paint will not allow it to dissipate the heat as well.
Aftermarket Options
Fatfoxx offers a Ford TFI relocation kit with a heatsink that will accept your Ford Ranger / Bronco II TFI module.
Removing The TFI
Disconnect The Battery!
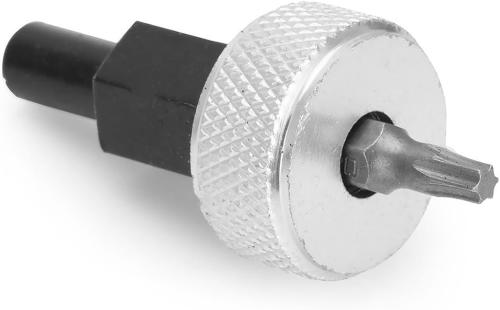
Removing the TFI module is going to require thin wall 7/32″ (5.5mm) socket
This wrench is the only way to remove and replace a TFI module. It is a special 7/32″ (5.5mm) socket with a very thin wall. On some occasions the TFI bolts will have a T-20 head. You can get a ratcheting TFI tool that has a 7/32″ (5.5mm) end and a T-20 end. The TFI never needs to be torqued down with a socket set, so the simple plastic handle design is great and simple to use. To remove the TFI simply remove the two bolts and slide the module downward. You MUST slide the TFI down before you pull it away from the distributor or it won’t come off correctly.
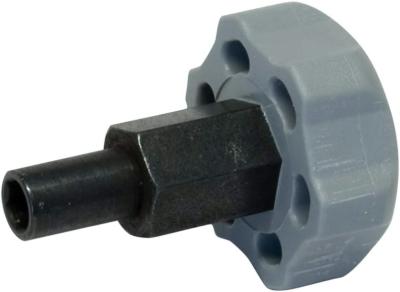
Lisle 64650 Ignition Module Wrench for Ford
Performance Tool W1216 Ignition Module Tool
Kastar FM720A Ford Ignition Module Wrench
Starting the Modifications
Begin by modifying the TFI heat sink to fit the 3 PIP connectors that are on the Ranger TFI but not on the remote mounted TFI’s that Ford later produced. Place the TFI in the heat sink and mark the fins that need to be removed for the TFI to properly fit. Place a large flat head screwdriver between the fins, push the screwdriver towards the fin you want to remove. The fin will break right off and near the bottom of the heat sink. After the Fins have been broken off you can use a metal file to remove any excess material and to make the job look clean and professional. Find a good place to mount it away from the engine.
Using the appropriate heat sink grease, smear an even film of it approximately 1/32″ thick on the base of the TFI and mount the TFI to the heat sink.
From here, there are (2) ways you can wire up the remote TFI.
Wiring Method #1 – New Harness With Connectors On Both Ends:
Fabricate the wiring harness using 3 lengths of at least 18-gauge wire. The spade connectors are your standard 18ga connectors. The males are, however, too wide for the female PIP terminals in the distributor. Simply file the sides down with a fine file until they fit snugly.
Here’s a comparison:
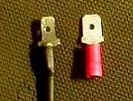
Before on the right, after filing on the left
The connector on the left had the red plastic insulation removed. The wire was crimped, soldered and covered with heat shrink tubing.
Next, go to the junkyard and cut a couple of feet of TFI wiring harness and salvage the foil wrap that Ford uses. Strip the insulation off a length of 10-12ga wire and interweave it among the foil, leaving it unattached towards the TFI end and grounding the other end to a suitable ground point. The foil insulates the wire from any interference. A trip to Radio Shack may be an easier route. They sell wire looms that will protect from any radio frequency interference and magnetic interference. Interference is obviously a bad thing; it can cause misfires if the TFI thinks it is getting the signal from the PIP to fire a plug. Install number tags to both ends of each wire so you know what’s connecting to what later. Wrap your new harness in the salvaged foil. Neaten it all up with some 1/4″ wire loom.
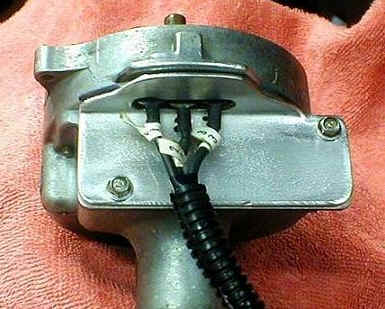
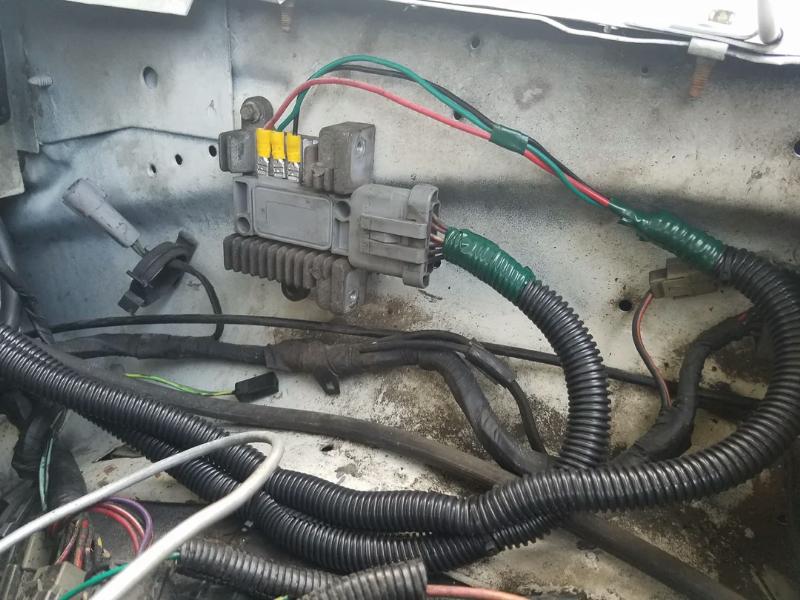
With the old TFI missing from the distributor body, a rather large opening will be left that will allow moisture/dirt to enter. You need to make a block off plate to close it up. Below you’ll see a block off plate made out of sheet metal. There is an opening made for the new TFI harness to connect to the distributor. Note the number tags on the wires.
CAUTION! At this point the TFI is turned around 180* from its normal mounting position. Be very careful and make sure that the #1 wire is connected to the #1 PIP terminal AND the other end of the #1 wire is connected to the #1 TFI terminal! Same procedure with #2 and #3! It’s very easy to get turned around here!
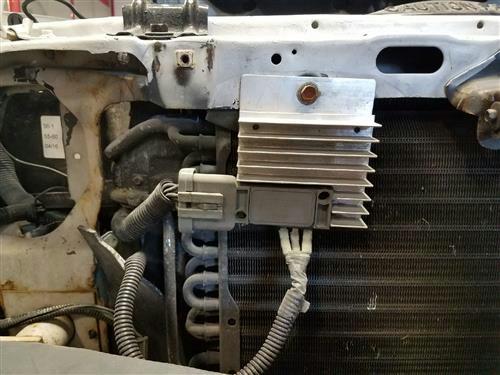
Here’s a look at the remote mounted TFI with the new harness coming in on the top. DO NOT PAINT THE HEATSINK!
Wiring Method #2 – New Harness With Old TFI Module On One End:
Some people have taken the old TFI module, gutted it and used it as a ‘plug’ for their new harness. The object is to use the (3) existing prongs in the old TFI to plug in to the Hall Effect PIP Sensor in the distributor. Once the TFI is cleared you need to remove the electronics. Do this carefully. There are three wires coming out of the top that you will need to soldier wires too. They are on the right side of the TFI and not directly under the male connectors. You can use a test light or multimeter to determine what metal prong goes to the metal pieces on the inside. Cut the end of the TFI so that the wires can be ran out of the old TFI plug. Filling it with a substance such as hot glue or some kind of epoxy is recommend to keep the wire in place and safe.
Now that you have all the connections made to relocate the TFI module, triple check all the connections and location of wires that you have ran. Make sure that the wires are not shorted inside the gutted TFI, make sure they are routed away from heat, and tight on the TFI. Connect the battery and start the car. Check the timing to ensure it’s correct. The car should idle smooth and not have any sporadic misses. If it does, recheck everything, there might be interference in the system.
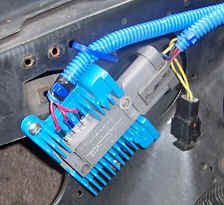
Relocated TFI Module
Here is a photo of a relocated TFI module in a heatsink. DO NOT use female wire connectors with exposed metal. Only use connectors that are wrapped in a plastic case to protect the connection from shorting out.
Related Articles
Ford EEC-IV/TFI-IV Electronic Engine Control Troubleshooting
Last Updated:
About The Author
Jim Oaks is the founder of TheRangerStation.com, the longest-running Ford Ranger resource online since 1999. With over 25 years of hands-on experience building and modifying Ford Rangers — including magazine-featured builds like Project Transformer — Jim has become one of the most trusted authorities in the Ford Ranger off-road and enthusiast space.
Since launching TheRangerStation.com, Jim has documented thousands of real-world Ranger builds, technical repairs, drivetrain swaps, suspension modifications, and off-road adventures contributed by owners worldwide. TheRangerStation.com has been referenced in print, video and online by enthusiasts, mechanics, and off-road builders looking for practical, and experience-based information.