• Welcome Visitor! Please take a few seconds and Register for our forum. Even if you don't want to post, you can still 'Like' and react to posts.

Replacing your timing belt (with pics)


rangebob

New Member
Joined
Aug 30, 2015
Messages
2
Reaction score
0
Points
0
Vehicle Year
97
Make / Model
ford
Transmission
Manual
Thank you for this thread. It was great. The only difference with mine is the mounting bracket for the power steering mount.

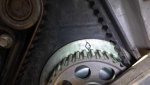
I tackled this project over the the past couple of days. The timing belt broke on the way home on Wednesday. I tore the front apart twice on Thursday. The first time I had it 180 degrees out. Lined the diamond up with the triangle so it wouldn't start at all. The second time when it started it was racing and wasn't idling correctly. Yesterday I tore it apart again and took some real time with ensuring that everything was lined up correctly. I rotated it 3 times and it was still good. I checked the tightness of the tensioner for the timing belt and rotated a few more times and it was still correct. It ran like it was supposed to.

This morning I went out to get some gas and it was back to racing. What could be causing this and if it is timing why did it change overnight?


3d914

New Member
Joined
Dec 20, 2015
Messages
1
Reaction score
0
Points
0
Transmission
Automatic
Thought I'd add some details from my recent trial with this. This was a neighbors 99 2.5L 8-plug.

First it is possible to do this job without removing and completely draining the radiator. It's best to use an impact wrench to remove the crank bolt. The Campbell Hausfeld TL1102 air impact wrench and a standard 7/8 half-inch socket will fit between the radiator and the bolt. This 250ft-lb wrench should be sufficient to remove the bolt. You may need to boost your compressor up to 100psi. That means you only have to drain the radiator enough to remove the upper hose.

The next thing I encountered was that the power steering bracket has four mounting bolts not 3, and one of them serves as a retainer for cabling. The three blue/yellow arrows are take a 13mm socket, the red/yellow takes a 10mm socket.


Once I got the cover off, I noticed the timing was off. The belt did have some surface cracking, but all the teeth were in good shape. It may have stretched some, but I think the timing was set wrong the last time it was done.

The reason I think that is because when I first set it with the new belt and the tensioner snugged up, I noticed both sprocket rotated CCW off their marks. I used the method suggested where you start from the crank and work your way CCW. Trying this twice still didn't produce the desired results, so instead I lined up the crank and the oil pump first, then routed around the tension and one side of the crank sprocket.

While a helper used a bar to relieve tension from the tensioner, I was able to guide the teeth onto the cam sprocket and keep it aligned. Triangle to triangle on the cam & diamond to diamond on the oil pump. Remember that both sprockets have identical markings - so don't confuse triangle with diamond on either one. If you have to lay the bar against the oil pump sprocket, be sure to use a section of the old belt to protect the teeth.

Also, don't forget to tighten the tensioner after you've rotated the crank pulley at least twice and checked the timing marks.

Cam


Oil Pump


I marked the triangle & diamond for each with a black marker, This made it easier to see with my mirror once the cover was back on.

I did have some ticking sound after starting it the first time. Turned out it was part of either the rear plastic cover or the front was touching. I had to loosen most the brackets again to get the cover to reseat properly and all was well.
 

Attachments


Sponsored Ad


Sponsored Ad

Staff online

Member & Vendor Upgrades

For a small yearly donation, you can support this forum and receive a 'Supporting Member' banner, or become a 'Supporting Vendor' and promote your products here. Click the banner to find out how.

Latest posts

Truck of The Month


Shran
April Truck of The Month

Recently Featured

Want to see your truck here? Share your photos and details in the forum.

Follow TRS On Instagram

TRS Events

25th Anniversary Sponsors

Check Out The TRS Store


Sponsored Ad


Sponsored Ad

Sponsored Ad


Amazon Deals

Top