flaminranger
New Member
- Joined
- Aug 9, 2009
- Messages
- 278
- Reaction score
- 1
- Points
- 0
- Age
- 55
- Location
- washington (the state)
- Vehicle Year
- 1988
- Make / Model
- Ford
- Engine Size
- 2.0
- Transmission
- Manual
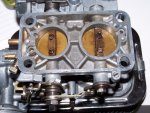
Ok I have posted before that I would post up some pics and details on how I installed my weber 32/36dgav on my truck so here goes:
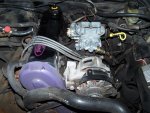
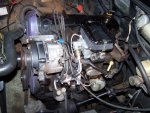
first I started removing all the smog crap on the truck cause most of it was junk this is what it looked like at first.(FIRST PIC)
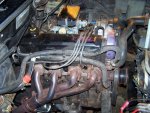
secondly I removed the carb then the carb spacer and egr.(SECOND PIC)
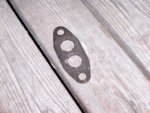
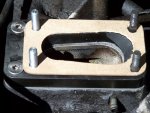
I then took the egr gasket off carefully and trace it onto a piece of aluminum I got from a friend and cut and shaped the piece to match the gasket and drilled the mounting holes to make a block off plate(this step is not necessary but I removed the egr cause the pipes going to it were damaged).(PIC THREE)
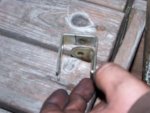
I took the throttle cable bracket off the old carb and had a friend weld it to the linkage that came with the weber. also make sure you get the orientation right on the linkage so when you bolt it back on the new carb the linkage goes on the same as it did on the original carb.(PIC FOUR)
the next step is the hard part you need to cut the tab off the spacer then bevel the wide side of the opening to allow the secondary butterfly to open this can be done with a hand grinder but I had a friend with a bridgeport cut it for me. then with the carb centered over the two holes next to the beveled end mark the new holes that need drilled and tapped on the opposite end of the spacer(I used a gasket instead of the carb to make it easier to mark.Then mark the holes and drill them and tap them it has been a while but I think I used 5/16 hardware.(PIC FIVE)
You will then need to counter sink the existing holes in the spacer on the same side as the bevel on the same end as the holes you drilled and tapped.
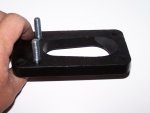
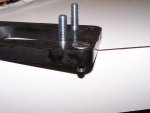
for hardware you need to get 2 studs in the size you tapped the holes. They can stick out the bottom a little bit but they need to be about 1/2" tall on the mounting side so they don't hit the linkage.also don't forget nuts to bolt down the carb to the spacer.(PIC SIX)
now the carb will need to have the mounting holes opened up to fit over the existing studs on the manifold. It doesn't take much and I was worried about cutting on my new carb but it won't hurt it if you only do the one end so it will line up and still seal up nicely. Also try not to do what I did and get a bunch of metal shavings inside the carb(DUH). (PIC SEVEN)
the last thing to do before mounting the carb is to remove the studs in the manifold closest to the valve cover and get some counter sink bolts in the same size threads as the studs, mine were metric and were a little difficult to find but I got my new bolts at a local hardware store.
make sure you get them long enough to go through the spacer leaving enough thread to screw into the manifold.
Time to start mounting the carb; As for gaskets you need the factory ford gasket for the original carb, that will go between the spacer and the manifold.then bolt the spacer to the manifold with the new countersunk bolts you just got. not to tight or you can break the spacer ABOUT 15INCH POUNDS.Next thread in the studs into the spacer until snug. .(PIC EIGHT)
Then put the carb onto the spacer and then bolt it down. I found it easier to start the back nut closest to the valve cover then do the rest of the nuts. remember that you have not removed the studs furthest from the valve cover so you can use the original nuts to fasten it down.
hook up the linkage and plug off all the vacuum lines except the one on the base plate cause it needs to go to the dizzy advance.
On my truck I removed all the emissions junk cause it didn't work so I am not sure how you can hook up the egr vacuum lines to make it work but I am sure it can be done.
Now as for the fuel line I cut my hard line and used a weber fuel pressure regulator part number 31800.063. DO NOT USE A CHEAP ADJUSTABLE REGULATOR THEY WILL NOT WORK!!!!!
The fuel filter that works in the stock carb fits the weber I put thread sealer on mine cause I dropped it so it leaked a little bit but it didn't till I dropped it.
I hooked the choke wire to the battery side of the alternator with a splice connector.
All that is left to do is tune it as per the directions from weber.You are on your own for that.
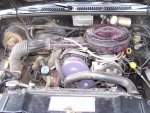
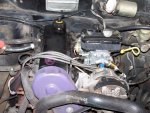
when done it should look like the last picture minuse the exhaust mod that I did and hopefully the oil leaks lol.(PICS NINE,TEN,AND ELEVEN)
I have never written up something like this before so I hope it works for ya and is not too confusing.
Thanks Duane
first I started removing all the smog crap on the truck cause most of it was junk this is what it looked like at first.(FIRST PIC)
secondly I removed the carb then the carb spacer and egr.(SECOND PIC)
I then took the egr gasket off carefully and trace it onto a piece of aluminum I got from a friend and cut and shaped the piece to match the gasket and drilled the mounting holes to make a block off plate(this step is not necessary but I removed the egr cause the pipes going to it were damaged).(PIC THREE)
I took the throttle cable bracket off the old carb and had a friend weld it to the linkage that came with the weber. also make sure you get the orientation right on the linkage so when you bolt it back on the new carb the linkage goes on the same as it did on the original carb.(PIC FOUR)
the next step is the hard part you need to cut the tab off the spacer then bevel the wide side of the opening to allow the secondary butterfly to open this can be done with a hand grinder but I had a friend with a bridgeport cut it for me. then with the carb centered over the two holes next to the beveled end mark the new holes that need drilled and tapped on the opposite end of the spacer(I used a gasket instead of the carb to make it easier to mark.Then mark the holes and drill them and tap them it has been a while but I think I used 5/16 hardware.(PIC FIVE)
You will then need to counter sink the existing holes in the spacer on the same side as the bevel on the same end as the holes you drilled and tapped.
for hardware you need to get 2 studs in the size you tapped the holes. They can stick out the bottom a little bit but they need to be about 1/2" tall on the mounting side so they don't hit the linkage.also don't forget nuts to bolt down the carb to the spacer.(PIC SIX)
now the carb will need to have the mounting holes opened up to fit over the existing studs on the manifold. It doesn't take much and I was worried about cutting on my new carb but it won't hurt it if you only do the one end so it will line up and still seal up nicely. Also try not to do what I did and get a bunch of metal shavings inside the carb(DUH). (PIC SEVEN)
the last thing to do before mounting the carb is to remove the studs in the manifold closest to the valve cover and get some counter sink bolts in the same size threads as the studs, mine were metric and were a little difficult to find but I got my new bolts at a local hardware store.
make sure you get them long enough to go through the spacer leaving enough thread to screw into the manifold.
Time to start mounting the carb; As for gaskets you need the factory ford gasket for the original carb, that will go between the spacer and the manifold.then bolt the spacer to the manifold with the new countersunk bolts you just got. not to tight or you can break the spacer ABOUT 15INCH POUNDS.Next thread in the studs into the spacer until snug. .(PIC EIGHT)
Then put the carb onto the spacer and then bolt it down. I found it easier to start the back nut closest to the valve cover then do the rest of the nuts. remember that you have not removed the studs furthest from the valve cover so you can use the original nuts to fasten it down.
hook up the linkage and plug off all the vacuum lines except the one on the base plate cause it needs to go to the dizzy advance.
On my truck I removed all the emissions junk cause it didn't work so I am not sure how you can hook up the egr vacuum lines to make it work but I am sure it can be done.
Now as for the fuel line I cut my hard line and used a weber fuel pressure regulator part number 31800.063. DO NOT USE A CHEAP ADJUSTABLE REGULATOR THEY WILL NOT WORK!!!!!
The fuel filter that works in the stock carb fits the weber I put thread sealer on mine cause I dropped it so it leaked a little bit but it didn't till I dropped it.
I hooked the choke wire to the battery side of the alternator with a splice connector.
All that is left to do is tune it as per the directions from weber.You are on your own for that.
when done it should look like the last picture minuse the exhaust mod that I did and hopefully the oil leaks lol.(PICS NINE,TEN,AND ELEVEN)
I have never written up something like this before so I hope it works for ya and is not too confusing.
Thanks Duane
Attachments
-
 186 KB Views: 481
 -
 147.7 KB Views: 474
 -
 66.7 KB Views: 371
 -
 79.1 KB Views: 486
 -
 59.8 KB Views: 477
 -
 68.5 KB Views: 409
 -
 124.4 KB Views: 511
 -
 148.2 KB Views: 425
 -
 173.1 KB Views: 512
 -
 145.6 KB Views: 543
 -
 168.3 KB Views: 490
Last edited: