
Dave18
Member
- Joined
- May 31, 2011
- Messages
- 64
- Reaction score
- 39
- Points
- 18
- Location
- Littleton, Colorado
- Transmission
- Manual
- 2WD / 4WD
- 2WD
Original Poster: Dave18
Difficulty: 5 out of 10
Time to install: 8 hours
Disclaimer: The Ranger Station.com, The Ranger Station.com Staff, nor the original poster are responsible for you doing this modification to your vehicle. By doing this modification and following this how-to you, the installer, take full responsibility if anything is damaged or messed up. If you have questions, feel free to PM the original poster or ask in the appropriate section of The Ranger Station.com forums.
Brief Explanation: Accessing the heater core requires (at least partially) removing the entire dash. It's not as hard as it sounds, and none of the steps are overly difficult, but there are a lot of things to disconnect. If you take your time and label all the fasteners it's not bad, I promise!
Tools Needed:
-Nice socket set with deep sockets
-Ample lighting and headlamp
-T20 torx driver
-that little pry tool for popping out plastic push fasteners (optional)
Parts Needed:
-New heater core (get a good one because you won't want to do this twice)
-This is a great time to replace any burned out dash bulbs too, so snag some new ones if you need them.
I recently replaced the heater core in my 2002 Mazda, after the original started leaking coolant 22 years and 230,000 miles in. Intrestingly, the first symptoms were not the coolant smell but the windscreen fogging up when I wouldn't expect it to... it happened a couple times before it finally gave out a few days later and filled the cab with coolant vapor. The process is long and tedious but not all that difficult. Have a few cups to keep track of the many fasteners and label them with sticky notes. This took me a Friday evening and most of a Saturday.
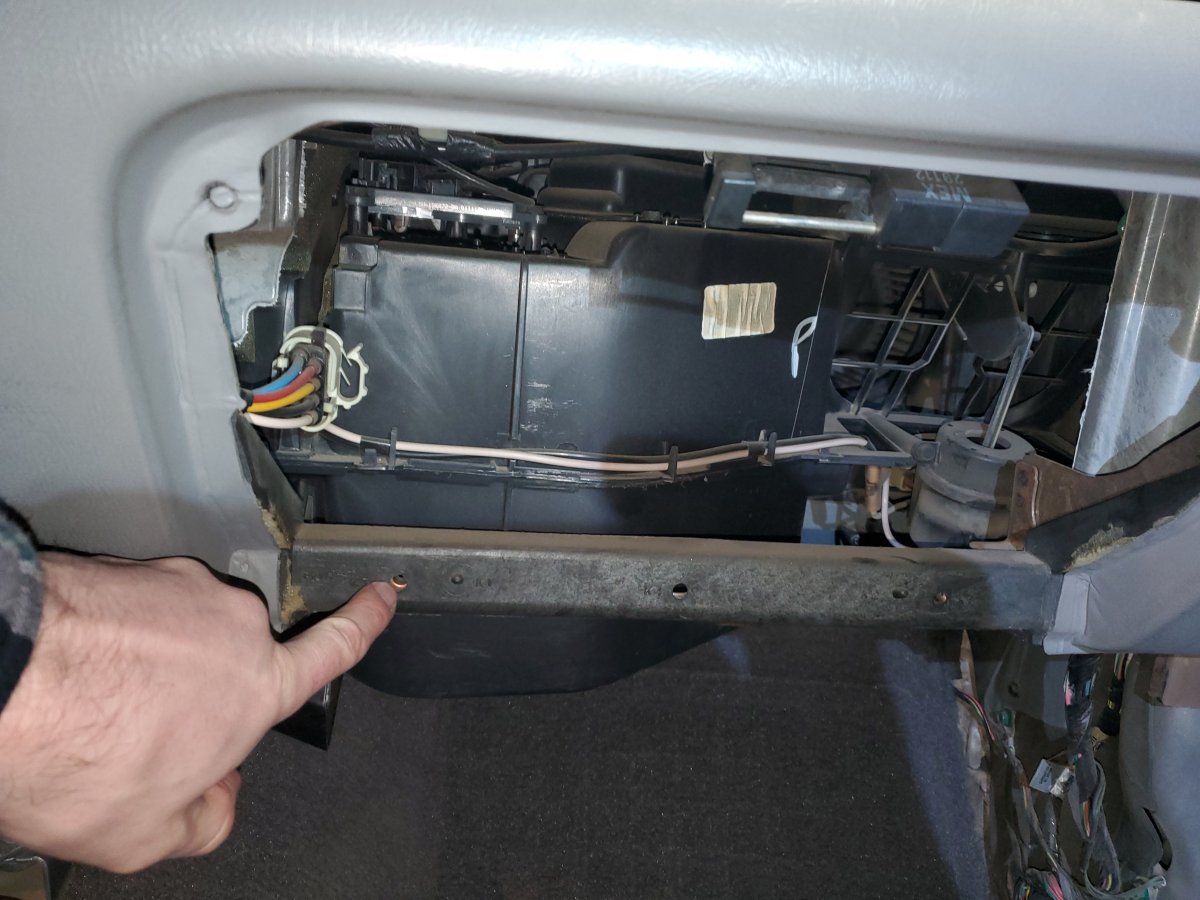
1) Remove glove box. Squeeze the side of it in to allow it to pivot all the way down, then remove the two screws on the hinge.
2) Remove both kick panels (the plastic covers on the outboard sides of each footwell). You remove these by unscrewing the forward couple phillips screws on the floor trim strips to lift them up... the kick panels just tuck underneath those. The driver side one also has a plastic push fastener near the parking brake pedal.
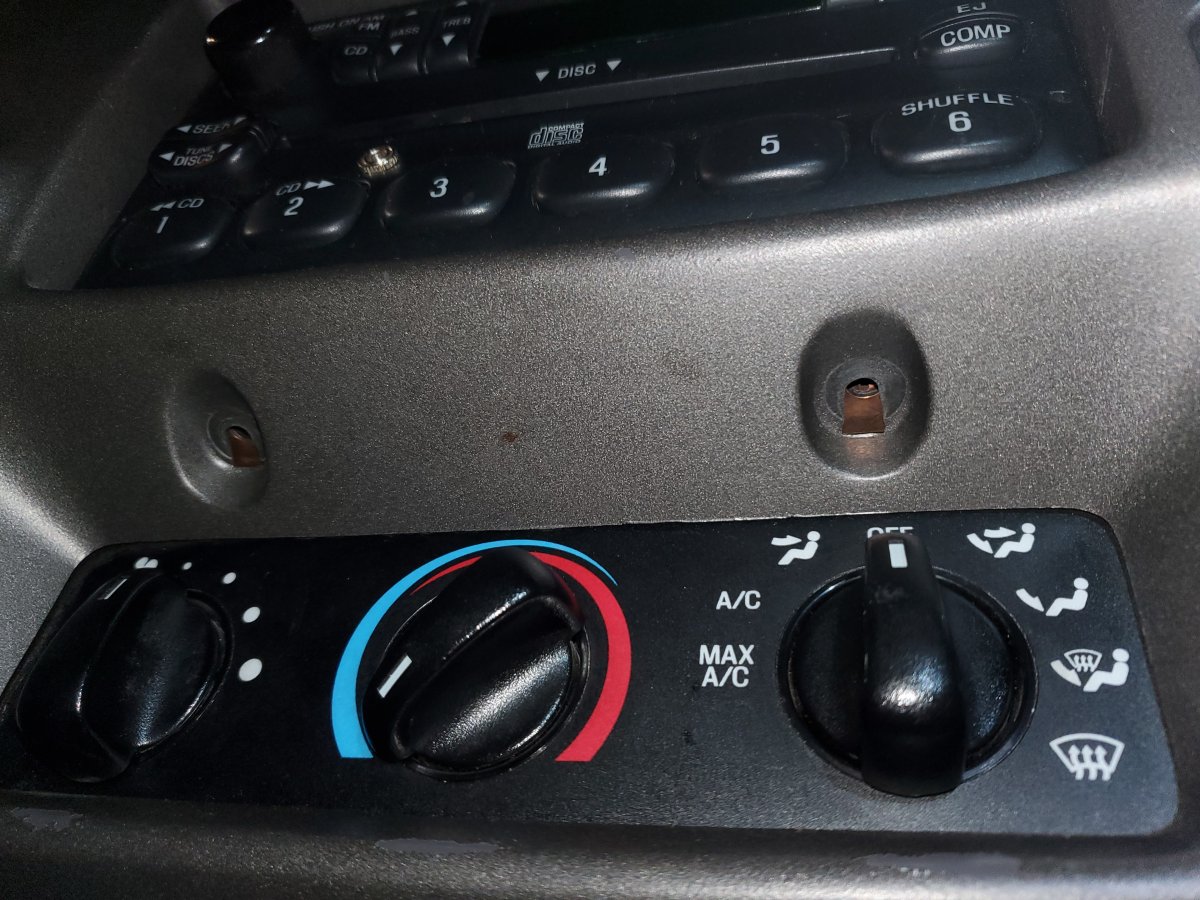
3) Remove the radio and radio bezel. To do this you take out the two 7mm screws above the HVAC knobs and carefully pry the bezel out from the sides. I just use a flathead screwdriver to do this, it's easier if you've taken the radio out before since I think the clips sieze up a little.
Pull the whole assembly out a few inches (it slides on a rail), and disconnect the fog lamp switch, cigarette lighters, and transfer case control (if applicable). Then pull it out enough to disconnect the radio and antenna.
4) Remove the plastic knee guard cover under the steering column. This is held on with two 7mm screws on the plastic panel, and two T20 torx screws on the hood release handle (remove the handle too now)
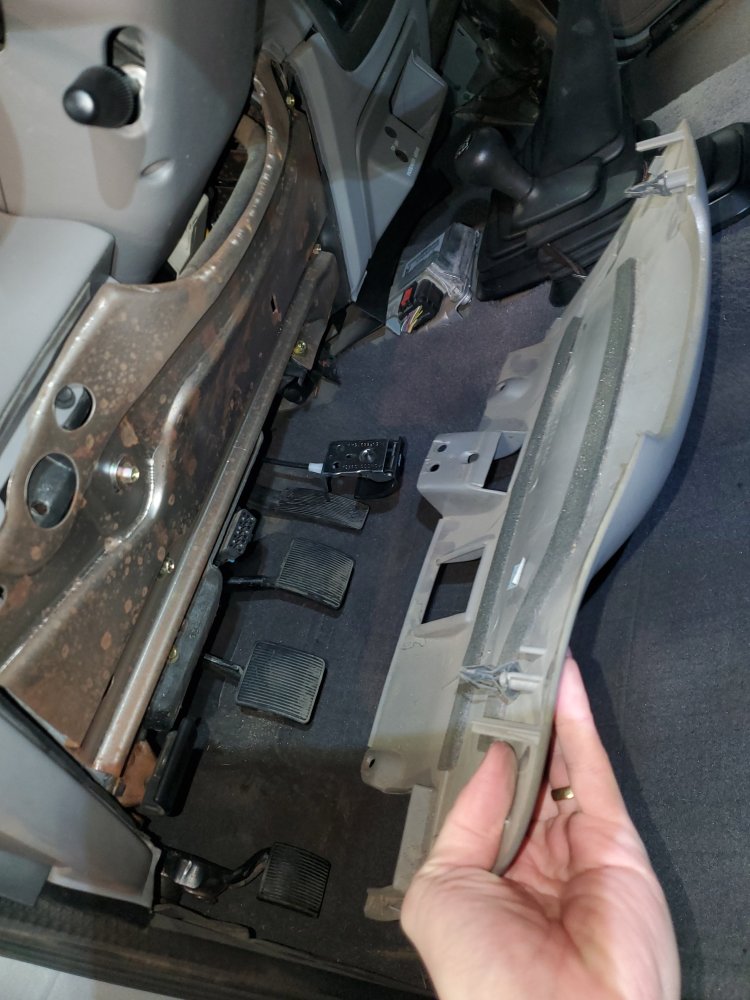
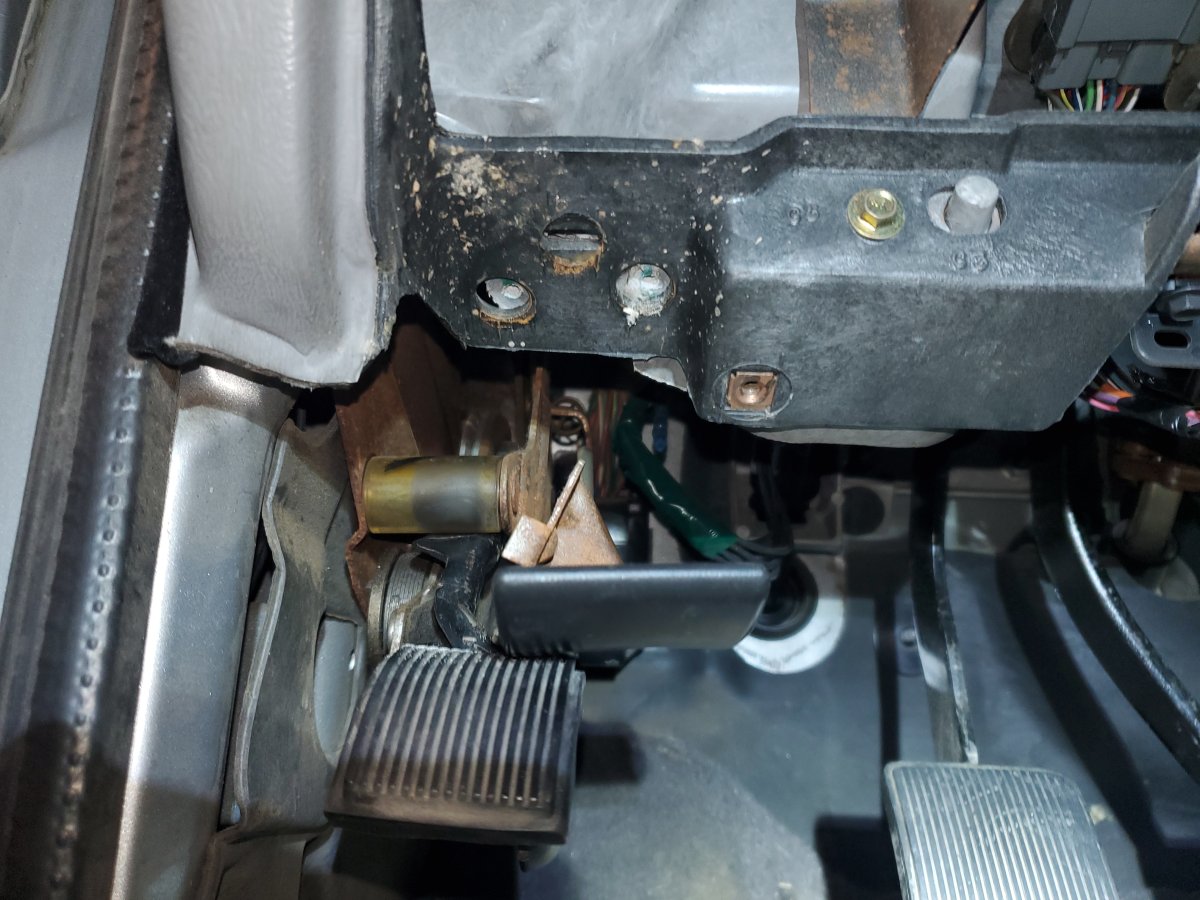
5) Now remove the steel plate that was behind that plastic knee guard - it is held on by five 8mm screws. You can see the plate in the above photo.
6) Remove the instrument cluster bezel. It's held on by three obvious 7mm screws at the top, right above the cluster, and two more on the bottom (these two were previously hidden behind the steel plate)
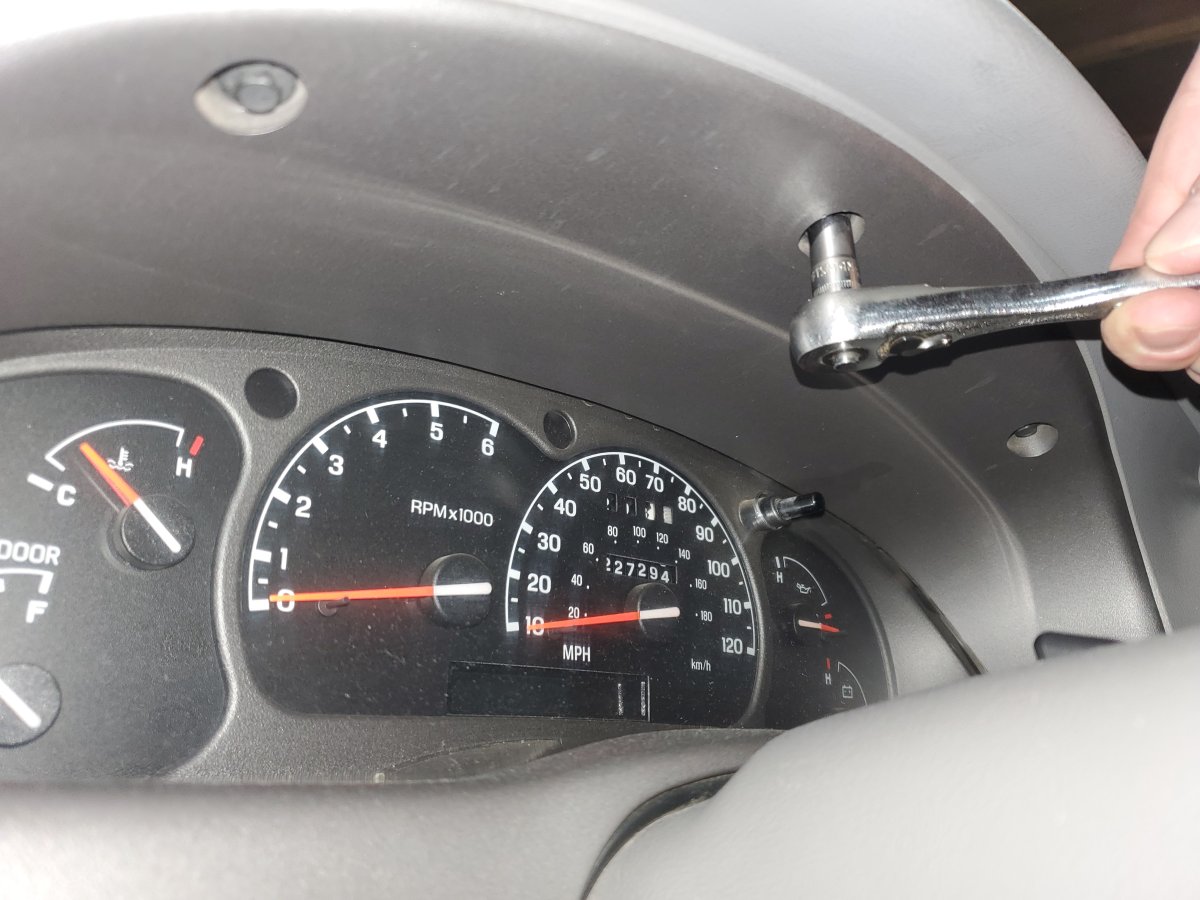
Make sure to disconnect the headlight switch and dimmer knob as the bezel comes off. You may have to lower the steering column in order to weasel it off.
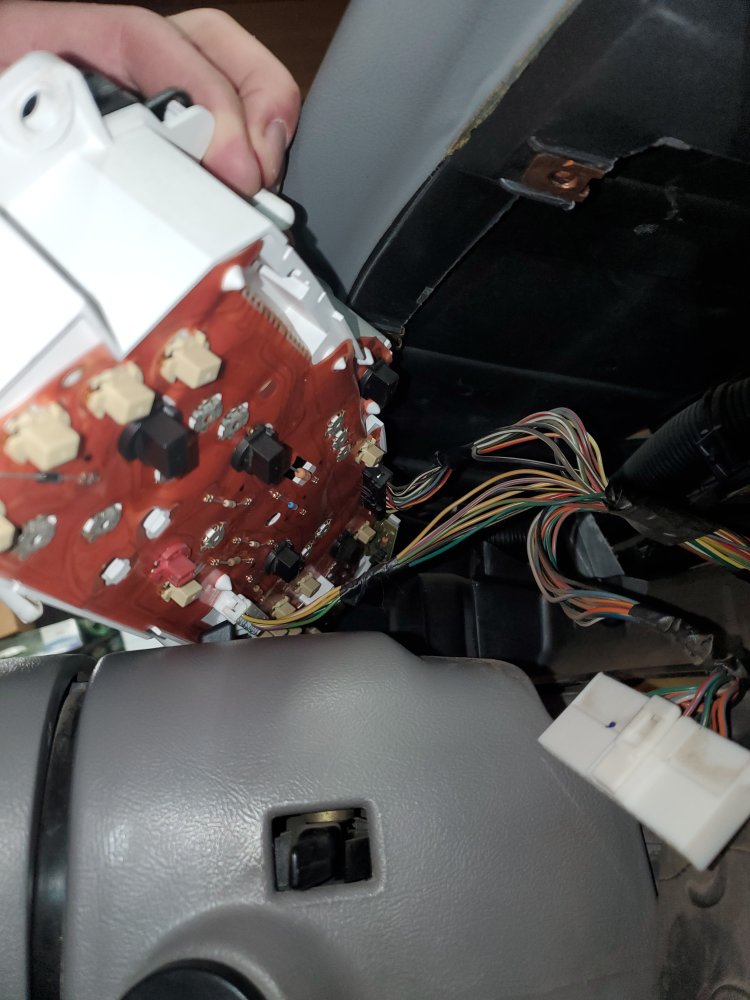
7) Now you can remove the instrument cluster itself. It just has four 7mm screws around the perimeter - remove the ones on the white plastic structure. The trick here is demating the three connectors on the back side - they are not too tough but the PCB is a flexible film that you don't want to push off of too hard. Each connector has a tab that you push down to release and then you sort of wiggle it side-to-side. Be patient here and make sure you aren't putting any force on the resistors mounted to the back of the PCB. This is probably the most actually difficult part of the whole job, but the cables themselves are mercifully long so you can move it around if you need.
8) Remove the parking brake release handle - you don't need to remove the whole mechanism! I mistakenly did and it was a pain to put back haha. Just pull the two 7mm screws holding the handle to the dash, since the dash will need to be able to move shortly.
9) Next move to the engine compartment, and remove the two 8mm screws that secure the relay box. You'll need to move this aside to gain access to the two main bus connectors that go through the firewall.
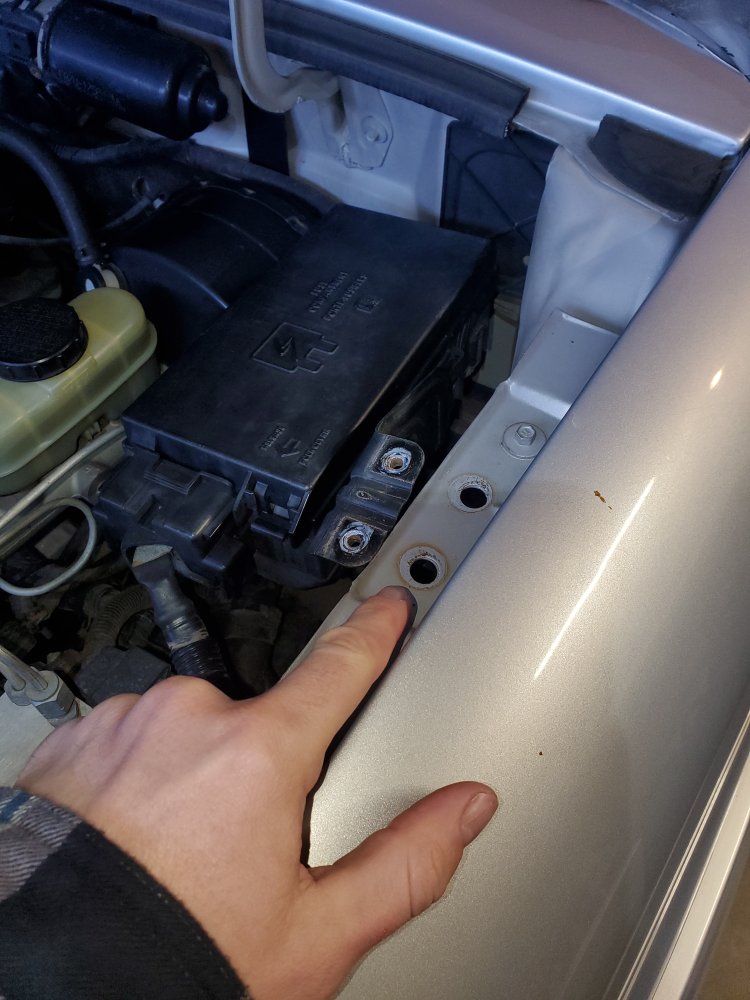
It gets easier to move if you also unbolt the massive ground strap coming out of the front of the relay box, and the clutch fluid reservoir (if applicable).
10) You can now get to the two large connectors passing through the firewall. The 10mm bolts on the two connectors function as jackscrews to demate them, so start by loosening them all the way.
The connectors will back out and you should be able to pop them off without trouble. This is a nice design! Next pop off the black housing around the two connectors. You just wiggle it off - there's not a trick or anything:
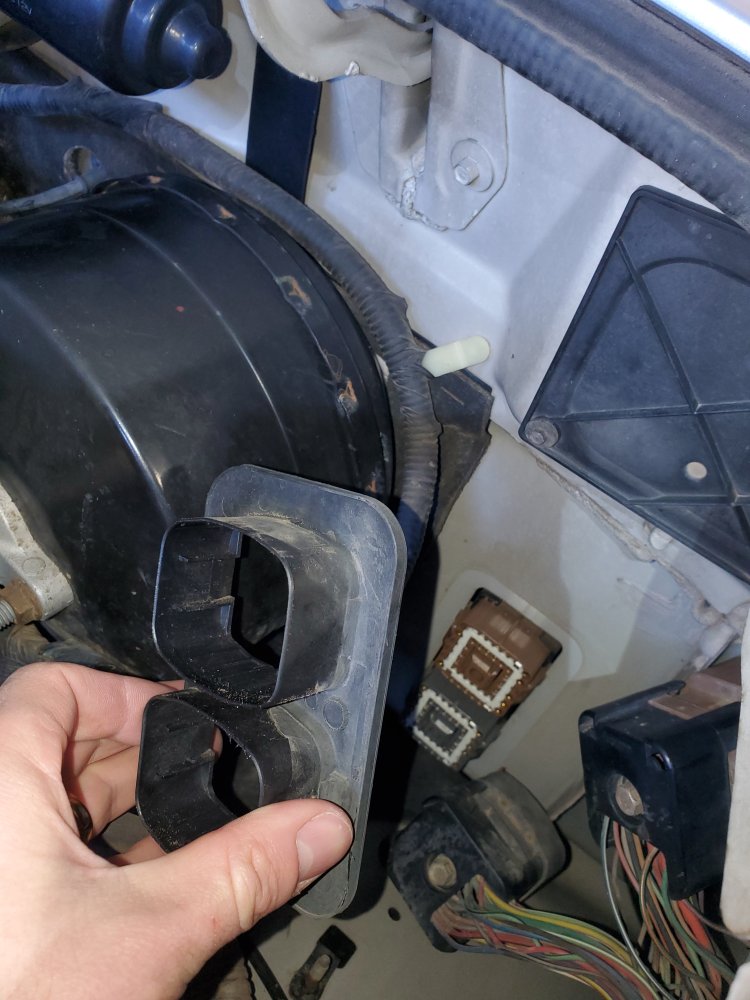
To remove the connectors from the firewall, squeeze the tabs on the sides and push the connectors into the cab.
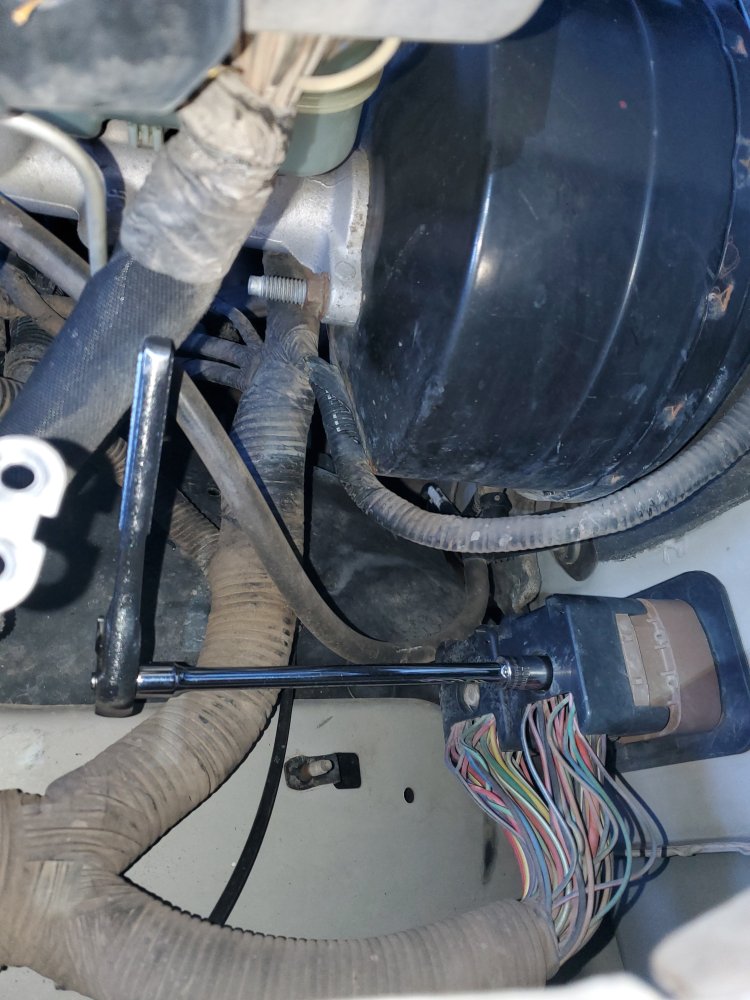
11) I'm not sure if you have to do this, but I also demated the PCM connector and removed the PCM. To do this you back the jackscrew in the center of the connector out to demate the connector. Then remove the two 11mm nuts off of the studs on either side of the PCM.
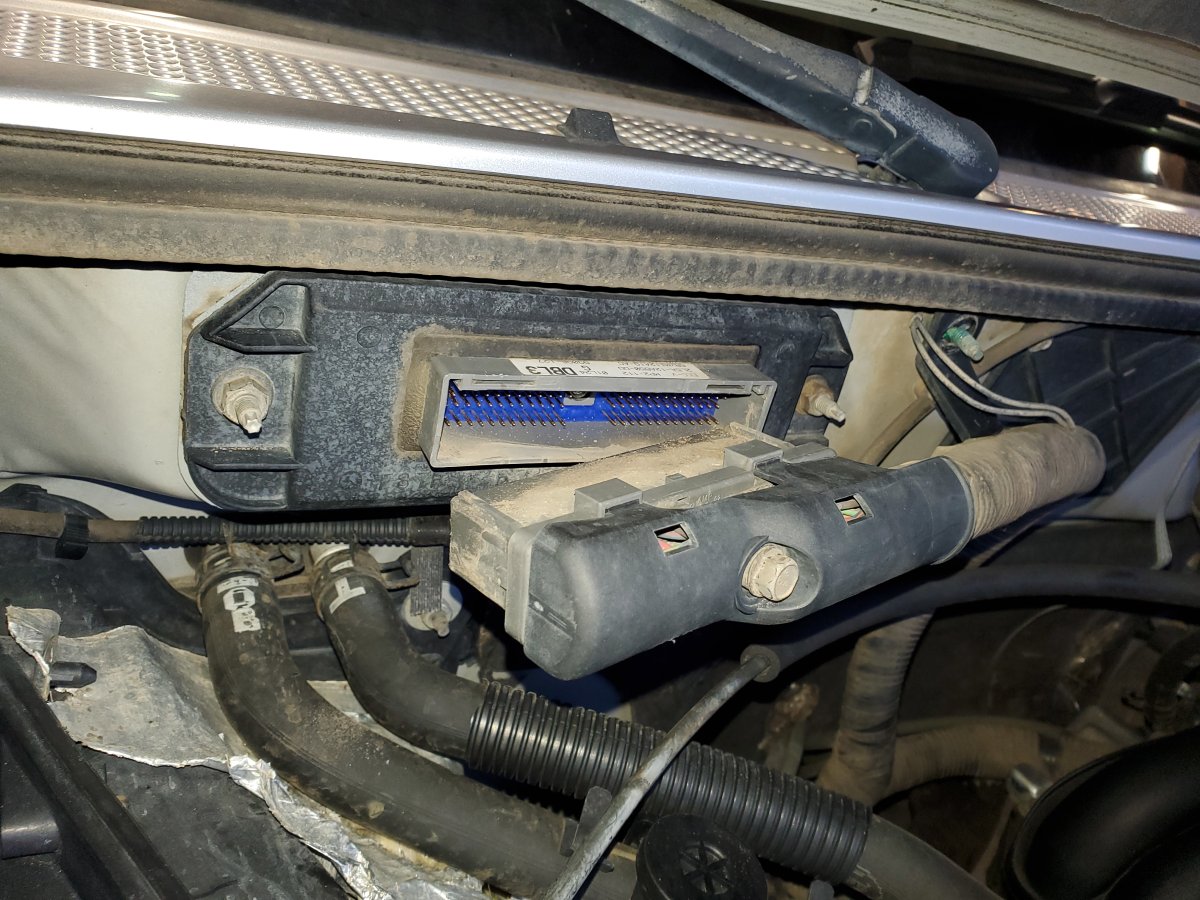
It slides out of a housing that protrudes into the dash - you may be able to remove the dash without this step, but the Chilton guide included it so I did it.
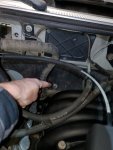
12) Now is also a good time to disconnect the coolant hoses that that go to the heater core through the firewall... they are right under the PCM. Squeeze the hose clamps with some pliers and move them down the hose. I find channel-locks work well for this. You may have to patiently twist the hoses back and forth to break them free if they have never been replaced. I didn't bother draining the coolant since this is near the top of the system, but a little bit will pour out when you take the hoses off. Try to catch it since it's very toxic to pets, etc.
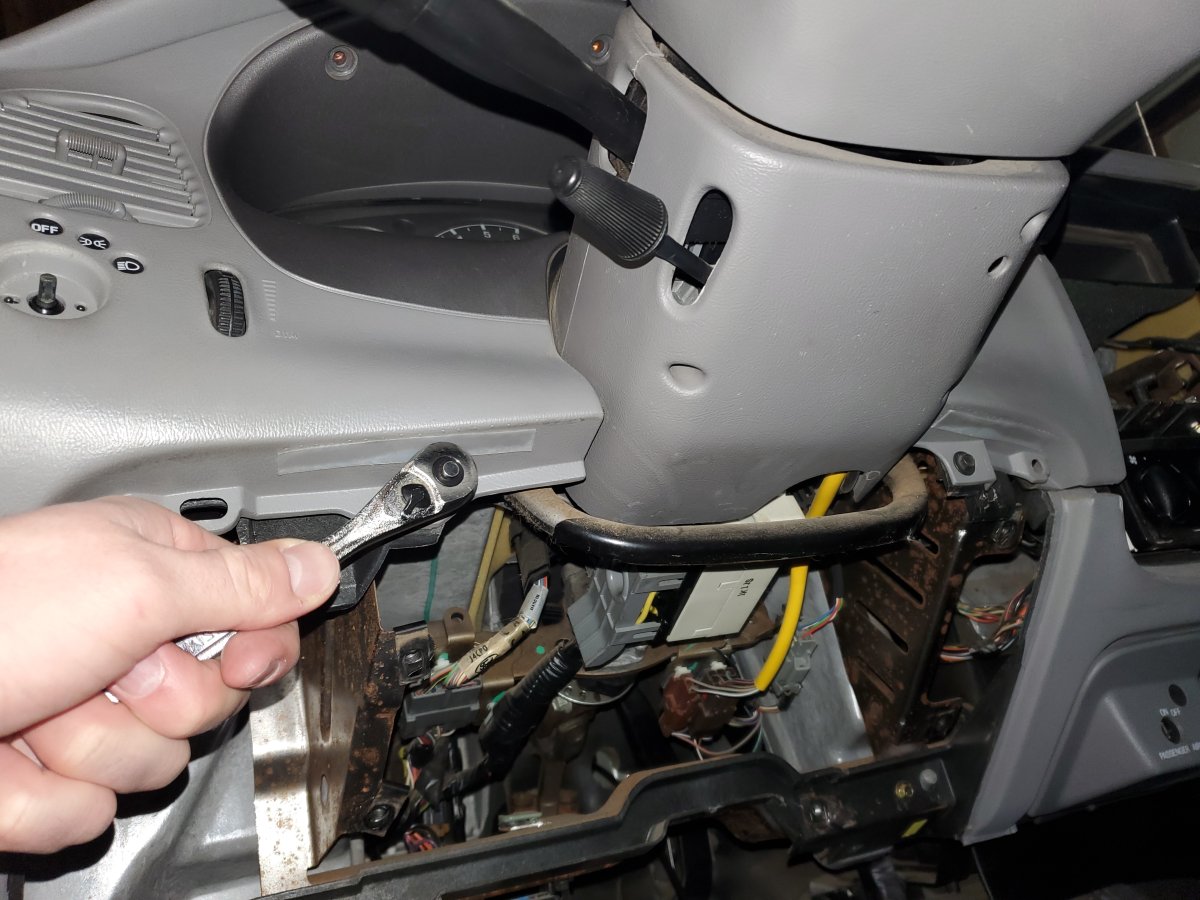
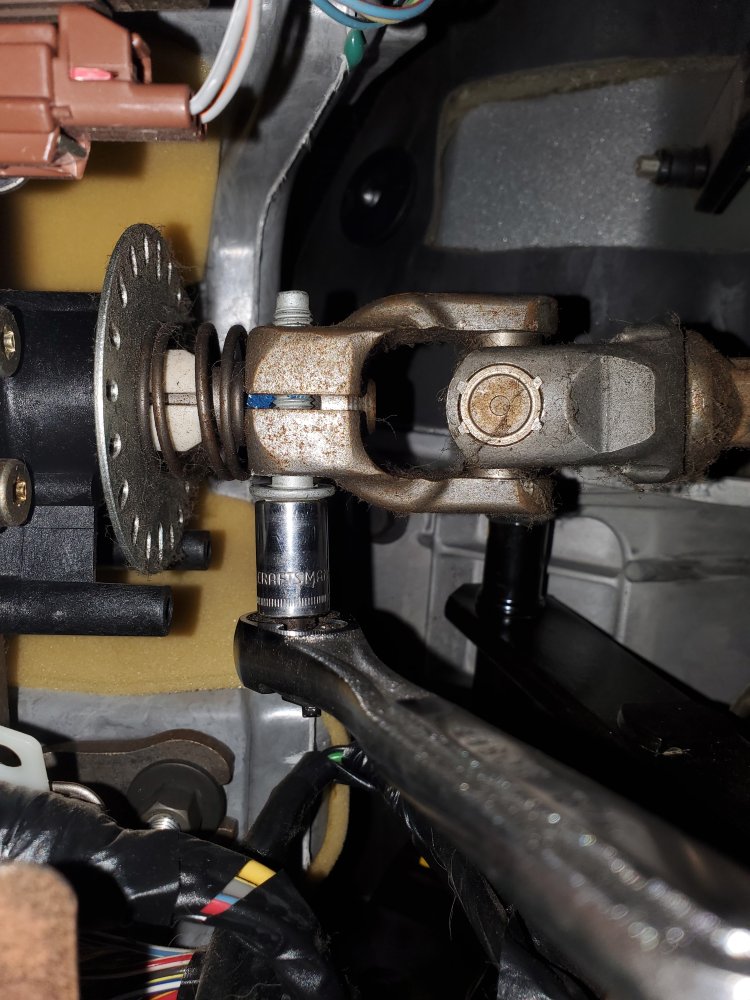
13) Move back to the cab, and remove the steering shaft pinch bolt under the steering column. It uses a 10mm socket. This will allow the steering wheel and column assembly to move away from the steering shaft when you move the dash back. You take the pinch bolt out, and then there is enough play to push the U-joint side out and down to disconnect the column from the shaft. You don't have to remove the wheel itself, or any of the plastic around the steering column.
14) While you are upside down under the steering column, demate the brake and clutch electrical connectors and unplug the airbag control module. The brake and clutch connectors are both located on the pushrods for those pedals, and have tabs to release them... I was able to do the brake one by hand but needed a flathead to pry the release tab up on the one for the clutch. The airbag control module is located on the transmission tunnel right in the center. You may need to remove a shifter bezel or center console to get at it, but if you have a center console that will need to be removed anyway to make room for the dash to come out. My truck is a manual, so unfortunately I don't know what all is involved to remove the console. There are some ground lugs around the airbag module that I did not bother disconnecting... there seemed to be enough slack to leave them be, as long as you don't take the dash all the way out of the vehicle. I did remove a little plastic push fastener that was securing the wire bundle to the transmission tunnel (and broke it because I don't have the right tool).
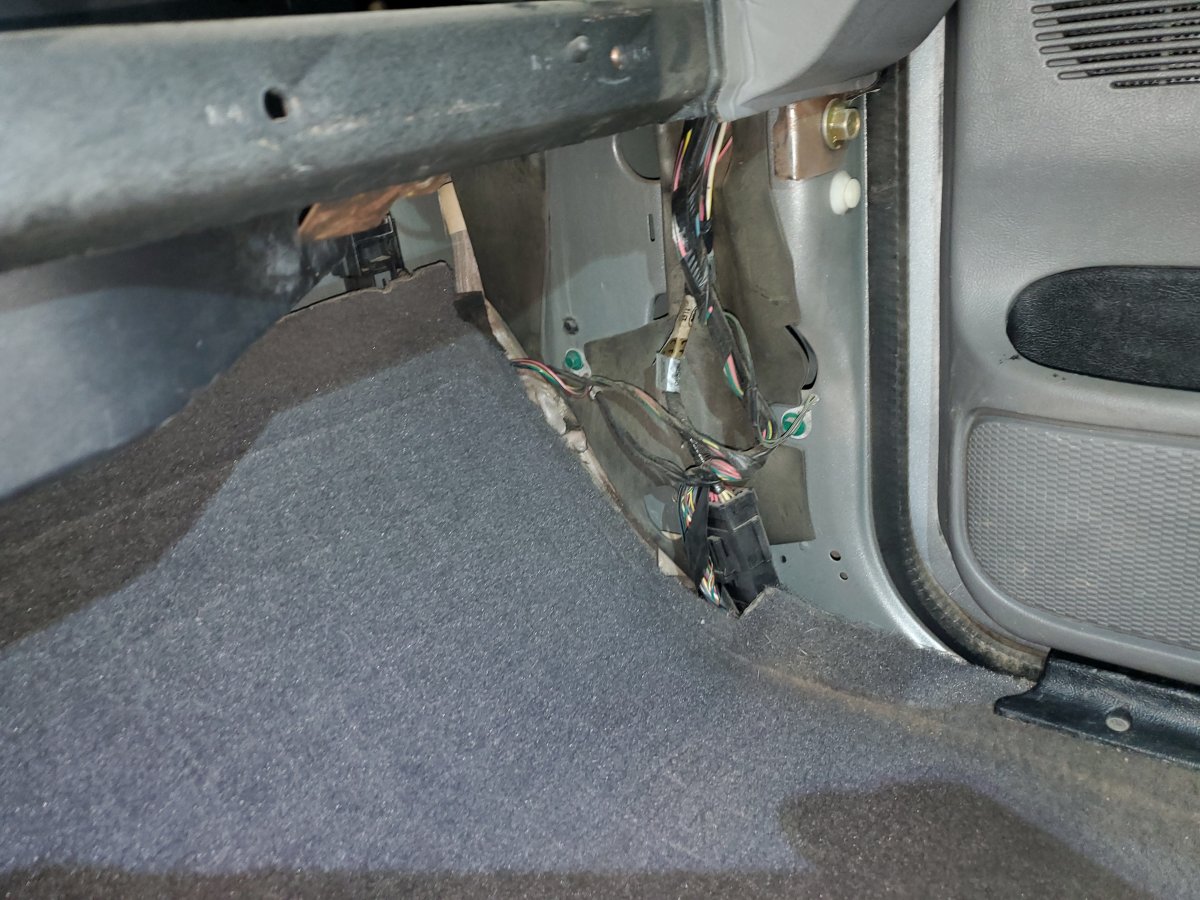
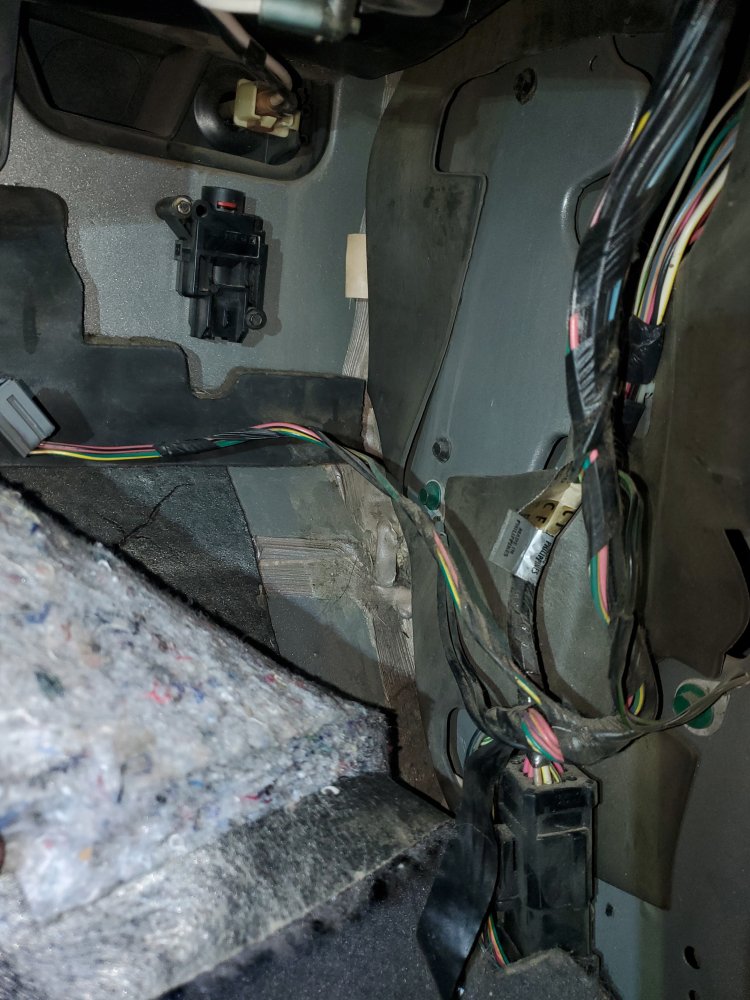
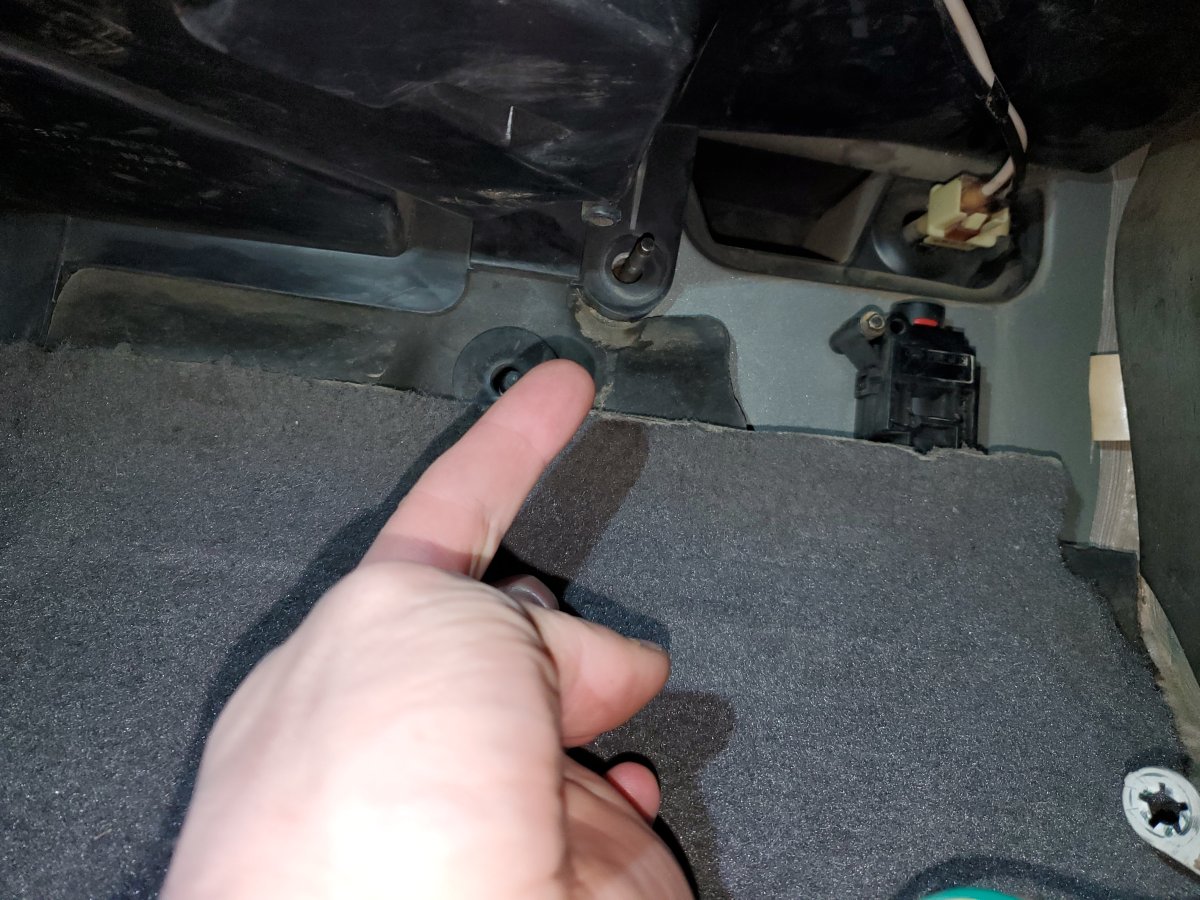
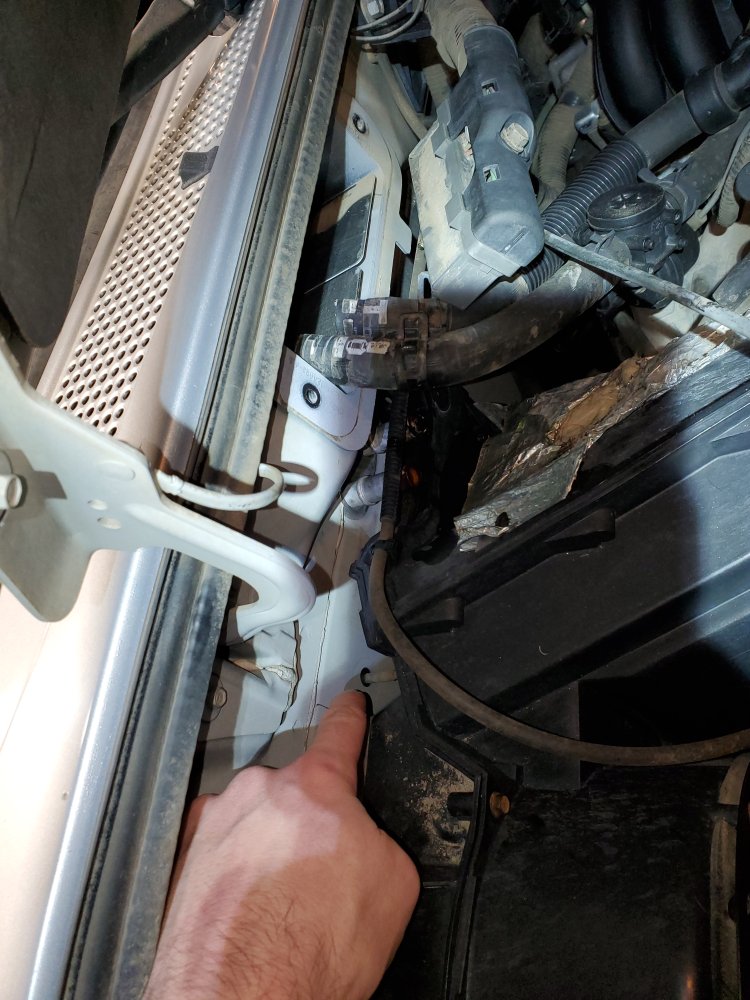
15) While you're disconnecting things, move to the passenger side and unplug the fuel pump's crash sensor reset thingie... this is right up under the glove box and you might have to pull the carpet back a bit to get at the connector on the bottom. To the right of that, under the kick panel you removed earlier, is another connector that needs to be unplugged along with two green ground lugs. Here is what the passenger footwell will look like with everything disconnected (the carpet is pulled back some):
16) Disconnect two multi-line vacuum connections next... One is visible in the last image just above the fuel pump crash sensor thing we unplugged. The other is inside the dash behind where the glove box would go:
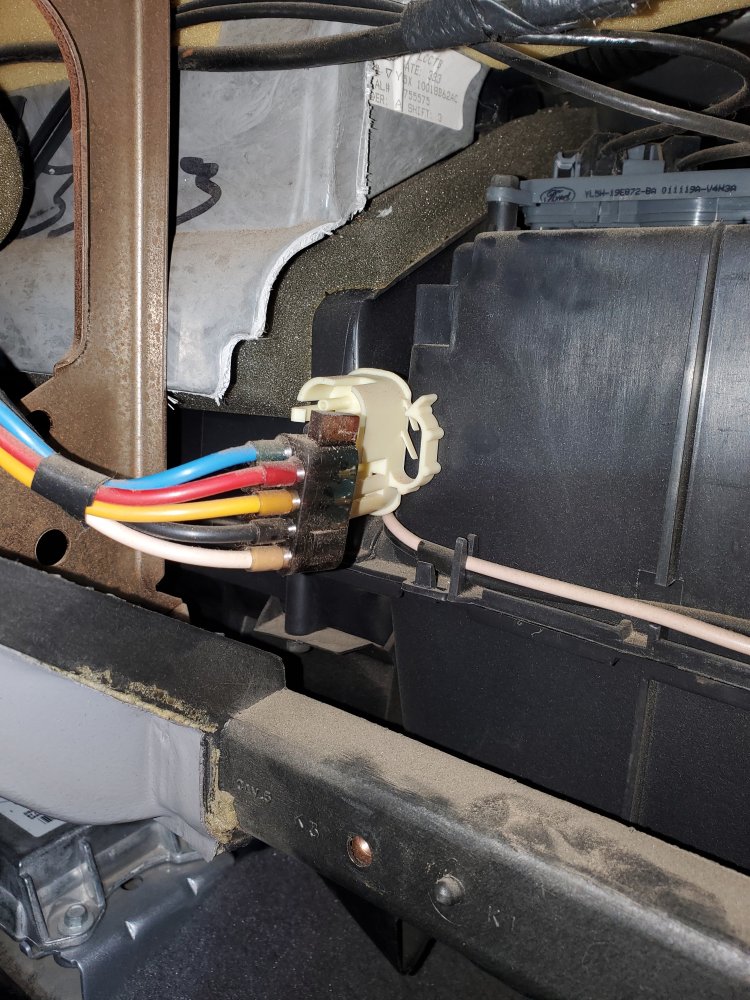
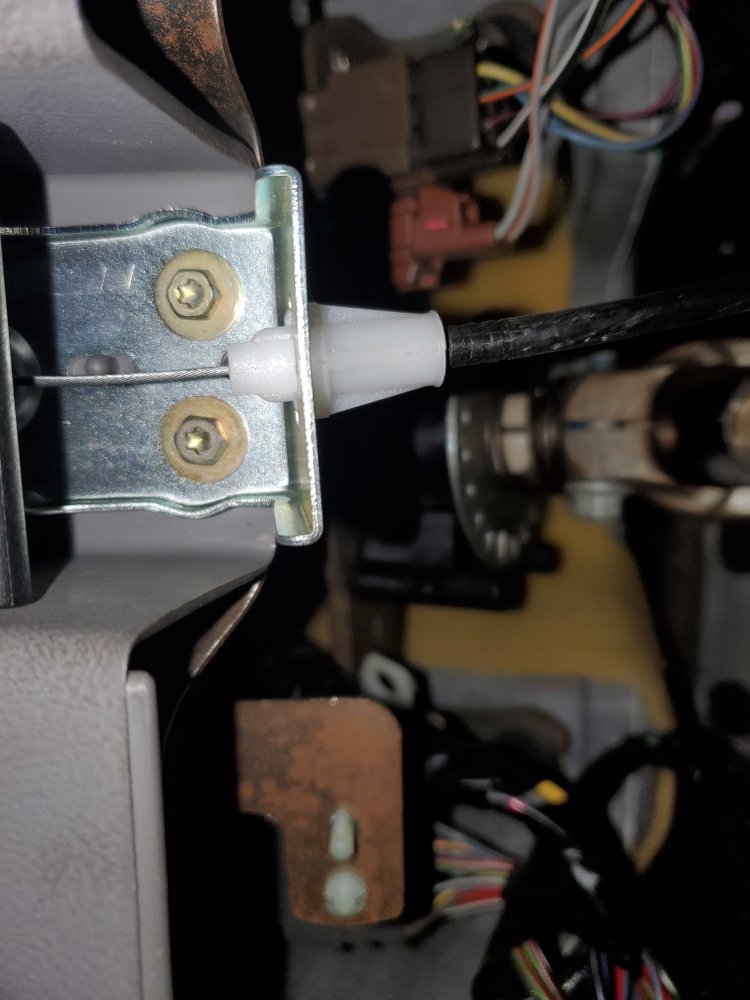
They are flexible silicone and if you look closely you can see tabs on them that allow them to disconnect. You'll also want to disconnect the heater blend door control from the top of the heater box in the cab... this is a cable loop that comes from the heat/cool knob on the HVAC controls and runs to a black connector behind the glove box. The connector is easy to remove, and once you do you can see the neat little shaft it uses to move the blend door. The connector is visible in the top right of the last photo.
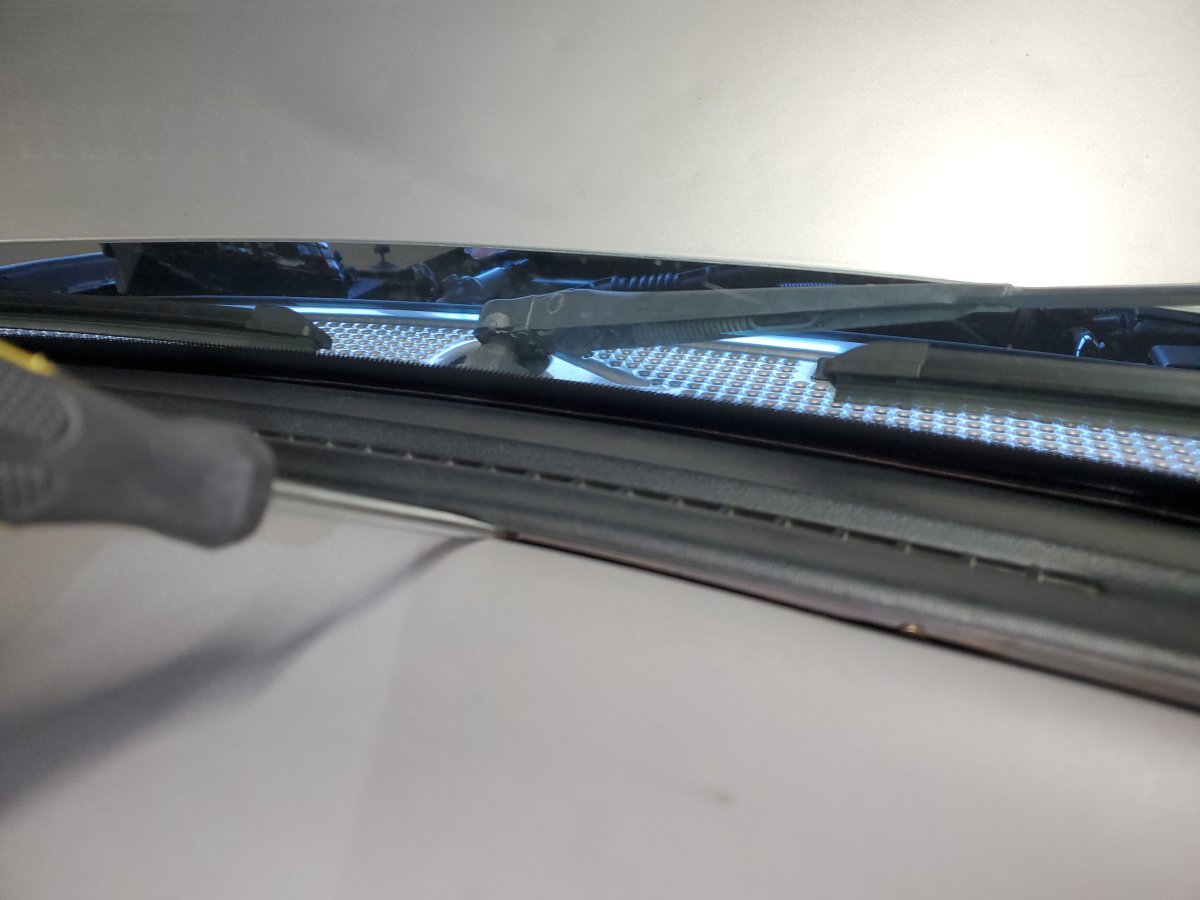
17) To gain access to three of the dash bolts, you need to carefully pop off the defroster vent bezel. It's held on by a series of metal push-fit fasteners, so you have to get a flathead or wooden shim under the edge and carefully work it loose. I found the vent bezel itself to be pretty robust, but the dash surface around it had been blasted by the Colorado sun for 22 years and was easy to crack.
18) Now it's finally time to loosen the dash! There are two large (I think they were 13mm) bolts by the fuse compartment (pop the cover off this if you haven't yet), three on top under the defroster bezel, and one on the bottom right by the fuel pump stuff we were disconnecting. The ones on top are not as tricky to reach as you'd think, but a universal joint extension helps a lot. Also be careful not to put your wrench/hand through the windshield when they let go! Keep the two lowest bolts backed out almost all the way, so they can support the dash as you pull it back a few inches. When you're ready, lift and pull the whole dash backwards to the two remaining bolt heads. This is a good time to check for any wires or vacuum lines that are being stretched.
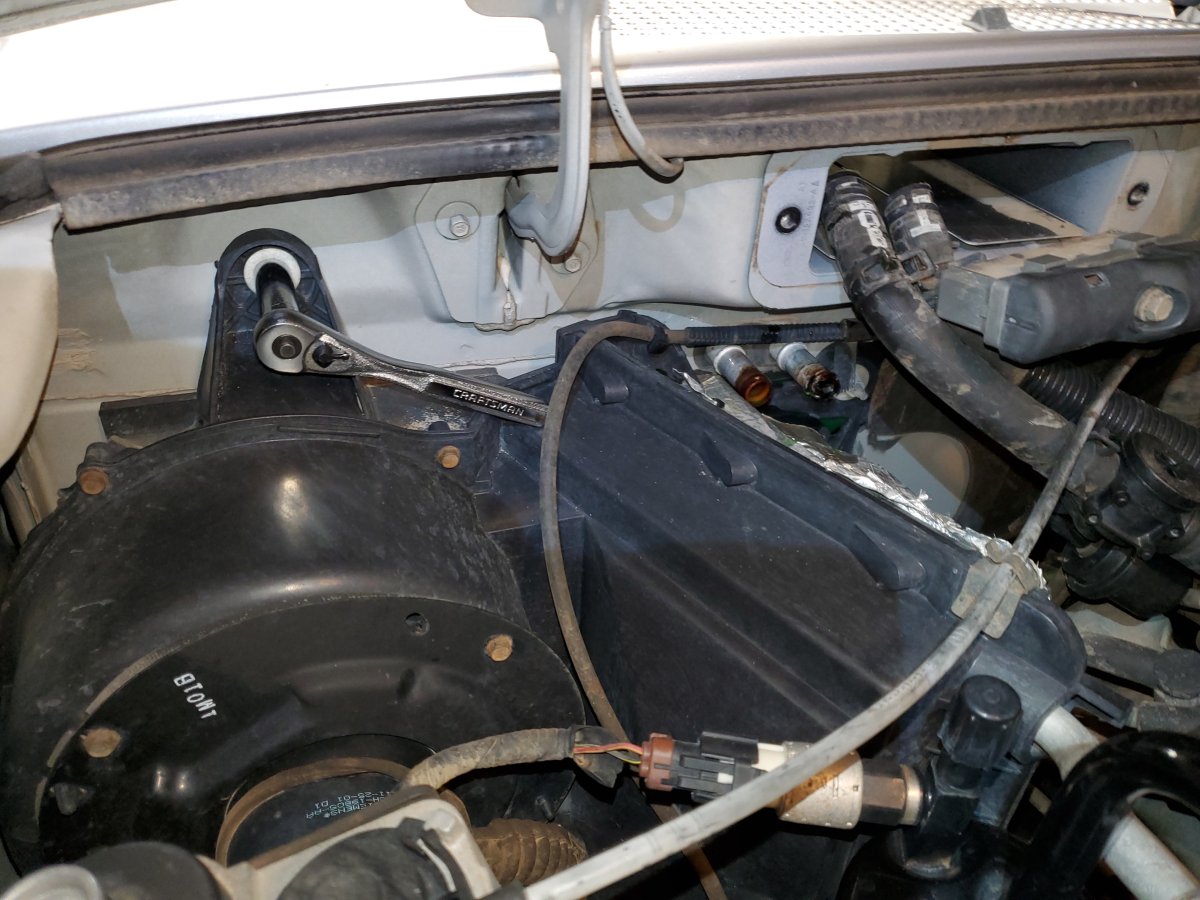
19) Before you fully remove the dash, move back to the engine bay. The assembly that houses the blower motor and AC evaporator blocks a few of the heater box fasteners, so you need to partially remove it. I'll call this the HVAC housing. You can do this without disconnecting any AC lines or anything like that; there is enough play. Remove the three 11mm nuts (they are on studs) along the top and inboard side of the HVAC housing.
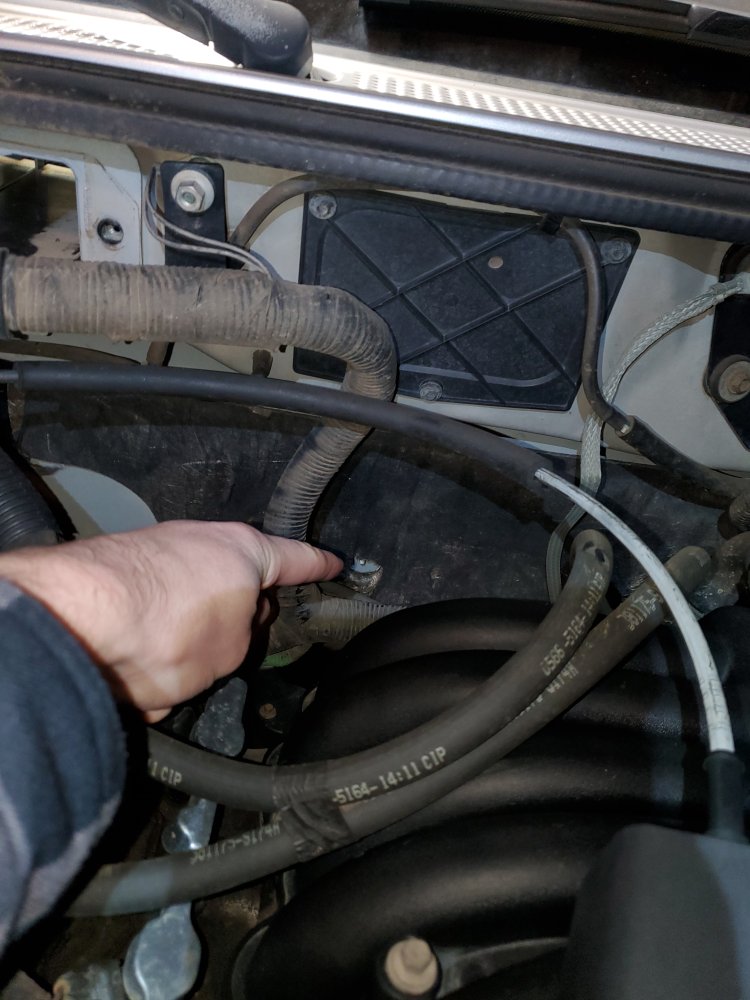
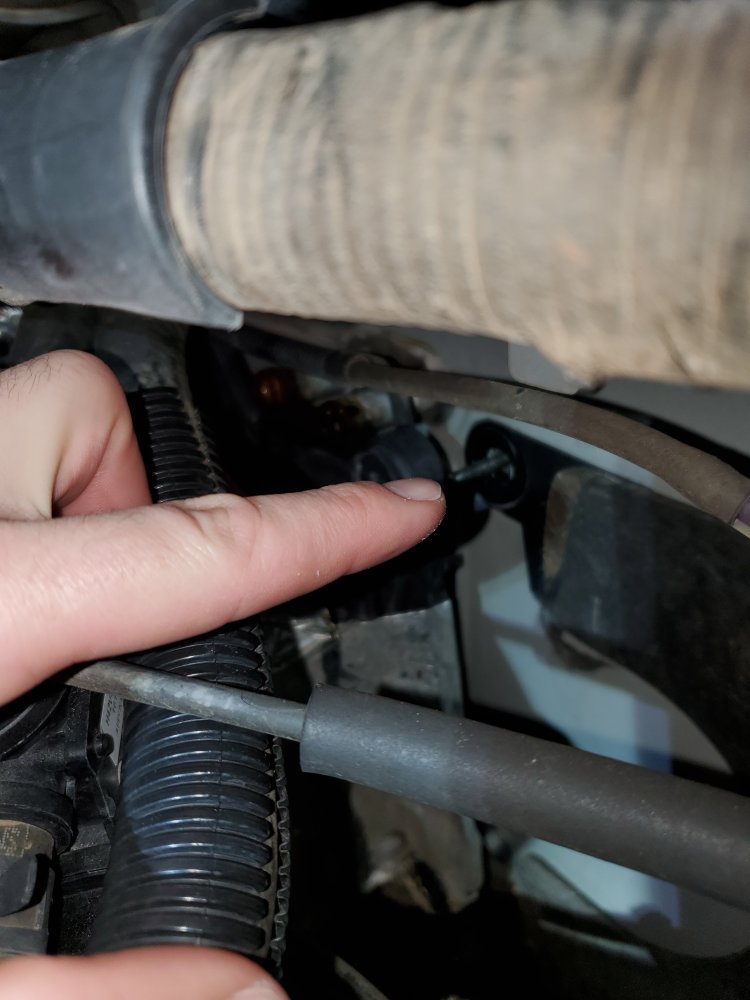
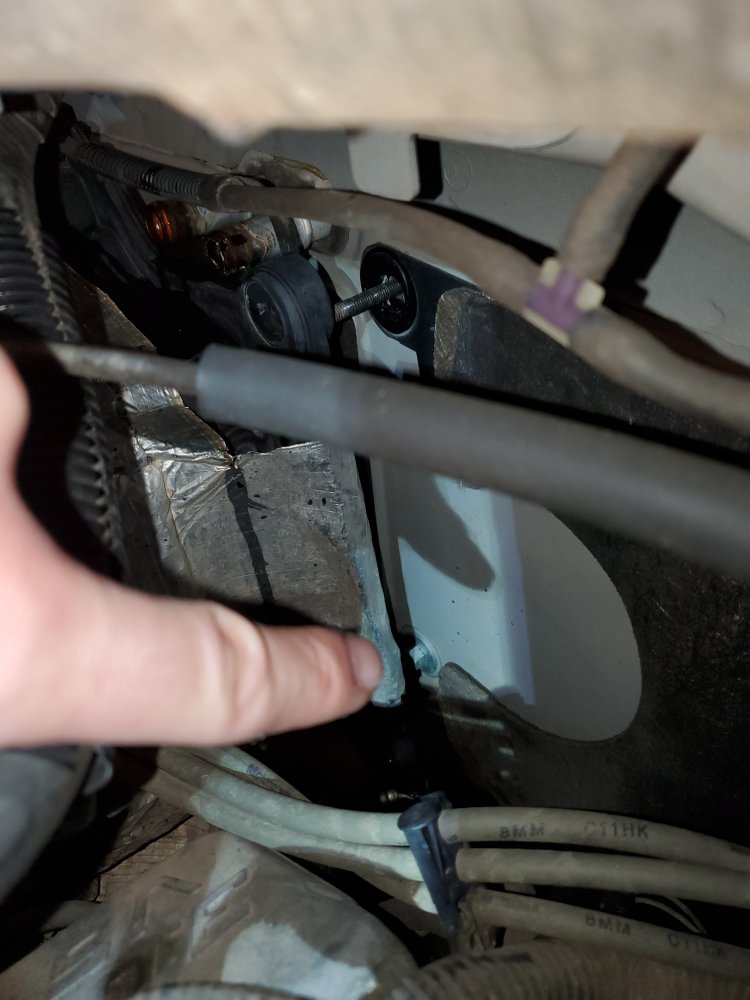
Remove one 11mm nut from a hole in the insulation on the firewall right behind the engine:
Finally, remove one more 11mm nut from a stud on the INSIDE of the cab, back near the fuel pump sensor thing you disconnected earlier:
NOTE: apparently on some models, I think after 2003, this nut is on the other side of the firewall and requires removing the black plastic inner fender liner around the wheel. This isn't too bad to do, but it's worth checking to see which side yours is on because it takes some time.
20) The HVAC housing in the engine bay can now be pulled (with some effort) back a few inches. Pull it back enough that it slips off of the threaded studs that the nuts were on. Now, you'll remove three additional 11mm nuts that secure the cab-side heater box to the firewall. Two are on the same studs that the previous nuts were on, and the third one is obvious under the top center of the HVAC assembly in the engine bay. These are the nuts that hold the heater box (in the cab) to the firewall...
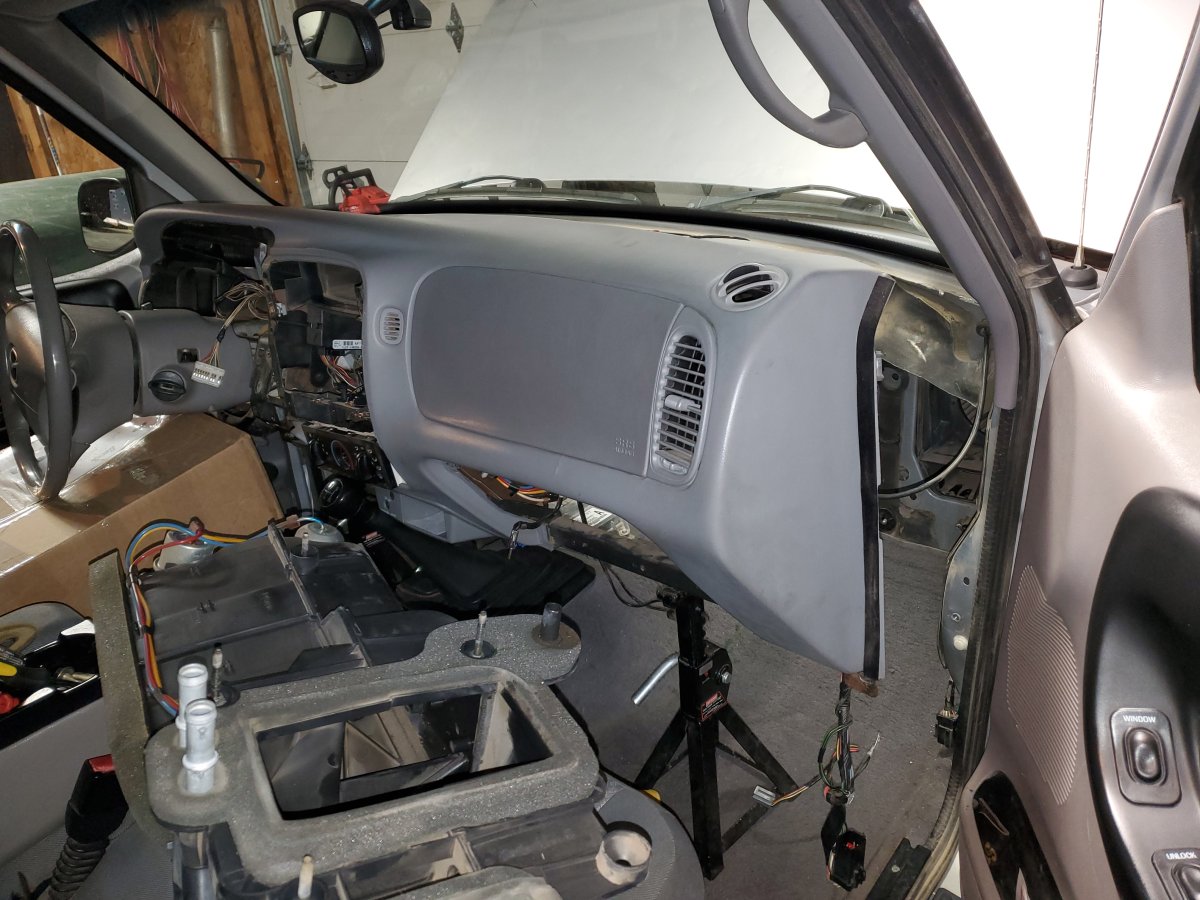
21) Now you can finally remove the heater box, with the leaking heater core inside! Have a friend help you support the dash as you remove those last two 13mm bolts all the way. You don't have to take it all the way out - there will be more to disconnect if you do that. I had to move mine a foot or so back in order to maneuver the heater box out around it. If you don't have extra hands around, I found that jack stands placed in the footwells did a good job of supporting the weight of it (someone will still have to keep it from tipping over). Here is mine with the heater box sitting on the seat and the dash on stands:
22) the heater box is easy to open up and remove the core. I believe there were five screws to take out. The core slides up and out once the lid is off!
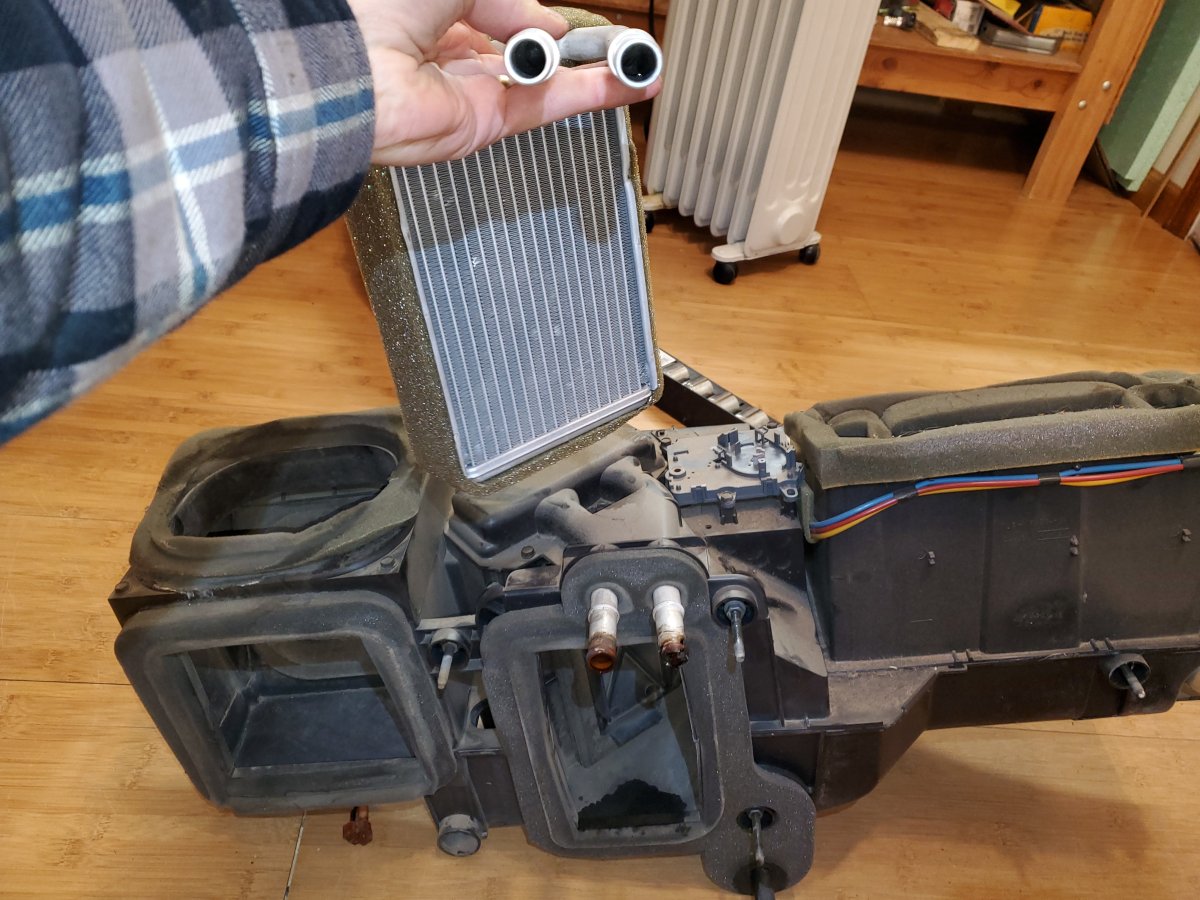
I wiped the inside of it out to clean out the residual coolant as best I could.
Reassembly is the reverse, and goes a lot faster than taking everything apart did. I added a little bit of locktite to the steering shaft pinch bolt, since it looked like it had some on it originally. Good luck!
Difficulty: 5 out of 10
Time to install: 8 hours
Disclaimer: The Ranger Station.com, The Ranger Station.com Staff, nor the original poster are responsible for you doing this modification to your vehicle. By doing this modification and following this how-to you, the installer, take full responsibility if anything is damaged or messed up. If you have questions, feel free to PM the original poster or ask in the appropriate section of The Ranger Station.com forums.
Brief Explanation: Accessing the heater core requires (at least partially) removing the entire dash. It's not as hard as it sounds, and none of the steps are overly difficult, but there are a lot of things to disconnect. If you take your time and label all the fasteners it's not bad, I promise!
Tools Needed:
-Nice socket set with deep sockets
-Ample lighting and headlamp
-T20 torx driver
-that little pry tool for popping out plastic push fasteners (optional)
Parts Needed:
-New heater core (get a good one because you won't want to do this twice)
-This is a great time to replace any burned out dash bulbs too, so snag some new ones if you need them.
I recently replaced the heater core in my 2002 Mazda, after the original started leaking coolant 22 years and 230,000 miles in. Intrestingly, the first symptoms were not the coolant smell but the windscreen fogging up when I wouldn't expect it to... it happened a couple times before it finally gave out a few days later and filled the cab with coolant vapor. The process is long and tedious but not all that difficult. Have a few cups to keep track of the many fasteners and label them with sticky notes. This took me a Friday evening and most of a Saturday.
1) Remove glove box. Squeeze the side of it in to allow it to pivot all the way down, then remove the two screws on the hinge.
2) Remove both kick panels (the plastic covers on the outboard sides of each footwell). You remove these by unscrewing the forward couple phillips screws on the floor trim strips to lift them up... the kick panels just tuck underneath those. The driver side one also has a plastic push fastener near the parking brake pedal.
3) Remove the radio and radio bezel. To do this you take out the two 7mm screws above the HVAC knobs and carefully pry the bezel out from the sides. I just use a flathead screwdriver to do this, it's easier if you've taken the radio out before since I think the clips sieze up a little.
Pull the whole assembly out a few inches (it slides on a rail), and disconnect the fog lamp switch, cigarette lighters, and transfer case control (if applicable). Then pull it out enough to disconnect the radio and antenna.
4) Remove the plastic knee guard cover under the steering column. This is held on with two 7mm screws on the plastic panel, and two T20 torx screws on the hood release handle (remove the handle too now)
5) Now remove the steel plate that was behind that plastic knee guard - it is held on by five 8mm screws. You can see the plate in the above photo.
6) Remove the instrument cluster bezel. It's held on by three obvious 7mm screws at the top, right above the cluster, and two more on the bottom (these two were previously hidden behind the steel plate)
Make sure to disconnect the headlight switch and dimmer knob as the bezel comes off. You may have to lower the steering column in order to weasel it off.
7) Now you can remove the instrument cluster itself. It just has four 7mm screws around the perimeter - remove the ones on the white plastic structure. The trick here is demating the three connectors on the back side - they are not too tough but the PCB is a flexible film that you don't want to push off of too hard. Each connector has a tab that you push down to release and then you sort of wiggle it side-to-side. Be patient here and make sure you aren't putting any force on the resistors mounted to the back of the PCB. This is probably the most actually difficult part of the whole job, but the cables themselves are mercifully long so you can move it around if you need.
8) Remove the parking brake release handle - you don't need to remove the whole mechanism! I mistakenly did and it was a pain to put back haha. Just pull the two 7mm screws holding the handle to the dash, since the dash will need to be able to move shortly.
9) Next move to the engine compartment, and remove the two 8mm screws that secure the relay box. You'll need to move this aside to gain access to the two main bus connectors that go through the firewall.
It gets easier to move if you also unbolt the massive ground strap coming out of the front of the relay box, and the clutch fluid reservoir (if applicable).
10) You can now get to the two large connectors passing through the firewall. The 10mm bolts on the two connectors function as jackscrews to demate them, so start by loosening them all the way.
The connectors will back out and you should be able to pop them off without trouble. This is a nice design! Next pop off the black housing around the two connectors. You just wiggle it off - there's not a trick or anything:
To remove the connectors from the firewall, squeeze the tabs on the sides and push the connectors into the cab.
11) I'm not sure if you have to do this, but I also demated the PCM connector and removed the PCM. To do this you back the jackscrew in the center of the connector out to demate the connector. Then remove the two 11mm nuts off of the studs on either side of the PCM.
It slides out of a housing that protrudes into the dash - you may be able to remove the dash without this step, but the Chilton guide included it so I did it.
12) Now is also a good time to disconnect the coolant hoses that that go to the heater core through the firewall... they are right under the PCM. Squeeze the hose clamps with some pliers and move them down the hose. I find channel-locks work well for this. You may have to patiently twist the hoses back and forth to break them free if they have never been replaced. I didn't bother draining the coolant since this is near the top of the system, but a little bit will pour out when you take the hoses off. Try to catch it since it's very toxic to pets, etc.
13) Move back to the cab, and remove the steering shaft pinch bolt under the steering column. It uses a 10mm socket. This will allow the steering wheel and column assembly to move away from the steering shaft when you move the dash back. You take the pinch bolt out, and then there is enough play to push the U-joint side out and down to disconnect the column from the shaft. You don't have to remove the wheel itself, or any of the plastic around the steering column.
14) While you are upside down under the steering column, demate the brake and clutch electrical connectors and unplug the airbag control module. The brake and clutch connectors are both located on the pushrods for those pedals, and have tabs to release them... I was able to do the brake one by hand but needed a flathead to pry the release tab up on the one for the clutch. The airbag control module is located on the transmission tunnel right in the center. You may need to remove a shifter bezel or center console to get at it, but if you have a center console that will need to be removed anyway to make room for the dash to come out. My truck is a manual, so unfortunately I don't know what all is involved to remove the console. There are some ground lugs around the airbag module that I did not bother disconnecting... there seemed to be enough slack to leave them be, as long as you don't take the dash all the way out of the vehicle. I did remove a little plastic push fastener that was securing the wire bundle to the transmission tunnel (and broke it because I don't have the right tool).
15) While you're disconnecting things, move to the passenger side and unplug the fuel pump's crash sensor reset thingie... this is right up under the glove box and you might have to pull the carpet back a bit to get at the connector on the bottom. To the right of that, under the kick panel you removed earlier, is another connector that needs to be unplugged along with two green ground lugs. Here is what the passenger footwell will look like with everything disconnected (the carpet is pulled back some):
16) Disconnect two multi-line vacuum connections next... One is visible in the last image just above the fuel pump crash sensor thing we unplugged. The other is inside the dash behind where the glove box would go:
They are flexible silicone and if you look closely you can see tabs on them that allow them to disconnect. You'll also want to disconnect the heater blend door control from the top of the heater box in the cab... this is a cable loop that comes from the heat/cool knob on the HVAC controls and runs to a black connector behind the glove box. The connector is easy to remove, and once you do you can see the neat little shaft it uses to move the blend door. The connector is visible in the top right of the last photo.
17) To gain access to three of the dash bolts, you need to carefully pop off the defroster vent bezel. It's held on by a series of metal push-fit fasteners, so you have to get a flathead or wooden shim under the edge and carefully work it loose. I found the vent bezel itself to be pretty robust, but the dash surface around it had been blasted by the Colorado sun for 22 years and was easy to crack.
18) Now it's finally time to loosen the dash! There are two large (I think they were 13mm) bolts by the fuse compartment (pop the cover off this if you haven't yet), three on top under the defroster bezel, and one on the bottom right by the fuel pump stuff we were disconnecting. The ones on top are not as tricky to reach as you'd think, but a universal joint extension helps a lot. Also be careful not to put your wrench/hand through the windshield when they let go! Keep the two lowest bolts backed out almost all the way, so they can support the dash as you pull it back a few inches. When you're ready, lift and pull the whole dash backwards to the two remaining bolt heads. This is a good time to check for any wires or vacuum lines that are being stretched.
19) Before you fully remove the dash, move back to the engine bay. The assembly that houses the blower motor and AC evaporator blocks a few of the heater box fasteners, so you need to partially remove it. I'll call this the HVAC housing. You can do this without disconnecting any AC lines or anything like that; there is enough play. Remove the three 11mm nuts (they are on studs) along the top and inboard side of the HVAC housing.
Remove one 11mm nut from a hole in the insulation on the firewall right behind the engine:
Finally, remove one more 11mm nut from a stud on the INSIDE of the cab, back near the fuel pump sensor thing you disconnected earlier:
NOTE: apparently on some models, I think after 2003, this nut is on the other side of the firewall and requires removing the black plastic inner fender liner around the wheel. This isn't too bad to do, but it's worth checking to see which side yours is on because it takes some time.
20) The HVAC housing in the engine bay can now be pulled (with some effort) back a few inches. Pull it back enough that it slips off of the threaded studs that the nuts were on. Now, you'll remove three additional 11mm nuts that secure the cab-side heater box to the firewall. Two are on the same studs that the previous nuts were on, and the third one is obvious under the top center of the HVAC assembly in the engine bay. These are the nuts that hold the heater box (in the cab) to the firewall...
21) Now you can finally remove the heater box, with the leaking heater core inside! Have a friend help you support the dash as you remove those last two 13mm bolts all the way. You don't have to take it all the way out - there will be more to disconnect if you do that. I had to move mine a foot or so back in order to maneuver the heater box out around it. If you don't have extra hands around, I found that jack stands placed in the footwells did a good job of supporting the weight of it (someone will still have to keep it from tipping over). Here is mine with the heater box sitting on the seat and the dash on stands:
22) the heater box is easy to open up and remove the core. I believe there were five screws to take out. The core slides up and out once the lid is off!
I wiped the inside of it out to clean out the residual coolant as best I could.
Reassembly is the reverse, and goes a lot faster than taking everything apart did. I added a little bit of locktite to the steering shaft pinch bolt, since it looked like it had some on it originally. Good luck!
Attachments
-
 112.5 KB Views: 19
 -
 201.6 KB Views: 20
 -
 87.7 KB Views: 18


