
Introduction
The Skyjacker Suspension kits are among the highest overall quality you’ll find for the Ford Ranger, Ford Explorer, and Ford Bronco II. Unfortunately, they aren’t without a few small issues. Following are some tips for dealing with the minor quirks of these suspension kits and getting the best performance from it. This is from my own experience on installing three such kits on three different trucks.
Skyjacker Coil Springs & Spacers
The Skyjacker coil springs are among the softer, more flexy coils you’ll find among the major kit manufacturers. Because of this, you will likely need 1″ coil spacers to go under the bottom spring perches, along with possibly a couple additional washers to total about 1-1/4″ – 1-1/2″ if installing on a Supercab (Skyjacker should specify a longer (NOT stiffer) coil for the heavier trucks, but for some reason they don’t). 4.0L Regular cab trucks may need a 3/4 – 1″ spacer. Bronco II’s and 4-cylinder Rangers shouldn’t need more than 1/2″ of spacer, if any at all.

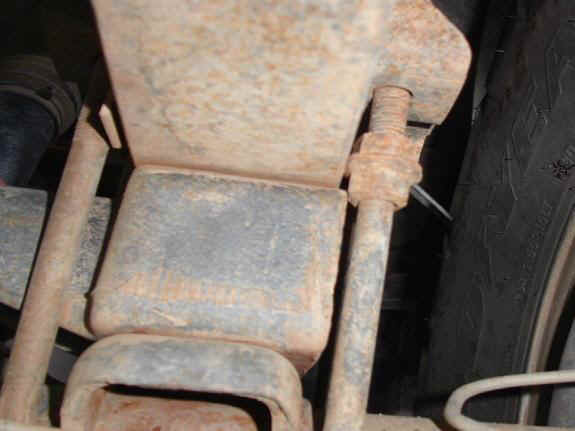
Here is the coil spacer installation on a Supercab Ford Ranger with a Dana 35 axle
The spacer (along with any 1-3/8″ I.D. washers needed) goes under the bottom coil spring perch (washers first) which is on the top stud/bolt attaching the radius arm to the axle. Be sure these bolts are torqued to 200-250 ft-lbs (the coil retaining nut only needs about 75). It is also possible in some cases to use the next size up coil spring and do away with using a spacer completely. Skyjacker pt.# 136 coils (spec’d at 6″ lift) produce 4.5″ lift on a 4.0 V6 Supercab 4X4 and work well with the axle mounted on the 4″ bracket position (upper holes). The steering linkage angle will be better with the axle in the upper holes as well.
Overload Leaf Springs
A second item is the overload leaf on the rear leaf springs that usually gets crooked. Threading 2 nuts with a flat washer between them down the rear U-bolts and tightening them together alongside the leaf will keep it inline. The leaf will then butt up against the edge of the washer keeping it straight. I have found trying to use the OE retainer on the Skyjacker leaf to not work. The small tabs tend to give way.
Skyjacker Braided Stainless Steel Brake Lines
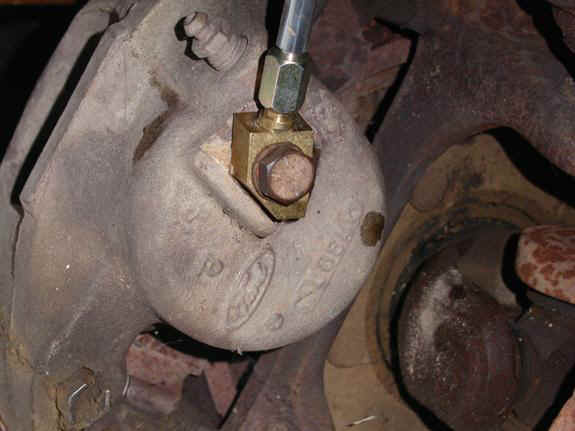
A third item is with the Skyjacker DOT braided brake lines. The banjo fitting that attaches to the brake caliper needs a bit of grinding (or filing) at a 45-degree angle on one corner. This will allow you to put it in a better position (less vulnerable to rubbing on the tire and allows for more suspension travel). In addition, the brake line should be secured to the coil winding with a zip-tie to help keep it away from the tire, as well.
Skyjacker Class-II Extended Radius Arms
Often some grinding on the backside of the driver side axle beam at and around the support bolt for the differential is needed to get the radius arm of a Class II kit to fully seat forward so you can get the main bolts through. The radius arm itself may also need grinding on the flat area between the axle mounting ears. This one is not exclusive to Skyjacker. I’ve seen this clearance issue at the diff a few times with different kits. It may be due to manufacturing tolerance variations at Ford. This will most likely be needed on the Dana 35 axle. Dana 28 axles probably won’t have this issue.
If tire rub occurs on the rear lower part of the front fender, I have found it is possible to move the front axle forward about 3/4″ by rearranging the assembly order of the radius arm bushings (and/or using different bushings). The little OE Ford plastic spacer can be assembled onto the frontside of the supplied bushing, for example, instead of behind as described in the instructions. The axle can be moved as much as one inch forward via the radius arms without creating a problem elsewhere.
I had the plastic spacer crack once (assembled as per the instructions). After replacing it with a new one, I tightened a hose clamp around it for support and its held up fine since. Not sure if this is common or not but is a good preventative measure.
Transmission Crossmember
Lastly, I have found the replacement transmission crossmember supplied with the Class II kits is of somewhat thin tubing. Although it is plenty strong to support the transmission, a good impact, high-centering it on a large rock can dent or bend it.
I put a piece of 1 – 1-1/4″ dia. cold-roll steel bar (dowel) inside the crossmember tube and welded it at both ends. The dowel should be about 1/2″ shorter than the tube length so the welds don’t interfere with mounting it to the radius arm brackets.
This adds considerable strength to it so it can survive Rubicon (sized) rocks without bending. 3/16″ wall tubing can be used inside the crossmember if you feel solid dowel is overkill (weight).
Conclusion
With the above suggestions applied to the Skyjacker Class II suspension system, an even greater level of performance and durability can be achieved from an already great kit.
Link
Related Articles
Getting The Most From Your TTB Suspension
Steering Tech – Discussing TTB Steering and Alignment
Is The Ford TTB Suspension Really That Bad?
Installing A Skyjacker Class II Suspension Kit
Skyjacker 1983-1997 Ford Ranger Class II Instructions .PDF
Installing A Skyjacker Class I Suspension Kit
Skyjacker Extended Radius Arm Installation
Last Updated: November 15, 2025
About The Author
Shawn “4x4junkie” has been part of The Ranger Station since 2001 and brings decades of hands-on mechanical experience to the community. A lifelong tinkerer from the San Fernando Valley, he’s largely self-taught, learning by working on his own vehicles, reading service manuals for fun, and tackling everything from suspensions and axles to transmissions. He currently owns and maintains a 1994 Ford Ranger XLT 4x4 and a 1990 Ford Bronco II XLT 4x4.
Shawn has contributed multiple technical articles and countless forum insights, most notably in the Suspensions and Axles sections. He’s known for practical, experience-based problem solving—often cutting through online folklore with real-world fixes. Whether helping diagnose issues or sharing fabrication knowledge, he’s committed to keeping TRS the best Ford Ranger resource available.