
Introduction
1986-1997 Ford Ranger SuperCab (Extended Cab) trucks use a 2-piece driveshaft. This article discusses the benefits of switching to a one-piece driveshaft and how to do it.
The Problem With A Two-Piece Shaft
SuperCab 4×4 Rangers used a two-piece rear driveshaft through 1997. In stock form, the only problem with the 2-piece shaft is that the rubber carrier bearing bushing can fall apart and need to be replaced. No biggie. However, Lifting the rear more than 1-2″ will cause vibration due to increased U-joint angles. This will also lead to accelerated wear of the U-joints and carrier bearing bushing.

Lowering the carrier bearing can correct the new vibration, but it’s trickier than it sounds. Because the carrier bearing is mounted on top of the crossmember, the entire crossmember must be lowered. After all that, you can still have vibration problems due to the design of the 2-piece shaft. The two U-joints at each end of the shaft (axle and T-case) are not phased together, meaning the ears on the shaft are 90 degrees to each other. If you lower the carrier bearing so that the two shaft sections are inline, you can be guaranteed of vibration.
1998-2011 Ford Ranger SuperCab One-Piece Driveshaft
Instead of going through all that trouble of guessing and checking and maybe getting it right, just ditch the two-piece shaft completely. 1998-2011 4×4 SuperCab Rangers have a nice one-piece shaft that is a 90% bolt-in swap and will keep you free from vibrations when you’re riding high. Also, the 2002-2005 Ford Explorer Sport Trac 4×4 rear drive shaft is the same as the 1998 Ranger 1-piece shaft.
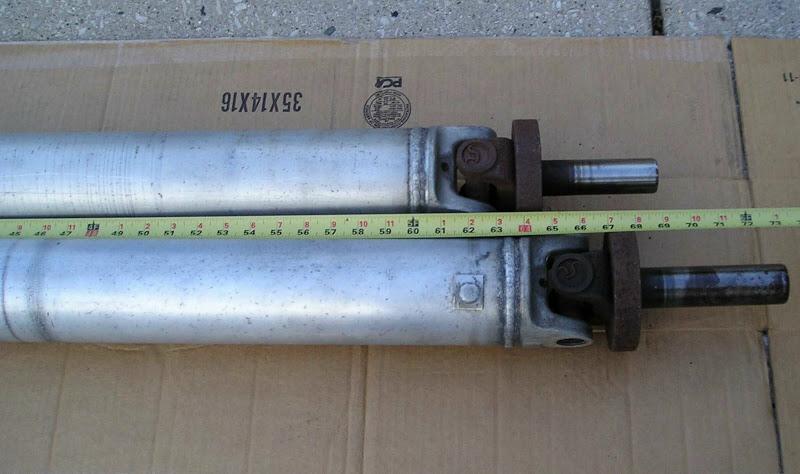
First, locate a one-piece shaft. Anything from a 1998-2011 SuperCab 4×4 Ranger or Mazda B-Series will work. It doesn’t matter if it’s a manual or automatic transmission, but the junkyard’s computers will ask, so just pick either one. Some junkyards will also ask for the distance weld-to-weld: It is 47″. Some of these will be aluminum and some steel. It’s a matter of preference or availability which you get. Just make sure whatever it is it’s not dented or bent.
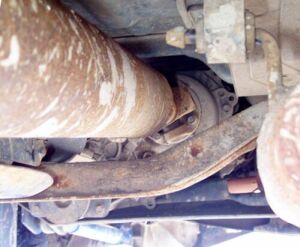
Set your parking brake and block the wheels. Without a driveshaft, having the tranny in gear or in park is worthless. Mark the orientation of the ends of the driveshaft on the axle and transfer case. If you ever go to put the original shaft back in it is good to maintain the original orientation to avoid minor imbalances. Unbolt the carrier bearing from the crossmember first. Then unbolt the ends of the shaft from the flanges with a 12-point 12mm socket (your 6-point sockets won’t work here). A light tap may be necessary to break the flanges apart.
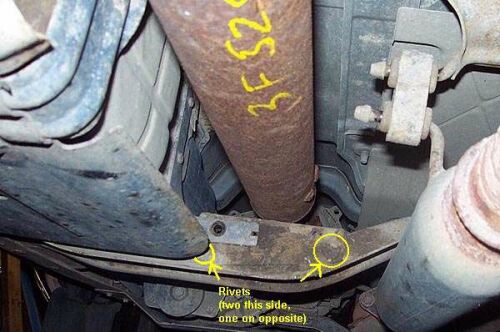
Now is the easiest time to deal with a few clearance issues before you put the new driveshaft in. The bracket that the carrier bearing was bolted to needs to go. There are three rivets holding it to the crossmember that must be ground off and hammered through. They’ll be rusted in there well so use a heavy hammer and a 3/8″ socket extension as a punch once you’ve ground the heads off. There is a tab on the gas tank skidplate that bolted to the carrier bearing bracket that needs to go also.
If you have a suspension lift taller than 4″ installed, you will also need to either move the entire crossmember forward some (drill new holes, reattach with bolts), or notch the center of it for clearance. This is so the shaft doesn’t contact it (and possibly get dented) when the rear suspension is fully extended.
Complete removal is not recommended (it is a structural frame component).
The gas tank skidplate does not contact the driveshaft on level ground, but when the rear suspension flexes a lot, it will hit towards the rear of the skidplate and make an awful screeching sound that will make anything that isn’t deaf wish it was. Remove the skid plate to do this trimming. Throwing sparks around your gas tank isn’t a great idea, and you don’t want to cut too deep and nick the tank either. There are four bolts holding the skid plate on that will probably be tight and a pain to get out, but well worth not sitting under the truck with a grinder and gas tank above your face. I took off a little more than an inch for the rear 2/3 of the skid plate and have not had any contact since trimming.
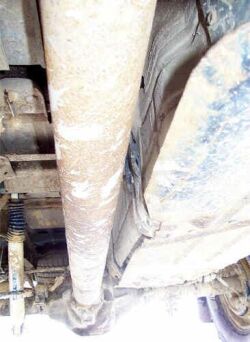
Bolt the skidplate back into place and then install your new driveshaft with the slip-joint towards the transfer case. Torque the driveshaft-to-flange bolts to 85 ft-lbs. There isn’t a great demand for the two-piece shafts, so I’m going to see if I can extend the long section of the old shaft for use as a trail spare. Might work, might not. We’ll see…~TRS
Author’s Notes:
1998+ 2WD Supercab Rangers also were fitted with one-piece driveshafts from the factory. This swap should be possible on these also. I cannot however comment on 2WD clearance issues as I have not researched them. I’ve heard slight floorboard modification may be needed.
All 1998+ 2WD Supercab shafts will be the large aluminum units.
If you own a 1983-1989 Supercab model, this swap can still be done, but the rear driveshaft flange on the axle will be smaller. You will need to swap the larger rear U-joint attachment with 3″ bolt spacing with another forward one that has a 2.5″ bolt spacing.
It also was brought up just as this article was being finished that later Supercab 4x4s fitted with aluminum shafts have a larger T-case flange (same as the larger rear flange with 3″ bolt spacing). These will require either swapping the forward U-joint piece or swapping the t-case flange. –4x4junkie .
Revisited June 29, 2009
From RedRanger_97:
I just recently purchased a 2003 aluminum driveshaft and just wanted to pass some info on to make it work. first of all, the Advance Auto P/N is 1-0134 for the front flange u-joint if you don’t change the t-case flange. Also, I have had to trim the gas tank skid plate like mentioned but after a little bit of driving it still touched the rear skidplate bracket. So, I had to cut it off and custom fab a new one. I also had to barely trim the front bracket too.
From oldmantruck:
I’m swapping in a late model aluminum 1-piece driveshaft into my 1994 supercab Ranger. The article gives info for a steel one. I found out as mentioned that the aluminum one uses a larger flange on the transfer case. Since the flange wasn’t available from the truck, I got the driveshaft from I needed a conversion u-joint Spicer Part Number 5-134x. This is basically a 1310 u-joint on one side and 1330 u-joint on the other.
From AllanD:
IF you “need” a conversion joint you have the wrong flange. The “eared” half of the companion flange comes in two sizes. One for the 4-inch diameter T-case flange, and another for the 5-inch flange. My personal “issue” with “conversion” aka “Jump size” U-joints is that you are using a nonstandard parts that you must keep track of because U-joints are ultimately a “wear item”. If you simply get the correct flange “adapter” then you get to keep track of the fact that you now need a U-joint for a 1998-up ranger (MUCH easier to remember).
Update 05/12/2010
From Sasquatch_Ryda:
The Explorer Sport Trac (2002-05) 4×4 rear drive shaft is the same as the 98 ranger 1 piece shaft. So, it is another option for people looking to swap out the 2-piece.
Update 06/10/2011
From rrbrian222:
I did the swap on my 95 2wd/MT/Super cab last fall…. It is definitely a simple bolt on affair; the 1996 model will be identical to mine. I would recommend removing the center bearing cross member since it’s no longer needed and mine was just a rust magnet anyway.
There are no floorboard clearance modifications needed, even for the larger diameter aluminum drive shaft. I think the hardest part is finding the correct shaft in a junk yard since the 2wd manual transmission version seems to be less common than the 2wd auto.
Here’s some info on the 1998-2011 aluminum shafts for anyone with an older 2wd SuperCab looking to upgrade:
126″ wheelbase Manual Transmission
Part # F87A-4602-NB
64″ Weld-to Weld
28 spline Slip-yoke
126″ wheelbase Automatic Transmission
Part # F87A-4602-PB
60″ weld-to-weld
24 spline Slip-yoke
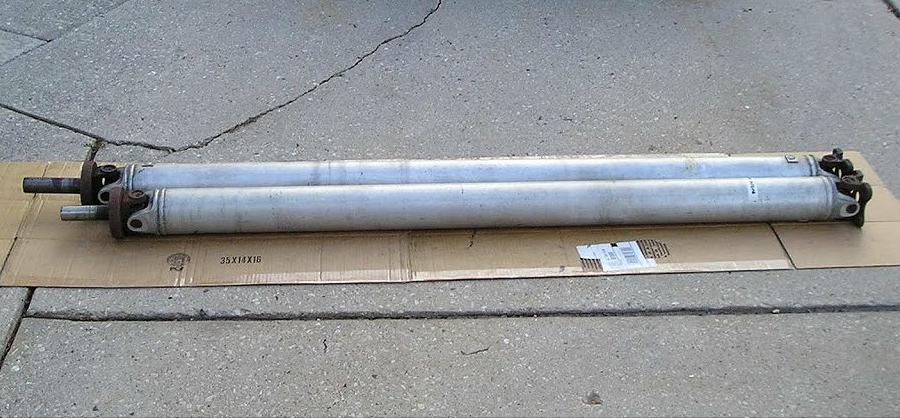
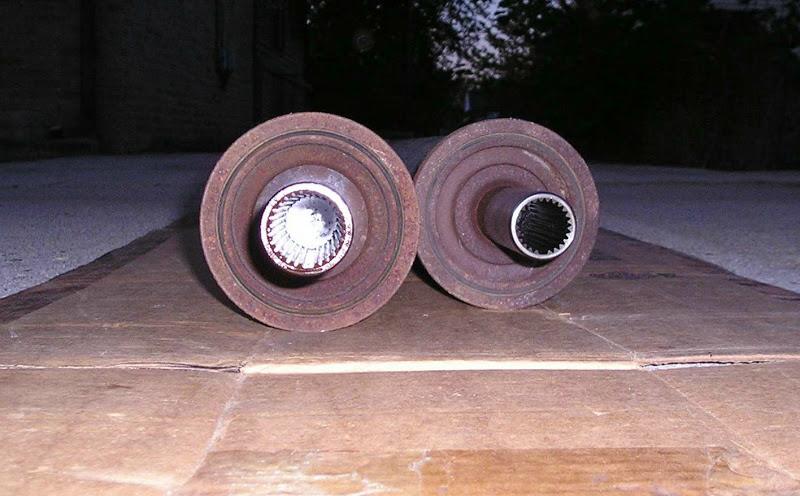
Here are some pics I took this summer when I had my driveshaft out. They are one of each laying side-by-side:
Related Article
1-Piece Driveshafts And Why You Want One
Building A Front Driveshaft For A 1998+ Ford Ranger
Last Updated:
About The Author
Jim Oaks is the founder of TheRangerStation.com, the longest-running Ford Ranger resource online since 1999. With over 25 years of hands-on experience building and modifying Ford Rangers — including magazine-featured builds like Project Transformer — Jim has become one of the most trusted authorities in the Ford Ranger off-road and enthusiast space.
Since launching TheRangerStation.com, Jim has documented thousands of real-world Ranger builds, technical repairs, drivetrain swaps, suspension modifications, and off-road adventures contributed by owners worldwide. TheRangerStation.com has been referenced in print, video and online by enthusiasts, mechanics, and off-road builders looking for practical, and experience-based information.