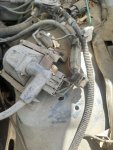
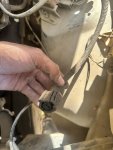
Yes, that is the spot. But drop back about 6 inches or so away from this connector for the red/green tap. And move 24 inches or more away from this connector and cut the green/yellow dot wire. It will stay plugged into the coil, and the far end of the green/yellow dot you cut will go to the black wire on your new distributor.
Once you do the swap and get it running good, you can get behind the pass side kick panel in the interior, and pull the computer. Unplug the large wiring plug to the computer and pull the computer out.
Then take the computer wires, and push hard where they go through the firewall, there is a large rubber grommet that will push through leaving a large hole. Take the large computer wiring plug, bend it around as tight as you can, and shove it and the wiring through the hole.
Then fish this harness up the fender into the engine compartment. Anything connected to this harness can leave. All those solenoids on a bracket on the pass side fender can leave. And sensor on the engine, carb, etc that is hooked to this harness can leave. Just gently pull on the harness, unplugging things till it is free. You will find a hot wire or two connected to the starter solenoid. You can snip these and tape them, and use them later for power if you need to.
There may be a ground here or there that has to come loose. Once the harness that was hooked to the computer is free, toss it, you are done. If you keep track of the components that the harness was plugged into, those can leave also.

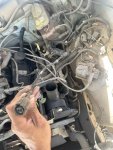
2.8 hei conversion by D Franklin, on Flickr