• Welcome Visitor! Please take a few seconds and Register for our forum. Even if you don't want to post, you can still 'Like' and react to posts.

Alternative Switches for Touch Drive


GrandpaSquid

Member
Joined
Sep 17, 2023
Messages
18
City
South carolina
Vehicle Year
1993
Engine
4.0 V6
Transmission
Automatic
Trying to get the 4x4 working on my 93 ranger. Followed the thread on here for testing everything. The module tested good, 4h tested good, but 4l did not. I know you can't get them new, and my local jy had all there's yoinked already. I'd prefer not to have to resort to ebay if I can help it. So I was wondering if anyone has custom swapped in any kind of alternative stitch gear? Looking at the wiring diagram with my limited electrical knowledge it seems like its just a toggle or a momentary switch. I have some in the garage from past projects. I'm confident(with some guidance) I could wire them in. Did a long Google and haven't found much, can't think of any more keywords to try so I decided to just ask. Thanks for those who read this and even more thanks to those that can provide some insight.
 
I did it, worked good. But you did have to be careful and make sure you are in the right gear.

The switch you need is a center off, spring loaded up and down switch. It will have 6 terminals on it. I highly recommend buying the proper spring loaded switch, since I found you have to bump the switch to move the transfer case motor. Here is a switch that is already setup for this.


If you look at the pictures of this switch, it has a "X" wired in it. You cut the wires on the transfer case motor itself, and run two wires (I ran a small cable) from there along the frame up into the engine compartment.

I then mounted the switch under the dash, and ran 4 wires to it. Two are power and ground. The other two go out under the hood and splice into the motor wires you ran. The power wire hooks directly to the battery + with a circuit breaker.

On the switch, the motor wires can hook to the center terminals. The power and ground can wire to either the top of the "X" or the bottom of the "X". When you move the switch off center, it connects the motor to the top of the "X" or if you move the switch the other direction, it connects the motor to the bottom of the "X". This is basically swapping the polarity of the power going to the motor depending on which way you move the switch.

I labelled my switch "2wd" on one side, and "4wd" on the other side. When I would bump the switch in the "2wd" direction it would move the transfer case into 2wd. To keep from straining things I would only momentarily bump the switch. The factory computer must have used a lower voltage on the motor, because a straight 12v moves the motor very quickly, another reason to just bump the switch.

When I would bump the switch in the "4wd" direction, it would move the transfer case out of 2wd and into 4hi. Once in awhile I would not bump it enough and you would hear a slight grinding noise. One more bump would do it. I would come to a stop, put the trans in neutral, and then give it several bumps in the "4wd" direction, this would put it in 4 low. You can feel it sometimes going in gear.

I used this for years, and reliably was able to use 4x4 when I needed it. Unlike the computer system which only worked when it wanted to.
 
I haven't actually done it myself, but if you were to put a resistor inline with the 12V going to the motor, will reduce the strain on it when it hits the end of it's travel (making it easy to find 2HI and 4LO by holding the switch a bit longer, though bumping would still be needed to find 4HI and N). If you're creative, you probably could even tap into the sensor wires and have it work the 4x4 and Low Range lights on the dash so you know exactly when you've found 4HI while bumping the switch looking for it (who knows... there might even be a sensor contact for Neutral too, I haven't looked).

I don't know offhand what value resistor it would take, but I would think around 1 or 2 ohms, and a power rating between 25 - 50W (some experimenting would be needed).
 
I have a 96 Explorer with 4x4 and an 4r44e or something? automatic, my Ranger is a standard and I have a spare for it.
Not certain it would work or not but I'll be fair as I can if it would.
You have the one from yours tho huh
I've never really done much with them excepting to clean it up, much as you would do a starter and selinoid, and sometimes the connections inside (where the wheel turns as it goes to different setting) can get gummed up and needs cleaning
 
Last edited:
I did it, worked good. But you did have to be careful and make sure you are in the right gear.

The switch you need is a center off, spring loaded up and down switch. It will have 6 terminals on it. I highly recommend buying the proper spring loaded switch, since I found you have to bump the switch to move the transfer case motor. Here is a switch that is already setup for this.


If you look at the pictures of this switch, it has a "X" wired in it. You cut the wires on the transfer case motor itself, and run two wires (I ran a small cable) from there along the frame up into the engine compartment.

I then mounted the switch under the dash, and ran 4 wires to it. Two are power and ground. The other two go out under the hood and splice into the motor wires you ran. The power wire hooks directly to the battery + with a circuit breaker.

On the switch, the motor wires can hook to the center terminals. The power and ground can wire to either the top of the "X" or the bottom of the "X". When you move the switch off center, it connects the motor to the top of the "X" or if you move the switch the other direction, it connects the motor to the bottom of the "X". This is basically swapping the polarity of the power going to the motor depending on which way you move the switch.

I labelled my switch "2wd" on one side, and "4wd" on the other side. When I would bump the switch in the "2wd" direction it would move the transfer case into 2wd. To keep from straining things I would only momentarily bump the switch. The factory computer must have used a lower voltage on the motor, because a straight 12v moves the motor very quickly, another reason to just bump the switch.

When I would bump the switch in the "4wd" direction, it would move the transfer case out of 2wd and into 4hi. Once in awhile I would not bump it enough and you would hear a slight grinding noise. One more bump would do it. I would come to a stop, put the trans in neutral, and then give it several bumps in the "4wd" direction, this would put it in 4 low. You can feel it sometimes going in gear.

I used this for years, and reliably was able to use 4x4 when I needed it. Unlike the computer system which only worked when it wanted to.
I knew there would be a switch type that would be perfect! A full bypass is fine by me as well, I have lots of leftovers from a cj5 my pops "restored" recently. It was a hunt club truck so he had to make an entirely new loom for everything. I'm still gonna keep an eye out for a manual box to swap in.

So you think with some high level Jerry Riggin I could utilize the factory 4H switch as the center off switch? Maybe just remove the power wires to the module but leave the position wiring intact? Then maybe the indicator lights will still work.
 
You can't use any of the original switches. You must use a spring loaded switch so you can bump the switch. Also, you will notice the switch I linked to is good for 30 amps. You are controlling the motor directly, none of the factory switches are designed to handle the current load of the motor directly.

I did actually hook up the lights to help me figure out what mode I was in. But I didn't want to get too complicated in my post.

While I cut the motor wires, I left all the little wires intact that go to the motor switch. They still went up to the shift computer which was under the dash panel on my 86. I had indicator lights on a overhead console. The indicator lights, the position wires from the transfer case motor, and key on power are all located at the shift computer. If you are good at wiring and have a wiring diagram, you can rewire, sending voltage down to the shift switch, and having voltage come back on different wires for different positions and wire those into the proper lights.
Hmmmm.... I could run inline relays. I want to keep factory as possible. Just gonna be a balancing act between my willingness to put in the effort vs my desire to take the path of least resistance.
 
Get you a bunch of push buttons.
We used to have an old Plymouth with push button gear shift.
It had all the buttons on the dash, not sure if it had a "PARK" button or not
One time my father took the boat to a lake we lived near and went fishing
When he was getting ready to leave he backed the Plymouth (station wagon) with trailer attached down to the water.
He was pulling the boat up onto the trailer and his feet started getting wet. He looked down and water was coming up onto his trailer and he was tring to walk up that trailer to the car, which was soon under water also and he was sitting on top of it.
I think it was bad about slipping out of PARK ;)
 
Hmmmm.... I could run inline relays. I want to keep factory as possible. Just gonna be a balancing act between my willingness to put in the effort vs my desire to take the path of least resistance.
Sounds like you have some electrical experience. I never know a person's expertise when replying. So you can consider my posts just ideas to get you going, I am sure there are many ways to do it. I just think this way of electrically bypassing it is better than crawling under the truck and turning one of those knobs they sell.
 
Sounds like you have some electrical experience. I never know a person's expertise when replying. So you can consider my posts just ideas to get you going, I am sure there are many ways to do it. I just think this way of electrically bypassing it is better than crawling under the truck and turning one of those knobs they sell.
Most definitely your suggestion is a route I'm leaning heavily down. I just like the idea of my bodge to be as undetectable as can be. Sorta like the nuts I put into the passenger window motor gear to prevent slipping and make it work again for free(bolt bucket ftw). On the flip side my Bronco has a house light switch drywall screwed into the coin tray on the dash straight wired to the battery and front fog lights. I can jank with the best of then when function is all that matter. Lol.
 
One of the problems with this bypass is a 3rd party operating your vehicle. Or a child riding with you (should be in the car seat I know, but) being curious and playing with the switch. A bunch of the functions of the original computer was the safety of the driveline/transfer case. You will get a reliable working 4x4 system, but you will lose these features. Like;

Shift on the fly. Can't do it, you will have to stop traveling to go into 4x4.

You had several conditions to go into 4 low. The vehicle could not be moving, you had to be in neutral, etc.

None of this is a problem if you pretend you now have a lever sticking out of the floor. You just have to put your thinking cap on a little bit when going into 4x4, just like you would with a manual transfer case.
 
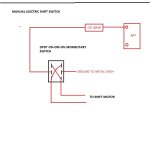
Ranger(Ford) shift motors are the same as the power window motors, 2 wires
12volt on one wire and Ground on the other causes motor to spin clockwise
Reverse the polarity, ground/12v and motor spins counter-clockwise
Window up window down

Shift motor's 2 wires(and power windows 2 wires) are BOTH GROUNDED when not in use
Each motor wire has its own 30amp relay, 5 POLE relay
When relay is off its wire to motor is Grounded
When motor needs to be activated then only one of the relays needs to be activated, disconnecting it from ground and connecting to 12volts, because the other wire is already a ground

Most of these motors have a Thermal Limiter circuit breaker inside
This means when the motor's mechanical mechanism hits too much resistance(sudden high amps) the Limiter opens, cutting ground or 12volts, doesn't matter which, so motor won't turn any more
Which is why windows don't break if you continue to hold the up or down button, lol
There is no other "limit switches" just the Thermal Limiter, on windows or the shift motor
The shift motor has a mechanical stop on its drive wheel because you could damage the transfer cases Shift rod if it was used as the resistance stop for thermal limiter
Widow regulators are tougher, but you can still wear down/strip gear teeth, lol

So all you need to move the shift motor are two 30amp 12v 5 pole relays and a 20amp fused circuit, you want the fuse to blow before the wires or relays, lol


The position of the shift motor is the hard part
But Ford has done the hard work with the contact plate and 5 contacts
Contact plate is on the drive gear, the part that turns as the motor turns the shift rod in transfer case

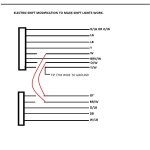
You would have 4 LEDs(12v lights), all have 12volts with key on
There are 5 position wires on the shift motor
One main wire, yellow/white wire, which would be a full time Ground wire
Then 4 wires, one for each light bulb, the bulbs ground wire

001 transfer_case_shift_motor_pin_readings.png


This is what the controller uses to determine shift rod position
Open means NOT connected to yellow/white wire
Shorted means connected to yellow/white wire, in this case gounded

You would use light bulbs instead, say numbered 1 to 4 left to right
1 on
2 off
3 on
4 off
So thats 2WD(2H)

1 off
2 off
3 on
4 on
4High

1 on
2 on
3 off
4 off
4Low
 
I only wired two lights. On mine I wired in the original lights in the console. On a friend's I converted I added two lights in the same metal bracket that held the switch under the dash. I only needed a 4 hi light and a 4 low light. If I bumped the switch several times in the 2wd direction, and both lights were out, I was in 2hi. Bump it in 4x4 direction till the 4 hi lit, I was in 4 high. Keep bumping it a lot till the 4 low light lit, I was in 4 low. I didn't care about neutral either, though I am sure it would be easy to find, no lights and it will not move in any gear.

My priority was to keep it simple. I did not want to duplicate the complicated Ford system. Below I attached a picture for the modifications needed to make the lights work on a 1986 ranger system. This truck had the shift computer under a panel on top of the dash on the pass side. The diagram represents the two large wiring plugs going into the computer.
 

Attachments

  • ELECTRIC SHIFT COMPUTER PLUG MODIFICATIONS.jpg
    ELECTRIC SHIFT COMPUTER PLUG MODIFICATIONS.jpg
    54.5 KB · Views: 77
Studying Ron's chart, it looks like I used at the computer connector Pin 8, Pin 5 and Pin 7. I grounded Pin 8, and then Pin 5 must have been 4 low and Pin 7 must have been for 4 high.

It was a long time ago, but I am assuming the lights were fed power when the key was on in the console, and when I grounded the correct wire to pin 8, that made the light come on.
 
Here is the switch wiring.
 

Attachments

  • ELECTRIC SHIFT SWITCH.jpg
    ELECTRIC SHIFT SWITCH.jpg
    42.5 KB · Views: 77

Sponsored Ad


Sponsored Ad

TRS Events

Member & Vendor Upgrades

For a small yearly donation, you can support this forum and receive a 'Supporting Member' banner, or become a 'Supporting Vendor' and promote your products here. Click the banner to find out how.

Recently Featured

Want to see your truck here? Share your photos and details in the forum.

Ranger Adventure Video

TRS Merchandise

Follow TRS On Instagram

TRS Sponsors


Sponsored Ad


Sponsored Ad


Amazon Deals

Sponsored Ad

Back
Top