• Welcome Visitor! Please take a few seconds and Register for our forum. Even if you don't want to post, you can still 'Like' and react to posts.

96 4.0 Explorer XLT 4x4 Getting it back on the road


You have the egr and the fuel pressure regulator vacuum lines switch.
Thanks Sno, I'll check that, but far as I know they fairly well just layed right back into place, I didn't stretch or strain them in any way, simply moved them out of the way due to all the other lines(elec and such) being in more solidly fixed positions
 
I drove it into town tonight to get some gaskets and such, and a transmission filter kit. The CEL was off before but on again tonight. When I got home, before shutting it off I hooked up the reader and it had 4 codes this time.
First it gave a P0125 Insufficient Coolant Temperature for Closed Loop Fuel Control
P0401 Exhaust Gas Recirculation Flow Insufficient Detected
P0174 System too Lean (Bank 2)
P0113 Intake Air Temperature Circuit High Input

Any ideas what I've got going on here?
96 Explorer 4.0 4WD Automatic
It has the very large radiator and I believe a very high output fan, kicks out such a breeze I've found it difficult to search for vacuum leaks, was thinking earlier about removing the fan belt while it's cool and checking for leaks again
I plan on checking or just replacing the thermostat, it could have a low temp one. The guy had been trying to get the AC working but they sent him the wrong clutch. He gave me that but I can't use it that I know of(it needs at least an AC clutch, but I just got a non AC belt for now
The thing seems to be really guzzling the gas
 
Last edited:
You want the simple vacuum gauge. The normal carb application low psi/vac is fine. Vac is vac.

To check fuel psi you need a efi psi testor. Not the same or relevant to the task we want you to do.
 
Your sure no wires are pinched?

Egr setup is hanky and sounds like an exhaust leak. Is it loud?

I would pop the fan off for testing.
 
I must have still been half asleep there. Yes, it is much louder. Actually the first thing I did was to check an O2 sensor I had tried to remove when first changing the trans-fluid and filter, but it had seized up halfway out. I had considered just grabbing a pipe wrench and twisting it on out but since they're basically hollow I didn't want to cause a major problem and just tightened it back till later, although it hadn't fully re-seated, but still was tight.

It didn't want to tighten further so I went on to town for the in-lb torque wrench I'd been forgetting, and some fluids for the transfer case and differential. I'm also having trouble finding a throttle body gasket locally, and it needs cleaned also. I'm hoping to swap the valve body out tomorrow and Tues, plus the other things, hoping for sure to have drive-able by Thursday.

Sorry I missed the point of your post, and I will certainly undo the fan and see what I can find there. The vacuum gauge will be in Tues. I believe it is very likely something in the egr valve area
 
On another page, I did pull the Differential pan today, probly first time it's seen daylight in 220,000 miles
 

Attachments

  • DSCF4064.JPG
    DSCF4064.JPG
    228.1 KB · Views: 173
  • DSCF4061.JPG
    DSCF4061.JPG
    187.1 KB · Views: 160
Diff looks ok ish


The O2 fiasco is a likely partial issue.

Throttle body should be oring.....

.hand tools to r&r and clean gently with tb cleaner and good towel....
 
I ordered an O ring too, it was all we could find at either store. Be here tuesday also. Funny thing was, an intake body comes with the(4 bolt square w/ round hole) gasket I had expected to find?
 
So here's what I've got for the valve body replacement. Didn't really have a suitable cardboard to draw it on, so I used some bits of wood to build a frame with some screws and glue.
Then added some old Felpro gasket material to the mix,
Layed the valve body onto the material, and stamped out marks to the bolt hole with an old friend of mine, a Hilti nail(makes a great center punch into Anything).
Made slots in all the marks and stapled it onto the frame.
Used a printout of the torque sequence
Turned the bolt locations one sideways as opposed to upside down. (Funny how they used a musical progression in that one eh?)
and circled where they go

I don't think this post will work well, for some reason, but it's just all in steps :)
 

Attachments

  • DSCF4072.JPG
    DSCF4072.JPG
    125.6 KB · Views: 168
  • DSCF4078.JPG
    DSCF4078.JPG
    213.5 KB · Views: 156
  • DSCF4080.JPG
    DSCF4080.JPG
    89.7 KB · Views: 171
  • DSCF4083.JPG
    DSCF4083.JPG
    214.2 KB · Views: 159
  • DSCF4085.JPG
    DSCF4085.JPG
    157.8 KB · Views: 159
  • DSCF4086.JPG
    DSCF4086.JPG
    205.2 KB · Views: 164
Last edited:
Afraid I didn't make much progress today, got sidetracked too many times, and at one point I stooped over to unscrew a water hose going out to the barnyard and it was extremely hard to untwist. When I went to stand up my back hurt more than it has since an injury in 2003, even hard to walk sometimes. I took a heavyweight ibuprofen a little while ago, hoping that'll help, and if not I've got a stronger something I don't use often, hoping it won't go there.

I got it up on jacks all around and lifted maybe 3 inches on each one. I've come to really like those factory jacks, that one on the right is from the 93 Ranger, the blue one on the left is probly 20 years older and came from a sale a couple weeks ago,$2, one in front is from the Explorer and another from the wrecking yard, another couple of bucks. They're easy to move around and use, and don't ever leak oil ;)

I dropped the pan and filter off the transmission, put the oil in a 5 gallon bucket for recycling, got the solenoid harness all loose and pulled the servo cover and piston. I believe the server has still got to come out too, but wasn't real sure while I was under there. I had hoped to get the valve body out too but was running out of daylight and didn't want to rush it. Tomorrow is supposed to be a decent day also, so I hope to get the valve body swapped out and transmission all back together.
Still want drain the transfer case and need to fill the differential also
 

Attachments

  • DSCF4089.JPG
    DSCF4089.JPG
    156.4 KB · Views: 165
i think my back would hurt less if i was not always crawling under machines fixing them
 
thats why i put a drain plug in.....filter and save the fluid if its not trashed.....mercon fluid is 50-60 bux for cheap shit.
 
That plug certainly crossed my mind as the fluid began dropping out all around me
 
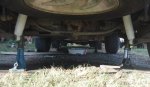
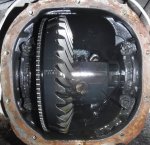
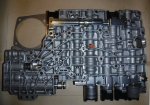
I got the Valve body swapped out today and changed the fluids in the transfer case and differential. Seems the transfer case is a D2562.
The valve body wasn't so bad, just kinda messy, and I couldn't possibly catch it all. Got a large bottle of Dawn detergent to soak the gravel with(maybe it'll help to dissolve some of it).
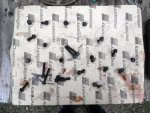
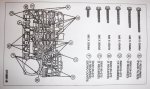
The gasket material worked well enough to hold the bolts, but it was difficult to match them up with their prospective slots as I had to transfer from a view above to a flipped one on the ground, but going back together I only had two (X2) I had to switch(one too long, one too short, switch kinda deal).
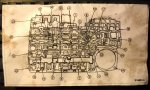
I also really messed up with the reverse servo gasket, but hadn't even known it existed until seeing it leaned up in the drain pan. I followed the pattern visible on the old valve body and placed the gasket in place on the new valve body, started all the bolts in with a cordless drill, clutch adjusted on 1(of 1-24) and ran em in using the torque sequence. Then set em on in with the in-lb torque wrench(loaner from AZ, still in the cellophane, about $50 I think).

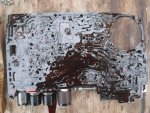
Then a lightbulb came on :/ as I realized I'd put the reverse servo cover gasket on the rong side of the valve body, and only choice was to drop it, and move the gasket, and so I did.

Only back the bolts out( every one) and wiggled it loose enough to drop free of the transmission enough, fished a needle nose pliers around a crossmember and some other stuff and fished it out from behind, then started back in with the cordless screwdriver and then torque wrench, each in sequence to 85 in-lb( a number I calculated as just above midway of the high and low side of the torque recommendation.
Then the reverse servo w/ its' gasket under the cover, and on to the pan and dropping the fluids in the TC and Diff.

I was filling them all as the daylight rapidly began to wane, had enough fluids all around, excepting had to use some Dexron V in the TC.

After filling the transmission started the engine and just let it idle a while, then put it into R and let the tires idle around a bit, then into D, still idling. Then shut it off and let the fluid settle as I filled the TC and Diff. fluid.
Then re-checked the transmission and it was showing about a qt high. Took it off the jacks as the last vestule of daylight flickered away, a misty rain had begun to fall.

Then I drove it 50 miles, filled the tank, my last one computed as just over 10 mpg(14 gal to go 150 miles) but the engine seems to be a bit smoother although it still has definite issues (sputters under any strain, and still has codes) I picked these codes up after it sat about an hour P0401, P0756, and another P0104.

The transmission is doing better w/ reverse, doesn't seem to grind as before under strain, but still does it on the highway going into a heavy wind, although it didn't coming back w a tailwind.
 

Attachments

  • DSCF4096.JPG
    DSCF4096.JPG
    239.1 KB · Views: 155
  • DSCF4109.JPG
    DSCF4109.JPG
    194.3 KB · Views: 162
I want to add that the transmission is shifting much differently, smoother, in fact. I haven't had time to fully discern what it is actually doing now, although I am quite certain it's still slipping between 2 & 3( and possibly more), although I believe it to be upstream(or down, as it may be), but it will take some time getting used to, until I can be certain where things are at now. I do believe it will get me to the family Thanksgiving tomorrow, and am very grateful for that :)
I also believe it was rather jammed up in places. As the photo shows, there were two big blobs of goo on top on removal. ( just below center on the lower left) I hadn't wanted to post this shot because the camera saw it much differently that I had in the sunlight, all I saw was the two big blobs on the seal, and a very oily surface(no real differentiation in the colors)
 

Attachments

  • DSCF4093.JPG
    DSCF4093.JPG
    312.8 KB · Views: 166

Sponsored Ad


Sponsored Ad

TRS Events

Member & Vendor Upgrades

For a small yearly donation, you can support this forum and receive a 'Supporting Member' banner, or become a 'Supporting Vendor' and promote your products here. Click the banner to find out how.

Recently Featured

Want to see your truck here? Share your photos and details in the forum.

Ranger Adventure Video

TRS Merchandise

Follow TRS On Instagram

TRS Sponsors


Sponsored Ad


Sponsored Ad


Amazon Deals

Sponsored Ad

Back
Top