• Welcome Visitor! Please take a few seconds and Register for our forum. Even if you don't want to post, you can still 'Like' and react to posts.

2.8L V6 wont stay running. When running it hesitates. It hesitated when I tried to drive it.


UPDATE: I got my timing light, extra tools, and my wire.

I cant seem to figure out how to tighten the dist bolt and the rotor has some slack on it. (It turns clockwise but not counter) If that fine?
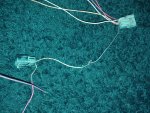
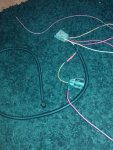
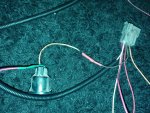
Also, today I modded the heatsink so the HEI can fit on it. I need to get longer bolts for it to fit properly and be able to mount somewhere under the hood. Ive patched and fixed the the bad wiring on the harness. So thats ready. Now its time to wiring it up, mount the HEI, and fire it up.

Im gonna do that tomorrow since Ive made a mess out of what I did today.
 
Guess what that slack is in the rotor? That is the advance mechanism with the weights and springs down inside the distributor. When you rev the engine up, that rotor is going to move by itself in that direction, the amount dictated by rpms. You are learning a lot here. Twisting the distributor around to set the timing, the rotor turning by the centrifugal weights inside advancing the timing automatically.

And then if you look down inside the distributor there is a plate that the distributor pickup module is bolted to. It's loose also. If you look at it, there is a linkage rod going from the vacuum advance unit to this plate. The vacuum advance moves the rod back and forth, which also varies the timing by the position of the pickup that reads the little star wheel. This adjusts the timing according to vacuum level in the engine. Vacuum level varies with the load on the engine so it varies the timing according to load.

Your old distributor had none of this. This is why you are swapping in this distributor with all these mechanical timing adjustment mechanisms inside it.


Thanks for the knowledge! I was worried it was bad since I read reviews about some sort of play in the shaft or something.

Ive always loved learned new stuff! Especially when it came to cars! older cars. What about the hold down bolt? I cant see to get a good grip on it. Ive tried a normal wrench, crows foot, and a socket. Ive used 13mm but I just cant seem to get a grip on it to be able to either tighten or loosen it when needed.

Ive made a contraption for the HEI since I had to use what I had laying around.

The wiring on the harness is all patched up and Ill post a photo here. I did the best I could with the knowledge I had. It looks way better though. Less risk of something breaking.

EDIT: posted the before photos and not the after. The after have been posted.
 

Attachments

  • IMG_20200426_181348.jpg
    IMG_20200426_181348.jpg
    365.8 KB · Views: 118
  • IMG_20200426_181409.jpg
    IMG_20200426_181409.jpg
    180.9 KB · Views: 114
  • IMG_20200428_215134.jpg
    IMG_20200428_215134.jpg
    176.8 KB · Views: 121
  • IMG_20200428_215140.jpg
    IMG_20200428_215140.jpg
    351.9 KB · Views: 119
Last edited:
I found the stock coil wiring. Its got a resister hooked up to it. Should I reuse it or not?
 
On my setup I'm running a ballast resistor on the RUN circuit to drop the voltage to the coil a little after the engine starts. The resistor you found on your stock coil; what does it look like, and how was it wired in?
 
If you are using the stock coil then use the resistor block, if its a newer coil then by-pass it

The older coils would run too hot with 13.5-14.5volts(alternator voltage) with engine running so the resistor was used to cut voltage down by about 5 volts, so coil would get 8.5-9.5volts engine running

But when starting the engine the resistor had to be by-passed, because 12volt battery voltage actually drops down to about 9.5-10.5volts when starter motor is activated, so coil would only be getting 4.5-5.5volts thru the resistor, so there was a separate START wire to power the coil

Us old guys remember the old 4 post starter relays(solenoids) on the inner fender, the 4th post was "I" for ignition, it had battery voltage only when starter relay was activating starter motor(9.5-10.5volts), the wire on the "I" post ran to coil "+", the START wire :)

If engine cranked but didn't start, but you got a backfire or an almost start when you let off on the key, that ment START Wire was bad
If engine started but stalled as soon as you let off the key, resistor was bad or the RUN wire to coil
 
On my setup I'm running a ballast resistor on the RUN circuit to drop the voltage to the coil a little after the engine starts. The resistor you found on your stock coil; what does it look like, and how was it wired in?

GREEN: Just one lead
GRAY: Had 2 leads coming off it. The splice was horribly done like all of the other ones.

IMG_20200429_182334.jpg


This whole truck was Bubba/Hillabilly repaired.
ngmmoe332je31.jpg
 
That's not a resistor its a capacitor, it reduces Radio interference on AM radio stations, Spark systems make lots of Radio "noise"
It doesn't hurt anything and can't effect spark
 
That's not a resistor its a capacitor, it reduces Radio interference on AM radio stations, Spark systems make lots of Radio "noise"

After looking at it and cleaning it up. I did figure that out. I started looking around it and cleaning it up. I learned it was a cap.
Should I remove it or what?
 
You can leave the cap off, if you don't plan on listening to AM radio (ever heard of the lyrics "FM- no static at all"?).

Looks like your wiring is coming along nicely. And I bet that your engine compartment already looks a lot better than it did.
 
You can leave the cap off, if you don't plan on listening to AM radio (ever heard of the lyrics "FM- no static at all"?).

Looks like your wiring is coming along nicely. And I bet that your engine compartment already looks a lot better than it did.

Yeah it is! I found a good page of a good wiring setup. Ive got all of the alternator wires all loomed up and going behind the motor, oil pressure wire is all replace and loomed up, All of the wires that were bare were shrinkwrapped, any messy wire was shopped and stripped so its ready to be spiced together, the engine bay looks like it should.

No AC, PS, no brackets/mounts, no useless wires, and next Im gonna remove the rest of the AC system and the air pump.

Im gonna make this truck look and run awesome! I am gonna loom and zip tie all of the wires. To keep it as clean as possible.
 
next Im gonna remove the rest of the AC system and the air pump.

Did you mention before you want to remove the black plastic box sticking out in the engine compartment with the A/C lines going to it? I meant to comment on that before and forgot. If you want your heater to work you have to keep that big black box. You can take it off and take the A/C coil out, but the box has to go back on the firewall.
 
Did you mention before you want to remove the black plastic box sticking out in the engine compartment with the A/C lines going to it? I meant to comment on that before and forgot. If you want your heater to work you have to keep that big black box. You can take it off and take the A/C coil out, but the box has to go back on the firewall.

didn't know that. Ive seen trucks that didn't come with AC and they just had a flat black piece. I figured I could just block whatever off after I removed it.

What about removing the air pump? Ive heard a PS belt will do the trick for just running the crank, water, and alt.
 
You can leave the cap off, if you don't plan on listening to AM radio (ever heard of the lyrics "FM- no static at all"?).

Looks like your wiring is coming along nicely. And I bet that your engine compartment already looks a lot better than it did.

My truck doesn't even have a radio haha.

Im planning on redoing the wiring for it since it was also bubba wired up. It ran off the battery even if the truck was off. Horrible power drain issue. Im gonna install my CB in my truck while I do the radio.
 
Some of the later model big trucks did have a small flat duct that bolted on when you did not have A/C. I have never see a ranger without A/C but if they did it that way, and you could find that flat duct and it would bolt on, then you would be good. All the air for the ventilation runs through that box from the fan, so if you take that box off none of it will work, unless they did make that flat duct that would channel the air across.

I took my air pump completely off. No problems doing that except the pipe that runs from the exhaust manifold on the pass side of the engine. It has fittings on each exhaust manifold, and they look very difficult to remove, and access to them is terrible. So I cut the large hose off going to that pipe in the rear, but left some hose there and the hose clamp. I then found something big enough to stick down in the hose and clamp it in to plug it off. It hasn't burned out yet. If it leaks it's a exhaust leak.
 

Sponsored Ad


Sponsored Ad

TRS Events

Member & Vendor Upgrades

For a small yearly donation, you can support this forum and receive a 'Supporting Member' banner, or become a 'Supporting Vendor' and promote your products here. Click the banner to find out how.

Latest posts

Recently Featured

Want to see your truck here? Share your photos and details in the forum.

Ranger Adventure Video

TRS Merchandise

Follow TRS On Instagram

TRS Sponsors


Sponsored Ad


Sponsored Ad


Amazon Deals

Sponsored Ad

Back
Top