- Joined
- Aug 11, 2007
- Messages
- 18,554
- Points
- 3,101
- Age
- 70
- City
- Ontario, Canada
- Vehicle Year
- 2007
- Transmission
- Automatic
- My credo
- Love Thy Neighbor
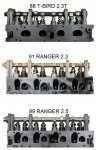
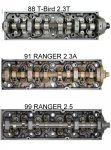
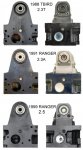
Firing order is always 1-3-4-2 on these engines. It's even stamped on some of the older intakes but not sure about the newer ones.
Same oil works for all...but I guess that would depend on what you are running to start with...5W30 worked for me most of the time just fine...really doesn't matter what brand other than mixing synthetic with regular oil...
I always installed the plugs after the other items were installed just so I didn't break them...they are the weak point and if my wrench or socket slipped that would almost guaranteed be what they hit...
I found this on the tech page (now called the How To Tech) and it is probably the best resource you can have...I would also suggest picking up a Haynes manual if you don't already have one...they list how to steps for setting the timing and other common procedures...I still have mine in a bin somewhere...and I will admit that I had one but didn't follow the steps properly and made a simple job into a very frustrating experience...
Edit: Forgot the link...")
http://www.therangerstation.com/how...cement-on-a-2000-and-older-ranger-4-cylinder/
So use them when you can...if you have questions about those resources there is always an answer to clarify somewhere.
Spark plugs are pretty specific to the head...a few years used same plugs but if you need clarification it is always better to list the part you are using...that way someone can check them for you and save time...
this is for the 1999 Ford 2.5...
Bosch Spark Plug
Part Number: 5530-05212362
Notes: Nickel -- Gap 0.044 in
Bosch Spark Plug
Part Number: 5530-05250275
Notes: OE Fine Wire Double Iridium -- Do Not Gap, Gap is Preset
So you can see there are a few available so without knowing your part number this list could be quite long...
Same oil works for all...but I guess that would depend on what you are running to start with...5W30 worked for me most of the time just fine...really doesn't matter what brand other than mixing synthetic with regular oil...
I always installed the plugs after the other items were installed just so I didn't break them...they are the weak point and if my wrench or socket slipped that would almost guaranteed be what they hit...
I found this on the tech page (now called the How To Tech) and it is probably the best resource you can have...I would also suggest picking up a Haynes manual if you don't already have one...they list how to steps for setting the timing and other common procedures...I still have mine in a bin somewhere...and I will admit that I had one but didn't follow the steps properly and made a simple job into a very frustrating experience...
Edit: Forgot the link...
http://www.therangerstation.com/how...cement-on-a-2000-and-older-ranger-4-cylinder/
So use them when you can...if you have questions about those resources there is always an answer to clarify somewhere.
Spark plugs are pretty specific to the head...a few years used same plugs but if you need clarification it is always better to list the part you are using...that way someone can check them for you and save time...
this is for the 1999 Ford 2.5...
Bosch Spark Plug
Part Number: 5530-05212362
Notes: Nickel -- Gap 0.044 in
Bosch Spark Plug
Part Number: 5530-05250275
Notes: OE Fine Wire Double Iridium -- Do Not Gap, Gap is Preset
So you can see there are a few available so without knowing your part number this list could be quite long...
Last edited: