• Welcome Visitor! Please take a few seconds and Register for our forum. Even if you don't want to post, you can still 'Like' and react to posts.

1996 2 door flareside TRX KILLER!


P.O.R.-15, not sure if your familiar with it. Darn good coating to use in this situation. They aint kidding about wearing gloves. That stuff has to wear off of you if you get it on. Its pricey, needs proper prep like anything else. (this aint rickoleum) eastwood products makes something similar but Ive never tried it.
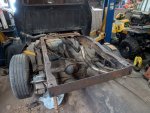
I've used Eastwood too. Also good stuff. POR 15 really needs a top coat/sealer if you want it to last. The manufacturer recommends it too. And don't use Rustoleum!
 
I hate to say this, but I'm thinking about buying another Ranger too. This next one will be a gift to a highschool kid. Thanks to all of your help, I know what to do and how to do it. That second Ranger could come together faster and better than the first.
 
Last edited:
Started repairing the back corner of the frame.

1000000425.jpg


Previous owner meatballed a couple pieces of 3/16 strap over the crummy part of the frame. I took a flap wheel to their crap weld along the top until I could sneak my air chisel in and then just peeled the rest of it off like the top of a spam can.

1000000426.jpg


Yeah, pooched. A bit further forward than I hoped too.. I was hoping I could leave the rearmost shackle hanger holes but it was just too thin.

1000000427.jpg


Chopped the bad bits out, leaving the top & bottom of the rail which are thick enough.

1000000429.jpg


Scab properly scabbed in.

1000000432.jpg


Ground the vertical weld down on the inside so an overlapping plate can be welded on nice and flat..

1000000433.jpg


1000000434.jpg


Flap wheeled it as smooth as is needed.. MUCH BETTER!

1000000435.jpg


Good days progress. More next weekend.
 
hey thats how the back end of my frame looks too! i have to take off the bed soon and do the crossmembers down there too any thing i should watch out for or anything i might run into ?
 
hey thats how the back end of my frame looks too! i have to take off the bed soon and do the crossmembers down there too any thing i should watch out for or anything i might run into ?

What you see is likely what you'll get lol. Just go over everything with a finer tooth comb and make sure it's all solid. Getting an air hammer will pretty quickly tell you the truth.. the worst spots will generally be the parts of the frame that have a bracket or something mounted to them.
 
Tinkered with the truck for a few hours on Saturday.

Back of the frame has been cut square with the top of the rail and a temporary crossmember got tacked in..

1000000469.jpg


Also busted the shock mounts off the frame.. removed the 2nd from the rear crossmember.. got my 2 shackle hanger holes drilled in the patch from the previous weekend and marked where the shackle hanger holes need to be in the fishplate.

1000000473.jpg
1000000474.jpg


Broke one of the HF air hammer bits too somehow.. disappointing considering the material I was using it on is MUCH softer than itself..

1000000470.jpg


Oh well.. sharpened it up real good in the bench grinder and it made a good center punch for the holes I drilled lol.


It's crazy how flimsy the frames are on these.

Before I tacked that piece of flat across the back of the frame my passenger side rail was "unsupported" from the very back until the front spring hanger.. and I could twist the frame around back and forth nearly an inch and a half lol.


Gonna try and patch up the thin spot behind the driver's side shock mount next weekend..
 

Attachments

  • 1000000469.jpg
    1000000469.jpg
    283.2 KB · Views: 26
  • 1000000470.jpg
    1000000470.jpg
    143.2 KB · Views: 16
Last edited:
Whelp, ranger Sunday was mostly a bust.. again 😑 thanks to an empty bottle of shielding gas. Goddamn tanks always seem to run dry when your most in the mood to frizzle fry some metal together don't they? Gah.

I did manage to get a whopping 4 welds done at least..

My solution to getting a full perimeter weld on the fishplate was to make the holes in the plate pretty much 2x as large as the holes in the frame.. that way I could weld the inside diameter of the plate and still have room for a bolt to slide through easy peasy.

1000000529.png
1000000530.jpg


I'm pretty heckin happy with how it's turned out. I'll flap wheel the welds flat and then double up on some XL washers when it's time to bolt the hanger back on.
 
Didn't make the trip to get more gas for the welder thanks to an exceptionally shit week.. ranger Sunday was a success anyways.

Fuel tank has been removed, the remainder of the leaf spring related brackets have been removed from the frame, and the leaf spring bushings have been exorcized.

1000000566.jpg


Oddly (but thankfully) none of the leaf spring bushings had the annoying outer sleeve. Just rubber and the inner sleeve shoved into the leaf..

1000000565.jpg


The insides of the eyes are kinda lumpy bumpy and need to be hit with a flap wheel to fix em back to round but I'm relatively sure I have a bag of them kicking around somewhere that are close enough to the right diameter to work. Everything will be replaced with poly.

More next weekend!
 
Haven't had the ability or time to really work on this the past few weekends in any meaningful capacity but I have made SOME progress at least..

The rear suspension has all the poly bushes in it now, the thin spot by the driver's side shock mount has been patched & plated (shoulda plated the outside rather than the inside... Oh well) and I finally got started making it new crossmembers today.

1000000651.jpg


4x4" pieces of 1/8" welded to the frame so far, will be welding some 2.5" round tube between them next weekend. I forget how thick the tube I bought is.. I believe it's 14ga.. either way.. these are gonna stiffen up the frame greatly AND weigh less than the junk ones I ripped out of it 👍🏻 hell yeah.

Total cost of material for 3 new crossmembers.... 50$

Beats the hell out of buying flimsy OE replacements at well over $100 EACH..


Total cost of everything so far including truck.... $2,669.
 
Next time you make plates round the corners. Sharp corners are stress risers and can propagate cracks.

I totally meant to.. dunno what happened to that train of thought between the time I was cutting them out and welding them on though lol.. d'oh!

A few posts up you'll see that I cut the corners of the plate I put behind the passengers shackle hanger at 45°s.... Is that kosher enough? or are real deal ROUND corners really the way to go?

perfect circle is the perfect distribution of the stress load. The second you start making it oblong, or if you have any kind of sharp corners, even if it’s a very wide angle, that will be more of a stress point.
 
1000000652.jpg


Thanks gents! Duly noted.. will be making things as round as I can from here on.
 
Generally the expectation is that the patch plate will be the same thickness of the frame, then you fish plate both the inside and outside of the patch plate.

Round the corners as much as possible, and where you do have a point, run the welds out 3/4 or 1” out past where you normally would.
 

Sponsored Ad


Sponsored Ad

TRS Events

Member & Vendor Upgrades

For a small yearly donation, you can support this forum and receive a 'Supporting Member' banner, or become a 'Supporting Vendor' and promote your products here. Click the banner to find out how.

Recently Featured

Want to see your truck here? Share your photos and details in the forum.

Ranger Adventure Video

TRS Merchandise

Follow TRS On Instagram

TRS Sponsors


Sponsored Ad


Sponsored Ad


Amazon Deals

Sponsored Ad

Back
Top