• Welcome Visitor! Please take a few seconds and Register for our forum. Even if you don't want to post, you can still 'Like' and react to posts.

Topper change?


Hazmat Ranger

May 2009 STOTM
U.S. Military - Veteran
MTOTM Winner
TRS Banner 2010-2011
Joined
Jun 7, 2008
Messages
2,070
Reaction score
40
Points
0
Age
56
Location
North Texas
Vehicle Year
1995
Make / Model
Ranger
Engine Size
4.7
Transmission
Manual
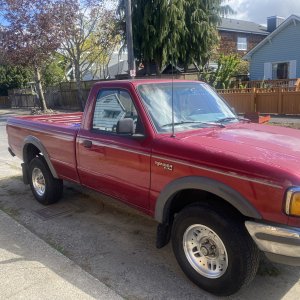
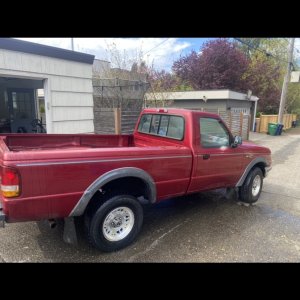
How is this . . . tried to get it close to Sand and keep the reflections.


--weezl--

June 2011 OTOTM Winner
Law Enforcement
OTOTM Winner
TRS Banner 2012-2015
Joined
May 26, 2010
Messages
8,495
Reaction score
182
Points
0
Location
hell
Vehicle Year
2007
Make / Model
Ford
Engine Size
4.0
Transmission
Manual
how do you paint an object like that, without losing the reflections and such? i've seen some people with some sweet ps skills, changing the color of the paint under the mud speckles on my truck and such...
 

anchorshot

New Member
Joined
Feb 28, 2009
Messages
143
Reaction score
0
Points
0
Location
Tampa
Vehicle Year
2004
Make / Model
Ford
Engine Size
V6 3.0L
Transmission
Automatic
Wow, nice job! Could you lighten it up a little bit? Please?
 

Hazmat Ranger

May 2009 STOTM
U.S. Military - Veteran
MTOTM Winner
TRS Banner 2010-2011
Joined
Jun 7, 2008
Messages
2,070
Reaction score
40
Points
0
Age
56
Location
North Texas
Vehicle Year
1995
Make / Model
Ranger
Engine Size
4.7
Transmission
Manual
how do you paint an object like that, without losing the reflections and such? i've seen some people with some sweet ps skills, changing the color of the paint under the mud speckles on my truck and such...
My style is to make a copy of the part to be changed and copy it to a new layer over the base image and then change the color of the copied layer before trying various layer effects to get the right tone and so that it looks realistic as possible.


Wow, nice job! Could you lighten it up a little bit? Please?
Let me give it a try, I do not save the photoshop images so the layers are all "flattened" . . .
 

Hazmat Ranger

May 2009 STOTM
U.S. Military - Veteran
MTOTM Winner
TRS Banner 2010-2011
Joined
Jun 7, 2008
Messages
2,070
Reaction score
40
Points
0
Age
56
Location
North Texas
Vehicle Year
1995
Make / Model
Ranger
Engine Size
4.7
Transmission
Manual
A little lighter . . . how is this?


Tonka

New Member
Joined
Jul 8, 2011
Messages
221
Reaction score
3
Points
0
Location
Kankakee, IL
Vehicle Year
1989
Make / Model
Ford
Engine Size
2.9 V6
Transmission
Manual
how do you paint an object like that, without losing the reflections and such? i've seen some people with some sweet ps skills, changing the color of the paint under the mud speckles on my truck and such...
What I do is very similar to what the guy did. Using Photoshop 7.0:

1. Copy the one and only layer, which will by default be named "Background copy".
2. Click the little icon in the layers palette that has the mouse-over pop-up text that says "lock transparent pixels"
3. Now pick a color you want, and color the layer, or just parts of the layer, with the brush tool. It'll be a flat, solid color.
4. In the layers palette, there's a drop menu and by default it says "Normal". Use that drop menu to experiment with different color modes. Try "color", "overlay", "soft light" and "hard light", or all of them. You can also experiment with different shades of the brush color, the opacity slider, etc.

That's the basic procedure for changing the color of an object while maintaining texture, detail, reflections, etc.


To do something like just the topper, for best results you'd have to zoom in and cut out just the topper so your new color layer is only the topper.

1. Grab the pen tool, start somewhere around the outer edge of the object you want to cut out, and click along the perimeter of the object. For curves it gets complicated but if you zoom WAY in, you can just keep clicking and making new "points" along the path really close together, and at normal zoom level you won't be able to tell the difference. Once you get all the way around the object, clicking on the very first dot you made will close the path. If you're done, skip to step 3.
2. If the object you're cutting out happens to be a pickup truck and you want to make "holes" in it for the background that you can see through the windows (take a look at my current avatar. It might change when this thread gets old but right now it's a cutout of my Ranger) just start cutting out the path around the parts you want gone. Photoshop magically reads your mind.
3. Go to the Paths palette and while "work path" is highlighted blue, at the bottom of the palette, click the 3rd icon from the left. It's a circle made of dotted lines. It will turn your path into a selection and you will get the "marching ants" around your path.
4. Back in the layers palette, right-click on the layer you want to copy the object from and choose "layer via copy". Now you're ready to go back to the beginning of my instructions here about how to change it's color.
 
Last edited:

--weezl--

June 2011 OTOTM Winner
Law Enforcement
OTOTM Winner
TRS Banner 2012-2015
Joined
May 26, 2010
Messages
8,495
Reaction score
182
Points
0
Location
hell
Vehicle Year
2007
Make / Model
Ford
Engine Size
4.0
Transmission
Manual
I learned a quick way to do it, though I can't name the steps right now, when I get to my laptop, I'll update it with the answer I used
 

Hazmat Ranger

May 2009 STOTM
U.S. Military - Veteran
MTOTM Winner
TRS Banner 2010-2011
Joined
Jun 7, 2008
Messages
2,070
Reaction score
40
Points
0
Age
56
Location
North Texas
Vehicle Year
1995
Make / Model
Ranger
Engine Size
4.7
Transmission
Manual
Tonka - I remember 7, I am using CS3 now and a lot of those steps are keystrokes or short cuts. Efficiency is increased - the layer via copy is a simple CTRL+J and if you want to move the selection entirely to a new layer CTRL+SHIFT+J.
Something to keep in mind when doing color changes is to ALWAYS make a copy of the pic you are working on, does not destroy the original and use adjustment layers (??? in 7) to adjust color, bright/contrast, levels, color balance and more without changing the layer the part or image is on. Gives you flexibility in changing anything whenever you want.
 

Tonka

New Member
Joined
Jul 8, 2011
Messages
221
Reaction score
3
Points
0
Location
Kankakee, IL
Vehicle Year
1989
Make / Model
Ford
Engine Size
2.9 V6
Transmission
Manual
Well when somebody gives me a bootleg copy of CS3 I'll have it. Til then I'll use my bootleg copy of 7.0. I don't understand why Photoshop (the REAL Photoshop) is so expensive. I say, if they don't want people to bootleg it, they'd put a more appropriate price tag on it! :annoyed:
 

Hazmat Ranger

May 2009 STOTM
U.S. Military - Veteran
MTOTM Winner
TRS Banner 2010-2011
Joined
Jun 7, 2008
Messages
2,070
Reaction score
40
Points
0
Age
56
Location
North Texas
Vehicle Year
1995
Make / Model
Ranger
Engine Size
4.7
Transmission
Manual
I hear ya - I got this one through work, but I have CS on my personal laptop and that cost me 650, I was working in Afghanistan at the time and bringing in some good $$$, so no problem.
Not sure how long you have been using PS, but if you ever have any Q's hit me up I might have a solution for you. I have been chopping, modding, and designing for 14 years, since 5.5 version.
 

Tonka

New Member
Joined
Jul 8, 2011
Messages
221
Reaction score
3
Points
0
Location
Kankakee, IL
Vehicle Year
1989
Make / Model
Ford
Engine Size
2.9 V6
Transmission
Manual
I hear ya - I got this one through work, but I have CS on my personal laptop and that cost me 650, I was working in Afghanistan at the time and bringing in some good $$$, so no problem.
Not sure how long you have been using PS, but if you ever have any Q's hit me up I might have a solution for you. I have been chopping, modding, and designing for 14 years, since 5.5 version.
I took a semester course in 2001 and since then I've actually learned more about the program on my own than I did in the class.

The class also taught Adobe Illustrator but I didn't mess with it much after the class.

I was trying to make a smooth gradient along a curve for an instrument panel for a MS Flight Simulator aircraft but I couldn't remember much about Illustrator so I was able to get it done in Photoshop.
 

Sponsored Ad


Sponsored Ad

Members online

Member & Vendor Upgrades

For a small yearly donation, you can support this forum and receive a 'Supporting Member' banner, or become a 'Supporting Vendor' and promote your products here. Click the banner to find out how.

Truck of The Month


Mudtruggy
May Truck of The Month

Recently Featured

Want to see your truck here? Share your photos and details in the forum.

Follow TRS On Instagram

TRS Events

25th Anniversary Sponsors

Check Out The TRS Store


Sponsored Ad


Sponsored Ad

Sponsored Ad


Amazon Deals

Top