
- Joined
- May 18, 2008
- Messages
- 1,510
- Reaction score
- 368
- Points
- 83
- Location
- Vancouver area BC Canada
- Vehicle Year
- 92 & 83 project
- Make / Model
- Ford
- Engine Type
- V8
- Engine Size
- 4.0L 302
- Transmission
- Automatic
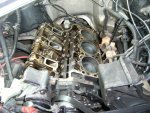
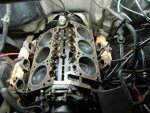
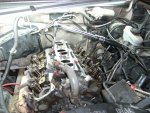
This takes off from upper intake removal. As I didn't take any pics before this section. I have the driver head off this is how I left it last night.
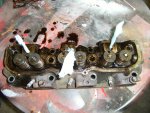
The clean piston top is the blown head gasket.
So after the head is removed a look over the gasket shows the problems.
After the heads are off, I recommend rolling shop towel into strips and placing it into the head bolt holes, and also the intake for the rail's holes. This cleans out any oil and water that could be trapped in there. When returning the head bolts into the block this will prevent a oil locking in the hole and gives a true fit/tightening. after you use the towels, I also finish the cleaning with cotton swabs (Q-Tips) to make sure these passages are free of any liquids.
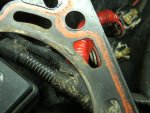
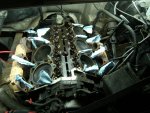
When removing the heads, the rails will need to be taken off. I keep track of what push rod goes with what rocker and keep them all laid down in the same order, when replacing them they should go to the same ones that they came off of.
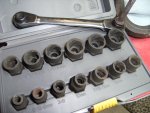
I do recommend getting a set of these reversing wrenches and or a set of reversing sockets. The exhaust bolts can be very tough to remove from the heads. If they slightly start to strip they can easily round out. Another option is to try and crack them loose while engine is still hot. If they start to round out, stop turning and go to the reversing tools. Nothing hurts more than rounded exhaust bolts. As you can see I had to use one for a rounded bolt.
When I take bolts off and out a spot, I like to apply a small dab of never seize to the bolt, then replace it into the hole it came from. this way it eliminates lost bolts when putting the stuff back together the bolts are where they should be. Not in a can all mixed up with other stuff.
After the heads are off, clean everything with scraper (old gasket material and such)
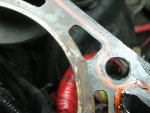
placing the gaskets on the block is straight forward then place the heads on. check to make sure the pins are still in the block. There are 2 round dowel style pins that hold the heads in place. check that they are there.
You will need torque wrenches to properly put the bolts to the desired pressures. There is a process to installing the heads.
when the heads are on the block, follow the sequence for the bolt pattern. (Felpro gaskets have a cue sheet to follow.) Do both heads to the first stage (44 PSI) then place the folding intake gasket over the valley. This can be a bit intimidating as it will not fold and sit perfect at first.
In the kit could be a tube of gasket silicone. apply to back and front of the block where the intake will sit. (read the sheet included in the kit) it is your friend.
With a small torque wrench apply the desired pressure. the folding gasket will start to bend into place. take care to feel the bend and align if needed. the heads and the intake get tightened as a complete set, so you need to go back to head bolts for stage 2, then back to the intake again.
follow the directions included with the set.
I don't replace headbolts. I am sure others will say they are 1 use only and get new ones. Your call on what you want to do. to this day I have not had any failures with reusing the bolts. Make sure they are clean and the holes are clean, tighten down to the stated pressure. After that the head bolts need another 80 degrees of free hand turning. Get a white metal ink pen and make a small dot/line on each bolt, then turn them to the proper spot.
Replace the rocker rails, they are tighten to stop. Make sure no oil is in the threads and clean the bolts. there is no play in the rails. tighten to tight.
From here it is a back to bolting all the items taken off the engine. Intake, front pullies and accessories.
hope this rambling helps someone. cheers
edited: added ....
(I wrote above, last night and was a bit tired. I need to add a couple further explanations)
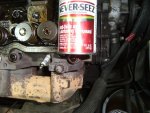
The never-seez won't be added to head bolts or any interior bolts, just out of engine bolts that should get some help, IE exhaust bolts, and the one in the pic is for the frame for the dis pack. These type of bolts get a dab of the gel to keep them fit. I also add a small dab to the bracket bolts for alt and power pump.
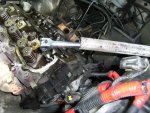
The type of head bolts are a size 55 Torx. No way around this, get the proper tools for the job. Mine are 3/8 drive, Would prefer 1/2 inch drive as they take a good deal to loosen and place on. The 3/8 also gets a 1/2 inch adapter to fit the 1/2 torque wrench. Weakest spot is the adapter. (maybe I ask santa for a 1/2 drive set") ) A breaker bar 1/2inch also gets the extension (floor jack handle) stuffed in for more leverage to remove the bolts. #6 cylinder can be a pain to get off, as the heater box could get in the way of a good bite on the top of the wrench. take cation on that bolt to not slip it. (passenger side back bolt) (see pic)
) A breaker bar 1/2inch also gets the extension (floor jack handle) stuffed in for more leverage to remove the bolts. #6 cylinder can be a pain to get off, as the heater box could get in the way of a good bite on the top of the wrench. take cation on that bolt to not slip it. (passenger side back bolt) (see pic)
When I took off the intake I didn't remove the fuel rail system from it. there is no real need to unless you want to replace that gasket or check the injectors. (but no real reason to do that either) why create more work?
cheers
The clean piston top is the blown head gasket.
So after the head is removed a look over the gasket shows the problems.
After the heads are off, I recommend rolling shop towel into strips and placing it into the head bolt holes, and also the intake for the rail's holes. This cleans out any oil and water that could be trapped in there. When returning the head bolts into the block this will prevent a oil locking in the hole and gives a true fit/tightening. after you use the towels, I also finish the cleaning with cotton swabs (Q-Tips) to make sure these passages are free of any liquids.
When removing the heads, the rails will need to be taken off. I keep track of what push rod goes with what rocker and keep them all laid down in the same order, when replacing them they should go to the same ones that they came off of.
I do recommend getting a set of these reversing wrenches and or a set of reversing sockets. The exhaust bolts can be very tough to remove from the heads. If they slightly start to strip they can easily round out. Another option is to try and crack them loose while engine is still hot. If they start to round out, stop turning and go to the reversing tools. Nothing hurts more than rounded exhaust bolts. As you can see I had to use one for a rounded bolt.
When I take bolts off and out a spot, I like to apply a small dab of never seize to the bolt, then replace it into the hole it came from. this way it eliminates lost bolts when putting the stuff back together the bolts are where they should be. Not in a can all mixed up with other stuff.
After the heads are off, clean everything with scraper (old gasket material and such)
placing the gaskets on the block is straight forward then place the heads on. check to make sure the pins are still in the block. There are 2 round dowel style pins that hold the heads in place. check that they are there.
You will need torque wrenches to properly put the bolts to the desired pressures. There is a process to installing the heads.
when the heads are on the block, follow the sequence for the bolt pattern. (Felpro gaskets have a cue sheet to follow.) Do both heads to the first stage (44 PSI) then place the folding intake gasket over the valley. This can be a bit intimidating as it will not fold and sit perfect at first.
In the kit could be a tube of gasket silicone. apply to back and front of the block where the intake will sit. (read the sheet included in the kit) it is your friend.
With a small torque wrench apply the desired pressure. the folding gasket will start to bend into place. take care to feel the bend and align if needed. the heads and the intake get tightened as a complete set, so you need to go back to head bolts for stage 2, then back to the intake again.
follow the directions included with the set.
I don't replace headbolts. I am sure others will say they are 1 use only and get new ones. Your call on what you want to do. to this day I have not had any failures with reusing the bolts. Make sure they are clean and the holes are clean, tighten down to the stated pressure. After that the head bolts need another 80 degrees of free hand turning. Get a white metal ink pen and make a small dot/line on each bolt, then turn them to the proper spot.
Replace the rocker rails, they are tighten to stop. Make sure no oil is in the threads and clean the bolts. there is no play in the rails. tighten to tight.
From here it is a back to bolting all the items taken off the engine. Intake, front pullies and accessories.
hope this rambling helps someone. cheers
edited: added ....
(I wrote above, last night and was a bit tired. I need to add a couple further explanations)
The never-seez won't be added to head bolts or any interior bolts, just out of engine bolts that should get some help, IE exhaust bolts, and the one in the pic is for the frame for the dis pack. These type of bolts get a dab of the gel to keep them fit. I also add a small dab to the bracket bolts for alt and power pump.
The type of head bolts are a size 55 Torx. No way around this, get the proper tools for the job. Mine are 3/8 drive, Would prefer 1/2 inch drive as they take a good deal to loosen and place on. The 3/8 also gets a 1/2 inch adapter to fit the 1/2 torque wrench. Weakest spot is the adapter. (maybe I ask santa for a 1/2 drive set
) A breaker bar 1/2inch also gets the extension (floor jack handle) stuffed in for more leverage to remove the bolts. #6 cylinder can be a pain to get off, as the heater box could get in the way of a good bite on the top of the wrench. take cation on that bolt to not slip it. (passenger side back bolt) (see pic)When I took off the intake I didn't remove the fuel rail system from it. there is no real need to unless you want to replace that gasket or check the injectors. (but no real reason to do that either) why create more work?
cheers
Attachments
-
 283.3 KB Views: 142
 -
 274.4 KB Views: 148
 -
 162.9 KB Views: 145
 -
 180.9 KB Views: 147
 -
 267.8 KB Views: 143
 -
 223.7 KB Views: 147
 -
 225.2 KB Views: 142
 -
 285.5 KB Views: 145
 -
 260.2 KB Views: 145
 -
 252.5 KB Views: 143
 -
 231.7 KB Views: 141
 -
 184 KB Views: 145
 -
 158.8 KB Views: 140
Last edited:


