• Welcome Visitor! Please take a few seconds and Register for our forum. Even if you don't want to post, you can still 'Like' and react to posts.

My New House & Workshop


The opening without 2x's is 40.25" wide. Too wide. Needs a wood frame screwed in to the block to mount the prehung door to.
 
Good Lawd... this building is one disaster after another... I say hook up the electrical system and leave a large open container of gasoline nearby and let the building sort itself out...

then build a new one after the debris from the old one has been cleared away.

AJ
 
The opening without 2x's is 40.25" wide. Too wide. Needs a wood frame screwed in to the block to mount the prehung door to.
That settles it then. Build your own custom sized door frame and door.
 
Good Lawd... this building is one disaster after another... I say hook up the electrical system and leave a large open container of gasoline nearby and let the building sort itself out...

then build a new one after the debris from the old one has been cleared away.

AJ

60165
 
Good Lawd... this building is one disaster after another... I say hook up the electrical system and leave a large open container of gasoline nearby and let the building sort itself out...

then build a new one after the debris from the old one has been cleared away.

AJ

Hey, anyone can take a good building and make it look better. Taking this disaster and making it in to something nice would be way more rewarding.

That settles it then. Build your own custom sized door frame and door.

No....

I just want to install a buck and either squeeze in a prehung 36 x 80 or shim a 32 x 80. ;)
 
Since this is Texas... Saloon Doors!

There is a bar in the next town over that has swinging saloon doors instead of regular front doors.

Electrical Figured Out (Mostly):
index.php
Here's the drawing I did of how the breaker box in my shop is wired up.

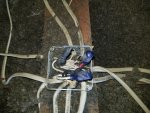
I opened up the ceiling and looked around. I found that the main building and the rear addition each has a junction box near the center of the ceiling.

The box in the rear 1/2 of the shop has a 12-3 Romex with a red wire coming in to it. The Red Wire feeds a 12-2 Romex to the wall switch, and then back to the black wire on all of the ceiling lights. It appears that the Black Wire on the 12-3 is feeding power to the black wire going to the outlets. And all of the white wires and bunched up together.


60176

The 12-2 with the white wire (yellow in diagram above) being used as a hot in the bottom of the breaker box is actually being used like a 12-3 for the 230 (?) air conditioner outlet. The only 12-3 Romex with a white wire running in the shop is the one for the lights and outlets.

With that said, I know for certain that a 12-3 Romex with a red wire goes to the front air conditioner. The other unknown 12-3 Romex most likely gets split between the outlets and lights in the front 1/2 of the building (front and mid room) like the rear 1/2 of the building does.

One 12-2 Romex is likely the 12-2 going in to the wall furnace at the opening between the front half and rear half of the building. That leaves one 12-2 that's still unknown.

From what I see in this diagram:

index.php

It would seem that it's ok to use that 12-3 with the red wire to have a split circuit with a shared neutral (white) wire. So I believe if I put each wire on it's own breaker, it's actually allowed to be wired like that. Although I'm sure you noticed there's no clamps holding the wires going in to the junction box. I thought there was some plastic ones that you can slide over the wires after the fact.

I'm trying to decide if I just want to leave it be and just create a new circuit for whatever I add, or run a separate 12-2 for the outlets and one for the lights (instead of the split circuit on a 12-3 (black/white/red) with a shared neutral), and put them in separate junction boxes. I just don't want to create more work and cost if I don't need to.

I don't like the way the air conditioner is wired. I'd replace that wire with a proper 12-3.

The Roof Rafter / Ceiling Joist:

I also looked at the roof. The rafter and ceiling joists are all 2x6's. There's a 12x6 ceiling joist every 16-inches. The rafter has a 1x6 running through the top of it along the peak of the roof. There's also a 2x6 laying along the top of the ceiling joists running the length of the center of the ceiling.

I measure the roof at a 12-inch distance and found that it rises 2.75-inches every 12-inches.

60186


60187


60188

I still want to create a 6-foot wide by 10-foot long tray in the ceiling and move the joists in that area up 12-inches to create a pocket to lift vehicles up in to for clearance.
 

Attachments

  • 20210517_192459.jpg
    20210517_192459.jpg
    220.5 KB · Views: 117
Last edited:
Swamped with the City driveway, late to this dance:

On the 36” door. Call around the metal door and door frame places and ask if they have any used doors and frames. Usually 25cents on the dollar. Negotiate from whatever they tell you, they want to move the stuff. Check salvage yard too.

Most metal door frames are in three pieces. They wrap around the block. You put the top up, and then each side hooks into the top, slanted out to the opposite side, and then swing it into place. You can shift the top corners side to side to square it. Solid as a rock and secure when installed. Like a ranger, try not to buy a rusty one, and with a coat of rustoleum from a brush or roller, looks like new.

If you go wood, the hinge side of the frame is the most important. Use toggle bolts and shims to “pinch” the 1x or 2x into place. The trick is a couple tubes of waterproof liquid nails everywhere. Coat the toggles as you push them in, run zig zag beads on every layer of 1x 2x or whatever including all the shims. Then, when it sets up, it’s like iron.

On the lock side, you can use a much thinner “1x” “1/2x” Whatever you need to make the width. You can hog out the block 15” above and below the latch, and then fill in the hogged out area with a 2x, 4x or whatever. If I’m worried about security, I get like a 30” 1/16 piece of sheet metal (galv), fold it over, flange on the inside. Drill a hole where the latch goes, and screw the dickens out of it with 3” deck screws between it and the door, and also on the back flange. Goop the hell out of all the parts on that side too.

If you can’t get your 36” that way, first, I’d consider getting a concrete skill saw blade and just widening the opening. I don’t it would affect the structure. Then follow procedure above, but frame out might be thicker.

Or, if you can get close but need a little less than 36” door, get a prehung, take the frame apart and shorten the top, glue and screw/Brad it back together. On the door, cut the hinge side down on a table saw, and reset/recut the mortise for the hinges. The mortise tool is like $10. Try it on a couple 2x4s before you try it in the door.

On the rafters. You have a pretty stout rafter. Do not break the triangle. The 1x decking (as opposed to plywood) should be plenty strong to hold it together.

Cut the roof from one side to the other as wide as you want. Run a strong-enough cross member under both sides. Jack it up, and set it on stub walls. You’ll have to run angled braces from the middle or lower half of the stub all’s to minimum 2’ into the bottom rafter to keep the elevated section from folding over. I can help you with what the “string enough” support etc looks like when you have your dimensions for elevation (how wide & how tall, and what the angle braces should look like.

Disclaimer: very shallow rafter (minimal rise), it/they could crumble...,

My 2cents, hope it helps!
 
Hey, anyone can take a good building and make it look better. Taking this disaster and making it in to something nice would be way more rewarding
and by my method above, you *are* making this into something nice and a new building rising up like a phoenix from the ashes of the old one would be very rewarding.

Just sayin'


In a more helpful vein... I do like @Rick W s idea of getting a used steel door or a concrete saw and trimming up the existing opening to install a 36" door... my guess is with the right type of saw you could cut what you need out in 10 minutes. Just make sure you don't have any wires in the bricks on the side that you cut. Hit up the Rent A Center and see what they advise for the best tool to do that...

AJ

You can get a concrete blade for your skill saw and it cuts the block like butter. But it does make a dusty mess. I added two windows to one of my block buildings. You do have to cut from both sides, the skill saw is not deep enough. And then just use a hammer and knock out anything left.

Not sure how you would do your ceiling "tray". You can't just cut the ceiling joists that the ceiling is nailed to, they are under tension holding the sidewalls from splaying out from the roof.
 
Not sure how you would do your ceiling "tray". You can't just cut the ceiling joists that the ceiling is nailed to, they are under tension holding the sidewalls from splaying out from the roof.

This section of the building is 31-feet long. I want to create a 6' x 10' tray in the ceiling. With 2x6 ceiling joists every 16-inches, there's a lot of reinforcement keeping the roof from spreading out.

Since the distance from the bottom of my ceiling joist to the roof is only 32-inches, I'm not going to raise the joist up 12-inches. From what I've read you can move the joist up 1/3 of the distance.

My ceiling height is 87.5" (7'-3/12"). If I remove my LED lightbar, the distance to the top of my bed cage is 77" (6'5"). That leaves me with 10.5" of space to jack up my Ranger.

If I cut out the rafter and secured a new one on top of it to form a bridge, that would gain 5.5" and give me a ceiling height there of 93" (7'9"). That would give me 16" of ceiling space to jack the Ranger up in to.

If I installed a new joist (like in Example 4 below) 10.5-inches higher it would give me a ceiling height here of 98" (8'2"). That would give me 21" of ceiling space to jack the Ranger in to. I'd like to have the space to lift the Ranger up at least a foot and get it on jack stands. Just cutting out a 6-foot section of ceiling joist and attaching a new one on top of it would give me 16" of space to work with.

I don't know if any of these examples would work. They're just ideas I've come up with. Like I said, I'm not doing this on the whole ceiling. Just a 6'x10' space in a 18'x31' (width x length) space.

60212
 
You can get a concrete blade for your skill saw and it cuts the block like butter. But it does make a dusty mess. I added two windows to one of my block buildings. You do have to cut from both sides, the skill saw is not deep enough. And then just use a hammer and knock out anything left.

What about the stuff that's right?
 
This section of the building is 31-feet long. I want to create a 6' x 10' tray in the ceiling. With 2x6 ceiling joists every 16-inches, there's a lot of reinforcement keeping the roof from spreading out.

Since the distance from the bottom of my ceiling joist to the roof is only 32-inches, I'm not going to raise the joist up 12-inches. From what I've read you can move the joist up 1/3 of the distance.

My ceiling height is 87.5" (7'-3/12"). If I remove my LED lightbar, the distance to the top of my bed cage is 77" (6'5"). That leaves me with 10.5" of space to jack up my Ranger.

If I cut out the rafter and secured a new one on top of it to form a bridge, that would gain 5.5" and give me a ceiling height there of 93" (7'9"). That would give me 16" of ceiling space to jack the Ranger up in to.

If I installed a new joist (like in Example 4 below) 10.5-inches higher it would give me a ceiling height here of 98" (8'2"). That would give me 21" of ceiling space to jack the Ranger in to. I'd like to have the space to lift the Ranger up at least a foot and get it on jack stands. Just cutting out a 6-foot section of ceiling joist and attaching a new one on top of it would give me 16" of space to work with.

I don't know if any of these examples would work. They're just ideas I've come up with. Like I said, I'm not doing this on the whole ceiling. Just a 6'x10' space in a 18'x31' (width x length) space.


I like example 6, personally. Except that I see a problem. The end of your existing ceiling joist is unsupported. I'm not an engineer, but somehow I don't think that hanging the ceiling joist off of the new joist will be enough. I would think that you'd need to support it from underneath. @don4331 what do you think?

This might work better (note that it's not drawn to scale):
60215


I've eliminated the need for supporting the inside end of the existing ceiling joist. Now, the end of the joist (or is it now a rafter?) is attached to, and supported by, the collar tie, and the opposite joist (rafter?).

Here's another option that might work better, also not to scale, and also eliminating the need to support a hanging inner end of a ceiling joist:

60217


The upper collar tie would be optional. I'd put it in, just because I like overkill, but I don't think you'd have to.
 
Here's another option that might work better, also not to scale, and also eliminating the need to support a hanging inner end of a ceiling joist:

View attachment 60217

The upper collar tie would be optional. I'd put it in, just because I like overkill, but I don't think you'd have to.

This is essentially Example 5 but in the example it shows the old ceiling joist that will still be holding up the drywall ceiling.

In my shop the ceiling joists also serve as rafter ties. But in a garage without a ceiling, the rafter ties are spaced 4-feet apart. So it would seem that moving the joist up no more than 10-inches still allows it to serve as a rafter tie. In my drawing they would also help hold up the ceiling joist where it's been cut.

rafter_ties.jpg
 
This is essentially Example 5 but in the example it shows the old ceiling joist that will still be holding up the drywall ceiling.

In my shop the ceiling joists also serve as rafter ties. But in a garage without a ceiling, the rafter ties are spaced 4-feet apart. So it would seem that moving the joist up no more than 10-inches still allows it to serve as a rafter tie. In my drawing they would also help hold up the ceiling joist where it's been cut.


Right. I've eliminated the old ceiling entirely in the area where you want the raised ceiling because I'm uncomfortable with hanging the inside edge of the original ceiling joist off of the new, higher, ceiling joist.
 
@Jim Oaks

I’m about 100 miles away from home doing a property inspection on 81 acres in about a dozen buildings, so I can’t send you something right at this minute.

A few of your sketches are a disaster waiting to happen, but a couple of them have potential. And @1990RangerinSK Inspired me, with something you can change, something you can implement pretty easily with a little money. I’m swamped again tomorrow but I should be able to get you something by Friday
 

Sponsored Ad


Sponsored Ad

Special Events

Events TRS Was At This Year

TRS Events

Member & Vendor Upgrades

For a small yearly donation, you can support this forum and receive a 'Supporting Member' banner, or become a 'Supporting Vendor' and promote your products here. Click the banner to find out how.

Latest posts

Recently Featured

Want to see your truck here? Share your photos and details in the forum.

TRS Latest Video

TRS Merchandise

Follow TRS On Instagram

TRS Sponsors


Sponsored Ad


Sponsored Ad


Amazon Deals

Sponsored Ad

Back
Top