
DisturbedMXer8
Active Member
- Joined
- Dec 7, 2009
- Messages
- 279
- Reaction score
- 29
- Points
- 28
- Location
- Anaheim, California
- Vehicle Year
- 1988
- Make / Model
- Ford Ranger XLT
- Engine Type
- 2.9 V6
- Transmission
- Automatic
- 2WD / 4WD
- 2WD
Hey everyone! About 5 months and 3-4k miles into owning my new '23 Ranger someone rear ended me while I was parked at work. This bent the steel structure of the bumper which buckled the plastic trim quite badly. I was able to fix this to a degree, but I had to remove all of the plastic trim which naturally broke half of all the clips/retainers that are molded in place. This left me very dissatisfied with Ford's rear bumper design, so I opted to upgrade. I went with Rough Country's rear bumper mainly due to the price, but I also liked the simple design and addition of corner steps. The reason for this post is that I felt that the install wasn't quite as simple as it seemed that it would be initially. Figured I'd share some of that info with you all here in case anyone is considering one of these.
There is conflicting info directly from Rough Country regarding the factory hitch. Their promo video for this bumper states that it allows use of the factory hitch, however their website says that it does not. It definitely DOES NOT allow to retain the factory hitch. Fortunately for me I did not have one, but if you do please keep this in mind. Some of the info also mentions that the cube lights are pre-installed, but they are not. Barely worth mentioning, but you will have to install those into the bumper yourself before wiring them up =P.
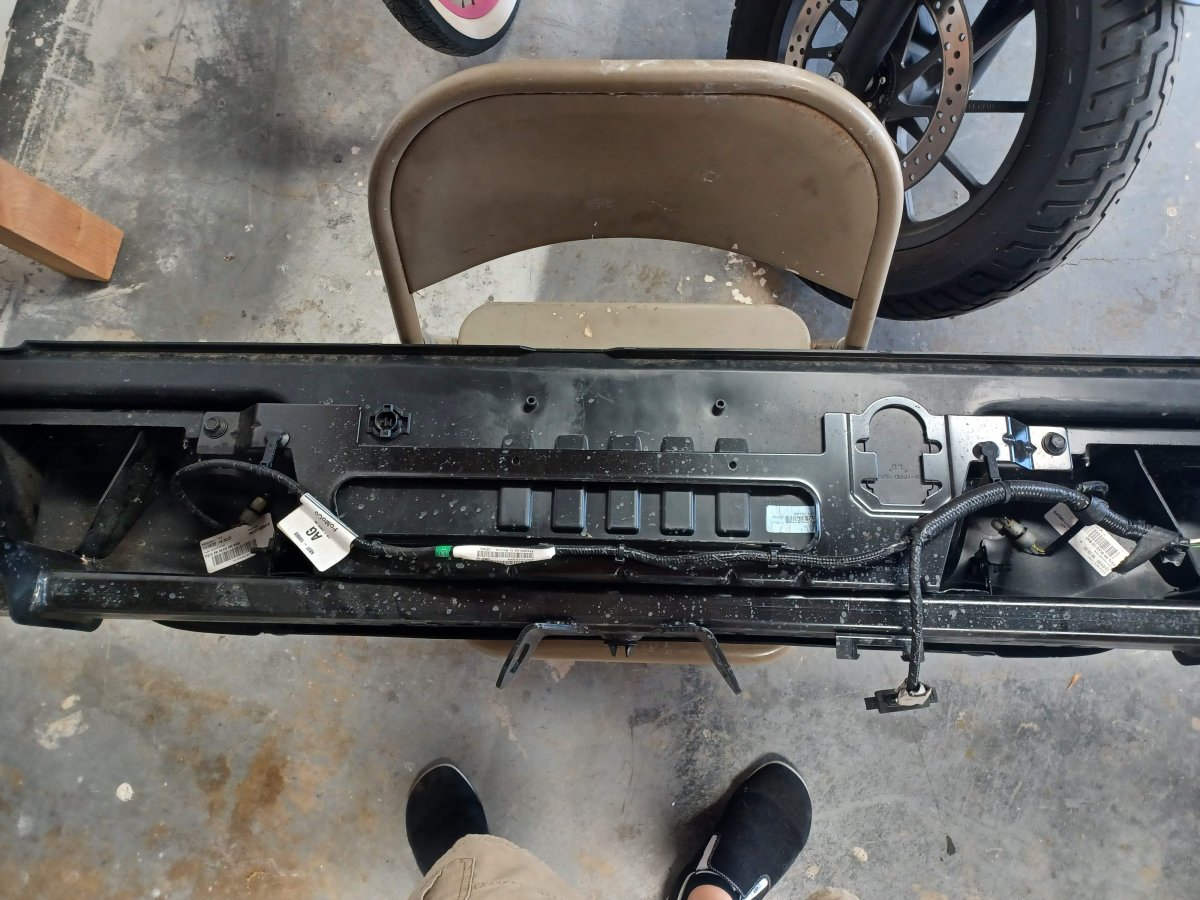
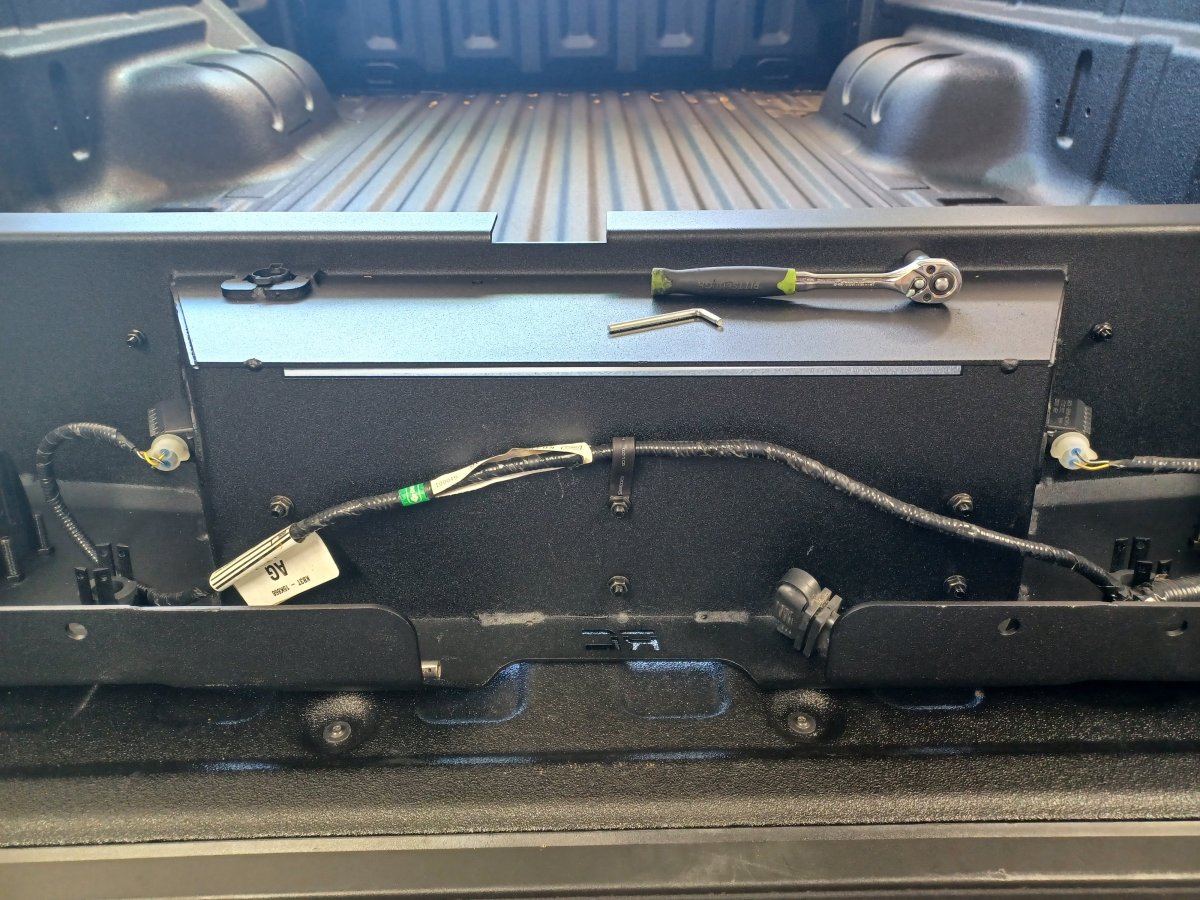
The first and main issue I ran into was while swapping the OEM rear bumper wiring harness to the new bumper. I have a base model with no parking sensors, and my harness was fastened to the OEM bumper skeleton with several clip style retainers. The RC bumper has no retainers whatsoever for the harness, and there is no instruction as to what to do if this is the case. Not sure if sensors hold the harness in place for models equipped with them, but I had to use my imagination here. I went with an adjustable wiring retainer I found in my toolbox to start off, and a couple of fixed hoop style ones when I realized that one by itself wasn't enough:
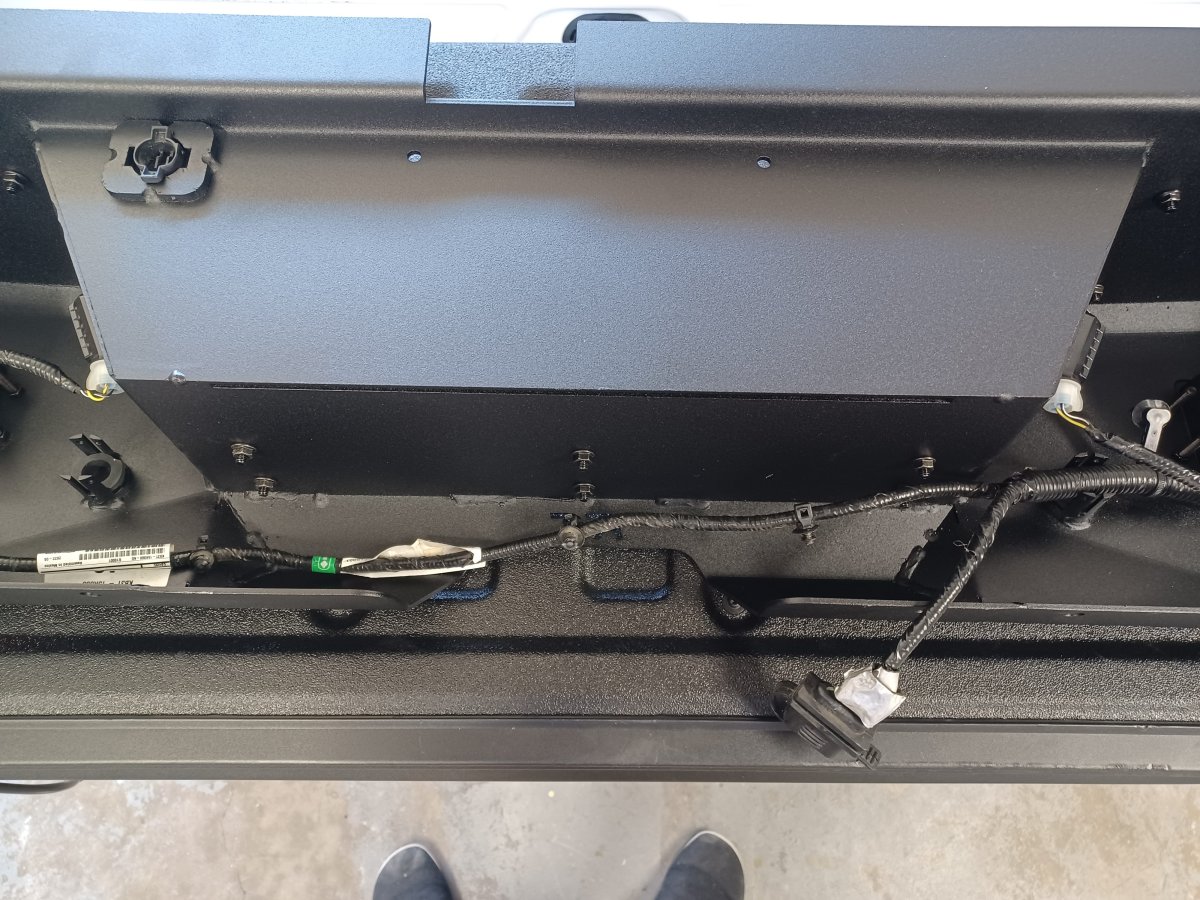
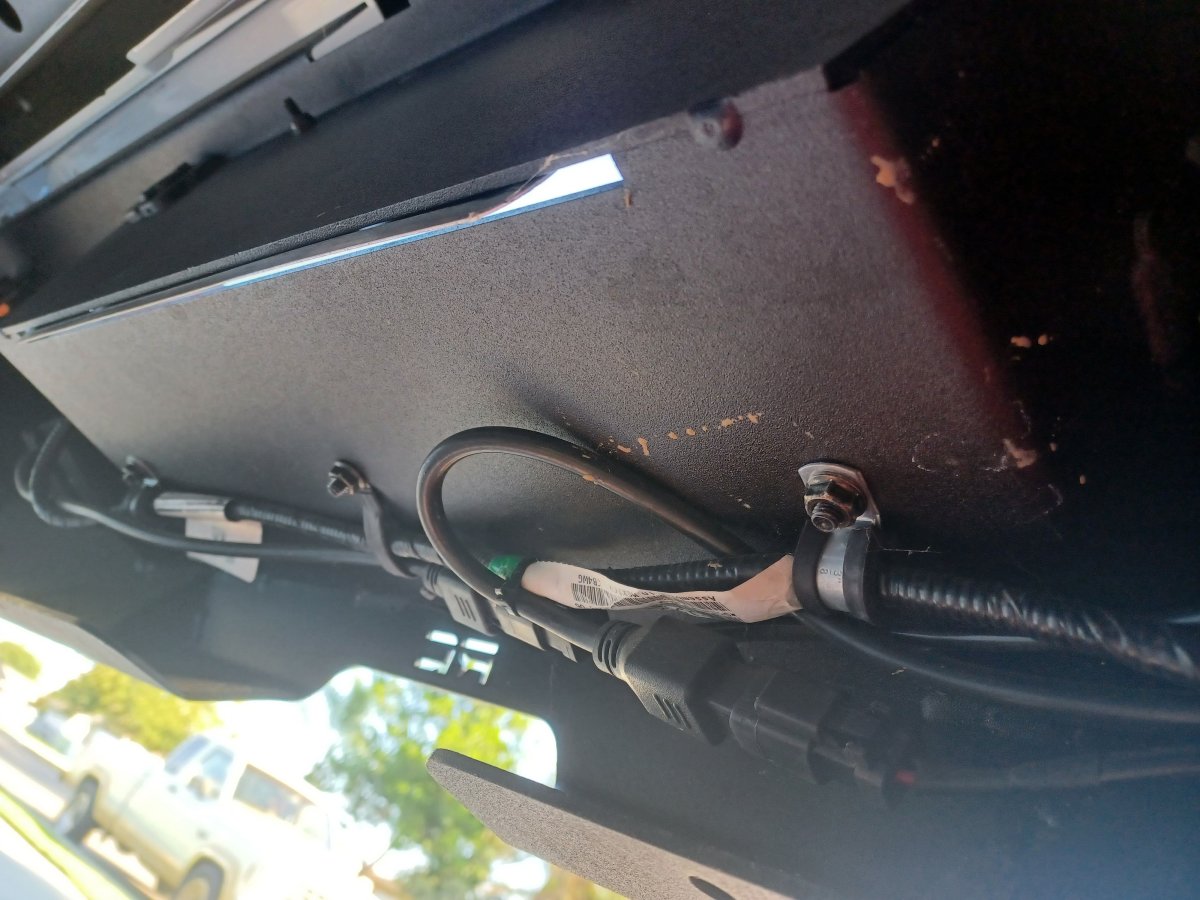
Also, due to the orientation of the harness here and the new position of the license plate lights, the driver side light would only barely reach when plugged in. I opted to open the factory harness and pull that socket over to the other side of the plastic loom:
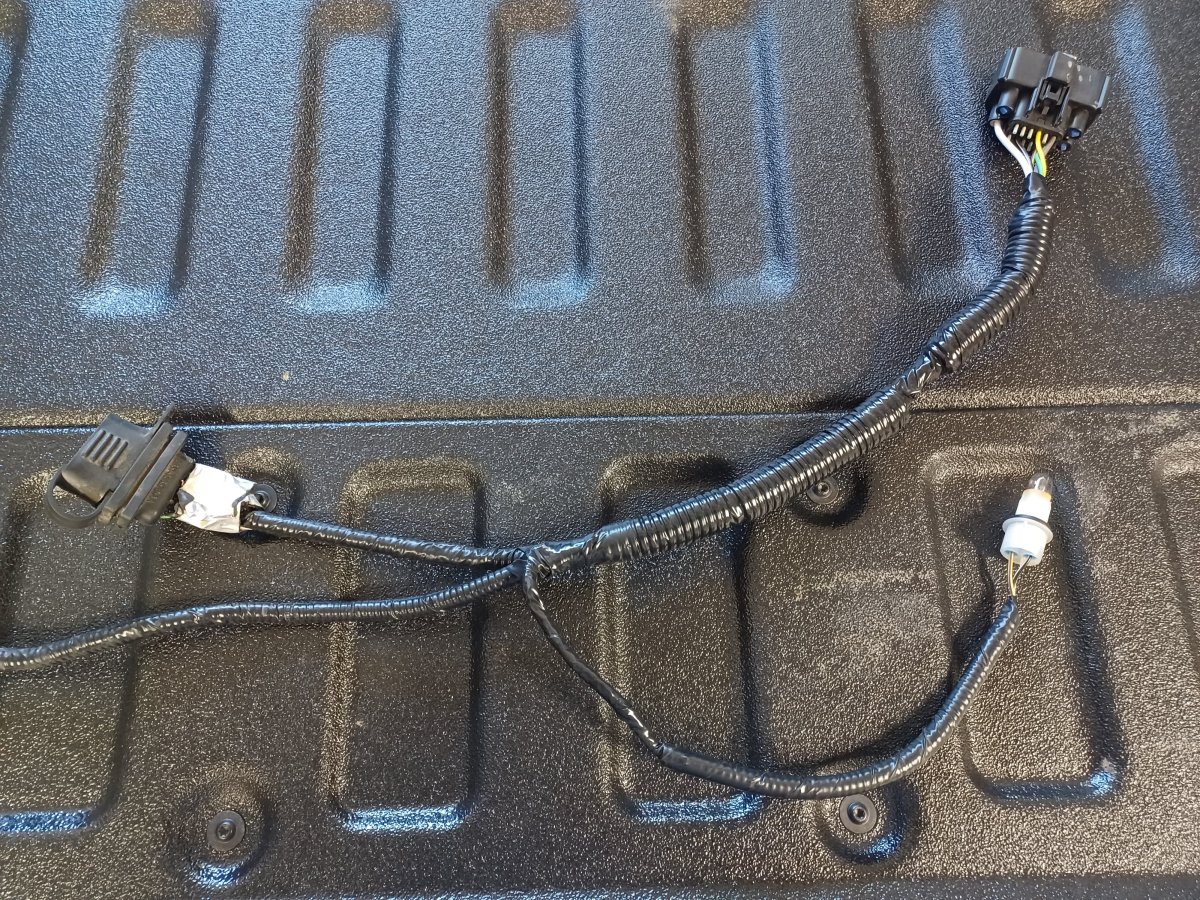
Once I had the wiring in place I just used a few zip ties to tidy everything, I think it's ok for now. Installing the bumper by myself was tricky, but I got it snug and adjusted as best as possible before tightening down all the way. The edges of this bumper are a tad sharp, so be careful when bolting up initially, it can adjust far enough to scratch the bed corners.
Then came the wiring. I ran mine along the factory harness starting at the back of the battery, trying to stay at the top of the frame rail as much as possible all the way to the driver side rear bed corner, then hooked over across the bumper just like the factory harness. The wiring provided by RC is long enough, but just barely. Once I had everything in place I pulled it as snug as possible toward the back of the truck, and the passenger side light wiring still doesn't quite tuck away as neat as I'd like. I currently have the positive hooked up directly to the battery, and I have the ground wire attached to the body ground point next to the battery. If anyone knows a good switched positive in the engine bay I can use instead let me know. This process was tedious, but simple. No real issues other than strained patience.
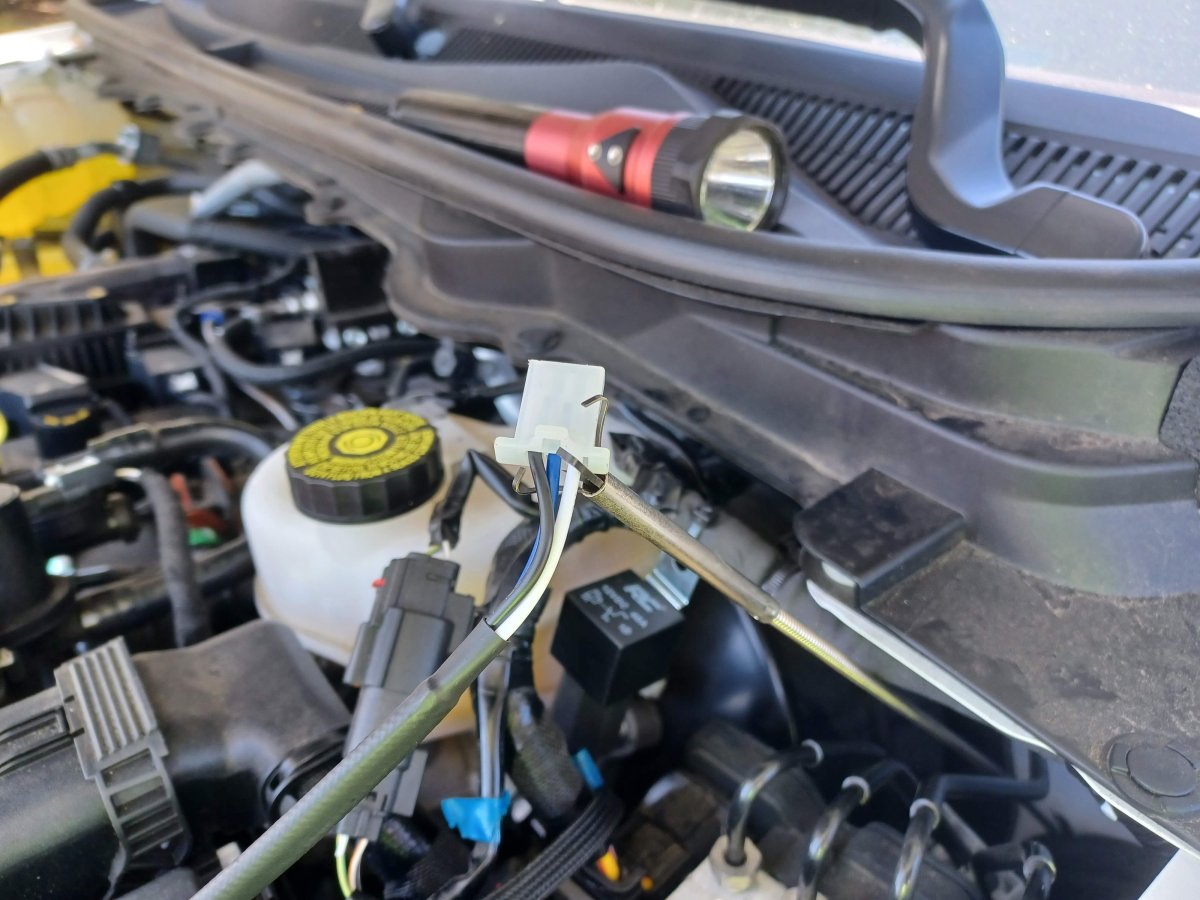
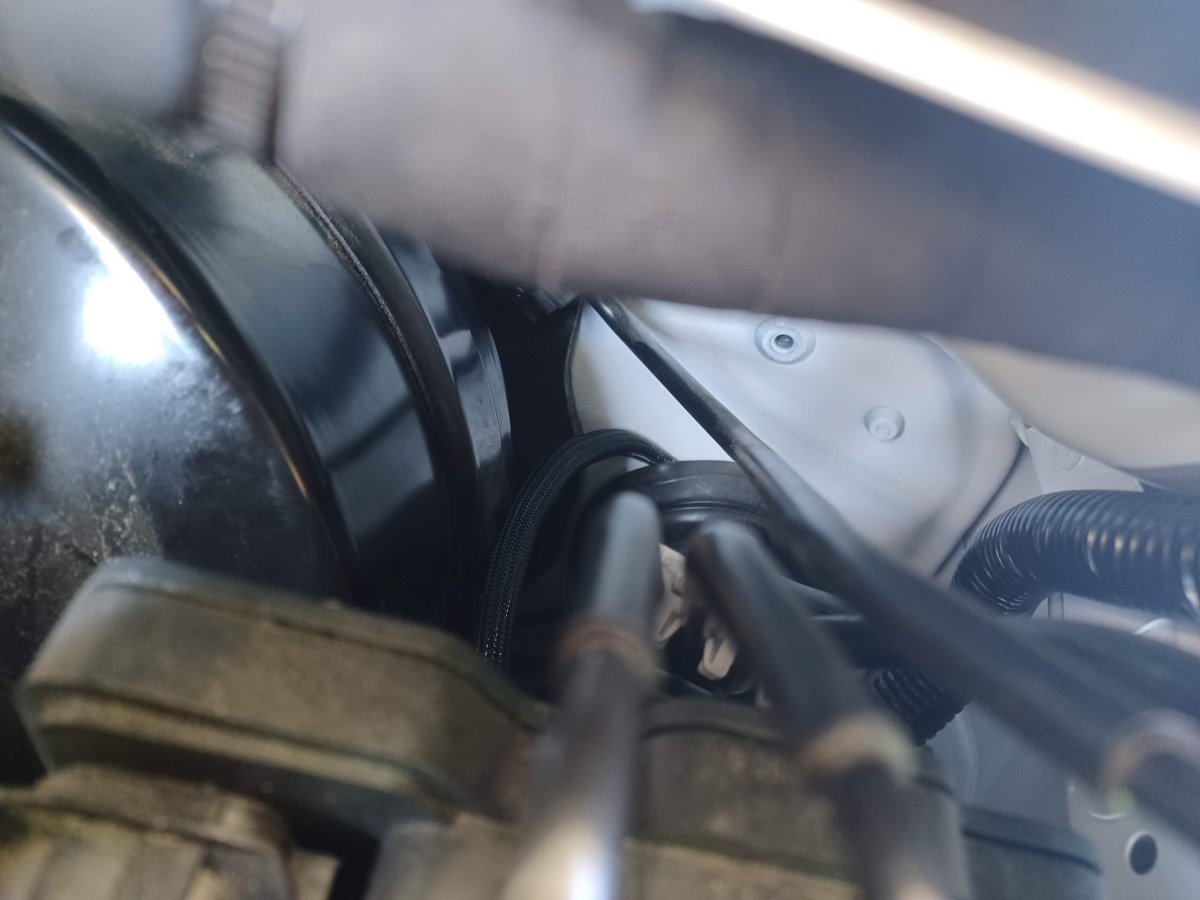
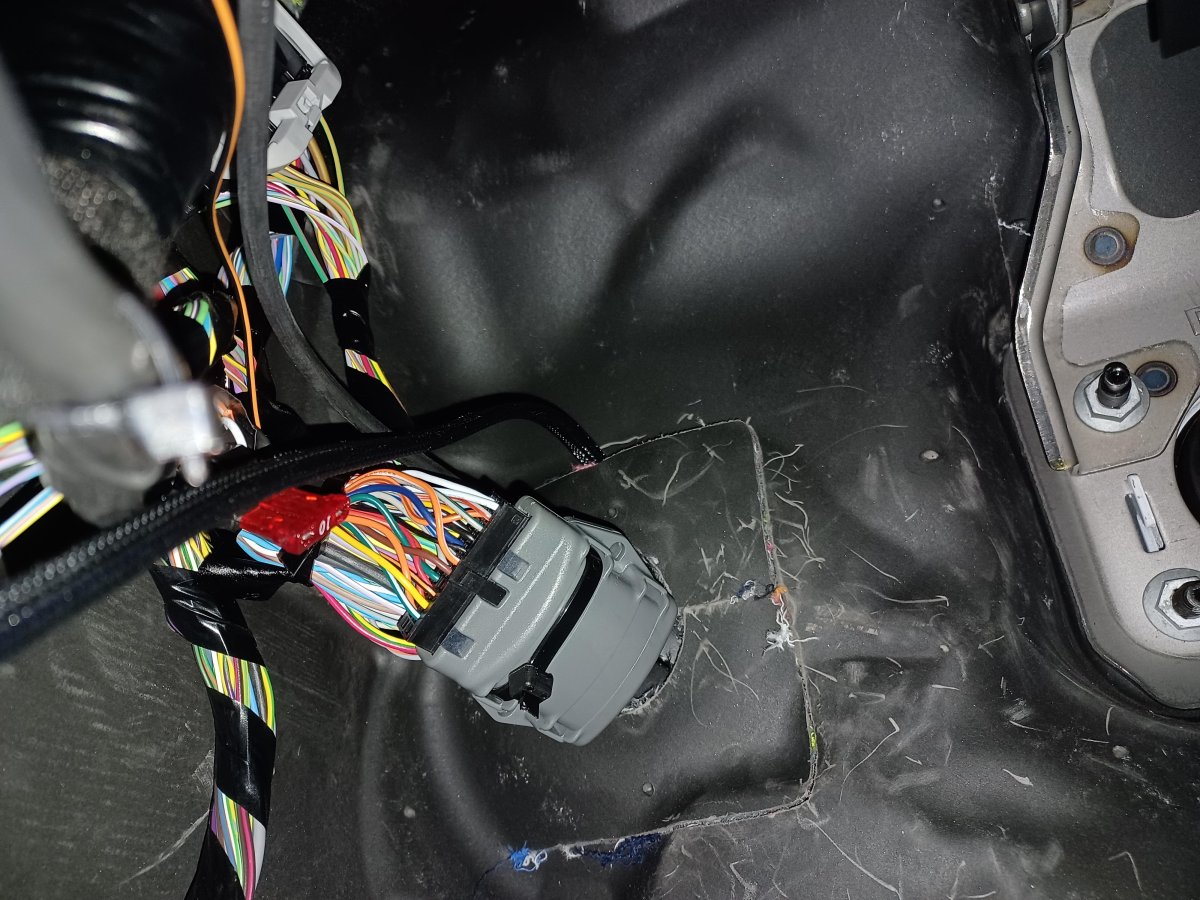
Wiring the switch was the hardest part of the wiring process. I really didn't want to route wiring through the fender, and I didn't want to cut/alter the factory harness firewall grommet in any way, so I opted to pull that grommet to the side and route the wiring through that way. I've done this before with some accessories on my '88 Ranger, and after 14+ years have had no issue, so figured it'd be ok here. I used one of those spring loaded grabber tools to grab the wiring and pull it through:

I used the RC on/off switch for a week or two, but couldn't get it to stick (and I didn't like the design anyway), so I went with this interesting aux switch panel I found on Etsy instead:
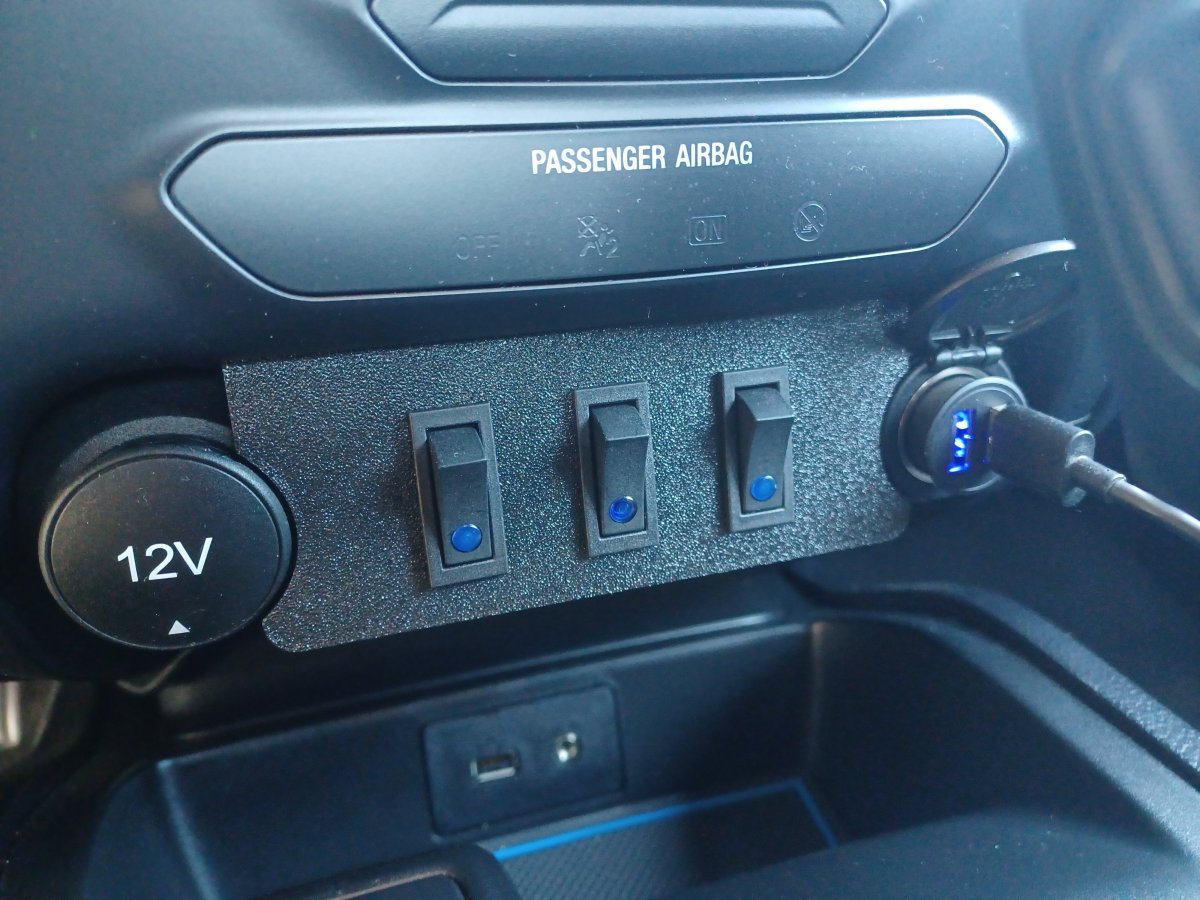
This panel just snaps into place, no tools or anything required, and the wiring is only noticeable if you're looking for it (and even then it's tucked so far out of the way I forget it's even there). All of the extra wiring is pulled through, bundled up, and zip tied behind the dash. Here's a few pics of the finished product:
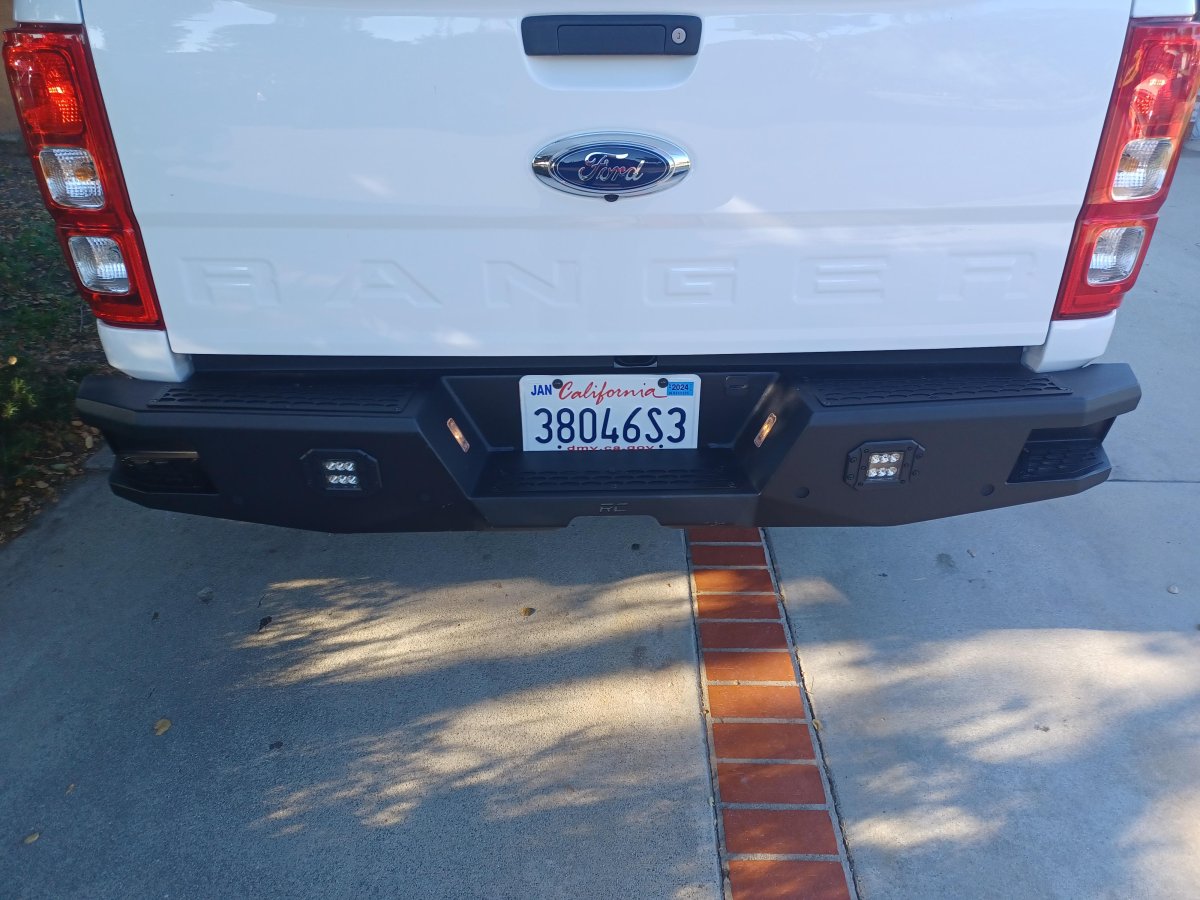

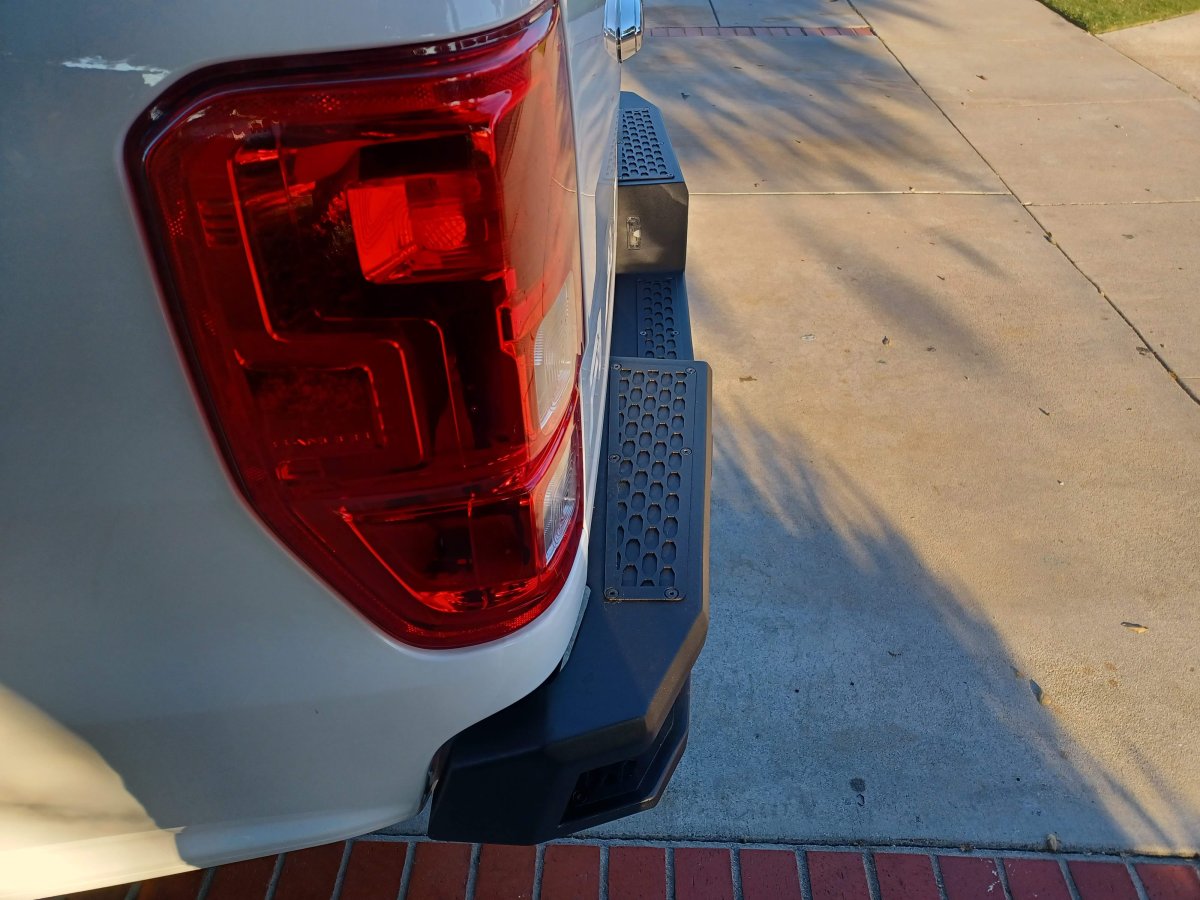
So far I'm very happy with it. The corner steps alone are worth the money and labor. The lights are super bright and very handy when I'm out in the desert at night.
A couple last things I'd like to mention:
- Before installing, make sure to tighten all of the little allen head bolts that secure the grip plate things. I had one fall out while driving and the kit did not come with extras.
- If your truck does not have parking sensors (like mine), the rubber inserts to plug the holes just kinda... push in place? There is nothing that holds them there other than the tight fit of the rubber, so I'm concerned those may fall out if this rubber shrinks or hardens after a while. Time will tell I suppose.
- There is no bracket or installation location for the factory 4-pin trailer light connector. I don't plan on towing with this truck so I just zip tied mine out of the way, but this is definitely something to consider if you are. I'm not even sure how well it aligns with the OEM location, and I have a feeling it's too far to the driver side as-is.
- This kit does come with a bracket to install the 7-pin trailer connector, however it is this big bulky thing that bolts to the bottom of the bumper and hangs down quite low. If I used/needed a 7-pin connector, this alone would almost be a deal breaker for me on the whole thing.
Hopefully this info is helpful to someone out there. Any questions or suggestions feel free to let me know. So far I'm glad I went with the upgrade, would definitely do it over again if I had to. If anything changes I'll be sure to update =].
There is conflicting info directly from Rough Country regarding the factory hitch. Their promo video for this bumper states that it allows use of the factory hitch, however their website says that it does not. It definitely DOES NOT allow to retain the factory hitch. Fortunately for me I did not have one, but if you do please keep this in mind. Some of the info also mentions that the cube lights are pre-installed, but they are not. Barely worth mentioning, but you will have to install those into the bumper yourself before wiring them up =P.
The first and main issue I ran into was while swapping the OEM rear bumper wiring harness to the new bumper. I have a base model with no parking sensors, and my harness was fastened to the OEM bumper skeleton with several clip style retainers. The RC bumper has no retainers whatsoever for the harness, and there is no instruction as to what to do if this is the case. Not sure if sensors hold the harness in place for models equipped with them, but I had to use my imagination here. I went with an adjustable wiring retainer I found in my toolbox to start off, and a couple of fixed hoop style ones when I realized that one by itself wasn't enough:
Also, due to the orientation of the harness here and the new position of the license plate lights, the driver side light would only barely reach when plugged in. I opted to open the factory harness and pull that socket over to the other side of the plastic loom:
Once I had the wiring in place I just used a few zip ties to tidy everything, I think it's ok for now. Installing the bumper by myself was tricky, but I got it snug and adjusted as best as possible before tightening down all the way. The edges of this bumper are a tad sharp, so be careful when bolting up initially, it can adjust far enough to scratch the bed corners.
Then came the wiring. I ran mine along the factory harness starting at the back of the battery, trying to stay at the top of the frame rail as much as possible all the way to the driver side rear bed corner, then hooked over across the bumper just like the factory harness. The wiring provided by RC is long enough, but just barely. Once I had everything in place I pulled it as snug as possible toward the back of the truck, and the passenger side light wiring still doesn't quite tuck away as neat as I'd like. I currently have the positive hooked up directly to the battery, and I have the ground wire attached to the body ground point next to the battery. If anyone knows a good switched positive in the engine bay I can use instead let me know. This process was tedious, but simple. No real issues other than strained patience.
Wiring the switch was the hardest part of the wiring process. I really didn't want to route wiring through the fender, and I didn't want to cut/alter the factory harness firewall grommet in any way, so I opted to pull that grommet to the side and route the wiring through that way. I've done this before with some accessories on my '88 Ranger, and after 14+ years have had no issue, so figured it'd be ok here. I used one of those spring loaded grabber tools to grab the wiring and pull it through:
I used the RC on/off switch for a week or two, but couldn't get it to stick (and I didn't like the design anyway), so I went with this interesting aux switch panel I found on Etsy instead:
This panel just snaps into place, no tools or anything required, and the wiring is only noticeable if you're looking for it (and even then it's tucked so far out of the way I forget it's even there). All of the extra wiring is pulled through, bundled up, and zip tied behind the dash. Here's a few pics of the finished product:
So far I'm very happy with it. The corner steps alone are worth the money and labor. The lights are super bright and very handy when I'm out in the desert at night.
A couple last things I'd like to mention:
- Before installing, make sure to tighten all of the little allen head bolts that secure the grip plate things. I had one fall out while driving and the kit did not come with extras.
- If your truck does not have parking sensors (like mine), the rubber inserts to plug the holes just kinda... push in place? There is nothing that holds them there other than the tight fit of the rubber, so I'm concerned those may fall out if this rubber shrinks or hardens after a while. Time will tell I suppose.
- There is no bracket or installation location for the factory 4-pin trailer light connector. I don't plan on towing with this truck so I just zip tied mine out of the way, but this is definitely something to consider if you are. I'm not even sure how well it aligns with the OEM location, and I have a feeling it's too far to the driver side as-is.
- This kit does come with a bracket to install the 7-pin trailer connector, however it is this big bulky thing that bolts to the bottom of the bumper and hangs down quite low. If I used/needed a 7-pin connector, this alone would almost be a deal breaker for me on the whole thing.
Hopefully this info is helpful to someone out there. Any questions or suggestions feel free to let me know. So far I'm glad I went with the upgrade, would definitely do it over again if I had to. If anything changes I'll be sure to update =].
Last edited:


