- Joined
- Oct 6, 2010
- Messages
- 426
- Reaction score
- 4
- Points
- 0
- Location
- Palmdale, California
- Vehicle Year
- 88
- Make / Model
- Ford
- Engine Size
- 4.0
- Transmission
- Manual
Detailed BII back hatch crack repair/reinforcement
All,
I have mentioned this repair several times but now have the pics to detail it. I got this hatch off Grimmity's 90 BII because it had the bosses for the flip out window and wiper taht I wanted. I'm adding heated glass too but this is about repairing the all too common cracking from the tire carrier. Here is how I fixed mine.
Oweing to the fact that I greatly admire Chip Foose's desing style, I didn't want my reapir/mod to show. I had done this on another BII but never took pics, so here goes....
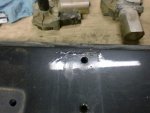
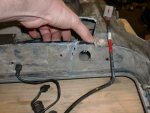
This hatch had the common cracked area and a bit more than I had seen before!
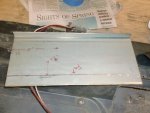
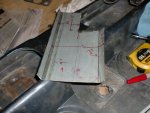
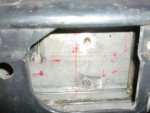
So I began by taking measurements for the area that needed repair. This hatch already had extra material removed around the access holes for some reason. As I had more room thatn usual I started with a piece of metal that I had, and used before for this, that I cut to 12" long and then trimmed the extruded edges off to come into the deminsions I needed, see pics. For this one my final size was 9" wide and 5 1/16" high with a notch to clear the latch back plate. I also pre-drilled the repair plate for the tire rack latch mount holes. I went a bit oversize to give me a bit of wiggle room when bonding the plate in.
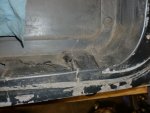
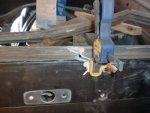
Once I had the plate to the shape I wamted I bent the 3/4" bottom edge to about a 45 degree and the top I bent bac just a touch from vertical to have more contact with the top edge to better support it and act as a backer for the fibergflass repair. I used a couple pices of angle iron, the concrete floor and hammers to make the bends. I then removed all the damaged/crack hatch material with and air fgrinder witha small disk and my trusty dremel and a tungsten burr. I roughed up the inside of the hatch where I was going to bond this plate and then cleaned/roughed up the back of plate with a 60 grit flap wheel. Then it was fun with fiberglass resin, mat, loose fiber fil and ever single clamping device I have, what fun. I let it all cure up and then removed the clamps. So I'm at this stage now. Sorry I did not take a pic when all tha clamps were on, too busy getting the resin off me...
All that's left now is to finish the body work and paint then reassemble. I'm also modding this one to put in an Explorer wiper motor and arm so have been taking pics of that too. Will post it up when I'm done. Hope this helps others who need to repair their cracked hatchs too. Later!
All,
I have mentioned this repair several times but now have the pics to detail it. I got this hatch off Grimmity's 90 BII because it had the bosses for the flip out window and wiper taht I wanted. I'm adding heated glass too but this is about repairing the all too common cracking from the tire carrier. Here is how I fixed mine.
Oweing to the fact that I greatly admire Chip Foose's desing style, I didn't want my reapir/mod to show. I had done this on another BII but never took pics, so here goes....
This hatch had the common cracked area and a bit more than I had seen before!
So I began by taking measurements for the area that needed repair. This hatch already had extra material removed around the access holes for some reason. As I had more room thatn usual I started with a piece of metal that I had, and used before for this, that I cut to 12" long and then trimmed the extruded edges off to come into the deminsions I needed, see pics. For this one my final size was 9" wide and 5 1/16" high with a notch to clear the latch back plate. I also pre-drilled the repair plate for the tire rack latch mount holes. I went a bit oversize to give me a bit of wiggle room when bonding the plate in.
Once I had the plate to the shape I wamted I bent the 3/4" bottom edge to about a 45 degree and the top I bent bac just a touch from vertical to have more contact with the top edge to better support it and act as a backer for the fibergflass repair. I used a couple pices of angle iron, the concrete floor and hammers to make the bends. I then removed all the damaged/crack hatch material with and air fgrinder witha small disk and my trusty dremel and a tungsten burr. I roughed up the inside of the hatch where I was going to bond this plate and then cleaned/roughed up the back of plate with a 60 grit flap wheel. Then it was fun with fiberglass resin, mat, loose fiber fil and ever single clamping device I have, what fun. I let it all cure up and then removed the clamps. So I'm at this stage now. Sorry I did not take a pic when all tha clamps were on, too busy getting the resin off me...
All that's left now is to finish the body work and paint then reassemble. I'm also modding this one to put in an Explorer wiper motor and arm so have been taking pics of that too. Will post it up when I'm done. Hope this helps others who need to repair their cracked hatchs too. Later!
Attachments
-
 65.2 KB Views: 119
 -
 80 KB Views: 130
 -
 73.8 KB Views: 114
 -
 62 KB Views: 107
 -
 80 KB Views: 118
 -
 69.2 KB Views: 131
 -
 55.1 KB Views: 131
Last edited: