
- Joined
- Dec 16, 2016
- Messages
- 1,029
- Reaction score
- 858
- Points
- 113
- Location
- Denver
- Vehicle Year
- 2009
- Make / Model
- Ford Ranger FX4
- Engine Type
- 4.0 V6
- Transmission
- Automatic
- 2WD / 4WD
- 4WD
Maybe I've been living in the big city too long, but after driving a bunch of vehicles over the years with automatic on/off headlights, it seems too much to have to manually turn on/off the headlights on the Ranger. (Maybe I just don't want to be like those idiots driving at night with just their dim daytime running lights on...)
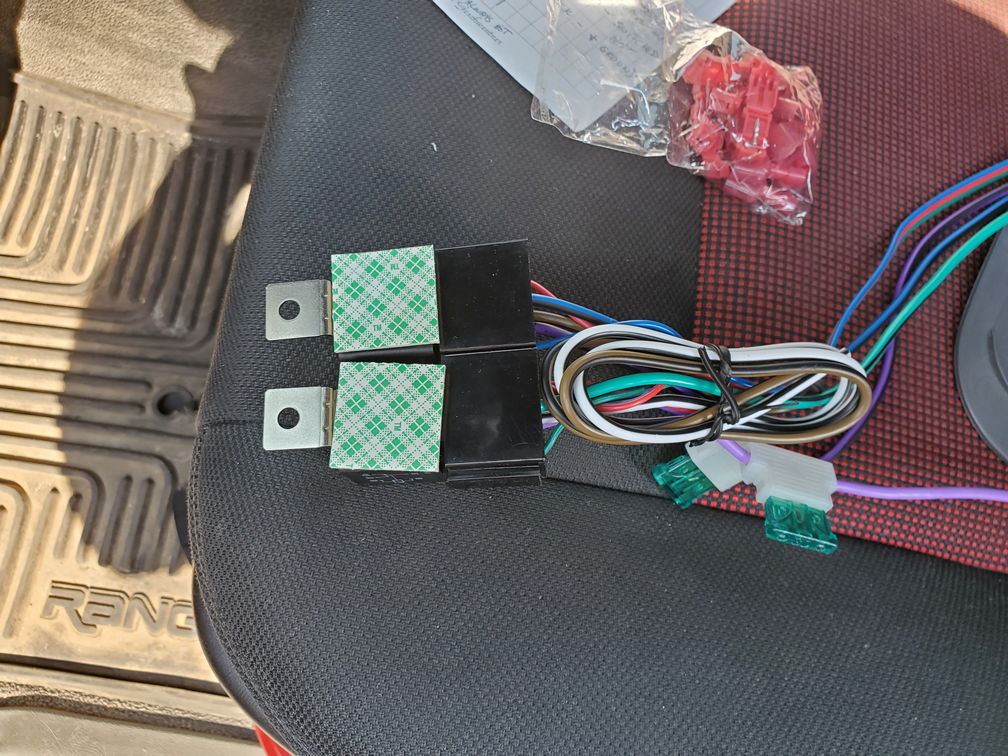
So, I bought the Directed Electronics Inc auto headlight system. This is available for less than $40 online. This kit can be set up to provide daytime running lights (headlights on always with the key on) or not, depending on your preference. Since the Ranger is mostly driven in poor weather (the Mustang is way more fun when its nice out) I elected to use the system default which includes daytime running lights. There is a simple modification to the DEI kit if you do not want the headlights on all the time.
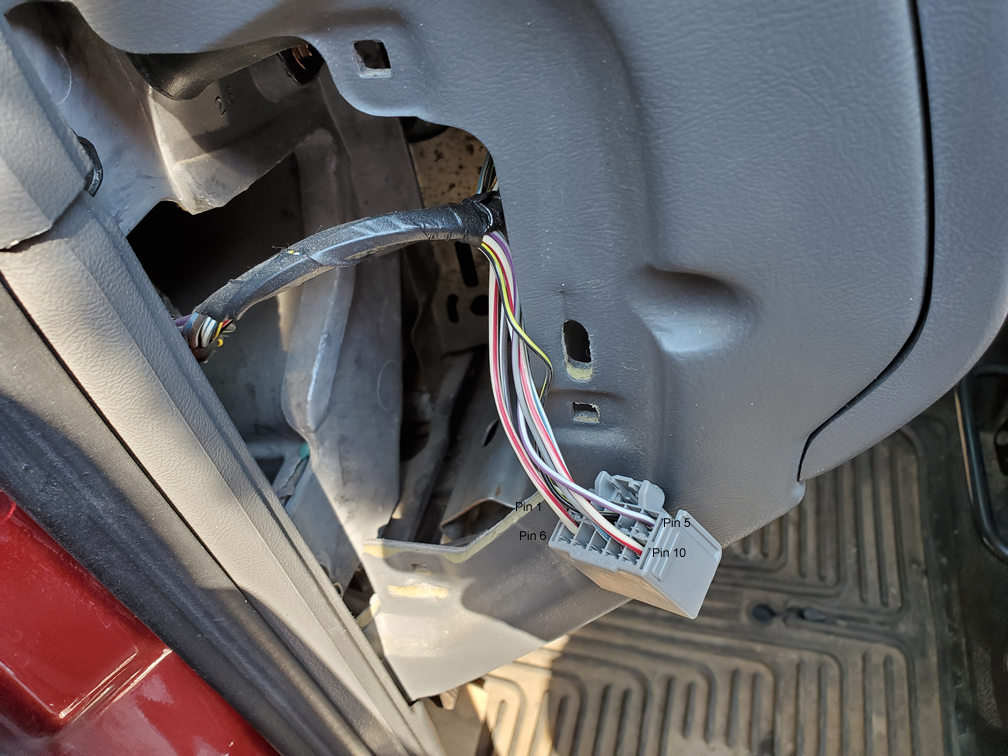
My Ranger is a 2009, and if I understand things correctly, the wiring from 2006 to 2011 is the same. The 09 has no fuse box on the left end of the dash, but conveniently still has the little door there. If you take off the door, you can access the connector to the headlight switch. The headlight circuit is engaged by connecting pin 1 to pin 6 on that connector. Note that this only turns on the headlights. The park/tail/instrument lights are engaged by connecting pin 5 to pin 10 on that same connector. Also note you cannot just connect all of those together - the way the headlight system senses that it should be on is totally different from how the park/tail/instrument light circuit senses that it should be on - so you must keep those circuits separated.
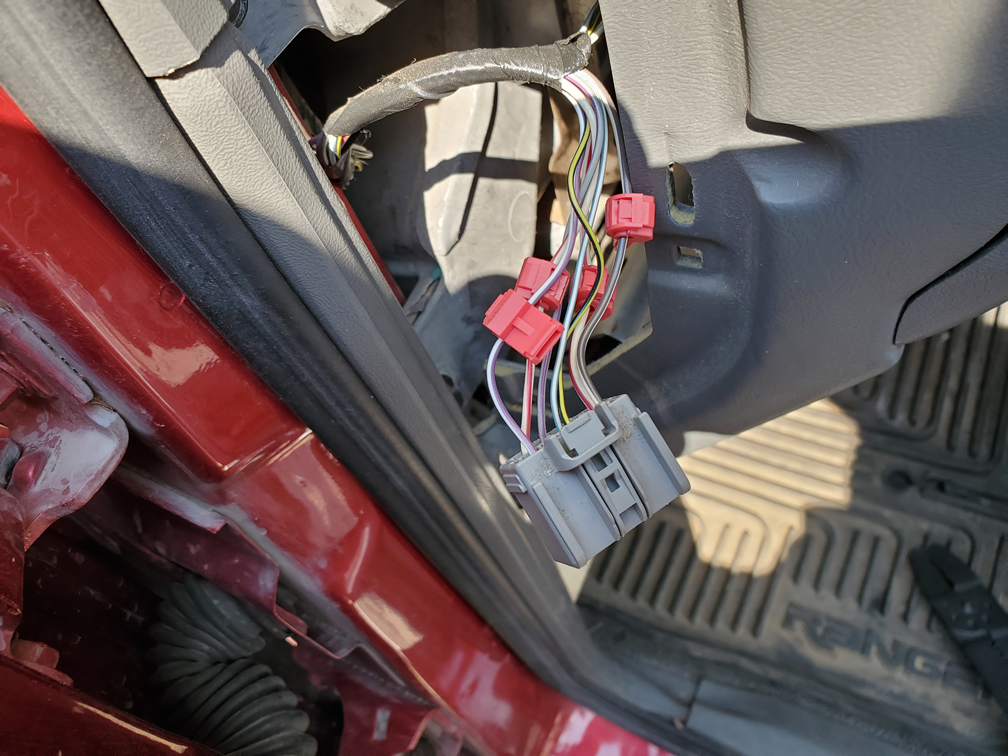
The DEI kit provides a pair of relays that are energized 1. when the key is on (for the daytime running lights) and 2. when the photo sensor says its dark (for the park/tail/instrument lights.) So, we put some taps on the correct wires on the headlight connector and connect those to the DEI relays.
To get the headlights to come on with the first relay, we connect pin 1 to green with black wire and pin 6 to purple wire (those wires go to the switched side of the 1st relay.)
To get the park/tail/instrument lights to come on with the second relay, we connect pin 5 to the violet with black wire and pin 10 to the blue with black wire (those wires go to the switched side of the 2nd relay.)
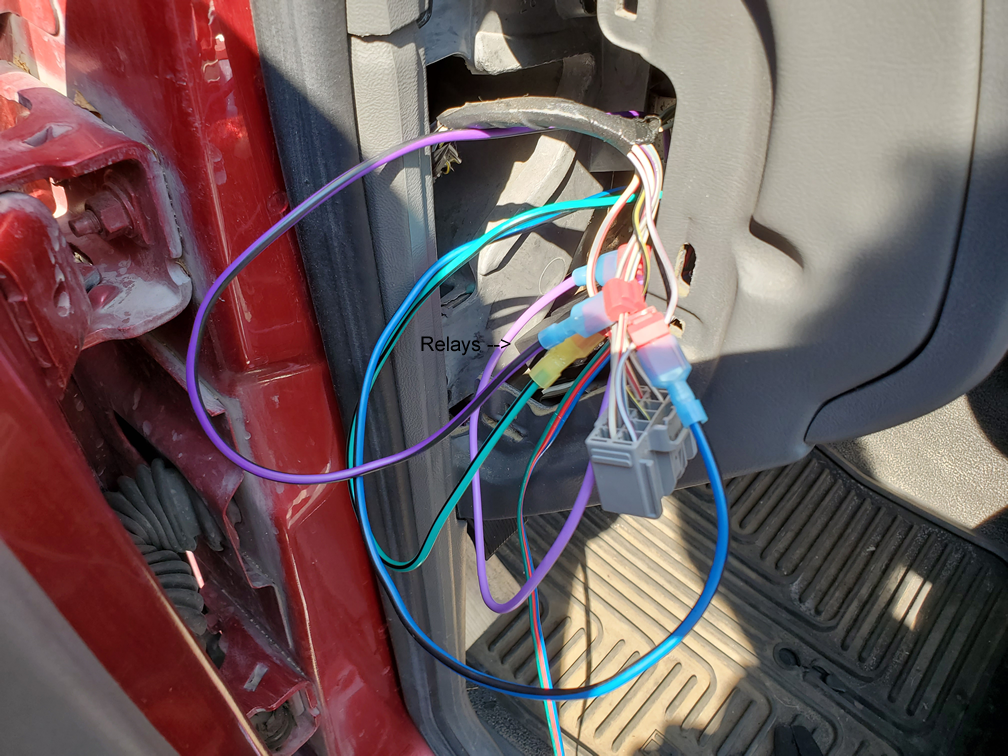
The DEI kit has standard type relays, so if ever one of them gets bad, you can just replace it.
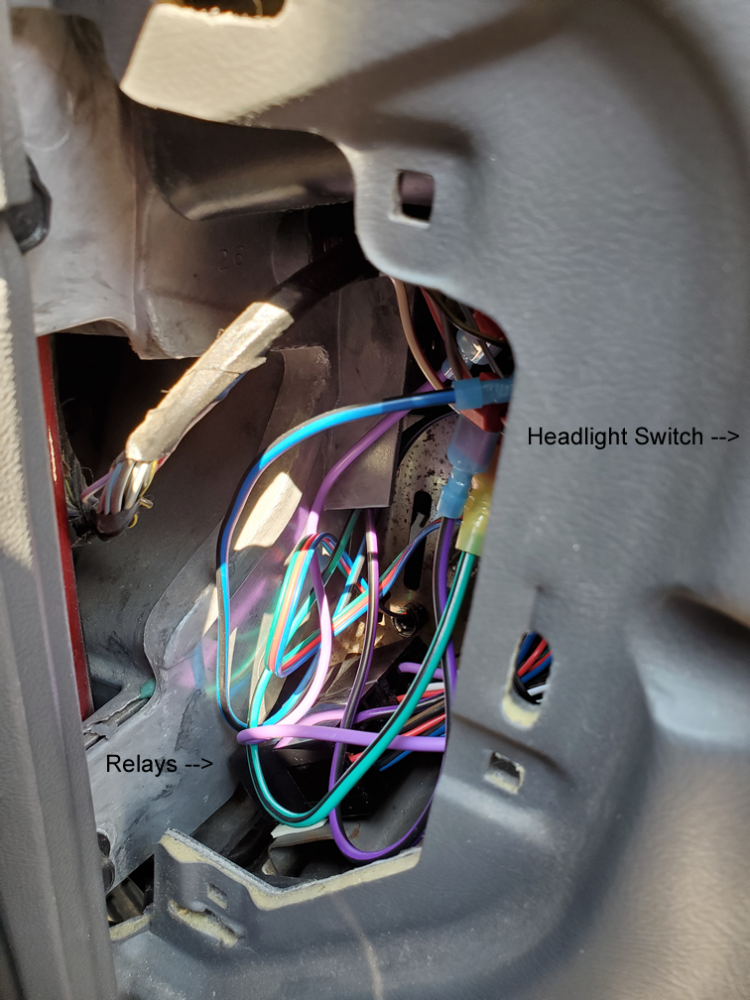
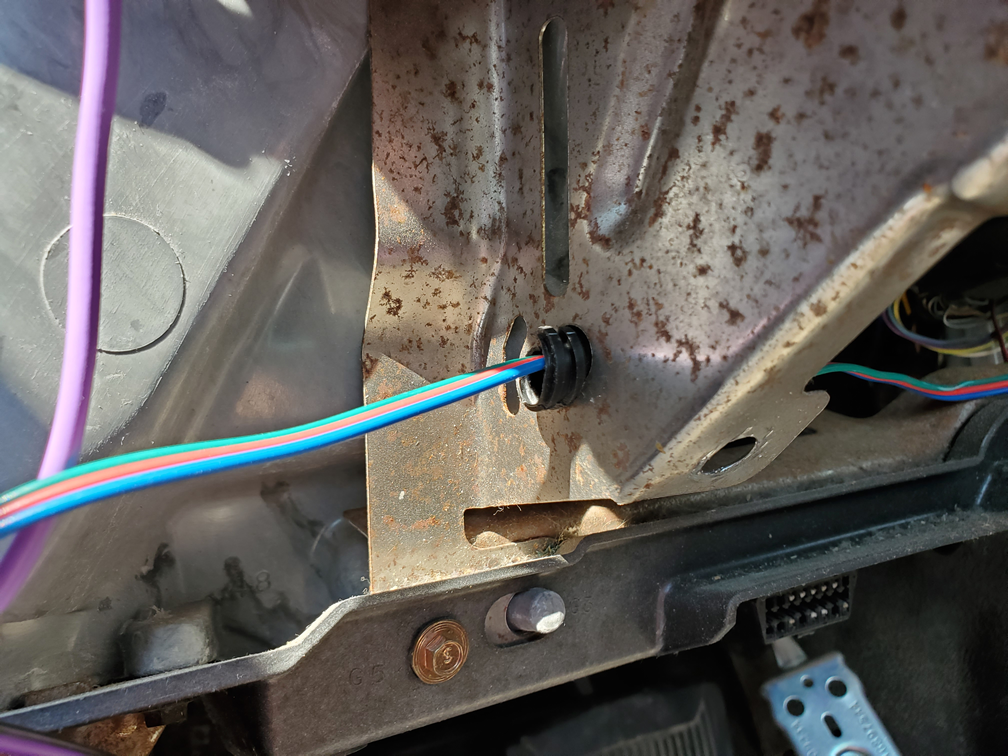
Now we need to run the control wiring over the the DEI control system and connect that to power. Conveniently, there are holes through the various metal parts to let the control wiring pass across the bottom of the dash. I put a little piece of split-flex in each of those openings so I don't have to worry about the insulation being worn away over time, because the metal holes are pretty sharp.
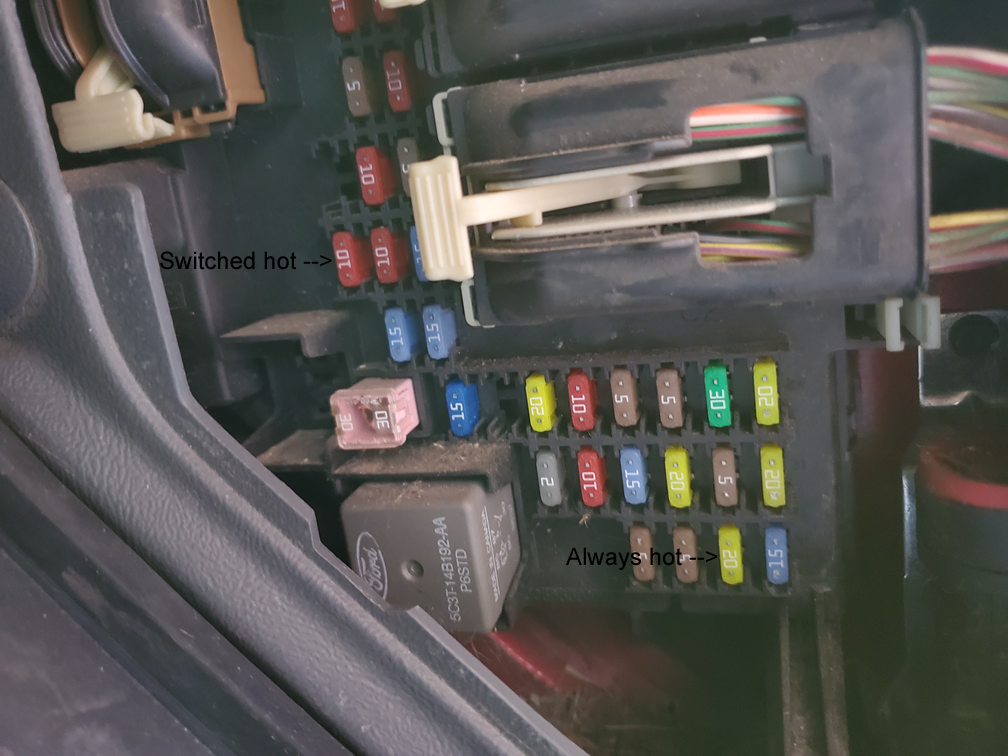
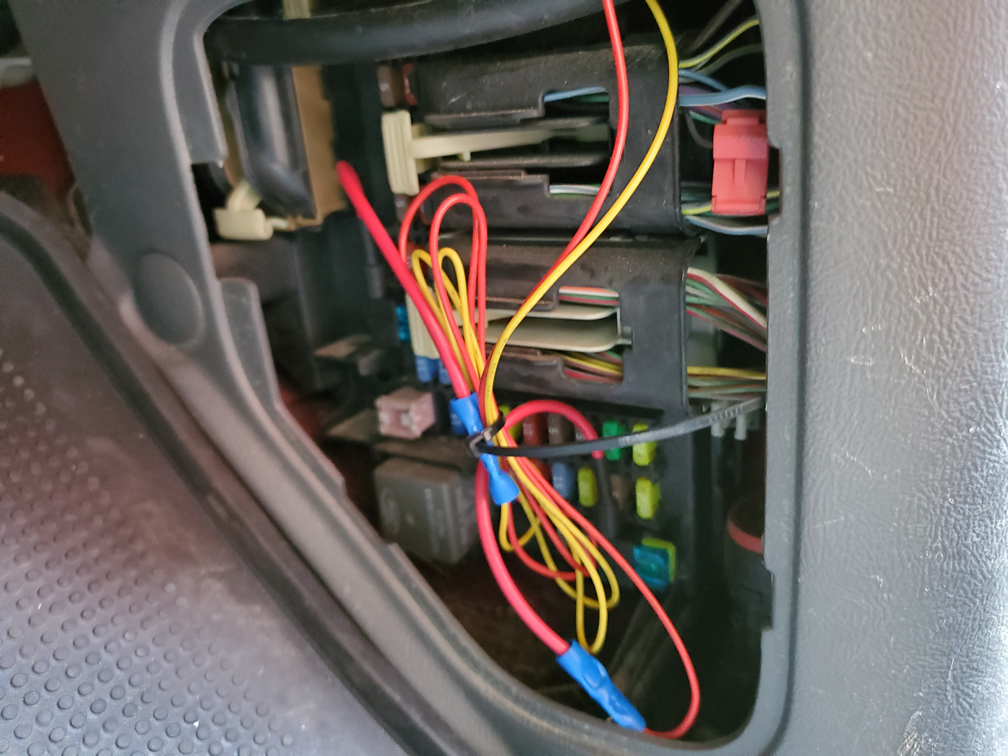
Now I got some "add a circuit" things to plug into the smart junction box to get both switched power and constant power. Note that if you don't care about the headlights staying on for a few seconds after you turn off the vehicle, you can connect both to switched power. Also note that the DEI wiring colors for power are opposite of the Ford convention - on the DEI, yellow is switched power and red is always hot. I have identified where I chose to tap into the sjb. Note that you have multiple possible locations, but you have to find places where the size of the "add a circuit" thing physically fits.
Then, the DEI controller needs to be grounded. I located the controller on the passenger side of the glove box. This gives me access to the device easily if that should ever be needed.
The photo sensor is adhesive mounted to the dash near the passenger A pillar, and the wire runs along the plastic cover on the A pillar down to the DEI controller.
So, I bought the Directed Electronics Inc auto headlight system. This is available for less than $40 online. This kit can be set up to provide daytime running lights (headlights on always with the key on) or not, depending on your preference. Since the Ranger is mostly driven in poor weather (the Mustang is way more fun when its nice out) I elected to use the system default which includes daytime running lights. There is a simple modification to the DEI kit if you do not want the headlights on all the time.
My Ranger is a 2009, and if I understand things correctly, the wiring from 2006 to 2011 is the same. The 09 has no fuse box on the left end of the dash, but conveniently still has the little door there. If you take off the door, you can access the connector to the headlight switch. The headlight circuit is engaged by connecting pin 1 to pin 6 on that connector. Note that this only turns on the headlights. The park/tail/instrument lights are engaged by connecting pin 5 to pin 10 on that same connector. Also note you cannot just connect all of those together - the way the headlight system senses that it should be on is totally different from how the park/tail/instrument light circuit senses that it should be on - so you must keep those circuits separated.
The DEI kit provides a pair of relays that are energized 1. when the key is on (for the daytime running lights) and 2. when the photo sensor says its dark (for the park/tail/instrument lights.) So, we put some taps on the correct wires on the headlight connector and connect those to the DEI relays.
To get the headlights to come on with the first relay, we connect pin 1 to green with black wire and pin 6 to purple wire (those wires go to the switched side of the 1st relay.)
To get the park/tail/instrument lights to come on with the second relay, we connect pin 5 to the violet with black wire and pin 10 to the blue with black wire (those wires go to the switched side of the 2nd relay.)
The DEI kit has standard type relays, so if ever one of them gets bad, you can just replace it.
Now we need to run the control wiring over the the DEI control system and connect that to power. Conveniently, there are holes through the various metal parts to let the control wiring pass across the bottom of the dash. I put a little piece of split-flex in each of those openings so I don't have to worry about the insulation being worn away over time, because the metal holes are pretty sharp.
Now I got some "add a circuit" things to plug into the smart junction box to get both switched power and constant power. Note that if you don't care about the headlights staying on for a few seconds after you turn off the vehicle, you can connect both to switched power. Also note that the DEI wiring colors for power are opposite of the Ford convention - on the DEI, yellow is switched power and red is always hot. I have identified where I chose to tap into the sjb. Note that you have multiple possible locations, but you have to find places where the size of the "add a circuit" thing physically fits.
Then, the DEI controller needs to be grounded. I located the controller on the passenger side of the glove box. This gives me access to the device easily if that should ever be needed.
The photo sensor is adhesive mounted to the dash near the passenger A pillar, and the wire runs along the plastic cover on the A pillar down to the DEI controller.


