• Welcome Visitor! Please take a few seconds and Register for our forum. Even if you don't want to post, you can still 'Like' and react to posts.

1976 O'Day Daysailer II Sailboat


bilbo

Well-Known Member
Joined
Oct 29, 2016
Messages
791
Reaction score
922
Points
93
Location
South Florida
Vehicle Year
1983
Make / Model
Ford
Engine Type
2.3 (4 Cylinder)
Engine Size
2.3L
Transmission
Manual
2WD / 4WD
2WD
Total Lift
0
Total Drop
0
It also had oar locks on it, and he bought 7ft oars from montgomery wards, which I found in the barn when I first moved back, and are hanging on my wall to this day, balanced on another wall with a 6ft crosscut saw blade. That to me is art
I like that kind of thing too. I built a set of snowshoes quite a few years ago. I like the traditional ones because they are quieter and I can get them big enough to float my big ass with some gear. A lady in the booming metropolis of Gentilly, MN used to make the steam bent frames and sold kits with cordage too if you chose. I built them to use them, and use them I did. They were huge, 64" from tip to tail I think. When we moved to FL I thought about bringing them with to hang on the wall, but I ended up leaving them at my Dad's so I could use them when I visit in the winter. I also have a smaller set that I was going to build for my son to use, but they're not done yet. By the time I was done lacing my hands looked like old Mother Hubbard's.

I used to really enjoy woodworking but two things happened. I worked in a shop building custom furniture so it became a job, and I was spoiled by the really nice tools in said shop. I don't think I could go back to building things with sloppy big box store tools again. When you set the fence at 32-1/16" and ripped something on their table saw it came out 32-1/16" and was clean and square, every time. When I make stuff at home I spend more time setting up tools than actually building.


bilbo

Well-Known Member
Joined
Oct 29, 2016
Messages
791
Reaction score
922
Points
93
Location
South Florida
Vehicle Year
1983
Make / Model
Ford
Engine Type
2.3 (4 Cylinder)
Engine Size
2.3L
Transmission
Manual
2WD / 4WD
2WD
Total Lift
0
Total Drop
0
I put on the gelcoat this morning. I mixed a few test batches before I felt I got the color right. Now that it's on the boat in a larger area I think it's too dark. Oh well. Maybe it's the lighting and/or it will lighten up as it cures. I think I had the right mixture as it worked in the cup very nice. I used 1.75% MEKP and it was between 72-75 degrees while I was working. I had about 5 minutes before it started to kick and turn a little pudding-like, and another 5-8 minutes of working life after that. I also found some areas on the keel that were weak and a few other chips, so I decided to sand those out and repair them with gelcoat too. Originally I was going to use epoxy for that since it's tougher and the keel sees a lot of abuse, but since I was gelcoating anyway I figured it was worth a shot.

IMG-5040.jpg


I was going to skip these and use epoxy on the keel since it's a lot more durable, but figured I'd give gelcoat a go while I'm doing it. I ended up doing 9 coats in three separate batches. There's a guy named Andy Miller that has tons of youtube videos of various boat repair and reconditioning processes. His videos have been extremely helpful for tips and techniques. In his video on gelcoat repair he recommends brushing each coat on perpendicular to the last after allowing the solvent to flash off. This worked really well and it was easy to build thickness. I'm hoping I've got enough product on, but if not I can sand and apply more layers.

IMG-5045.jpg
IMG-5046.jpg


IMG-5044.jpg


The skinny spots on the keel were hard to build up without running. After the first coat I just didn't bother with those areas until the gelcoat started to kick in the cup and get thicker. Then I could glob it on and it stayed put. The first two batches were plain gelcoat and I mixed wax in with the third batch to keep air off the surface and allow it to cure out completely. Unfortunately brushing it means there is a lot more sanding in my future, but I don't have any of the equipment needed to spray the gelcoat. I saw some videos where people were modifying cheap harbor freight guns and using those, but with brushing there is very little cleanup and if it kicks early in the cup you're only out a 99 cent chip brush that was disposable anyway. There's also no overspray to worry about.

Now I wait, and hope and pray I did it all right and the gelcoat bonds and cures out.
 

bilbo

Well-Known Member
Joined
Oct 29, 2016
Messages
791
Reaction score
922
Points
93
Location
South Florida
Vehicle Year
1983
Make / Model
Ford
Engine Type
2.3 (4 Cylinder)
Engine Size
2.3L
Transmission
Manual
2WD / 4WD
2WD
Total Lift
0
Total Drop
0
It looks like the gelcoat cured like it’s supposed to. Yay! I’m going to leave it through the night and begin sanding tomorrow.
 

bilbo

Well-Known Member
Joined
Oct 29, 2016
Messages
791
Reaction score
922
Points
93
Location
South Florida
Vehicle Year
1983
Make / Model
Ford
Engine Type
2.3 (4 Cylinder)
Engine Size
2.3L
Transmission
Manual
2WD / 4WD
2WD
Total Lift
0
Total Drop
0
Yep the color is boned. Pretty disappointed, but oh well the fish will have to look at an ugly boat bottom. I’ve been sanding all morning and it’s finally getting there. I bought an air sander to use because I got sick of hand sanding after 10 seconds. I started with 220 to cut down the peaks of the brush marks and will work my way up to 1200. I just finished the 220 work.
D8B50DEF-B3AD-4C22-A1DF-EDD19026615A.jpeg

The surface is far from perfect. It probably could have used one or two more coats, but it’s good enough. It’s only real purpose is to keep UV off the epoxy.
 

Josh B

Well-Known Member
Supporting Member
TRS 20th Anniversary
Joined
Aug 15, 2019
Messages
4,005
Reaction score
1,986
Points
113
Location
Oklahoma
Vehicle Year
1993
Make / Model
Ford Ranger
Engine Type
4.0 V6
Transmission
Manual
2WD / 4WD
4WD
Reckon it'll round the cape? :D
 

bilbo

Well-Known Member
Joined
Oct 29, 2016
Messages
791
Reaction score
922
Points
93
Location
South Florida
Vehicle Year
1983
Make / Model
Ford
Engine Type
2.3 (4 Cylinder)
Engine Size
2.3L
Transmission
Manual
2WD / 4WD
2WD
Total Lift
0
Total Drop
0
IMG-5055.jpg


The boat's upright again! Now I have to fix the screw holes for the rudder gudgeon, and that should be about it.


Reckon it'll round the cape? :D
Haha maybe, there's a guy from England who crossed the Atlantic in a boat kind of like mine. And a guy from Ohio who did the same in the other direction in a 13' boat. It was in the 60s I think. Though that's not quite as hairy as rounding Cape Horn.
 

Josh B

Well-Known Member
Supporting Member
TRS 20th Anniversary
Joined
Aug 15, 2019
Messages
4,005
Reaction score
1,986
Points
113
Location
Oklahoma
Vehicle Year
1993
Make / Model
Ford Ranger
Engine Type
4.0 V6
Transmission
Manual
2WD / 4WD
4WD
I wouldn't wish to try anything even near crazy these days, there's already too much crazy bouncing around out there, one might collect a lot larger batch than he bargained for.

That thing's looking plum good now dude :)
 

bilbo

Well-Known Member
Joined
Oct 29, 2016
Messages
791
Reaction score
922
Points
93
Location
South Florida
Vehicle Year
1983
Make / Model
Ford
Engine Type
2.3 (4 Cylinder)
Engine Size
2.3L
Transmission
Manual
2WD / 4WD
2WD
Total Lift
0
Total Drop
0
The sad thing is a trip across the Atlantic in a dinghy doesn't seem as crazy as what's going on landside at times.
 

Josh B

Well-Known Member
Supporting Member
TRS 20th Anniversary
Joined
Aug 15, 2019
Messages
4,005
Reaction score
1,986
Points
113
Location
Oklahoma
Vehicle Year
1993
Make / Model
Ford Ranger
Engine Type
4.0 V6
Transmission
Manual
2WD / 4WD
4WD
I used to meet people all along the Gulf coast in their little sailboats. The smallest thing you could get with a cabin was probably 25k or more, but they'd go bobbin all over the Gulf coast and beyond. Most times just weekend jaunts and sometimes longer. Billoxi was a really popular place, or out West End New Orleans was cool just sitting there about sundown and watch then all start slipping out into Lake Ponchatrain. Panama City and Tampa Bay were popular too.

I was frying out of Corpus Christi. around 82 or 3. I was waiting at the terminal for the crew who flew a charter from New Iberia. We'd meet there and shuttle over to the heliport to get on a chopper. There was an ad in the Corpus paper for a 32 ft Chris Craft. I knew the number was in Dallas so when I got off and flew there on Southwest they had already sold it :/
I was already planning a Panama Canal and California coast and everything in that boat
 

bilbo

Well-Known Member
Joined
Oct 29, 2016
Messages
791
Reaction score
922
Points
93
Location
South Florida
Vehicle Year
1983
Make / Model
Ford
Engine Type
2.3 (4 Cylinder)
Engine Size
2.3L
Transmission
Manual
2WD / 4WD
2WD
Total Lift
0
Total Drop
0
There's an event called the Texas 200 that leaves from Port Isabel, TX and ends approximately 200 miles up the coast. It's primarily for small boats, mostly sailboats, but I believe the rules are few and vague (on purpose) so basically anyone can enter. It takes 4-5 days and was modeled after a race called the Everglades Challenge here in South FL, but there's no official racing involved. While it's not quite rounding the Cape, weather does get extreme at times. I'd like to do that some day but I need to gain experience and work on some of my skills first. Nice thing is I'm an hour from the ICW so practice doesn't put me out too much. I'd like to take a trip and beach or island camp each night, but Florida is so built up and touristy camping is not allowed on the beach and from what I've found there are few other places to camp. Even on a little boat, a cabin drastically expands your capabilities.

Over the week I was able to pick at things a bit more, and worked on fixing the rudder mounting. To fix it, you have to remove the rotted wood and replace it with structural filler, inject it with thinned penetrating epoxy, or a combination of both. The epoxy seals the rotted wood and turns it into a composite. To get the real bad wood out I took an allen wrench and chucked it in my drill. Then put it in the hole and hit go. The wrench turns around and loosens up the worst of the rotten wood near the holes so epoxy can be injected. On the inside I noticed the wrench turned very easily, too easily like there was nothing there. I figured the wood was completely gone, but then found the wood near the outside was solid. I thought it was weird that it would be more rotten on the inside than the outside so I opened up the inside holes so I could see what's going on.

IMG-5056.jpg


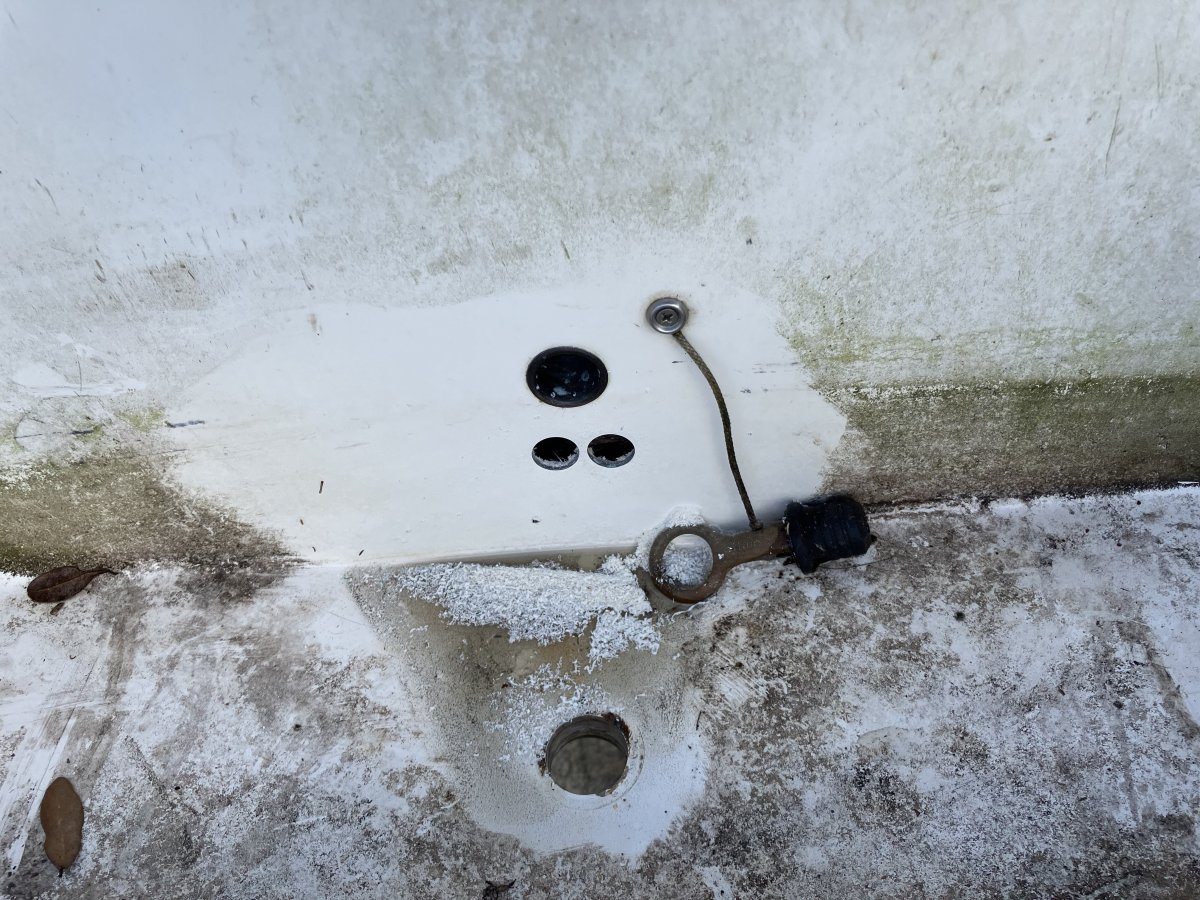
These two holes are for #10 machine screws that go through the transom to hold gudgeon. After opening them up I could see there was no plywood behind those holes. On most boats I've seen the transom has a solid core with laminate on either side. However this boat appears to have plywood bonded to only the outside laminate. The inside slopes back slightly so there's nothing behind it on that side, especially near the bottom. That kind of explains why the bolts looked like they were going to pull through. The hollow space behind this leads directly down to the bilge where the drain is, so unless the boat was upside down penetrating epoxy wasn't going to work. Thickened epoxy it is then! There are products ready made for this purpose, but I couldn't find them locally. I wanted to get this done before the weekend as it is forecast to rain and I didn't want all the wood getting soaked as it would take forever to dry, so I made my own filler using the dust captured by my RO sander when working on the hull and some glass fiber I chopped up. It wasn't super fun to work with but it got the job done.

I removed the bilge plug drain a few weeks ago as it needed to be resealed anyway. I found a piece of 3/4" copper pipe fit perfectly there and prevents any stray filler from dropping down and plugging the drain path for bilge water.

IMG-5063.jpg


I mixed up some epoxy and added my filler material, then set about shoving it in. Prior to this, I used some plumbing repair putty (also epoxy) to build a little "shelf" that would prevent my filler from sagging and/or running down. I really did not want to mess up bilge drainage as it would be a nightmare to access and fix any of that. The filler ended up working quite well, it didn't sag at all and the shelf probably wasn't even needed. The only trouble was it was hard to tool it and smooth it out due to the relatively long fibers. Commercial milled glass filler strands are very short but my homemade ones were all over the place. Not a huge deal as it can be sanded later.

IMG-5061.jpg
IMG-5062.jpg


Some cure time and a little sanding and this should be good to go.
 

bilbo

Well-Known Member
Joined
Oct 29, 2016
Messages
791
Reaction score
922
Points
93
Location
South Florida
Vehicle Year
1983
Make / Model
Ford
Engine Type
2.3 (4 Cylinder)
Engine Size
2.3L
Transmission
Manual
2WD / 4WD
2WD
Total Lift
0
Total Drop
0
While working on the boat last week, I went into the back of my workshop to grab something and heard a noise like a mouse or something under the shed. I looked inside one of my cabinets and found this little guy or gal:

IMG-5070.jpg


This town is sort of overrun with stray cats and we've seen a couple black ones around our yard often. We never see rats or other rodents so I've never really worried a lot about getting rid of them. I guessed it was one of theirs that maybe wound up in there, and just left for a while to see if Mama would come get it. When I went back to check I found Mama nursing three kittens in my reloading bench cabinet! She was not super happy with my intrusion so I let her be while we figured out what to do.

She must have snuck in while I was working, as the rollup door was locked shut otherwise. I've no experience with cats so I don't know how old the kittens were, but their eyes were still shut and they weren't really ambulatory yet. They could kind of crawl and roll though, and when I came back Mom was gone and two had found their way out of the cabinet. I put them into a dog crate with some towels and put them closer to the shed door so hopefully mom could come back for them. She did, and we were able to get her carrying the last one out on our webcam. It's kind of a cool video. I have seen Mom outside quite a few times since, as well as some new bits of dead animals and piles of feathers so I'd say she's doing fine.

Anyway I was able to finish reinstalling the rudder gudgeon and auto-bailer, the last leak points that needed to be fixed. The homemade filler sanded nicely and did the trick as it's now nice and rigid there so hopefully no more issues with the bolts through the transom. I used a product called 3m 5200 to install and seal these fittings. This stuff is miserable to work with. If you've ever mixed up cornstarch and water in science class, that's the consistency of 5200. It's thick, but as soon as you put it somewhere it slowly runs down. It's extremely tacky and takes forever (5-7 days) to cure. It does have a very strong bond and maintains some flexibility once cured, so it's a good product for fittings below the water line that won't need to be removed for a very long time. Messes aside I was able to get it all on there and it did cure out. I also used some fender washers instead of the tiny original ones for the inside of the transom.

IMG-5075.jpg
IMG-5076.jpg


After the 5200 cured out I filled up the bilge with water, and observed no leaks through the repaired areas of the hull or anywhere else. Depending on weather and some other commitments I hope to be able to try sailing it this Friday afternoon. Fingers crossed!
 

bilbo

Well-Known Member
Joined
Oct 29, 2016
Messages
791
Reaction score
922
Points
93
Location
South Florida
Vehicle Year
1983
Make / Model
Ford
Engine Type
2.3 (4 Cylinder)
Engine Size
2.3L
Transmission
Manual
2WD / 4WD
2WD
Total Lift
0
Total Drop
0
My Son and I washed the boat up and went for a sail on Lake Okeechobee yesterday evening. Everything worked well. No leaks, at least no worse than before. DS IIs have a common problem with leaks through the centerboard trunk into the bilge and I think that's what is happening with mine. It ends up being about a cup every couple of hours so nothing big. We bought a small outboard for it a couple of years ago but I've never used it until now. It's not really needed for sailing the lakes up North, but there's a long channel to access the open part of the Lake O as most of it is more like a swamp in my area and the motor proved its worth.


It felt good to have it back on the water. I also got to try out a bunch of the new rigging I did a couple winters ago, and also found that I've lost most of my routine. I kept noticing things as we went, like not tying and pulling down the boom. You can see the line dangling down in the photo. I also used the wrong sheet for the jib at first and felt pretty dumb. Still, not too bad for a first go. It was our first time on that part of the lake and we saw all sorts of birds, some were having good luck fishing!

IMG-5084.jpg


The Okeechobee waterway is a system of rivers, locks, and canals that runs through Lake O and shortcuts across the FL peninsula. We saw this tugboat heading East while we were sailing and it's common to see large boats on the lake doing the crossing. When there are hurricanes I guess some people use it to escape the storm. Normally the locks are open certain hours, but in that case they go 24/7.

IMG-5085.jpg


We also found a stowaway. This little guy was hanging out inside the centerboard trunk and he crawled out when I hauled in the control line, then hopped onto our anchor bucket.

IMG-5093.jpg
 

Attachments


Sponsored Ad


Sponsored Ad

Staff online

Members online

Member & Vendor Upgrades

For a small yearly donation, you can support this forum and receive a 'Supporting Member' banner, or become a 'Supporting Vendor' and promote your products here. Click the banner to find out how.

Latest posts

Truck of The Month


Shran
April Truck of The Month

Recently Featured

Want to see your truck here? Share your photos and details in the forum.

Follow TRS On Instagram

TRS Events

25th Anniversary Sponsors

Check Out The TRS Store


Sponsored Ad


Sponsored Ad

Sponsored Ad


Amazon Deals

Top