• Welcome Visitor! Please take a few seconds and Register for our forum. Even if you don't want to post, you can still 'Like' and react to posts.

1976 O'Day Daysailer II Sailboat


bilbo

Well-Known Member
Joined
Oct 29, 2016
Messages
791
Reaction score
922
Points
93
Location
South Florida
Vehicle Year
1983
Make / Model
Ford
Engine Type
2.3 (4 Cylinder)
Engine Size
2.3L
Transmission
Manual
2WD / 4WD
2WD
Total Lift
0
Total Drop
0
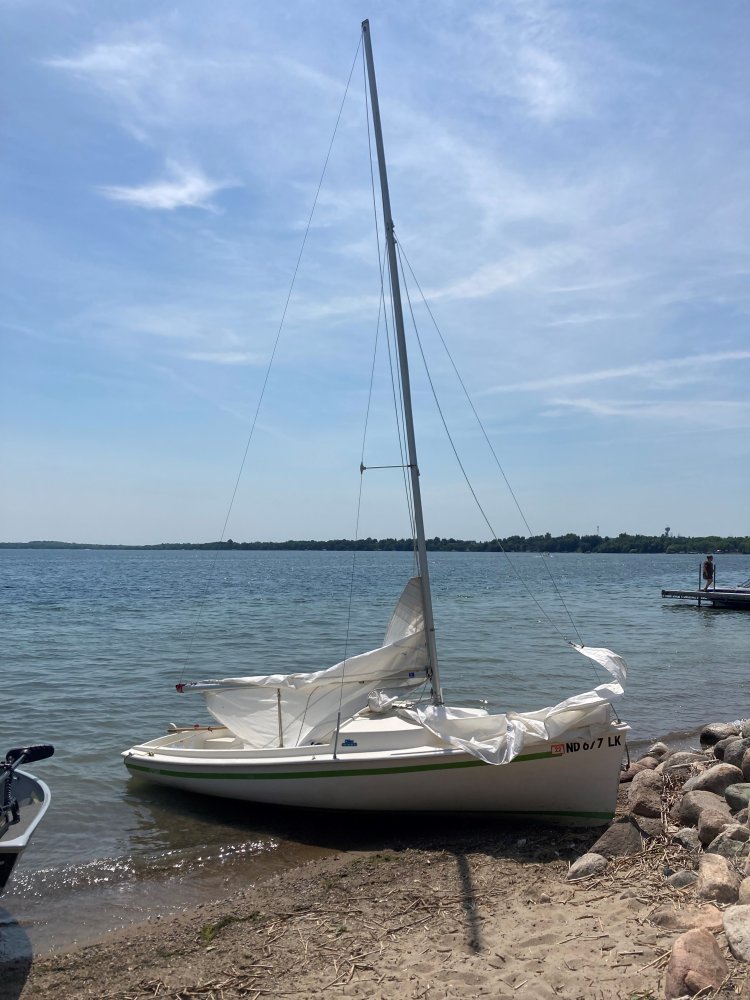
A boat counts as "other vehicles" right? A few years ago we bought an O'Day Daysailer II sailboat. It's ~17ft. long and uses a sloop rig, so one mainsail and one jib. The hull was originally designed by an Englishman in the 50's and has a small cuddy cabin that apparently can be slept in. The designers must have been a good bit shorter than me and enjoy donating blood to mosquitoes more than I do. Mine is the 2nd iteration (hence the "II") and thus has an FRP floor and seating, and a different cuddy than the original. These boats have a bit of a cult following and many race them. I knew none of that when I bought it, just wanted something to goof around in with my kids. There is also a DSIII but apparently it's not legal for racing. Here's our DSII, the Dingy Dinghy:

DSII.jpg


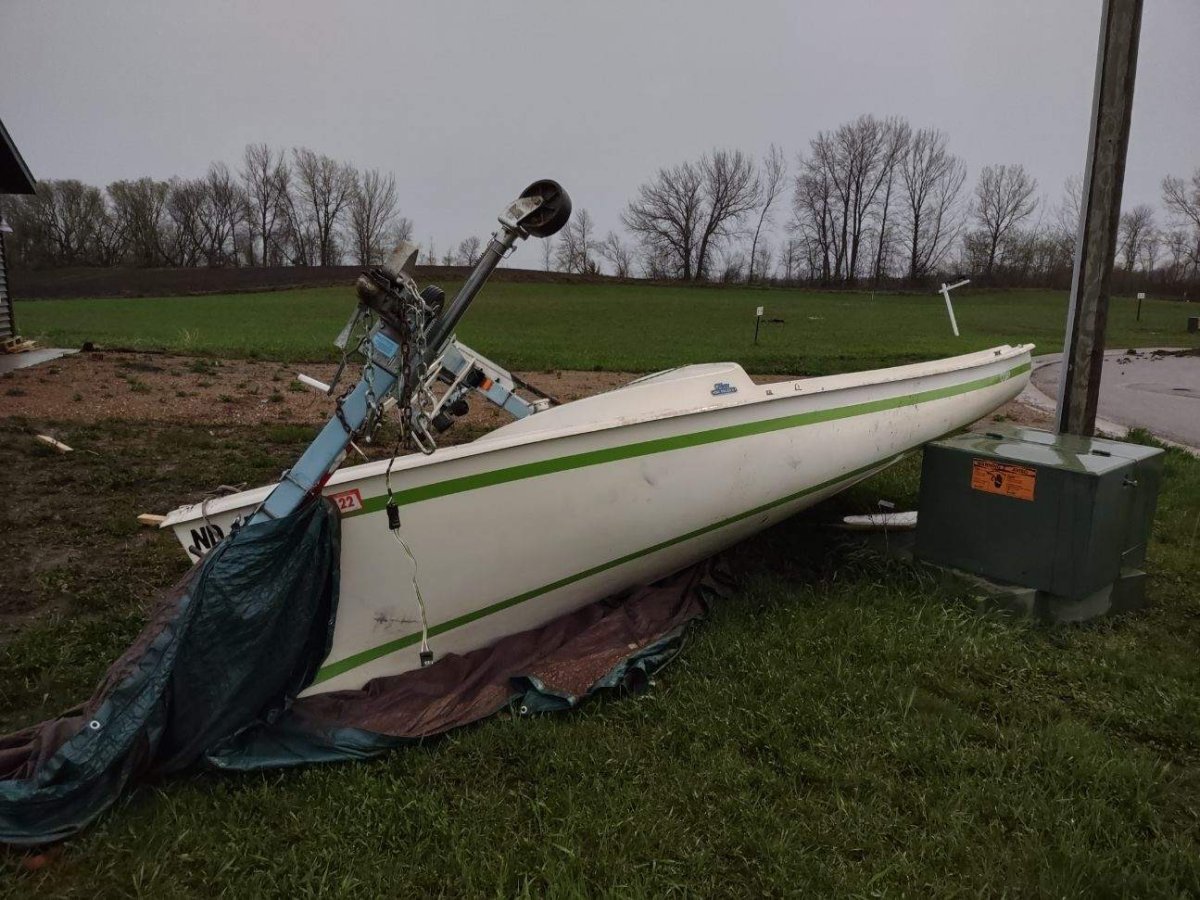
We usually kept the boat at my Dad's house in MN lakes country. There are far more sailing opportunities there than Eastern ND lol. Early May 2022 a nasty storm went through my Dad's place and either a very small tornado or microburst happened. The house and shop had minor damage like missing shingles and messed up soffit vents but otherwise OK. The boat/trailer was picked up by the wind and barrel rolled, separating during the brief flight, and landing about 20ft. off the driveway it was parked in on top of an electrical box. It hit hard enough to push the box off its base a little bit.

IMG-5034.JPG
IMG-5035.JPG


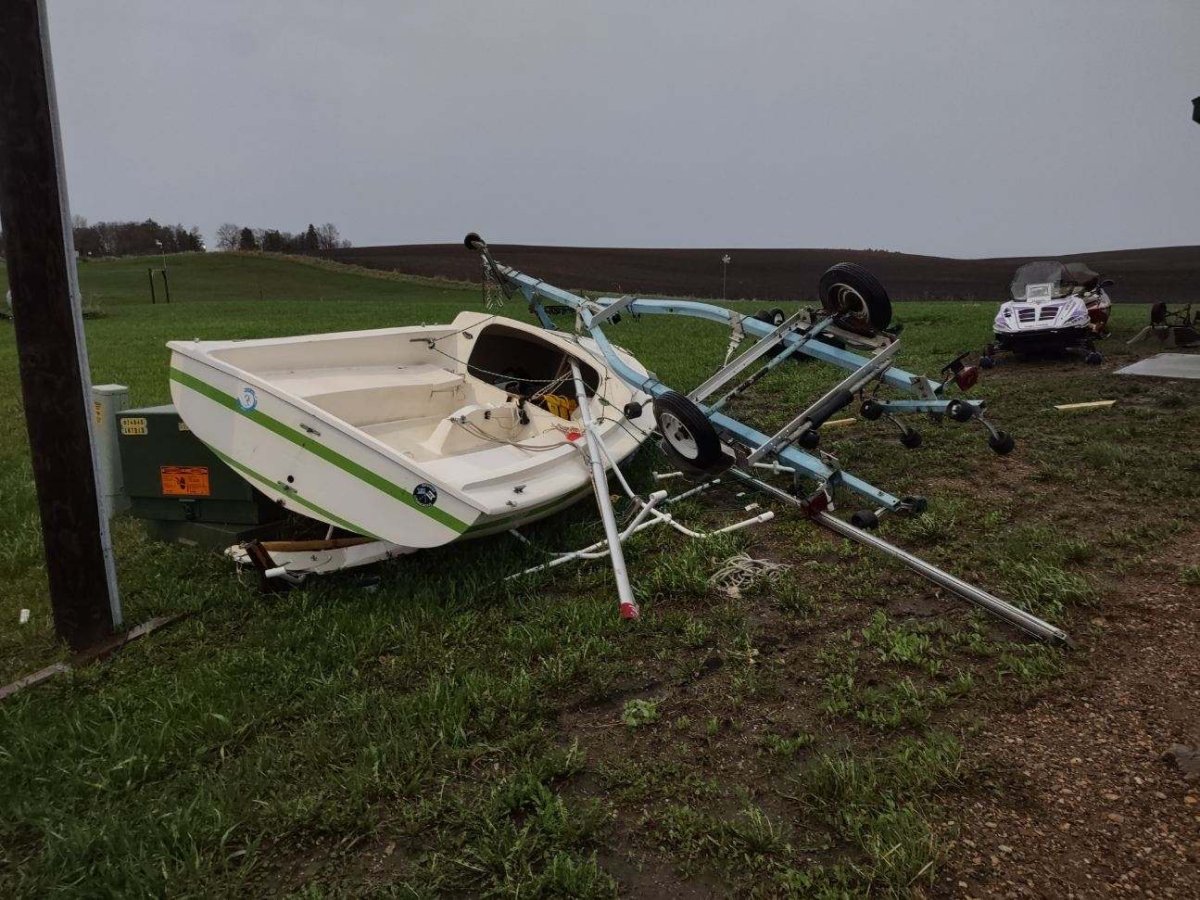
Dad waited for the electric company to come out to help move the boat. We weren't sure whether anything was torn loose inside the pull box, and didn't want anyone getting zapped. The box was fine and they were able to move the boat and get it realigned, then I was able to start looking the boat over. Daysailers are known to be overbuilt, but I was surprised how little damage it had sustained. All I could see was the bow eye was ripped off (it was about gone and due for replacement before this happened), some gelcoat dings from the trailer, and some gouged up gelcoat on the bottom from the pull box. The tall post on the trailer that holds the mast while traveling was bent, but easily straightened. We were able to load the boat on the trailer, and then it sat most of the summer while we figured out our move to FL.

I fixed all of the cosmetic damage to the boat, but don't have any pictures of it unfortunately. They were just small gelcoat dings that I filled in with MarineTex epoxy. I was going to take the boat out for a sail, but then thought just to be safe I'd fill the bilge with water and see if there were any leaks from hitting the electrical box. I'm glad I did:

IMG-4655.jpg
IMG-4657 (2).jpg


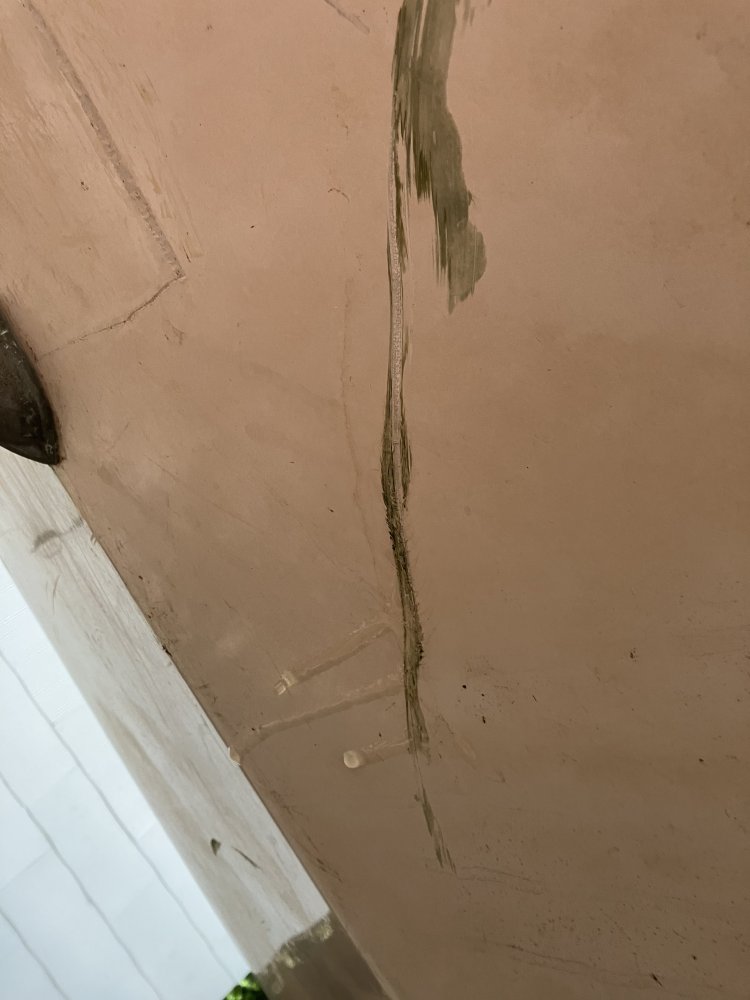
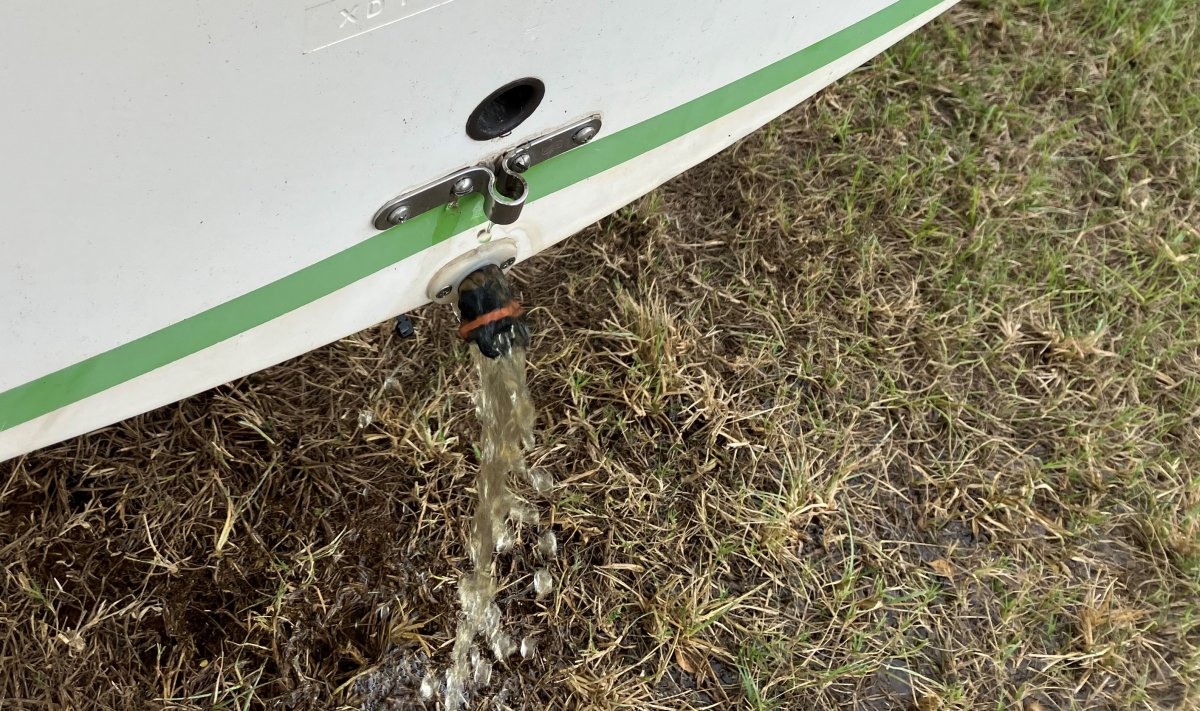
There were two especially nasty gouges on the bottom of the hull that were leaking, as well as the lower gudgeon for the rudder. While on the trailer, a mast crutch goes in the gudgeons to hold up the mast while trailering. The other end of the mast sits on a tall post at the front of the trailer. The mast crutch was broken in two, so I'm guessing that's when the gudgeon was damaged too. Shortly after this, we had to move into the new house we bought and the boat again sat for a while during our move-in, the holidays, people getting sick with Covid, and visiting family until I've finally been able to address the damage now. Aside from being perpetually itchy, the glass work is kind of fun. I'll update shortly with some more progress.


bilbo

Well-Known Member
Joined
Oct 29, 2016
Messages
791
Reaction score
922
Points
93
Location
South Florida
Vehicle Year
1983
Make / Model
Ford
Engine Type
2.3 (4 Cylinder)
Engine Size
2.3L
Transmission
Manual
2WD / 4WD
2WD
Total Lift
0
Total Drop
0
I needed to get to the bottom of the hull, so I rigged and launched the boat in my yard. Then I used the lines attached to the mast (halyard) to careen the boat over on its side. With this little boat it's very easy to do, and a stake with some line keeps the mast on the ground and the boat on its side. Careening is how they used to do maintenance and repairs under the waterline on large ships. They would sail it in on high tide and anchor, and when the tide went out they would careen it over. I imagine it's much more difficult on a larger boat with ballast.

I don't have a great picture of the entire thing, but here's the smaller of the cracks before grinding:

IMG-4977.jpg


The process is basically remove material until you reach good laminate and repair. Good laminate is dark colored. Damaged laminate is whitish and opaque. These areas need to be completely removed. I ended up finding two main areas of damaged glass.

IMG-4978.jpg
IMG-4976.jpg


There is a stringer on the other side of the hull between the two damaged areas on the right. Being at the center of the hull, the layup is very thick here, probably a good 1/4". I'm sure all the resin pools there too when they laid it up in the mold at the factory. Contrast that with the crack near the stern, it's only maybe 1/8" there.

The best way to repair something like this, especially below the waterline, would be to add a patch on both sides of the hull. Due to the way the DSII is constructed access to the backside of the hull is not straightforward. It would require cutting out the seat/deck behind the areas that need repair to provide access, and then another patch to the deck. Since the DSII is a small boat and fairly stout, I decided to repair it from the outside. If I were crossing oceans in this thing it would be different but it should work just fine for what this boat is used for.
 

bilbo

Well-Known Member
Joined
Oct 29, 2016
Messages
791
Reaction score
922
Points
93
Location
South Florida
Vehicle Year
1983
Make / Model
Ford
Engine Type
2.3 (4 Cylinder)
Engine Size
2.3L
Transmission
Manual
2WD / 4WD
2WD
Total Lift
0
Total Drop
0
Since the damage is long and skinny, I probably could have just finished grinding out the damage, laid the patch on the outside, and been done. Instead I decided to open up the cracks a bit more and put a backing plate in. It's not the full two-sided approach, but belt and maybe one suspender. I used a regular cut-off wheel made for metal. Up to this point, I had basically been grinding away gelcoat. While smelly, it's not as nasty as glass dust. Definitely a respirator and goggles are a minimum. A Tyvek suit would be ideal, but I don't think I'd make it in the South FL heat and humidity, so I wore old long sleeve shirts and overalls. The dust and tiny fibers found their way everywhere. I ended up washing the grass to get the glass/resin dust worked down so it didn't kick up when anyone walked through the yard. Here's the grinding part-way through. You can see part of the stringer on the left. The white piece to the right is a chunk of foam that is supposed to be for flotation in the event of a capsize. They just threw random chunks of polystyrene foam in the bilge and a compartment in the bow. Nowadays I think they use two-part expanding foam.

IMG-4979.jpg


The basic process for the patch is to bevel back the area around the damage and lay in cloth to build it back to the proper thickness. The bevel needs to be a minimum of 12:1 to the thickness of the layup. More doesn't hurt. So for a 0.25" thick layup you need to grind back 3" out on all sides of the damage. I used an angle grinder with a 36grit flap disc for the bulk grinding. I found that to be super effective for removing the laminate and getting the bulk of the bevel done. The slots are just big enough for me to get my fingers and some sandpaper inside the hull to rough it up. Once that was done I fished my backing plates in and "glued" them in place with thickened epoxy. I had laid these up earlier and experimented with different numbers of layers of FG cloth to get them as stiff as possible while still allowing them to conform to the hull shape somewhat. It ended up being unintentionally patriotic:

IMG-4996.jpg


The zip ties did a decent job getting the plate up against the hull, but there were some areas that didn't pull all the way in. Mostly on the ends. Once the epoxy cured, I made some more thickened epoxy to "fair" out those areas. Ideally, you want an even, shallow concave shape to the repair area. Otherwise, the cloth can bunch and/or air can be trapped easier in the layup. Both are bad. Unfortunately I didn't get any pictures of just that process, but you can see it in the photo below. The white and tan colored areas are the thickened epoxy. I don't know if this is absolutely necessary, maybe it is even detrimental, but it made sense to me so I just went with it. Plus I was kind of bored at the time and needed something to do while waiting for my FG cloth to arrive for the main repairs.

IMG-5020.jpg
 

bilbo

Well-Known Member
Joined
Oct 29, 2016
Messages
791
Reaction score
922
Points
93
Location
South Florida
Vehicle Year
1983
Make / Model
Ford
Engine Type
2.3 (4 Cylinder)
Engine Size
2.3L
Transmission
Manual
2WD / 4WD
2WD
Total Lift
0
Total Drop
0
To make the patch blend with the beveled edges, you cut multiple layers of FG cloth to build thickness starting with one the size of the entire bare layup area and cutting each successive one smaller than the last. There are two schools of thought on how these should be laid up. Some believe the largest piece goes first and others believe the smallest goes first. On this boat it's probably not that important, but I chose largest first due to that being recommended by resin manufacturers. I chose to start with the patch by the stern, the thinnest area.

The number of layers needed is based on the thickness off the cloth or mat used. I used 17oz. biaxial glass, meaning two layers of straight fibers at +/- 45 degrees. Each layer of plain 17oz. is approximately 0.030 thick, so to make 1/8" I needed 5 layers with an expected finished thickness of 0.15. The excess ends up being sanded/ground off.

Now it's time to choose resin. Although the boat is made from polyester, I decided to use epoxy because it's straightforward to mix and use and has excellent mechanical bonding capability. The mechanical bond is important especially since these repairs are below the water line on a fully cured surface. Polyester doesn't offer the strong mechanical bond and is more finicky about mixing. It uses a catalyst (Methyl Ethyl Ketone Peroxide) that kick-starts the crosslinking process that turns it into a solid. Too much catalyst and you will harden too quickly or start a fire in your mixing cup. Too little and it will not cure out. Epoxy works differently, with the hardener being a component in the cross-linked polymer chains. The problem with epoxy isn't UV stable so it must be coated with something and it's not officially compatible with gelcoat, which is polyester-based. Anecdotally it appears gelcoat can bond to epoxy that has been mixed, cured, and prepared correctly, so that's what I intend to do.

Back when I was in school I got to mess with composites a bit, so I'm somewhat familiar with the process. However, that was in a lab with ideal conditions and we had infusion systems, etc. This was completely different and I ended up kind of learning as I went. It was a humbling experience. Working on an uneven, vertical, odd-shaped surface in the elements is 100x more difficult and I immediately had issues. First, I wetted out each layer of glass on the bench and "stuck" them to the hull one after the other. The resin and patches started to slide downward and moving them back up was like pushing a rope. Second, with the top patch being long and skinny the biax wanted to disintegrate while I was trying to roll air bubbles out. Third, the hull was warm from the sun, which accelerated the epoxy cure and it became impossible to move the patch around. It ended up looking like dog sh!t.

IMG-5011.jpg


To add to the issues, I got ahead of myself and started the layup before I'd fully prepped the area. I had to put tape and plastic on quickly and did the best I could, but there were now epoxy runs all over the hull that needed to be removed later. The dew that collected on the boat overnight also blushed the epoxy. I talked to TotalBoat (resin mfg.) and they said as long as it hardened the repair would be fine, and thankfully it did harden. Also the top of the repair is a little resin starved. I considered grinding this out and redoing it but decided to let it ride as most of the patch is in position and wetted, and it was thicker than needed initially. Since I was working alone and had epoxy everywhere I didn't get any photos during the layup process unfortunately.

I made some changes for the second repair. First, I made sure I had everything taped off before starting the layup. I also laid up all the layers of the patch on the bench and transferred it to the hull as one piece, and added a layer of thin straight weave glass over the top of the whole patch. This added very little thickness, but held everything together during positioning and rolling out the air bubbles. 100x easier this way. I also put some plastic film over the area before it cured so it would keep the humid air and condensation away from the resin. This repair looked a lot better. It's about perfect on top but pretty resin-rich at the bottom though. I'm not sure how much control I have over that though.

IMG-5014.jpg


I laid the third repair up on a Saturday, so I was able to do it early enough I knew it would be fully cured before any danger of humidity and dew. This time I added some lines on each layer to help keep the layers of the patch aligned during layup, and tried to roll excess resin down to end up with a more even laminate. I went a little too far and the top got very slightly resin starved, but since this will be sanded off I wasn't worried.

IMG-5022.jpg


At this point, there are no longer any unintended holes in the bottom of the boat. Next step: Sand, sand, grind, and more sanding!
 

sgtsandman

Aircraft Fuel Tank Diver
TRS Forum Moderator
U.S. Military - Active
TRS 20th Anniversary
TRS Event Participant
Ham Radio Operator
GMRS Radio License
Joined
Mar 11, 2017
Messages
12,861
Reaction score
12,651
Points
113
Location
Aliquippa, PA
Vehicle Year
2011/2019
Make / Model
Ranger XLT/FX4
Engine Size
4.0 SOHC/2.3 Ecoboost
2WD / 4WD
4WD
Total Lift
Pre-2008 lift/Stock
Tire Size
31X10.5R15/265/65R17
While apples to oranges, when the fabrication shop does a repair on the skin of our aircraft, they do a “pyramid” patch with the biggest patch first then the smaller one(s) on top. This is aluminum skin instead of fiberglass. So, the reasons why may be different.
 

bilbo

Well-Known Member
Joined
Oct 29, 2016
Messages
791
Reaction score
922
Points
93
Location
South Florida
Vehicle Year
1983
Make / Model
Ford
Engine Type
2.3 (4 Cylinder)
Engine Size
2.3L
Transmission
Manual
2WD / 4WD
2WD
Total Lift
0
Total Drop
0
While apples to oranges, when the fabrication shop does a repair on the skin of our aircraft, they do a “pyramid” patch with the biggest patch first then the smaller one(s) on top. This is aluminum skin instead of fiberglass. So, the reasons why may be different.
I had heard that the aerospace industry repairs composites big patch first as well. What I read is that the big patch first allows full contact between the new laminate and old for the mechanical bond. The rest of the new laminate is essentially one homogeneous piece because it is chemically bonded. Small patch first results in little resin rich areas where each layer ends, and since the resin has poor mechanical properties you end up with kind of a broken up mechanical bond.

I never thought of a similar method being used with thin aluminum. Is the repair process similar with the bevel and whatnot? Are the repairs welded in?
 

sgtsandman

Aircraft Fuel Tank Diver
TRS Forum Moderator
U.S. Military - Active
TRS 20th Anniversary
TRS Event Participant
Ham Radio Operator
GMRS Radio License
Joined
Mar 11, 2017
Messages
12,861
Reaction score
12,651
Points
113
Location
Aliquippa, PA
Vehicle Year
2011/2019
Make / Model
Ranger XLT/FX4
Engine Size
4.0 SOHC/2.3 Ecoboost
2WD / 4WD
4WD
Total Lift
Pre-2008 lift/Stock
Tire Size
31X10.5R15/265/65R17
I had heard that the aerospace industry repairs composites big patch first as well. What I read is that the big patch first allows full contact between the new laminate and old for the mechanical bond. The rest of the new laminate is essentially one homogeneous piece because it is chemically bonded. Small patch first results in little resin rich areas where each layer ends, and since the resin has poor mechanical properties you end up with kind of a broken up mechanical bond.

I never thought of a similar method being used with thin aluminum. Is the repair process similar with the bevel and whatnot? Are the repairs welded in?
It depends on the repair and what the engineer calls for. Sometimes the skin is cut out and a filler piece is put back in with the pyramid patch on top. Other times, the patch is just placed on top.

The edges get beveled. The layers are sealed with a corrosion preventative sealant, some what like RTV. The rivets that get shot depend on the area and whether it is a critical air flow region or not.

If it isn’t critical, button heads are installed. If it is critical, rivets with a tapered head are flush fitted.

Fuselage skin thickness depends on the size of the plane and location. I think most of it is .060”. The seams between skin sections are over lapping like a boiler. But these are planes that were built in the late 1950s and early 1960s. Newer aircraft could be built differently.
 

dvdswan

Well-Known Member
U.S. Military - Veteran
Joined
Feb 11, 2021
Messages
2,835
Reaction score
2,904
Points
113
Location
Seattle, WA
Vehicle Year
1991
Make / Model
Ranger XLT 2WD
Engine Type
3.0 V6
Transmission
Automatic
2WD / 4WD
2WD
My credo
Keep your mind like an umbrella, it only works if its open... Continually learning.
Patriotic zip ties...

Looks like the patch work will be fine. Awesome job and pics.
 

bilbo

Well-Known Member
Joined
Oct 29, 2016
Messages
791
Reaction score
922
Points
93
Location
South Florida
Vehicle Year
1983
Make / Model
Ford
Engine Type
2.3 (4 Cylinder)
Engine Size
2.3L
Transmission
Manual
2WD / 4WD
2WD
Total Lift
0
Total Drop
0
It depends on the repair and what the engineer calls for. Sometimes the skin is cut out and a filler piece is put back in with the pyramid patch on top. Other times, the patch is just placed on top.

The edges get beveled. The layers are sealed with a corrosion preventative sealant, some what like RTV. The rivets that get shot depend on the area and whether it is a critical air flow region or not.

If it isn’t critical, button heads are installed. If it is critical, rivets with a tapered head are flush fitted.

Fuselage skin thickness depends on the size of the plane and location. I think most of it is .060”. The seams between skin sections are over lapping like a boiler. But these are planes that were built in the late 1950s and early 1960s. Newer aircraft could be built differently.
Thanks for the explanation! Riveting makes more sense. I suppose not much is welded on aircraft, and I'm guessing cosmetics of the repair aren't a huge concern.
 

bilbo

Well-Known Member
Joined
Oct 29, 2016
Messages
791
Reaction score
922
Points
93
Location
South Florida
Vehicle Year
1983
Make / Model
Ford
Engine Type
2.3 (4 Cylinder)
Engine Size
2.3L
Transmission
Manual
2WD / 4WD
2WD
Total Lift
0
Total Drop
0
My grinder, RO sander, and I had a hot date and got most of the repairs sanded down where they need to be. There was a lot of grinding and sanding, especially at the bottoms of each repair. If I could do this over I would try harder to get the boat completely upside down. That would have made it easier to do the layup and squeeze out the excess resin. I brushed on some plain epoxy to protect the areas from moisture while I figure out the gelcoat. You can see I still have more sanding to do below the area on the right. That's where epoxy ran down because I rushed and didn't have the area taped off. Oh well who doesn't like sanding?

sanded repairs.jpg


In the meantime I've been working on getting the gelcoat right. I bought a quart and some tint, so hopefully I can get the color close. Getting things to look nice is always the hardest part for me, and it's really not that important with this being on the bottom of the boat, but I'd like to match it as best as I can. If I ever capsize I want it to look good! Gelcoat is polyester based, so it uses a catalyst to kick off the crosslinking reaction vs. a hardener like epoxy. It's also fickle, especially when using small amounts like I am and the catalyst requirement is less than half a CC. The right amount of catalyst is crucial and changes depending on conditions, especially temperature. Some of my first test patches didn't cure at all, or cured in random spots but not elsewhere. I bought some small syringes from Tractor Supply to measure the catalyst for my second batch, since counting drops is kind of sloppy. I mixed that batch at 1.75% catalyst and it cured consistently, but I only had about 4 minutes of pot life before it went from pudding to a hard rubberlike glob over a span of about 30 seconds. I'm going to try a batch at 1.5% and see how that works.
 

sgtsandman

Aircraft Fuel Tank Diver
TRS Forum Moderator
U.S. Military - Active
TRS 20th Anniversary
TRS Event Participant
Ham Radio Operator
GMRS Radio License
Joined
Mar 11, 2017
Messages
12,861
Reaction score
12,651
Points
113
Location
Aliquippa, PA
Vehicle Year
2011/2019
Make / Model
Ranger XLT/FX4
Engine Size
4.0 SOHC/2.3 Ecoboost
2WD / 4WD
4WD
Total Lift
Pre-2008 lift/Stock
Tire Size
31X10.5R15/265/65R17
Thanks for the explanation! Riveting makes more sense. I suppose not much is welded on aircraft, and I'm guessing cosmetics of the repair aren't a huge concern.
On a military aircraft, not so much. A civilian airliner or private aircraft would be different.

Most aircraft are made of aluminum riveted to longerons, stringers, and bulk heads to make a monocoque frame. Some have some composite panels here and there to save weight. Like control surfaces, flaps, the nose cone, and so on.

A few made entirely of composites but that is not a common thing. Most of those are the fancier turbo props and some private jets.
 

bilbo

Well-Known Member
Joined
Oct 29, 2016
Messages
791
Reaction score
922
Points
93
Location
South Florida
Vehicle Year
1983
Make / Model
Ford
Engine Type
2.3 (4 Cylinder)
Engine Size
2.3L
Transmission
Manual
2WD / 4WD
2WD
Total Lift
0
Total Drop
0
I think it's becoming more and more common. But it's hard to beat the economy of the proven aluminum design. There was a place in Grand Forks that built small airplanes that were FRP composite. I can't remember the name of it but their big thing was a parachute that would gently lower the entire plane back to earth should anything go completely sideways. We toured it when I was in engineering school. This was during the recession in 2008 or so and nobody was buying toys like airplanes. It was depressing, most of their facility was empty. They even closed off their lobby and shut off most of the lights to save cost.
 

Josh B

Well-Known Member
Supporting Member
TRS 20th Anniversary
Joined
Aug 15, 2019
Messages
4,005
Reaction score
1,986
Points
113
Location
Oklahoma
Vehicle Year
1993
Make / Model
Ford Ranger
Engine Type
4.0 V6
Transmission
Manual
2WD / 4WD
4WD
Cool thread Bilbo. My father was by all appearances a simple carpenter, who spent the final 20 years or so of his working days simply building houses, but I came to know him as much more that that.

He loved to hunt and fish. In the 60's he had a cabinet shop and built custom cabinets, along with other odd things, such as a 16 foot plywood/fiberglass boat. It had storage under all the seats, but the middle compartment was actually a live-well, when it was in the water, remove the plug, and it takes in water equal to the lake or river level.

That thing was heavy as hek also, but a hek of a cool boat. I watched him put many a patch on that boat, or maybe it was like painting a car every year
 

bilbo

Well-Known Member
Joined
Oct 29, 2016
Messages
791
Reaction score
922
Points
93
Location
South Florida
Vehicle Year
1983
Make / Model
Ford
Engine Type
2.3 (4 Cylinder)
Engine Size
2.3L
Transmission
Manual
2WD / 4WD
2WD
Total Lift
0
Total Drop
0
Cool thread Bilbo. My father was by all appearances a simple carpenter, who spent the final 20 years or so of his working days simply building houses, but I came to know him as much more that that.

He loved to hunt and fish. In the 60's he had a cabinet shop and built custom cabinets, along with other odd things, such as a 16 foot plywood/fiberglass boat. It had storage under all the seats, but the middle compartment was actually a live-well, when it was in the water, remove the plug, and it takes in water equal to the lake or river level.

That thing was heavy as hek also, but a hek of a cool boat. I watched him put many a patch on that boat, or maybe it was like painting a car every year
That is cool Josh B, and good idea for the livewell. One of the neat things about fiberglass boats is they're basically forever repairable with basic tools in a backyard or boatyard.

I've found a few plans for boats and it looks like it would be fun to build one. I was reading about a boat called a Brockway skiff that was used in the NE US for fishing and stuff. Apparently the guy who designed and built them used plain old hardware store plywood, and while they didn't last long they were cheap enough to just replace when they wore out every few years. I think with the addition of a few layers of glass it would be durable and last a reasonably long time. The flat bottom and shallow draft would work well on our local swampy lake in good weather anyway.
 

Josh B

Well-Known Member
Supporting Member
TRS 20th Anniversary
Joined
Aug 15, 2019
Messages
4,005
Reaction score
1,986
Points
113
Location
Oklahoma
Vehicle Year
1993
Make / Model
Ford Ranger
Engine Type
4.0 V6
Transmission
Manual
2WD / 4WD
4WD
It also had oar locks on it, and he bought 7ft oars from montgomery wards, which I found in the barn when I first moved back, and are hanging on my wall to this day, balanced on another wall with a 6ft crosscut saw blade. That to me is art
 

Sponsored Ad


Sponsored Ad

Members online

Member & Vendor Upgrades

For a small yearly donation, you can support this forum and receive a 'Supporting Member' banner, or become a 'Supporting Vendor' and promote your products here. Click the banner to find out how.

Latest posts

Truck of The Month


Shran
April Truck of The Month

Recently Featured

Want to see your truck here? Share your photos and details in the forum.

Follow TRS On Instagram

TRS Events

25th Anniversary Sponsors

Check Out The TRS Store


Sponsored Ad


Sponsored Ad

Sponsored Ad


Amazon Deals

Top