
FX4 8.8-Inch Axle Swap for Ford Ranger (31-Spline Upgrade Guide)
This article documents a real-world swap of a factory FX4 Level II 8.8-inch rear axle into a Ford Ranger.
It covers why the FX4 axle is a desirable upgrade, what makes it different from standard Ranger 7.5 and 28-spline 8.8 axles, and the parts, challenges, and lessons learned during installation.
The FX4 Level II axle is a unique factory option featuring 31-spline axle shafts, larger brakes, and a Torsen gear-driven limited-slip differential. Because it comes from a Ranger platform, it bolts in with factory spring and shock locations, making it one of the cleanest heavy-duty rear axle upgrades available.
This guide is especially relevant for 1998–2011 Ford Ranger owners looking for increased strength, improved traction, and factory-level reliability without custom fabrication.
FX4 8.8 Axle Swap Overview
- Factory Ranger FX4 Level II 8.8-inch rear axle
- 31-spline axle shafts (stronger than standard Ranger axles)
- Larger drum brakes than the 7.5-inch rear
- Direct bolt-in suspension and brake line compatibility
- Comparison to Explorer 8.8 and Ranger 7.5 options
Who This Swap Is For
- Daily-driven Rangers needing better traction
- Snow, dirt road, and light off-road use
- Owners who want strength without lockers
- Rangers towing light trailers
By Frank T Austin
My adventure’s in upgrading to an 8.8” 31 spline Ranger rear
I have never been really happy with the wimpy little rear in my truck. While I don’t abuse it (too much) and I’m reasonably sure it probably would live a long trouble free lifespan. I have never liked the open diff inside and wanted at least a Traction-Loc for the winter snow and occasional, sometimes fast, dirt road foray. Leave it to Ford to not offer a Traction-Loc option with a 4 banger. Not to mention my having to tow my son’s Neon home about once a month for some kind of problem, usually electrical.
I even got a nice Traction-Loc for it but I could never manage to get enough free time to have it installed. I need my truck up and running all the time because my job is 24 hours a day, 7 days a week, 365 days a year. I have to carry 2 electronic leashes everywhere I go. It’s a royal pain, but like most people I live by the golden rule, “he who has the gold makes the rules”. Guess who doesn’t have the “gold.”
I have always envied the guys that have the time, talent, and tools to setup and install an Explorer rear in their trucks. They get all the benefits of bigger brakes, disks in some cases, 31 spline axles, and a much greater range of choices in differential types. It seems that everyone that makes a diff, makes one to fit the 31 spline 8.8”. The 28 spline model has nearly as many choices. Even if the 28 spline shafts themselves are exactly the same as those in the 7.5” rear. But for the lowly 7.5” your choices get a bit more restricted.
I have always thought that the ideal upgrade for my 01 2WD Ranger, would be to find a rear from a late model FX4 Level II Ranger. These rears are 8.8” with 31 spline axles, larger drum brakes, 10” X 2 ¼” verses my little 9” X 1 ¾”. Best of all they are equipped not with Ford’s tried and true, clutch based Traction-Loc, but a gear based Torsen LS diff. These are the among the best LS units on the market, especially for a vehicle who’s only serious exposure to off roading is an occasional dirt trail or Dave_R’s driveway. I just don’t have any real need or use for a locker.
The FX4 axle, being from a Ranger, also has the spring and shock mountings exactly where they should be, no cutting or welding required. It also shares the same hard brake lines every other Ranger has!
Well about 4 weeks ago I saw an 8.8” axle, without gears, for sale on e-bay. The starting price was only $50. I was curious and e-mailed the seller and found out that it was a 31 spline axle that had been removed from an FX4. That the guy selling it didn’t live very far from me (under 100 miles) was a definite plus, no shipping charges! With a starting price of only $50, I figured what the heck and put in a bid for it.
Well, I bit my nails waiting the three days for the end of the auction. When it ended I had been the only bidder! I immediately contacted the seller and made arrangements to pick it up the next day. I wanted to get hold of it before he figured out what the heck he had.
I spoke to the seller when I picked it up and found out that he was really a Dodge lover and had nearly a dozen different ones, in various stages of disassembly, around his house. I also found out that even though he worked in a large Ford dealer as a mechanic, he had no idea of the usefulness of this particular axle. When I asked why the axle had been taken out, he told me a tale of Ford having to recall a lot of the FX4’s. It seems that people were taking them off road and blowing up the Torsen diff’s. Imagine that people actually tried to drive their trucks off road, what a concept.
With that little tidbit of information in hand I did some research on the web and found an article about it. It stated that Ford had recalled a little over 1000 of them. And I guess in the usual corporate save a buck effort to save on the labor costs. They just swapped out the entire axle assembly, drum to drum. The one I got from him had, according to him, come from a 2002 truck that had never left the dealers lot before getting the rear replaced. I believed him, the brakes were brand new, heck the emergency brake cables were perfect and the drums still had the black factory paint on them!
While it was essentially a new rear there was a couple of things it needed before I could actually use it. First there were no gears or diff inside, he had removed the diff and gears. The original 4.10 gears were used for a friends truck and he just never bothered to put the Torsen diff back in. But he did give it to me. I think he just wanted to get rid of it. I wanted it to see if it really was a bad one. If it proved to be bad, I figured I could at least use the tone ring off it for whatever I replaced it with. Ford dealers want about $40 for the ring and they were the only source that I could find.
I e-mailed Zexel, the diff’s maker, with the “lot” number on the side of the unit and was told that it was indeed one of the “suspect” units. But they did say if I used it in a car or truck with an automatic transmission it would probably be OK. Probably OK? I didn’t like the sound of that and I have a standard and didn’t want to have to baby it all the time. So I started shopping around for a new LS unit and a set of gears.
I eventually chose to replace it with a Detroit Truetrac, another gear based LS as well as a new set of 3.73 gears. I also picked up a pair of wheel cylinders because the rear had been left outside for some time and the wheel cylinders had not been sealed off. Knowing the affinity of brake fluid for water I figured that they were probably junk at this point, and it would be well worth the replacement cost just for my own peace of mind.
So now I have all the parts to install the best rear Ford made for a Ranger into my truck, right, nope. I was intelligent enough to double check everything and found that the u-bolts and spring clamping plates on my truck would not be useable with the new axle. The stock 7.5” rear in my truck has tubes that measure 2 ¾” in diameter. The 8.8” rear I was installing has tubes that measure 3 ¼”. I needed to find a different set of plates and some new u-bolts.
Dave_R suggested a pair of F series truck plates, as God knows they made enough of them and the F-series trucks use the same size axle, just wider. So a quick trip to my local scrap yard yielded a pair of rusty, but serviceable plates. I then started on my search for u-bolts. Well that was fun, after looking through many of the local parts stores and getting nowhere someone suggested I try a local place that caters to the really big trucks.
I felt a little funny going into a place that caters to Kenworths and Macks looking for parts for the smallest Ford truck. But when I got there a nice gentleman behind the counter politely listened to my tale of all day bolt hunting and said “no problem, how many and what size do you need”. With that information in hand he promptly disappeared into the shop area saying, ‘I’ll be right back”. He returned less than ten minutes later with exactly what I had asked for, he had just made them for me.
Later I found that F-series trucks use a u-bolt that has a 9/16” diameter where the normal Ranger uses a ½” sized one. So the Ranger sized bolts I asked for, and got, are really a little small, but not unusable, for the plates. I plan on replacing them with the larger size ones as soon as I get a chance. I also forgot to include the size of the axle in my calculations so they also proved to be a bit shorter then I really wanted. They fit, but just barely.
It seems they don’t stock any particular size they just have the threaded bar stock on hand and bend them to order. Now I really did have all the parts I needed to install the rear, I hoped. I just needed some time where the office wouldn’t call and a little decent weather. The following Saturday turned out to be a very nice, clear, and relatively warm day. The office hadn’t called and the wife was away visiting her mother for the weekend. So I figured it was now or never I should have at least 3 or 4 hours free and jumped right into the job.
First order of business was to put something under the front wheels as my driveway has a noticeable slope to it. So once the rear wheels were off the ground it would immediately begin to try going down the driveway, whether it was on jack stands or not. A couple of handy 4 X 4’s I keep for that worked fine. I proceeded to get the truck as high as I could using my little floor jack, placing stanchions under the frame in front of the rear wheels. If your reading this Santa Claus, could you get me a bigger jack, please?
Next I put the floor jack under the rear to relieve the springs and shocks of the weight of the now hanging rear and started to disconnect things. Anyone know who the lunatic is who puts in the driveshaft flange bolts? The guy must be nuts, or a gorilla who doesn’t know his own strength, I couldn’t move them at all. Fortunately my 200+ pound 21 year old son showed up just then to see how things were going. I drafted him into service but it still took a breaker bar with a 3 foot piece of pipe on the end and all of him to crack them loose. That’s when I started praying the rest of the bolts wouldn’t be that tight. He quit after that going back to his job pumping gas around the corner. He thought what I was doing was too much like real work. Ungrateful pup, wait till the next time he needs a tow home.
All wasn’t lost however I had done some preplanning and had been spraying all the bolts I would have to remove everyday for three day’s with a little PB Blaster. So while the rest of them were tight they didn’t require an impact gun or a large kid with a pipe to get off. Good thing too, I couldn’t have finished the job otherwise.
I’m sure the wife would have been ticked off anyway if she had seen just how much work is involved. The only thing she had asked me was to make sure my son was there to help. It’s just her way of telling me she’s tired of having to use the visitors parking lot at the hospital after my three previous trips to their cardiac ward. Sometimes I have to count my blessings that she doesn’t understand what’s involved in anything under the paint. Heck it took her a while to realize my truck didn’t have two little brake pedals. (Just kidding sweetheart)
One thing I will tell you is to be sure you use the proper tools for the job. If you don’t have a tool you need, now is a good time to invest in them. Remember good tools are an investment not an expense. You especially want to have a good set of flare nut wrenches for the brake lines. Using the right, well made, tools will save you time, untold grief, and sometimes lots of Band-Aides. Not to mention needless additional expenses replacing parts that have been damaged or broken by using the wrong tool or a poorly made one.
After getting everything disconnected I started on the u-bolts. Be very careful when you get to this part. Once the u-bolts are off and you start to release the jack pressure holding the rear up against the spring. The axle will try to rotate nose (pinion) down and if your not ready for it, it will roll right off the jack. So watch your toes, fingers and anything else that might get in its way. The silly thing has no soft parts and is easily heavy enough to do serious damage. To whatever part of your anatomy it might try to land on or roll over.
At this point I had envisioned just sliding out the old axle, on the jack, and rolling the new one under on a set of spare tires I had stuck on it for the purpose. Well that might work if you have a big enough lift. But I didn’t and had to settle for getting the guy next door to steady it on the floor jack till I got it slid in sideways and raised into a position.
Here’s where I ran into a problem. The plates I had acquired, patiently cleaned up, and repainted, had pins in the center. The original plates have holes in the center to accommodate the nut on the top of the spring pack. I had missed that little detail and began to wonder if I had the right plates. Or was I just ignorant of something different about the F-series truck springs.
No matter I dug out my trusty angle grinder and proceeded to cut down the offending pin. I wasn’t about to reinstall the old rear after all this work. When I had ground it down to the level of the plate I could see a seam all around it and thought, hey this is a pressed in pin. It looks a lot like a wheel stud. So I tried to beat the rest of it out with a hammer and drift, no joy. I think they welded it in at the top. Now I’m getting a little annoyed. A silly ¼” pin in two plates is holding up my whole parade. My frustration index demanded I do something and do it now, so I dragged out the heavy artillery, “Smokey The Blue Tip Wrench”.
Well it took “Smokey” less than 5 minutes to not only remove the pins, but enlarge the pins holes to where they fit over the spring nuts just fine. My nice primer and paint did suffer some in the process, but we all have to make sacrifices, don’t we?
After that I used the floor jack to raise one side to loosely install the u-bolts then I did the other side. Here it gets a little interesting, you need to use the jack to raise the nose of the axle so you can align the spring pins with the mountings on the axle and tighten the bolts. It isn’t really hard to do its just the silly thing weighs a ton and doesn’t want to move much with the jack under it. If you put a piece of wood or a flat piece of steel on the top of the jack it will make wiggling the axle around to align it a little easier. Once you get everything lined up tighten the u-bolts up.
Now its time to reinstall the shocks, you may need to use the jack to raise the axle a little as the shocks (stock length) don’t reach as far as the axle hangs. Remember to route the passenger side e-brake cable behind the shock on that side and through the holder on the front part of the brake line splitter block before you bolt the block down.
Also make sure you hook the hard brake lines into their holders. Those sheet metal bits stuck on the back side of the axle tubes. There should be one on each side just for that. If not you can use a hose clamp and some electrical tape. Use a few wraps of the tape to pad the line a little and clamp it to the side of the tube with the hose clamp. An old piece of fuel or vacuum line split lengthwise slipped over the line will also work well for this. The clamp only needs to be tight.
Don’t overlook them they really are needed to help prevent the line from vibrating as this will eventually lead to fatigue cracking of the line. Just make sure whatever method you use you don’t crush the line itself. Not to mention the odd branch that will, they always do, find their way in there and bend or break them on you. Once that’s taken care of route the passengers side e-brake cable through the hole in the drivers side frame rail making sure that it doesn’t interfere with the ABS wires, the flexible brake line or the vent tube. Hook the cables together and to the connector from the pedal assembly.
If you haven’t done so already, hook up the driveshaft using some Lock-Tite on the bolt threads. Next check that you have the vent tube installed, and it is routed so it will not interfere with or be interfered with by anything else under there.
The last thing is to fill the axle with lube. I deliberately left out the ABS sensor so I could fill it through that hole. Putting lube in through the normal fill hole is a pain with the gas tank right there but there is plenty of room above the axle with it hanging. If you do it this way, just make sure you leave out the normal fill plug, so you don’t accidentally over fill it.
The Truetrac diff I installed doesn’t use a friction modifier, so I didn’t add any. But if you have installed a Traction-Loc or similar clutch based unit, be sure to include whatever friction modifier the manufacturer specifies when you fill it up. I would suggest putting it in first or after the first bottle so you can be sure it doesn’t drool out the fill plug. After filling it up I installed the fill plug and turned the axle by hand for a few revolutions to make sure that the lube gets into all parts of the diff and doesn’t leave air pockets. I then rechecked the lube level and finished by reinstalling the fill plug and the ABS sensor.
Now with everything in place and bolted tight it’s time to double check your work. I can’t overemphasize how important this is, it’s one of those times where patience and attendance to detail should never be considered unnecessary or a luxury. Never assume you did a good job getting everything in properly. You need to think of it as if it were a commandment. Take your time and have someone do it with you if you can. It often happens that you will overlook the same thing repeatedly. But different people miss different things. So, between the two of you, you shouldn’t miss anything.
Remember it’s going to be you or someone you care for, who else would you let drive your baby? That’s going to be zipping down the road at 60mph. Would you like any of those parts coming loose at that kind of speed? I know I wouldn’t. So do it slowly and carefully, start at one side and work your way across to the other. Take a two-minute break to pick up the garbage, put things away and then go back over it the other way. Last thing is to bleed the brakes and check the e-brake for function.
If you have done everything properly and taken the proper amount of care with your checks, you and your rear should have a long event free life. Unless you break something in the woods, but if that does happen at least you’ll know it won’t be because you got a minor case of the stupids and forgot something simple. Besides whom wants to have you’re wheeling buddies standing around your injured truck when one of them points at something under there and saying, “looks like you forgot something”. How embarrassing would that be?
If you have new gears or diff inside be sure to follow the manufacturer’s instructions during the break in period. A general “rule of thumb” for new gears is to leave the rear up in the air and let the truck idle in 2nd or 3rd gear for about 15 min. Let the rear cool off completely and do it again. After that put it down on the ground and drive it down the block slowly to double check the brakes. If everything seems OK, you can continue on for about 15 miles. Don’t go too fast, 30 to 40 mph is about all you want to go. Again, let it cool off and do the same thing again. Once you have about 50 or 60 miles on it that way try a longer faster run, say about 30 to 50 miles at 50 to 60mph. after two or three trips like that it should be OK to just go and have fun.
Personally, I would recommend that after you have driven it for two or three hundred miles. It’s time to jack it up change the oil and go over everything again. Newly installed nuts and bolts are prone to working loose after a couple of days’ worth of vibrations. So do the entire side to side check again, twice. You might be surprised at what you find, I know I was.
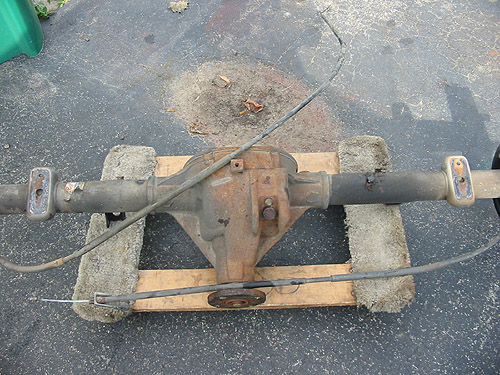
My old 7.5” axle after removal. It was good but I wanted better.
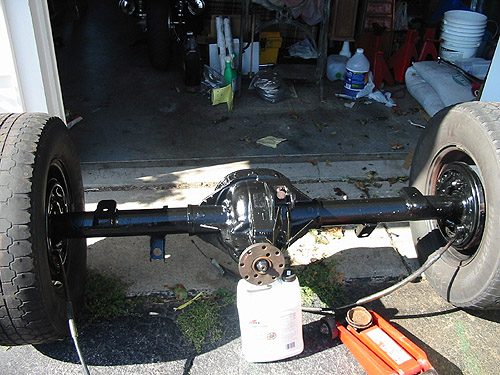
My nice new 8.8” Axle all ready for install, looks nice all painted up like that doesn’t it?
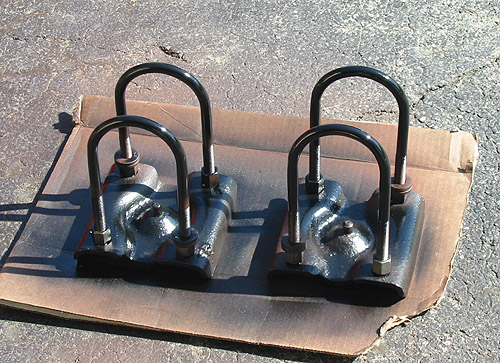
New U-Bolts and plates, in this picture you can see the offending pins in the center of the plates. Before my friend Smokey the blue tip wrench “removed” them.
Here’s the new 8.8” axle installed and ready for its first road test. Total installation time was just around 4 hours.
Was it worth the effort? I think so but the complete jury is still out. I’ll let you know as soon as I get some off road and snow driving under my belt. So far it seems to do much less tire spinning in the rain around tight corners. Especially when I can’t keep my foot out of it. Nasty little 4 bangers can be tough on tires if you have a heavy right foot.
If I do “accidentally” break the tires lose it seems to do it much smoother and actually gives you a decent warning. I get a little tire shake from the inside wheel, probably the axle arguing with the traction bars, and then it slowly starts to slide out if I keep my foot in it. It’s very easy to control the resulting slide with the loud pedal. Before with the open diff it would start spinning the inside wheel and then suddenly let go. It could be a little disconcerting if done at speeds above 25 to 30mph. mostly because of how far it would always come around before I could catch it, a truly well controlled drift was an iffy proposition at best.
OK, I know what some of you are thinking, “I could never do that”. It’s way too big a job. Well, I have to tell you, you’re wrong. Sure, the parts are big, but the job itself is not in any way technically challenging, anyone can do it if they try. There are no fine tolerances to worry about. Remember the axle itself self-aligns on the springs so that’s not a problem. Unlike full independent suspension systems, the beauty of the live axle rears our trucks use is that it’s virtually impossible to install wrong. Well, that’s not exactly true; I guess you could put the silly thing in backwards. That or not rechecking and retightening ALL the bolts would be doing it wrong. But those are about the only ways I can imagine anyone messing it up.
Good luck, be safe and have fun, I plan to.
Related Articles
Ford Ranger Rear Axles (1983-2011)
Ranger / Bronco II 7.5-Inch Axle History & Specs
Ranger / Explorer 8.8-Inch Axle History & Specs
Explorer 8.8-Inch Swap – No Welding
Ford Explorer 8.8-Inch Rear Axle – Swap
How To Spot A 31-Spline FX4 8.8-Inch Axle
What Is A Torsen Limited Slip Differential
About The Author
Jim Oaks is the founder of TheRangerStation.com, the longest-running Ford Ranger resource online since 1999. With over 25 years of hands-on experience building and modifying Ford Rangers — including magazine-featured builds like Project Transformer — Jim has become one of the most trusted authorities in the Ford Ranger off-road and enthusiast space.
Since launching TheRangerStation.com, Jim has documented thousands of real-world Ranger builds, technical repairs, drivetrain swaps, suspension modifications, and off-road adventures contributed by owners worldwide. TheRangerStation.com has been referenced in print, video and online by enthusiasts, mechanics, and off-road builders looking for practical, and experience-based information.