
Introduction
This guide provides step-by-step instructions for safely removing and installing the torsion bars and torsion bar keys (adjusters) on a 1998-2011 Ford Ranger 4×4. Proper maintenance of the front suspension is essential for ride height, alignment, and overall vehicle performance. Whether you are performing a lift, replacing worn components, or doing a Pre-Key modification, following the correct procedures ensures safety and optimal suspension operation.
Why Remove and Install Torsion Bars?
-
- Replace worn or damaged torsion bars and adjusters
- Perform a front suspension lift or Pre-Key modification
- Correct ride height and vehicle leveling
- Ensure proper alignment and handling
- Maintain suspension safety and stability
Parts & Tools Needed
- Torsion Bar (Ford P/N 5B326)
- Torsion Bar Key / Adjuster (Ford P/N 5B328)
- Adjustment Nut / Screw (Ford P/N 5B329 / HB1)
- Torsion Bar Insulator (Ford P/N 5B335)
- Torsion Bar Tool with adapters
- Socket set, wrenches, and torque wrench
- Jack and safety stands
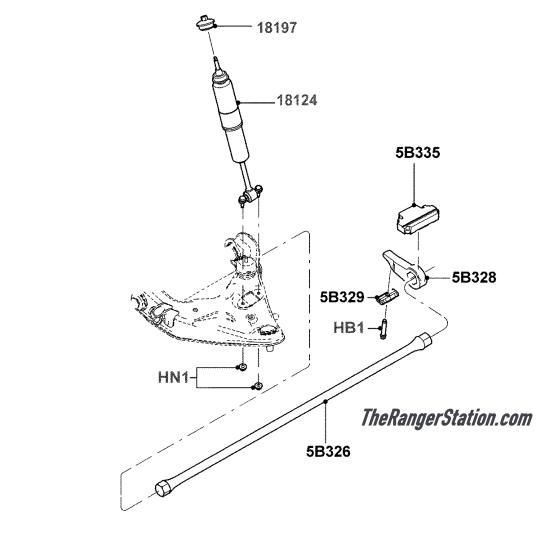
| Part Number | Description |
| 5B326 | Torsion Bar |
| 5B328 | Adjuster (key) |
| 5B329 / HB1 | Nut / Adjusting Screw |
| 5B335 | Isolator |
Safety Precautions
- Always wear eye protection and gloves when working with torsion bars.
- Block rear wheels and use jack stands before lifting the vehicle.
- Relieve torsion bar tension carefully using the proper tool.
- Measure and record the torsion bar adjustment before removal.
- Replace the adjustment bolt if it is removed or backed off; failure to do so can cause misalignment or unsafe suspension operation.
Quick Summary
Removing and installing torsion bars and keys on a 1998-2011 Ford Ranger 4×4 is essential for front suspension maintenance, ride height adjustment, and lift modifications. Use proper tools, record adjustment measurements, follow safety precautions, and always check alignment after installation to ensure optimal performance and tire longevity.
How to Remove Ford Ranger Torsion Bars and Keys
Follow the step-by-step instructions below to safely remove your torsion bars and torsion bar keys. Be sure to reference the diagrams and part numbers above.
To Remove:
1) Before servicing the vehicle, refer to the Precautions Section.
2) Remove the torsion bar cover plate.
NOTE: Before relieving the torsion bar tension, measure and record the measurement of the torsion bar adjustment bolt. This measurement will be used as the preset depth for the new torsion bar adjustment bolt during installation.
3) Relieve the torsion bar tension.
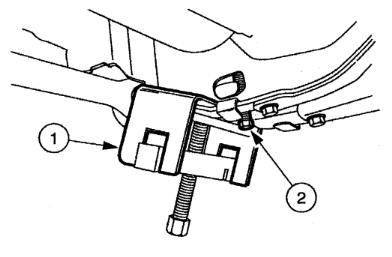
A) Position the Torsion Bar Tool and adapters.
B) Tighten the Torsion Bar Tool until the torsion bar adjuster lifts off the adjustment bolt.
CAUTION: The torsion bar adjustment bolt is coated with dry adhesive; and must be replaced if it is backed off or removed. Failure to do so can cause the adjustment bolt to loosen during operation and cause a loss of vehicle alignment.
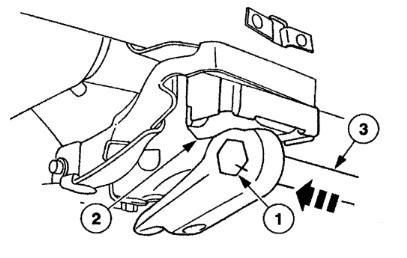
C) Remove the torsion bar adjustment bolt and nut.
D) Loosen the Torsion Bar Tool until the tension is removed from the torsion bar.
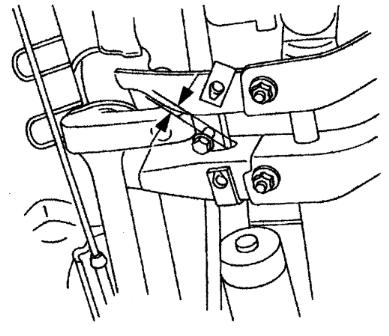
4) Mark the torsion bar and the adjuster for proper installation.
5) Remove the torsion bar insulator.
6) Grasp the torsion bar and pull it free from the front suspension lower arm.
To Install:
1) Position the torsion bar and the torsion bar adjuster.
2) Align the marks on the torsion bar and the torsion bar adjuster, then install the torsion bar adjuster.
3) Position the torsion bar insulator.
4) Install the Torsion Bar Tool and the adapters.
5) Tighten the Torsion Bar Tool until the new adjustment bolt and nut can be installed.
6 Turn the adjustment bolt until the preliminary adjustment measurement (recorded length of the old adjustment bolt) is reached.
7) Install the torsion bar cover plate. Torque the bolts to 46 ft. lbs. (63Nm).
8) If equipped with air suspension, reactivate the system by turning on the air suspension switch.
9) Lower the vehicle.
10) Adjust the ride height.
11) Check the alignment.
Related Articles:
Torsion Bar Removal Without A Special Tool
Shocks For Your Torsion Cranked Ranger
Last updated:
About The Author
Jim Oaks is the founder of TheRangerStation.com, the longest-running Ford Ranger resource online since 1999. With over 25 years of hands-on experience building and modifying Ford Rangers — including magazine-featured builds like Project Transformer — Jim has become one of the most trusted authorities in the Ford Ranger off-road and enthusiast space.
Since launching TheRangerStation.com, Jim has documented thousands of real-world Ranger builds, technical repairs, drivetrain swaps, suspension modifications, and off-road adventures contributed by owners worldwide. TheRangerStation.com has been referenced in print, video and online by enthusiasts, mechanics, and off-road builders looking for practical, and experience-based information.