• Welcome Visitor! Please take a few seconds and Register for our forum. Even if you don't want to post, you can still 'Like' and react to posts.

What did you do to your Ranger today? (Part Deux!)


Duh, senior moment here, forgive me (One of the things I hate about being a dimwitted senior old fart is sometimes you think like a dimwitted senior old fart).

I bought this trailer and the 15 or 20 14” Ranger bullet hole wheels and axles, etc. 2 or 3 years ago. While I hadn’t even started, no less finished, the Road Ranger tractor at that time, I remember doing all the math in my head (therein lies the problem), so I wouldn’t have to modify this trailer. Remember that 3-4 times a week I arrive in my kitchen and I can’t even remember why I came down from the bedroom

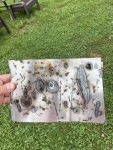
When I did the mock up this afternoon, I was using a 15”, 235/75/15 spare tire from the semi. I had completely forgotten that I had accumulated all of these 14 inch wheels, most of which have 185/65/14 tires on them, which are about the same width as the rim. Truck tires are 15 inch and wider.

Soooo, I went back out to the tire pile next to the shed of miracles, and I dug some of these things out, and then I redid the mock up. With the 14s, and the 185/65/14’s, I can keep the trailer frame width as is, and I end up at exactly 70 inches to the outside of the tires, which is exactly the same as the Road Ranger.

View attachment 94662View attachment 94663View attachment 94664
View attachment 94666

The truck’s tires stick out about an inch outside the fenders. So I’m going to rethink the trailer, so the trailer tires do the same thing. I will still keep the tires underneath the deck of the trailer. This puts me back to probably stepping up the deck, quasi goose neck, so the deck rides level when it’s attached to the fifth wheel.

My underlying point is that I really did think this out very well, then I forgot it all, but that was a few years ago, and I forgot that I was smart back then. Something like that.

And yes, I have to cut out about 3 inches from the forward axle so it mirrors the rear axle. Project for another day. Second set of brakes later too.

Before you set the axles in place, are you going with the traditional center of balance for a trailer or the semi trailer center of balance format? If the semi trailer format, you may want to do some research on what the ideal C/B range is so you can figure out axle placement. And if you are going with that format, you may want to reconsider your coupler due to the heavier weights.

Your current coupler might work, maybe, with a traditional trailer center of balance (10% - 15% of total trailer weight on tongue) and the center of trailer horizontal rotation would be in the center of the axles where the equalizer should sit.

I considered going tandem axle on my trailer but the amount of rework to do it would have been massive and more work than it would be worth for something that would be more for looks and with minimal other practical benefit. At least in my case.
 
Amen! I agree completely! Especially for all you kids! You can take pictures with your smart phones, and then look back in a second. I may have done that with one of my Polaroids, but I can’t find the prints!

I’ve said it a few times, but in 2014, I stepped in a tiny hole and destroyed my leg, my career, etc., and then I got a blood disorder that hampered my recovery. Part of my delusion was entering all of this Ranger stuff. I was buying all kinds of trucks and parts to build the Rangers we had left over from the engineering company. It was a coping mechanism, and turned into a great hobby, with a bunch of new friends!

(Assuming you all don’t hate me….)
You're good, Rick. I've done a similar thing but with motorcycles. I'm or was a Suzuki GS500 fan boy. I have 6 in various states of build. Enough parts to build 10. Two are rideable and look finished, but are projects really ever complete? I also have a 2000 V Star Classic 650 and my fav a 2014 Honda CB500X for adventure touring and set up for going offroad. I also have these cars, 1971 Buick Skylark been in my family since it was ordered new with a base GS Buick 350 engine, 1990 Mercury Blue Max Cougar very rare car, 1990 Mercury Tracer wagon, 1998 Chevy Cavalier sedan my grandmother (RIP) gave me in fall of 1999 with 4500 miles! for divorcing my 2nd wife, and the grande finale my 2001 Ford Ranger that my recent ex-girlfriend of 22 years gave me back in 2015. This truck as been through hell and been a major pain in my ass since she bought it off the original owner.
 
You're good, Rick. I've done a similar thing but with motorcycles. I'm or was a Suzuki GS500 fan boy. I have 6 in various states of build. Enough parts to build 10. Two are rideable and look finished, but are projects really ever complete? I also have a 2000 V Star Classic 650 and my fav a 2014 Honda CB500X for adventure touring and set up for going offroad. I also have these cars, 1971 Buick Skylark been in my family since it was ordered new with a base GS Buick 350 engine, 1990 Mercury Blue Max Cougar very rare car, 1990 Mercury Tracer wagon, 1998 Chevy Cavalier sedan my grandmother (RIP) gave me in fall of 1999 with 4500 miles! for divorcing my 2nd wife, and the grande finale my 2001 Ford Ranger that my recent ex-girlfriend of 22 years gave me back in 2015. This truck as been through hell and been a major pain in my ass since she bought it off the original owner.

Sounds like my affliction! I do my horse trading, and I get new stuff when I feel like it, and I never sell the old stuff. I’m at that point in life where I’m trying to downsize, which is why I am down to three Lincolns and three trucks, and a half dozen trailers and parts.

All is good with all these guys. I’m just playing around with a few toys, literally toys. If there is any “rub,“ it’s probably because the majority of these folks are relying on their vehicles for daily drivers, and to make a living, or to do a specific job. So when I build a truck or build trailer for fun with the junk I have laying around, it raises concerns for safety and performance and durability, and I think it just goes against the grain, against the concept of building the best functional vehicle.

While I say that, I offer it as explanation, and I have no hurt feelings or concerns with anybody who has chimed in with good advice, and a good heart. I have learned a lot from the guys on this site, and it has helped me out to build my toys.

With these thoughts it’s also time for another disclaimer. I am doing this for fun, with a lot of hands-on experience and engineering knowledge from my education and career. I do not advise anybody to do any of the things I’m doing, which can be best categorized as harebrained schemes.

Like the Road Ranger, I generally start with a dream spurred by whatever I’ve come up on that I can get cheap. As I refine the vision, I’m crawling on craigslist for anything that’s close to what I may need for materials. Then I piece it together making it work with what I have on hand or I could get cheap.

In deference to all the other guys, they are all advising, the correct thing, in engineering, called “design - build.“ You want to design it for the intended purpose, and then build it. What I am doing, all for fun, is exactly the opposite. I have a vision of what I want it to look like, and then I scavenge it together. I’m not building it for any useful purpose nor do I have to rely on it every day. Let me also offer, with all sincerity, the only places where I put in serious consideration are the safety items. I get challenged on that daily, but I make sure they are safe for what I am doing with them, while others are using solid reasoning on why it might not be ideal for what it looks like they should be able to do. I’m also honest and ethical, so when I end up selling these things, I am brutally honest about how they were built and what they can do and what they can’t do. I would never sell something like this to someone who had to rely on it like a hot shot.
 
Before you set the axles in place, are you going with the traditional center of balance for a trailer or the semi trailer center of balance format? If the semi trailer format, you may want to do some research on what the ideal C/B range is so you can figure out axle placement. And if you are going with that format, you may want to reconsider your coupler due to the heavier weights.

Your current coupler might work, maybe, with a traditional trailer center of balance (10% - 15% of total trailer weight on tongue) and the center of trailer horizontal rotation would be in the center of the axles where the equalizer should sit.

I considered going tandem axle on my trailer but the amount of rework to do it would have been massive and more work than it would be worth for something that would be more for looks and with minimal other practical benefit. At least in my case.

All good information. In your post you mentioned doing extra work simply for what something might look like. That almost defines what I’m doing, which makes no sense to folks who build things for a purpose. I truly appreciate all the advice on axle placement and loading, I’m aware of most of that, but it’s always good to get reinforcement. But I am building this mostly for looks and fun, although it will be serviceable to a certain degree.

I want it to look like a little tractor trailer. You’ve already seen what I’ve done to the Road Ranger. I want the trailer to look like a traditional flatbed for hauling materials, not a lowboy for handling equipment. The travel trailer frame was just about the right size for what I wanted. As stated earlier, if I took the 14 inch wheels in tight, I end up with the same track as the cab. I also mentioned that I’m building the wheel assembly like a railroad car truck.

Before I mount the completed truck underneath the trailer frame, I am going to jack up the trailer frame and back the cab up against it to get the level I want for the look I want. Then I will mount the truck underneath it with spacers to preserve that elevation. The wheels will be under the deck, not outside it, like a typical equipment trailer.

I suspect the connection point at the coupler will have to be higher, and the deck over the “pin” will have to be even higher than that to make sure the fenders clear when I’m turning and maneuvering. Like a lot of my stuff, I am going to field fit it rather than spending a ton of time on mathematical design. But just looking at it, I suspect the level deck will end about a foot and a half behind the back of the semi, it will step up about 1 to 1-1/2 feet, and then have a narrower flat platform going forward over the pin. The final design will be based on what I feel that day.

As regards the width of the trailer, that big square back bumper will actually have to be cut down a little bit. I am going to build about 8” extensions to the deck sides to match the Road Ranger about where the fenders are over the wheels on the cab, again, so it looks like a little semi.

Back to the actual axle placement and loading, remember the way I did the floating axle on the back of the semi, it will carry a good bit of weight. It’s a 3500 pound floating axle. The original Ranger axle and cab will be pulling it more than it will be carrying it. With double 3500# springs on the axles at the rear of the trailer, obviously that will carry the other half of the trailer. The actual axles are lighter, but the pair of them will carry more than 3500.

When I originally talked about this project a long time ago, I was talking about putting thousands and thousands of pounds on it. With the arrangement and the axles, assuming the trailer weighs 700 pounds, theoretically, I should be able to put 6000 pounds on it. You all know I’m certifiable, but that will never happen. I don’t think I would have any problem at all carrying 2 or 3000 pounds after I get all the electric brakes installed properly, but I’ll probably never do that either.

There’s one other consideration before I do anything heavy duty with it. When I put the frame on jack stands, you could actually bounce it a little bit. The travel trailer frames are made out of a springy steel that flexes a tiny bit with the bumps of the road. This is on purpose, since the cabins are typically nailed and screwed together, and they would shatter apart on a very rigid frame. I plan to put a couple toolboxes under the deck on the sides, and I plan on putting carriers for two spare tires, one on each side. When I build the frames for those, I plan on doing a little lattice work underneath the existing trailer frame to stiffen the whole thing. Most folks know a light weight truss can hold the same weight as a pretty stout beam. That’s how I plan on increasing the load capacity of the deck, so it doesn’t fold in the middle, while adding my other features.

Keep all those comments coming…
 
Unless you are driving a real tractor trailer, in

Are you trying to hurt my feelings? You don’t think this thing assembled from scrap yards, Craigslist, garage sales and a travel trailer frame isn’t a real tractor trailer?
 
All good information. In your post you mentioned doing extra work simply for what something might look like. That almost defines what I’m doing, which makes no sense to folks who build things for a purpose. I truly appreciate all the advice on axle placement and loading, I’m aware of most of that, but it’s always good to get reinforcement. But I am building this mostly for looks and fun, although it will be serviceable to a certain degree.

I want it to look like a little tractor trailer. You’ve already seen what I’ve done to the Road Ranger. I want the trailer to look like a traditional flatbed for hauling materials, not a lowboy for handling equipment. The travel trailer frame was just about the right size for what I wanted. As stated earlier, if I took the 14 inch wheels in tight, I end up with the same track as the cab. I also mentioned that I’m building the wheel assembly like a railroad car truck.

Before I mount the completed truck underneath the trailer frame, I am going to jack up the trailer frame and back the cab up against it to get the level I want for the look I want. Then I will mount the truck underneath it with spacers to preserve that elevation. The wheels will be under the deck, not outside it, like a typical equipment trailer.

I suspect the connection point at the coupler will have to be higher, and the deck over the “pin” will have to be even higher than that to make sure the fenders clear when I’m turning and maneuvering. Like a lot of my stuff, I am going to field fit it rather than spending a ton of time on mathematical design. But just looking at it, I suspect the level deck will end about a foot and a half behind the back of the semi, it will step up about 1 to 1-1/2 feet, and then have a narrower flat platform going forward over the pin. The final design will be based on what I feel that day.

As regards the width of the trailer, that big square back bumper will actually have to be cut down a little bit. I am going to build about 8” extensions to the deck sides to match the Road Ranger about where the fenders are over the wheels on the cab, again, so it looks like a little semi.

Back to the actual axle placement and loading, remember the way I did the floating axle on the back of the semi, it will carry a good bit of weight. It’s a 3500 pound floating axle. The original Ranger axle and cab will be pulling it more than it will be carrying it. With double 3500# springs on the axles at the rear of the trailer, obviously that will carry the other half of the trailer. The actual axles are lighter, but the pair of them will carry more than 3500.

When I originally talked about this project a long time ago, I was talking about putting thousands and thousands of pounds on it. With the arrangement and the axles, assuming the trailer weighs 700 pounds, theoretically, I should be able to put 6000 pounds on it. You all know I’m certifiable, but that will never happen. I don’t think I would have any problem at all carrying 2 or 3000 pounds after I get all the electric brakes installed properly, but I’ll probably never do that either.

There’s one other consideration before I do anything heavy duty with it. When I put the frame on jack stands, you could actually bounce it a little bit. The travel trailer frames are made out of a springy steel that flexes a tiny bit with the bumps of the road. This is on purpose, since the cabins are typically nailed and screwed together, and they would shatter apart on a very rigid frame. I plan to put a couple toolboxes under the deck on the sides, and I plan on putting carriers for two spare tires, one on each side. When I build the frames for those, I plan on doing a little lattice work underneath the existing trailer frame to stiffen the whole thing. Most folks know a light weight truss can hold the same weight as a pretty stout beam. That’s how I plan on increasing the load capacity of the deck, so it doesn’t fold in the middle, while adding my other features.

Keep all those comments coming…

My trailer sides slip in over the sides of the deck instead of resting on the deck and I had to relieve the 2X4s reenforcing the sides to accommodate the fenders. I did this to get full use of the entire 4X8 deck of the trailer and to enable me to bolt three of the four bolt holes of the recessed tie down anchors directly into the frame.

To do a double axle, the sides would have to relieved more to make room for the tires and fenders and the brush guards/steps would probably have to be eliminated. Never mind the amount of frame reinforcement I would need to do in order for a second axles to be supported.

It would look cool and distribute the weight better on a muddy trail but the benefit would probably be negated by the extra drag of an extra set of wheels and tire scrub could also be a problem.

Trailers off road can be a pretty good anchor on the tow vehicle as they are anyway.

Here’s the thread on the build as it is if you want to know/see more.

 
After afterthought. Again in the category of there are no stupid questions (or suggestions):

Do you have a drill press? For some of my screwy projects I’ve had to “turn” down the OD of a cylindrical metal part/piece. After busting a few things and fortunately not my fingers, I came up with this:

Using a stout threaded rod and a couple cone shaped wood ends, I pinched the piece so I could spin it on the drill press.

Trying to then cut with a tool never worked, too unstable. Then I had the brainstorm to put a rotating drum sander in my hand drill. With the drill press spinning, I held the hand drill drum at about a 45 degree angle, moving it slowly up and down, I could slowly grind down the outside.

Once, when I needed a piece precise, I ground only until it was a little oversized, and then I shifted to sheets of emery cloth, starting coarse and shifting sequentially to fine. I constantly checked it up and down with a digital caliper and worked it to pretty good precision.

If you go slow, you shouldn’t heat the metal. It was a little tedious, but considering your situation, budget, and desire for precision, it might work if you have a piece with the right ID that’s too big OD.

To make the wood cones, I used a hole saw a little bigger than the ID and used the cut plugs, I used a threaded rod like before, and just used a coarse file with it chucked in the drill press. After a couple tries, it was pretty easy to center parts.

Of course I save all this junk for the next time in the shed of miracles, but don’t ask me where they are!!!

Hope it helps!

& BTW, I trimmed the living heck out of a dozen of my trees up about 10ft, in front with my 10yr old 110v harbor freight chainsaw and my +/- 69 ft extension cord (started at 100’, but after 30 years, I’ve cut the ends off 20 times at least). Way more Macho than my Hobby Lobby glue gun, huh? Are you proud of me?
My dad has a drill press, unfortunately it’s apparently defective. It was a brand new Delta, but the chuck wobbles. It’s pretty solid all the way up, but as you pull it down, the wobble gets increasingly worse. Delta refused to do anything about the drill press. A drill press is on my list of tools to get. Actually at this point I’d really prefer a milling machine. Just no place to put it right now.

I’ve done rudimentary turning and I’ve hand filed and sanded a lot of stuff. Most recently I turned down some leaf spring bushings. Energy Suspension said they were the correct bushings but they were not. I needed the project done, so the bushings got modified.

Hot glue guns have their use. I always considered them a hobby tool and not much practical value. Then I was helping a contractor buddy with some kitchen countertops and he whipped out a battery powered one to fix the shims in place. If a shim got set and it wasn’t right, it just popped right off and could be re-set. I used to brad nail shims but if you have to pull the shim, then you have to deal with the nail. I ended up buying my own battery powered one and it gets used for anything that needs a quick temporary or permanent hold (depending on the situation) and I’ve used it to make temporary plugs for stuff like the back of an AC compressor to keep dirt out until I could get it mounted and the hose on.
 
For those that don't know, my wife and I called it quits two weeks ago now, after 22 years. I've been cleaning out my house and tossing everything. I'm trying to decided what I want to do with my house, gut and remod or gut remod sell. My near dead Ranger has been chunring along holding on while I get this done.
 
For those that don't know, my wife and I called it quits two weeks ago now, after 22 years. I've been cleaning out my house and tossing everything. I'm trying to decided what I want to do with my house, gut and remod or gut remod sell. My near dead Ranger has been chunring along holding on while I get this done.

Sorry to hear about your troubles. Relationship issues are tough.
 
the ranger went into storage while my son is living the good army life north of seoul in korea. i couldn't remember if i put that in this thread. he filled it up and put sta-bil in the tank and then drove it to the storage place and locked it in the room.
 
the ranger went into storage while my son is living the good army life north of seoul in korea. i couldn't remember if i put that in this thread. he filled it up and put sta-bil in the tank and then drove it to the storage place and locked it in the room.

My cousins husband is in the army and got sent to Korea in june.. tank driver. Hopefully nothing fucky happens.. because she's "due" in November lol. Good planning 😋
 
Sorry to hear about your troubles. Relationship issues are tough.
Thanks. We separated on good terms. We wanted different things. She moved back up to where she was from. I stayed down here. Our son, who is 20, decided to go back up there with her temporarily.
 
My Ranger is back on the ground again, and closer to it now. I installed the DJM 4/5 kit. Between school and work it ended up taking 4 weeks, but the end result is great. Now I just have to solve my battery issues so I can move it 🤣.
In not-ranger news, I tried welding for the first time. It was stick welding, I didn’t think it would be so hard, I just kept blowing holes through the thin sheet metal. Maybe the other methods would be easier…
 

Attachments

  • 7A210A5A-4B7C-45CD-82DB-3DD4D878CDC9.jpeg
    7A210A5A-4B7C-45CD-82DB-3DD4D878CDC9.jpeg
    127.1 KB · Views: 79
  • 9635F54D-649F-49D8-B1A9-2912E126F33D.jpeg
    9635F54D-649F-49D8-B1A9-2912E126F33D.jpeg
    190 KB · Views: 71
My Ranger is back on the ground again, and closer to it now. I installed the DJM 4/5 kit. Between school and work it ended up taking 4 weeks, but the end result is great. Now I just have to solve my battery issues so I can move it 🤣.
In not-ranger news, I tried welding for the first time. It was stick welding, I didn’t think it would be so hard, I just kept blowing holes through the thin sheet metal. Maybe the other methods would be easier…
Practice in heavier metal until you get good at controlling the puddle. Then start trying thinner gauge metal and learning how to fine tune the machine and using smaller rods.

practice, practice, practice.
 

Sponsored Ad


Sponsored Ad

Overland of America

TRS Events

Member & Vendor Upgrades

For a small yearly donation, you can support this forum and receive a 'Supporting Member' banner, or become a 'Supporting Vendor' and promote your products here. Click the banner to find out how.

Latest posts

Recently Featured

Want to see your truck here? Share your photos and details in the forum.

Our Latest Video

TRS Merchandise

Follow TRS On Instagram

TRS Sponsors


Sponsored Ad


Sponsored Ad


Amazon Deals

Sponsored Ad

Back
Top