• Welcome Visitor! Please take a few seconds and Register for our forum. Even if you don't want to post, you can still 'Like' and react to posts.

Replacing your timing belt (with pics)


Help

This is an awsome thread!! I did almost exactly as you did and now have
mine back together. I have spark but the motor does not start???What is next!
 
This is an awsome thread!! I did almost exactly as you did and now have
mine back together. I have spark but the motor does not start???What is next!

If you are sure you are getting spark but it is not firing it could be that you do not have fuel in the cylinder...or that the spark is out of phase with the fuel delivery...

You can check fuel delivery by cranking it a few times and then pull one of the plugs...if the plug is wet that means you are getting fuel...then you would need to check the timing again as it could be out 180*...

If the engine is bumping like it is burning the gas but not able to fire consecutively to keep it running that is another sure sign of timing being off...
 
Hey fellas, this is good except if you could offer done alterations to accommodate my situation. Aside from basic maintenance this is about my first whack at being a grease monkey. Anyway Belt broke on my 2.3 (88 ranger 4x4 5spd). And the top half of my cover is broken of (bought like that). So I'm having trouble knowing tdc. The bottom (crank) is easy to line up, I have that half of the Cover with those marks. But as far as the middle sprocket that turn the distributor and the top sprocket, I'm unsure of how to be exact. I have the Haynes manual it shows that peep hole over the cam sprocket, to line it up, but that is where my cover is missing so I'm not sure where to look. I think I can line up the middle sprocket by turning it to where it's pointing to the #1 spark plug. (Presuming piston #1 is the one closest to the radiator.) Any other tips for that one? I've called every parts place around here even the dealership and junkyard and online looking for that cover and I've struck out completely. Don't see old stuff in dog gone salty New York. Thanks for any help folks.
 
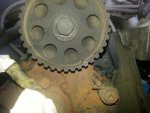
If you look closely at the cam sprocket area, around 4:00 O'clock on the dial, you should see a metal probe near the edge of the sprocket. It should point to the triangle stamped into the sprocket edge when the cam is aligned for TDC. If that is missing, you should see a bolt hole or the remains of said pointer right near 4:00 O'clock. Find a replacement pointer, remove the old remains, and bolt in the new-ish pointer.
As far as the aux drive, there are no pointers for distributor fired engines that I know of. Remove the cap, and rotate the aux shaft to get the rotor pointing to the #1 plug wire position. The distributor doesn't care about cam & crank timing, but you have to get it in the 'ballpark' for later setting the timing after everything else is installed. If you want to be real close to correct 10BTDC, you can loosen the distributor, and rotate the bowl with the ignition on, and the coil will fire as you rotate the bowl opposite the rotor & shaft. The mechanism doesn't know it is being rotated instead of the shaft, so it responds to and creates spark. Rotate such that the spark 'just occurred' and tighten the bolt. It should fire right up when you are ready.
The pointer mentioned is not real big, and is easily overlooked. If the previous owner had some sort collision, or swapped in a replacement the had been damaged, the pointer could have gotten removed or broken. Take a look.
tom
 
Ok, here's what I'm looking at. So there should be a METAL piece that semi circles around the bottom right of the sprocket? Attached by the bolt at 7 o clock on the sprocket and somewhere else? So is there a technical name for the part? How do I search for one? Just "camshaft index mark component" or something to that effect? I was looking for the mark they spoke of. That cleared some stuff up. Thanks
 

Attachments

  • 20150720_113649.jpg
    20150720_113649.jpg
    69.9 KB · Views: 583
You may be able to see the triangles in the picture on this web page:

http://www.rangerpowersports.com/fo...2-3-2-5-timing-belt-removal-installation.html

The triangles are different from my memory, as Ford must have changed things a bit.

There's another picture, at another site, but he broke off his timing pointer.

If you have lost teeth in your belt due to failure, the cam timing will change with each cycle of the missing teeth past the crank sprocket. It will skip or actually quit turning altogether when the tooth loss is at the crank sprocket. It may continue to turn somewhat, but will walk even more out of time as the crank continues to turn and the cam sits still for a bit.
tom

found another pic that may help:

http://www.ford-trucks.com/user_gallery/sizeimage.php?photoid=212205&.jpg=

from ford-trucks web site referenced in this post:

http://www.ford-trucks.com/forums/833982-2-3-timing-belt-tensioner-mod.html

They both are different from the ones I am familiar with. Either that or my memory has done things I am not aware of...
tom
 
If your truck is an 88, the timing marks were actually a plastic piece that was attached to the back part of the timing cover...the part that stays on when you pull the cover off. It was just three prongs and I have no idea why there were three of them other than for advanced or retarded timing.

There is/was an adjustable timing gear that would allow that to happen...but, anyway, when the cam...

FLOPS when you crank it...there should be four noticeable flops of the cam as you crank it around full turn...on the flop that gets the pointer pointing to 4 or 5 (I always used 5 but I'm on EST...lol) that is where the cam is set to compression...both valves closed on cylinder number one.

You don't really need to move it out of that flop position any more...unless you want to advance or retard the timing...and that is done by using an adjustable cam gear and some fancy footwork with the gear as it is out of the flop...

If that makes sense...otherwise you do not need to do anything other than point the mark on the cam to roughly 4 or 5 depending on your time zone...(not really)...
 
Ok, So to clerify, (before I really brake something :stop: ) the cam shaft can be "flopped" to a comfortable 4-5 position (if it rests comfortably) 2: the middle sprocket is to be turned until the rotor in the distributor is "about" under the 1st spark plug. 3: the crank shaft sprocket odds turned to align with the one part of the cover I DO have. And as long as once this is put together it turns easily by hand, I should be good? Seems pretty variable for something as touchy as timing. But what are my options considering the missing components? The plastic triangles weren't the case for me I think that may be Newer engines. So does this seem plausible? By the way, thanks again for the help fellas. This has been a great blessing.

Also, I was fearing pulling off that crankshaft pulley based on the posters struggles, but I just put a socket on the bolt, gave the ratchet a few good whacks, with a hammer and it came right loose, then the pulley wiggled right out. One blessing right?
 
Also I was told to replace the tensioner while I was at it and I have the part but is that spring going to explode if I take it off or will I be able to get it back on ok?
 
Sounds like you've got the idea. It may take a bit of tinkering when you are doing the final tune...like the distributor can be rotated a bit clockwise or counterclockwise to get the idle higher or lower.

This is fuel injected I'd imagine so you won't have the vacuum line on the stator of the distributor...mainly because you won't have a stator at all...I think...so what you will have is what is called a spout connector. The spout (stands for Spark Out) needs to be removed IF and ONLY IF you actually need to play with the timing.

As set above, it should be pretty close to what it was and should, hypothetically but not necessarily realistically, run and accelerate just fine.

If not...then we can get to the fine points...

Oh, and the spring is actually a twinkie when push comes to pull...you loosen that bolt that holds it on and it pretty much releases all the tension anti-climatically...so it only looks tough...it does the job though...keeps the tension where it should be...
 
Ok I followed your instructions. It turned smoothly by hand. So I put it back together and pulled the trigger. She ran. Idels a little rough so I'm not quite there yet, but I was hoping you would have some suggestions for fine tuning. I'm not sure how to interpert what I'm hearing into what needs to be done. It idles weak, sometimes strong, then dipping to 500-900 rpms. I heard a more conserning "tink" once or twice, not in a rythm. So I didn't run it much past that. I also thought it smelled a little "gassy" but, I might expect that. As you recall my cam sprocket positioning was more of a guess, so that's the one I would most likely expect to be off. So what am I hearing and what do I do about it? I recorded it idleing with my phone, if that would help, and if there was a way for me to post that I could.
 
OK, the fact that it is running is usually a good thing. And means you are closer to finished...hopefully. The rough idle could be cause by a number of things...gassey smell could indicate you're not quite timed properly...so may need to back up a bit and redo...but, first...

Try loosening the distributor hold down bolt and with the truck running turn the distributor counterclockwise about 2 or 3 degrees...see if it runs any better/worse...

I don't think this is quite like a carbureted engine so you may not get a desired effect but tell what happened with the rotation of the distributor...you can also try going a bit further than the 2 or 3 degrees...but not usually more than 10 degrees in either direction or you will loose it completely...meaning the truck will stall...so turn it back.


I guess I'm not sure what you mean by "distributor hold down bolt" there are the two screws the hold down the cap, then there was a very small bolt on the side of the distributor facing the engine.... Where is this mythical bolt you speak of?
 
The bottom bolt that actually holds the distributor in the hole.There is a metal piece that goes over the lip of the hole and the bolt holds that piece down so the dizzy doesn't pop out of the hole.

It is on the side close to the engine and not easy to get at...but I think that might be counter productive if the engine was running OK before...that shouldn't make any difference, but it can swing the timing just enough to correct for the belt not being put on properly...

Taking the belt off and doing everything over again is probably more effective...just be gentle when applying the tension to the belt as that can make it jump teeth or spin the gears enough to throw timing off (this is where the distributor turning might help...or might not).

The bolt should be 11/16 but I forget what that is in metric for some strange reason!
 
So then. is there a way to tell what is off? My bet would be the cam, but I don't know for sure. Also, do I advance a cog, or retard one? It doesn't seem wise to just start guessing my way around the sprocket. Any ideas?
 

Sponsored Ad


Sponsored Ad

TRS Events

Member & Vendor Upgrades

For a small yearly donation, you can support this forum and receive a 'Supporting Member' banner, or become a 'Supporting Vendor' and promote your products here. Click the banner to find out how.

Recently Featured

Want to see your truck here? Share your photos and details in the forum.

Ranger Adventure Video

TRS Merchandise

Follow TRS On Instagram

TRS Sponsors


Sponsored Ad


Sponsored Ad


Amazon Deals

Sponsored Ad

Back
Top