• Welcome Visitor! Please take a few seconds and Register for our forum. Even if you don't want to post, you can still 'Like' and react to posts.

My little Iron Ranger {Part 2}


a little closer.......................

Seeing okietheranger getting his v8 ranger running made me focus more on the finish line.

My brother wired up the gauges and threw in the battery just to make sure that the gauge lights work...........................and boy do they ever!!!!!!!:D

Sorry about the fuzzy pic, that's what happens when flash is disabled on the camera
P5020482.jpg


And, alas, I sold the first old part of my ranger. A guy I work with needed the internals from a 7.5(which is what the ranger used to have) and I told him $40 and it's all yours. I needed the extra space in the garage anyway.

Here she is, for the last and final time:bawling::bawling:
P5020480.jpg


Also, I had the machinist at work turn down the axle flanges because they were too big to fit inside the axle tube. I also marked the lines where I need to cut to shorten the housing. Pics will be up tomorrow.

I'm about to order all the exhaust components tomorrow also. Including some exhaust cutouts:D:D
 
lookin good-how much longer??

:dntknw::dntknw::dntknw:. I'm guessing maybe the end of the month to the beginning of June.

I just got a few more spendy items that I need and some machining to be done, then it should be close enough for start up at least.
 
I spent the better part of the day fabbin' my new leaf spring mount. After a couple of well placed gussets, I think it'll work better than factory.

I ran out of 1" long bolts, so I had to double nut one of them for set-up or I would've hit the mounting bolts for my hitch receiver(which I built last year, some of you might remember it).
P5080485.jpg


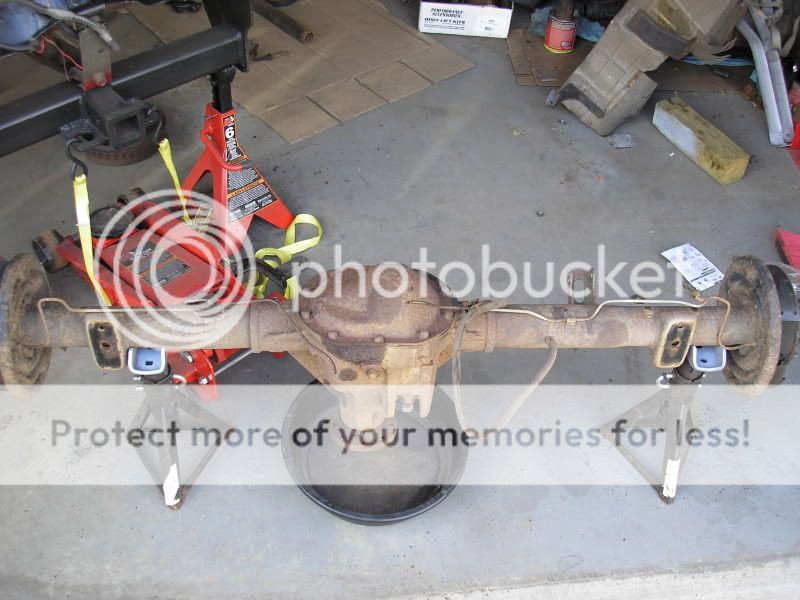
I spent some "quality" time on the 9" housing also. I chopped 5 3/4" off one of the ends to see if the new flanges would fit.
P5080486.jpg


P5080487.jpg


The tubes were 1/16" larger than the flanges, so I had to make another spacer to hold the bottom portion of the flange to keep it in line with the rest of the assembly.

I got a fairly straight 1" rod from work that I'll use to hold everything in a straight line with each other.

P5080488.jpg


P5080489.jpg


P5080490.jpg


Miraculously, the old race bearings from the 3rd member were the same diameter as the tube's ID. So, I tacked those to some useless spacers I had to hold them flat against the tube.

P5080492.jpg


I made this jig for about $10, the real one is aroung $130, big savings here.
I also read that this is the correct way to shorten a housing because even from the factory, the tubes themselves are off 90% of the time.

This is one of those cases

P5080493.jpg
.

But with the rod holding everything in a straight line, it should turn out the same too. (I hope!!)

I'll find out tomorrow.
 
Well, I got a few things out of the way. I tacked the housing ends on, came out exactly where I wanted them. I was going to flux-core wire feed the ends at home on my Handler 140, but the lack of "omph" from a 110v made me second guess myself.

I probably could've done it without problems, but I'll feel better if I spray welded the ends at work, that way it's held and welded the best way possible.

I'm also expecting the exhaust kit to be here tomorrow. Thrush mufflers, Summit Racing exhaust cutouts:D, for the ladies:icon_thumby:, a dual exhaust kit from Dynomax for an F-150(it should be basically the same thing, only longer, some cutting required), and O2 sensor bungs.

I also just purchased a Powertrax No-slip locker from RangerSVT, when that comes, I'll throw it in, send it to the tranny shop for gear set, and the third member will be done!!:yahoo:(finally:annoyed:)

The box was made for Moser Engineering for the stock axles. They need to chop 4" off each one, recut the splines and put the taper back in place, and put a 5x4.5 bolt pattern in.

I ordered some 3" aluminum tubing for the cold air intake. Since I also tig weld aluminum, I figured it'll only be a matter of cut and fit. The 90 degree elbow and the couplers for the MAF are on the way.

The new shackles are also on the way, When I get those in, I'll be able to put the leafs back on, and then I'll be able to put the new spring perches on the 9".


Slowly but surely she's coming together. I can only surrender so much funds due to the 32 hr work weeks, but thank God my brother is there to spot me the funds for the pricier things.


When the exhaust comes tomorrow, I'll take pics of her.:icon_thumby:
 
Full steam ahead!!!!

I got the left "prototype" leaf spring perch mount fabbed up and ready to bolt on. I put enough gussets on to help stiffen the plate, but I won't know until I got it bolted on.

P5140496.jpg


P5140497.jpg


Not too shabby, eh?


And, the exhaust components came yesterday. I felt like a kid on Christmas!!!

First here's the true dual exhaust kit for an F-150(some cutting will be needed, but it's pretty close otherwise).
P5140502.jpg


And these beauties are for the ladies:D:D:D(or a hint to the ricer posers to shut up!!!):D
P5140500.jpg


And to top the exhaust off are these thrush mufflers. Cheap, yet effective.
P5140501.jpg


All this exhaust made me also start on the intake. I went to the steel supply and bought myself a 3' chunk of 3" OD, 14ga aluminum tube. Perfect for what I need. I just need to decide where I want to route it.
P5140503.jpg


Finally, I took the rear end to work to spray arc the housing flanges for superior strength. The welds came out OK, but it's so hard to turn the housing and weld at the same time. At least the ends stayed true to measurement.

P5140499.jpg


P5140498.jpg


After the mounts are done, I'll be able to get the housing spring perches welded on and the brake and fuel lines run, even get that stupid gas tank reinstalled. Not easy to remove, probably not easy to put back in.:dunno:
 
Rear end is almost done................

I got the spring perches set to the angle the 7.5 was at(81 degrees), and will be welding them on tomorrow after work.

P5170506.jpg

P5170504.jpg


My prototype shackles work perfectly, so I went and built the pass. side one also. I think these will last me a very long time.:icon_thumby:

P5170507.jpg

P5170508.jpg


Here's one with both the mounts and the 9" rear end. Everything fits exactly where it should.
P5170505.jpg


All I need is RangerSVT to ship out the locker, then I can get the third member done.
 
looking good man, keep it up :headbang:
 
looking good man, keep it up :headbang:

Thanks!! I'm trying my best.

The good news is it looks like work has landed some mondo-huge contracts which will put us back on 40 work weeks plus OT!!!!!!!

Now I can eat something better than Chef Boyardee:icon_twisted:(not that it's bad, I just want to go out now and again):D
 
Wrong locker, gotta go spider for now.........

The locker that I bought was not the right one, luckly I was able to get my money back, but now I have to go lockerless so I can get this done(since a new, good one is way out of my price range). Oh, well. I'll only have the spiders until next summer when I'll have the $$$ for a locker.


So, here's the carrier assembled, ready to be sent to the local shop for gear reset:
P5230514.jpg


The rear end spring perches are now welded on, painted, and bolted up to the leafs. The stock retainer plates were too small, so I got some 3/8" plate from work, laid out the holes, and drilled them(made a HUGH mess!!). I gotta say, it looks pretty nice to me. Feels good to have the 9" installed for good.

P5230509.jpg


P5230510.jpg


P5230513.jpg


While installing the gas tank, I ran into a snag. Seems like the boxed portion I did interfered with the gas tank. There's a 14" span of the tank that sits inside the frame rail that I did not see the first time.

So, I had to get the ol' grinder with the cut-off wheel and go to town on a section.

Those of you who have a ranger with the plastic tank on the driver's side, carefull where you box the frame at.:dunno:

P5230512.jpg


But I got it done, the brother ran the brake and fuel lines, and the new gas straps are set in place.

At least the tank is where it's supposed to be.:D


What's to come:

The alternator is on the way, the cold air couplers are on the way, the axles are being worked on right now at Moser Engineering, should be done by Tuesday. Exhaust is being laid out for measuring.

I figure a few more weeks and she'll be ready to fire up(I really hope so, I even had a dream that it was done and I was crusing the hwys in her. That was the best dream ever!!!!:icon_thumby:)
 
See mine is up and running but it's done cheaply and I'm not all the proudest of it but she's my 4x4 rig and that's all she does cept haul the bike around sometimes, urs is looking very nice awsome fab work I wanna see that beast lay some rubber down!!
 
Well, the first run is going to be father away than I was hoping. I found out the slave cylinder isn't pushing the fork open far enough to disengage the clutch, so I'm looking at some ford probe slaves(smaller bore=harder to push clutch pedal, but won't take as much fluid to move as before), thus, the nice machined mount I made is a bust.

Also, the tranny shop won't take the third member until June 9th(they're the only busy shop here, does very fine work), so that's on the backburner.

But my brother started to trace the hot wires for the ignition, and soon, the fuel pump. Maybe I can get it started, but not moveable, within a few weeks.

Depends on how smoothly everything else is willing to go.............................
 
Headed in the right direction.......................

Well, the axle shafts came back from Moser, and they look fantastic!!! Unfortunatly, I forgot to take a picture of them:dunno:. Now I just need that 3rd member re-done and I'll be on the home stretch.

I cut and TIG welded the end of my cold air intake tube to get the right angle out of it. I also added a mounting tab(I'll have more pics when the clear coat dries) to help keep the tube stable.

Shined and polished, not bad eh?
P5300530.jpg


I fought hard, and managed to get the 3" Spectre coupler to squeeze over the 3.25" throttle body and MAF(Little WD-40 works wonders). The elbow is from ebay. 3 1/2" to 3" reducer. Worked perfectly.
P5300531.jpg


I also got the shock mounts welded on the 9". I cut, drilled, bent, and formed them myself(since the old ones were..........well, old.)
P5300528.jpg


P5300529.jpg


I also had slave cylinder issues. I couldn't get the slave to open up far enough to disengage the clutch. So, with a heavy heart and a broken spirit, I have to discard that 1" bore setup and start over with a smaller 3/4" bore slave(Less fluid to move, more opening distance covered).

After I'm sure that I cannot use this setup, I'll sell it to someone who can figure it out(I couldn't for the life of me).

P5300532.jpg


Tiny, isn't it?
P5300533.jpg


Also got the gas tank bolted down, my brother started tackling the wires, installed the one wire alternator and belt. Brake lines are almost done, and the 3" bumper lift brackets are almost done.

Like I said, if I had that 3rd member done, I would be on the home stretch........................:3gears:
 
U P D A T E . . . . . . . . . . . . . . . . .

Here's those updated pics I promised:

That tab hole in the battery tray is perfect for the tube tab
P5310534.jpg


Tucked neatly under the battery tray:
P5310535.jpg


The Moser'ed over axle(s), 4" shorter and 5x4.5 bolt pattern:
P5310536.jpg


My brother did an awesome job sandblasting, painting, and rebuilding the rear drum assemblies. I had to oval the holes a little bit to fit the torino style housing ends, but it fits perfect.
P5310537.jpg
 
She LLLIIIIIIIIIIIIIIIIIIIIIIIIIVES!!!!!!!!!!!!!!!!!!! !!!!!!

Not the best sounding(open headers, no O2's, and the idle needs adjusting), but she lives!!!!!!!!!!!! Finally, after 2 1/2 years, I finally get to this point and she breathes!!!!!!!!!!!!!!


Um, just for the record, that's me humming a tune(I forgot I was recording), I sounded like an idiot!!


Sponsored Ad


Sponsored Ad

TRS Events

Member & Vendor Upgrades

For a small yearly donation, you can support this forum and receive a 'Supporting Member' banner, or become a 'Supporting Vendor' and promote your products here. Click the banner to find out how.

Recently Featured

Want to see your truck here? Share your photos and details in the forum.

Ranger Adventure Video

TRS Merchandise

Follow TRS On Instagram

TRS Sponsors


Sponsored Ad


Sponsored Ad


Amazon Deals

Sponsored Ad

Back
Top