• Welcome Visitor! Please take a few seconds and Register for our forum. Even if you don't want to post, you can still 'Like' and react to posts.

Intake manifold gasket replacement


Tedybear

Well-Known Member
Firefighter
Joined
Aug 26, 2008
Messages
1,094
Vehicle Year
1994, 2001
Transmission
Automatic
My credo
Failing is easy. Everyone can do it.
Need to know the details on replacement of the intake manifold gasket.

Namely with the FelPro gaskets. When I did the gasket 4+ years ago (with the new heads) The instructions with it stated not to use any sealant, and that the gasket already had sealant on it.

Now my shop manual states to give the gasket a light coating of sealant before install.

Considering this gasket went south---should I add a light coating of RTV black around the ports and such prior to install? And if so, should I apply the coating and install without waiting---or give it a thin coat and wait a bit for it to start to harden.

If not RTV Black, what would be recommended--if anything- Or just put it on dry again and hope the factory sealant on the gasket does it's job?


Forgive me for asking what seems to be a basic question. I just do not like to repeat my work for something that can be prevented during install.

S-
 
We need more info, what engine are you working on, and what year is it/your truck?

SVT
 
It's in the 'info' bar under my name. Stock 1989 Bronco II with the 2.9v6
 
I did a front oil seal on a 2.0 neon. The book stated no lube. The gasket kit manufacturer had no instructions. I have a leaky front seal because I followed instructions. Turns out the book was correct IF you used a Teflon seal but the one supplied in the kit was the regular black "rubber". My point is that you need to follow instructions from the manufacturer first if provided because they would have the most current knowledge.
IMO , If I was to use rtv I would let it dry before installation so removal would be easier.

Sent from my XT1032 using Tapatalk
 
Last edited:
This time around it's a bit strange.

First kit I used when I did this first? Had a tube of RTV for the ends. The new gasket now has a cork rubber gasket actually 'glued' to those places to prevent leaks.

The box itself was not "Sealed" but all parts included. Missing of course? Any signs of the installation notes.

I know the corner edges of the cork gasket will need a touchup with RV black. That's a given.

I'll peek around a bit and see if I can dig up a pdf of the missing paper. Last thing I want to do? Would be to tear it apart again.

S-
 
Judging by the propaganda from Fel Pro's website? I'm guessing NOT to use any sealents on the gasket at all. Looks like a thin steel gasket with a composite rubber graphite faces--and a very thin silicone strip at the ports.

Just where the cork rubber may not seal all the way might need a touch up. (actually, the cork rubber end gaskets may actually do the entire job, I've not looked it over that deep yet)

If anyone has other feedback or ideas? Feel free to speak up!

S-
 
personally, on my 2.8 I used a felpro gasket...rtv black with a 1/4" bead on the ends, a thin film on all mating surfaces (including ports), and a dab on the bosses to seal each bolt. installed and torqued while the rtv was still wet.
 
personally, on my 2.8 I used a felpro gasket...rtv black with a 1/4" bead on the ends, a thin film on all mating surfaces (including ports), and a dab on the bosses to seal each bolt. installed and torqued while the rtv was still wet.

That's more or less how I was considering doing it. Not letting the RTV actually harden, but put a thin coating over all the ports, backside and frontside and the bolt heads. If it's done when the RTV is still wet and not even starting to harden-- Then everything should go together without any issues of having one area thicker then the other. Just a skim coat on all the ports and red silicone areas...(very thin coat) and then install on the spot.

Or just put it together 'dry' and see what happens?

:dunno:

S-
 
One issue with wet app is squeeze out getting into small passages....just be aware. A very thin skim coat is all that's needed.

Sent from my XT1032 using Tapatalk
 
my preference would be to stick with the tube...more control. I can't imagine the mess a gasket spray would make, but then I've never used it.
 
Jobs done.

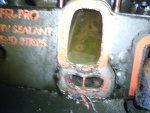
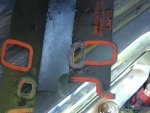
Trying to attach a couple of photos showing how bad this was.

I found the one bolt next to the offending 'leaker' loose. Not sure how it could have worked itself free? But it did, and the gasket shows the damage from the clamping pressure not being equally displaced.

From what I can see? The coolant also got between the metal insert and the gasket material. Nice bubbles around that port.

Had a major El Dumbo' during install of the new gasket. Hope it won't crap out. I went to torque it down, and this engine requires 5 steps total. I asked my wife for the first torque value and she mistakenly read off the 'final' torque of 18ftlbs. So I torqued that one on the same corner that failed to that spec....then asked for the correct pattern, when I noticed it starts off at 3, 6, 12, 18final, run engine for 15 minutes and re-torque.

So I made the one that I started with back to loose. And started all over again. Sense it was only the one bolt that got screwed up? I am hoping that the coating (light) of RTV Black on all the ports will help prevent the gasket from failing due to one bolt being not done as per instructions.

That just leaves the oil change on Tuesday and re-timing the engine. I dialed in that timing pretty darn close. Plus I checked the timing chain for slack. Nadda. Nice and steady movement, moved smoothly and no glitch when reversing direction slightly.

I'll add more if needed. For the time being the engine ran pretty smooth (even with just vacuum timing)

Have a super day!!

S-
 

Attachments

  • Yuck.jpg
    Yuck.jpg
    65.1 KB · Views: 85
  • blownout gasket.jpg
    blownout gasket.jpg
    68.9 KB · Views: 84
I have the instructions right here that comes with the same felpro set as I'm about to do mine this weekend. Says to "create intake manifold end seals by applying a continuous 3/16 bead of silicone sealant across the front and rear ends of the cylinder block, from one cylinder head to the other". However my manual says to put some on mating surfaces, and around bolt bosses as well. So I do both, cant hurt, as long as you watch for squeeze out, shouldnt be an issue if u just put a thin layer down. Felpro says to install and torque while still wet as well. If you want me to scan the sheet I will although you've already done the re install. Let me know!
 
Last edited:
Geez

Nice job to the aftermarket for making a product cheaper and worse. I guess the embedded cork strips were just too pricey. In the factory gasket, you would black rtv the corners and manifold bolt bosses. The gasket treatment takes care of sealing the ports--assuming surfaces are clean and not scored or pitted.

Personally, I'd go with factory part E3TZ-9439-D. It looks like you can pick one up on eBay for $16 shipped.
 
Wish I could get the notifications. For some reason no emails ever come through for me.


That being said? The first intake gasket I installed did need the treatment of the RTV black on the edges. It worked good, no oil leaks. The reason for the leak was my own install issue. When you find a bolt finger tight? Yeah, there's an issue.

The truck does have another issue that I'll be doing a post on. That and I'll have to see if I can figure out why the notifies are not working.

S-
 

Sponsored Ad


Sponsored Ad

TRS Events

Member & Vendor Upgrades

For a small yearly donation, you can support this forum and receive a 'Supporting Member' banner, or become a 'Supporting Vendor' and promote your products here. Click the banner to find out how.

Recently Featured

Want to see your truck here? Share your photos and details in the forum.

Ranger Adventure Video

TRS Merchandise

Follow TRS On Instagram

TRS Sponsors


Sponsored Ad


Sponsored Ad


Amazon Deals

Sponsored Ad

Back
Top