Cees Klumper
Well-Known Member
- Joined
- Nov 4, 2019
- Messages
- 250
- Vehicle Year
- 1990
- Engine
- 2.9 V6
- Transmission
- Automatic
- Total Lift
- only lift is from the oversized tires
- Tire Size
- 235/75 15
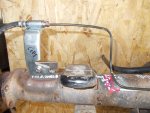
On Monday while driving I smelled burning fuel. Stopped to check and a puddle of raw gas was forming underneath at the rear. With my flashlight I could see it coming from one of the lines coming from the top of the gas tank, connected to the fuel pump. The lines are some sort of plastic 'ribbon' that snakes between the body and chassis there, then goes forward to the engine.
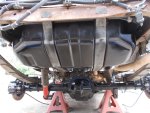
I could see it alright but I could not get at it to try and repair - not enough space. So I had to lower the gas tank enough so I could get at it.
Steps taken:
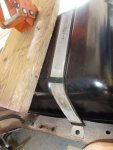
1 - need to first take off the 500 lb protective plate that covers the bottom of the tank. For that, first the filler plastic plate between the body and bumper has to come off. Then it's 4 bolts/nuts and voila
2 - position jack underneath tank.
3 - loosen the steel straps that hold up the tank in place
4 - oh right, take out the fuel filler tube, right where the tube meets the frame
5 - carefully lower tank at the rear. Remove the return vent line thingy that pushes into a rubber grommet on top of (I think, there's a sort of blanket on top of my tank) the tank or you can damage it by straining it too far. Note: once the tank is freed from the straps, it hecomes hard to control. More gas spilled this time from the piece of filler tube that remained. Choice words while manhandling the tank. Then,
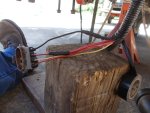
6 - remove the leaking line from the fuel pump by releasing the plastic snap clip
7 - inspect: this line had chafed through the protective sleave covering the plastic line as well as the line itself. Seems from it rubbing against the body
8 - I cut off about 8 inches from the old line, right from the plastic connector and back
9 - put (I think 5/8) rubber fuel hose on the connector with small hose clamp
10 - connect the other side to the plastic fuel line again with a hose clamp
11 - test for leaks: none
12 - put it all back together, victory test drive
I was lucky there was only about 3 gallons left in the tank. Fix cost maybe $4 in fuel line and clamps, plus of course about 2.5 hours and a shower from all the crud that fell on me laying below the truck playing with this tank and all.
I knew the funky plastic line could be fixed this way as the previous owner had already done the same thing to the other line connected to the pump, probably for the same issue. At least now I know how to drop the tank if I ever have to replace the fuel pump etc.
I could see it alright but I could not get at it to try and repair - not enough space. So I had to lower the gas tank enough so I could get at it.
Steps taken:
1 - need to first take off the 500 lb protective plate that covers the bottom of the tank. For that, first the filler plastic plate between the body and bumper has to come off. Then it's 4 bolts/nuts and voila
2 - position jack underneath tank.
3 - loosen the steel straps that hold up the tank in place
4 - oh right, take out the fuel filler tube, right where the tube meets the frame
5 - carefully lower tank at the rear. Remove the return vent line thingy that pushes into a rubber grommet on top of (I think, there's a sort of blanket on top of my tank) the tank or you can damage it by straining it too far. Note: once the tank is freed from the straps, it hecomes hard to control. More gas spilled this time from the piece of filler tube that remained. Choice words while manhandling the tank. Then,
6 - remove the leaking line from the fuel pump by releasing the plastic snap clip
7 - inspect: this line had chafed through the protective sleave covering the plastic line as well as the line itself. Seems from it rubbing against the body
8 - I cut off about 8 inches from the old line, right from the plastic connector and back
9 - put (I think 5/8) rubber fuel hose on the connector with small hose clamp
10 - connect the other side to the plastic fuel line again with a hose clamp
11 - test for leaks: none
12 - put it all back together, victory test drive
I was lucky there was only about 3 gallons left in the tank. Fix cost maybe $4 in fuel line and clamps, plus of course about 2.5 hours and a shower from all the crud that fell on me laying below the truck playing with this tank and all.
I knew the funky plastic line could be fixed this way as the previous owner had already done the same thing to the other line connected to the pump, probably for the same issue. At least now I know how to drop the tank if I ever have to replace the fuel pump etc.
")
")