• Welcome Visitor! Please take a few seconds and Register for our forum. Even if you don't want to post, you can still 'Like' and react to posts.

Early Christmas for project " OUTRANGEROUS"


rjaaaaaa2

Well-Known Member
Joined
Nov 19, 2018
Messages
98
City
gettysburg, Pa.
Vehicle Year
2001
Transmission
Automatic
Well it's finally time to take the ranger bacx off the road and get her ready for some more winter mods.
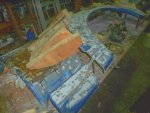
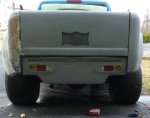
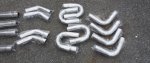
I went to the local, scrap yard this week and did some pickin, I got a rear window panel out of a 1950 chevy pu that I will be installing this winter, also picked up a couple of nice charcoal bucket seat for the interior, couple off exhaust tips that will fit into my newly redesigned rear roll pan.
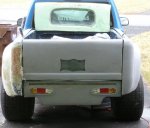
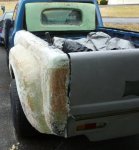
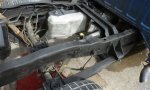
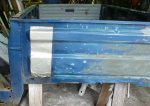
I still have some work to do on the left rear fender to match the right side. I also have some plans for up front which will be self explanatory when you see the photos.
I also hoping to get this thing all repainted by late spring or early summer. I pulled the tags and insurance off the truck foe 6 months to save a few bucks towards the mods. Should be starting to take it apart soon and get started. st1.JPGwd1.JPGwd2.JPGsc1.JPGsc2.JPG
 
nice to see ya posting!
 
maybe i can come over for a look see as i am working out in pa....
 
damn...3.5 hrs.....i forgot how far down it was...
 
Ok, pulled the rear fenders off to get started on the left fender.
Work is going a little faster on the second fender since some of the ground work has been established, using what I learned on the first fender makes it much easier, should make it a lot quicker.
I've been working on it lately and have been making good progress and its much easier when you have a finished fender in front of you to go off of.
Cut fender and moved section to be widened and added sculpting material ( URETHANE FOAM SHEET). This foam is just a a backing for the fiberglass, foam will be sculpted to fender shape the fiberglass cloth will be laid over it, when set up the fender is turned over and all the foam is removed and inside is preped for fiberglassing also
 

Attachments

  • rtfender3.JPG
    rtfender3.JPG
    178.5 KB · Views: 166
Last edited:
Well been working a few days here since its been so nice. Worked on left fender and got it all glassed in and looking pretty good. looks amazingly like the right side but who would know, I'm the only one who will see them side by side.
I'm working on the design for a small wing on the tailgate, we'll see
37113
 

Attachments

  • lft1.JPG
    lft1.JPG
    140.3 KB · Views: 167
  • lft2.JPG
    lft2.JPG
    139.5 KB · Views: 163
  • lft3.JPG
    lft3.JPG
    140.9 KB · Views: 166
Damn. I can't wait to see this completed.
 
I like where you're heading with this.
 
Thanks guys, it's coming along but I've been sick for the past week. Just got back out in the garage today and did some sanding and filling. Second fender is way easier than the first. Really looking forward to installing the new back window. Looking around to see what kind of wood I can find for the bed, which will be the next phrase. I want a wood bed floor that I can take out easily and replace with a plywood box for hauling stuff.
thanks
Ron
 
Alright guys, got a little work done this week. Did some sanding & filling of low and high spots. Put on a lite coat of primer just to see the problem areas. came out looking good a few minor spots and than hopefully this week I can take it outside and give it a couple of heavy coats of primer for final block sanding. The other fender will receiv
37874
37875
37876
e the same treatment.
 
Ok, thanks guys.
Things are moving along, I finished both rear fenders and they are ready for final primer and block sanding before paint. I put them away and covered them up and moved on to the bed and chassis. Bed has taken a beating in the past 19 yrs, I treated it like a truck.
So while the bed is off I will replace the rear shocks and the rear spring shackles, pretty rusted out.
I started scraping and wire brushing the chassis, sprayed with rust inhibitor (extend) then sprayed with undercoating. Did what I could but will do the underside when I do the exhaust which I received the other day. It looks pretty nice. I had bought a set of mufflers earlier, and I bought a set of remote cutouts. 4.6 should sound wild with open exhaust. not that I'd use them or anything. Remember I'm 71 years old .lol
I worked on the relocation of the gas filler, you can see the hole cut in the inside of the bed on the first bed photo, I already made the bracket that holds the filler tube. Had to alter the filler tube because it hit the inside of the fender and while altering the original filler while I was brazing a new piece on the inside neck was made of plastic, yea plastic so you know what happened to it. Toast, so now I need another filler tube. Bummer
While I was getting started on the bed, I found 2 large strips off aluminum tape glued to the front of the bed with thick black gooyee stuff, does anyone know what these are for, they are between the bed and the back of the cab. Mine are gone now but what a messy job.
Here are a few pic's.
38493
 

Attachments

  • ch2.JPG
    ch2.JPG
    156.5 KB · Views: 177
  • bd1.JPG
    bd1.JPG
    223.8 KB · Views: 167
  • bd2.JPG
    bd2.JPG
    139.1 KB · Views: 168
  • exh1.JPG
    exh1.JPG
    89 KB · Views: 156
  • exh2.JPG
    exh2.JPG
    244.3 KB · Views: 157
  • exh3.JPG
    exh3.JPG
    139.5 KB · Views: 163

Sponsored Ad


Sponsored Ad

TRS Events

Member & Vendor Upgrades

For a small yearly donation, you can support this forum and receive a 'Supporting Member' banner, or become a 'Supporting Vendor' and promote your products here. Click the banner to find out how.

Recently Featured

Want to see your truck here? Share your photos and details in the forum.

Ranger Adventure Video

TRS Merchandise

Follow TRS On Instagram

TRS Sponsors


Sponsored Ad


Sponsored Ad


Amazon Deals

Sponsored Ad

Back
Top