• Welcome Visitor! Please take a few seconds and Register for our forum. Even if you don't want to post, you can still 'Like' and react to posts.

Early Christmas for project " OUTRANGEROUS"


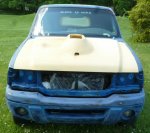
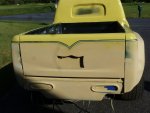
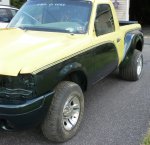
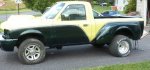
Waiting for some material so worked on the grill material and how to fasten it all together. It all fit well so I'll put it away till after paint.
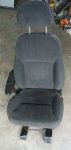
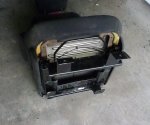
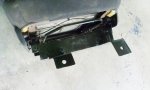
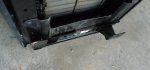
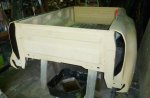
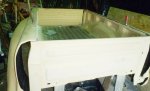
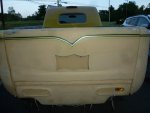
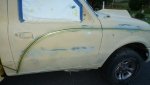
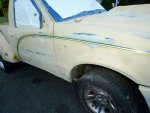
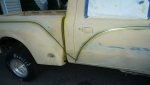
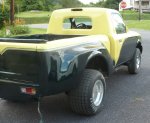
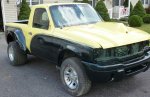
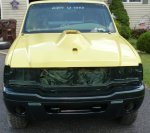
I finished the brackets for the seats and test fitted them, everything looked good so I took them all off and painted them and reinstalled it all. put them in the back of the garage under a blanket. I'll save all the interior parts till after paint except for construction of the center console which I will start soon. Need some spray adhesive and wood glue. Supposed to rain tomorrow so I guess I'll violate my lock down and go to the auto store, haven't been off the property for 5 weeks. my Mustang needs some exercise too.
 

Attachments

  • st1a.JPG
    st1a.JPG
    61.5 KB · Views: 140
  • st2.JPG
    st2.JPG
    136 KB · Views: 132
  • st3.JPG
    st3.JPG
    110.9 KB · Views: 131
  • st4.JPG
    st4.JPG
    90.7 KB · Views: 134
They were designed that way. Some vehicles, if the lower valence is broken in any way, the air flow is ruined and the vehicles will over heat because enough air isn’t getting into the radiator. I’m thinking it was either Camero or the Pontiac version that was notorious for it but I can’t remember for sure.

A lot of them had a bigger opening in the lower valence as well that what the Ranger has.
yep, the firechicken had basically an air scoop that went under the bumper and was part of the valence. if that was broken, you had issues.

I think a good systemt hat keeps the grill design as he wants it would be to cut the new material into three or four horizontal strips that overlap each other by about 1/4", have those strips tied to gether with a few rods on the inside of the grille, all of the strips are on pivots on each side of the grille and a solenoid hooked up to one of the rods that can open and close the strips like a Jalousie window or venetian blind... instant air on demand.

AJ
 
So I've been doing a little primer work and have the bed all primered up and I did the lower half of the truck body below the new rear window. looks good but this primer I have is very heavy with solids, so much that my 1.3 nozzle wouldn't spray it at the mixture stated on the can so I added some reducer to thin it out a little and gave it 3 coats instead of 2 and it looks too be ok. I'll get some pics tomorrow. I'll be moving the truck out into the yard to finish taping everything up and finishing the primer. It's getting there and oh by the way I PICKED UP MY PAINT TODAY, YAHOO. It looks good but I wanted a little metallic in the yellow and my supplier couldn't get any to show up in the yellow, they added the same amount of additives that the dark green has but it doesn't show up in the yellow. The green has some good sparkle to it so I bought some micro metal flakes from Roth, something that I can spray and I'll mix it in my first coat of clear. That should add a little sparkle to it all.
Should be doing final sanding next week !!!
 

Attachments

  • bedprm1.JPG
    bedprm1.JPG
    119.4 KB · Views: 124
  • bedprm2.JPG
    bedprm2.JPG
    117.5 KB · Views: 140
  • prm1.JPG
    prm1.JPG
    152.5 KB · Views: 141
  • prm2.JPG
    prm2.JPG
    164 KB · Views: 134
  • prm3.JPG
    prm3.JPG
    165.4 KB · Views: 139
  • prm4.JPG
    prm4.JPG
    161.4 KB · Views: 140
So I did a little sprayout this week on the front of the bed and the lower rear cab. I needed these painted prior to mating the bed and cab anyway so I practiced the with the new paint.
I looked for some colors that had a little metallic sparkle to them but didn't see anything quite like I wanted, the GM dark green had a little sparkle in the paint chip that looked ok but the toyota yellow didn't have any at all. The paint supplier who mixed the paint put the same additives in the yellow that was in the dark green but it didn't show up in their sprayout, so I ordered 2 oz.'s of micro mini .004 silver flakes.
I sprayed 4 coats of yellow base coat then added 1` teaspoon of silver flakes to approx. 6 oz of clear coat. ( I'm spraying with a hvlp w/ 1.4 tip). I sprayed 1 heavy coat of clear with the flakes in it then followed with 3 more coats of clear. It came out awesome, I couldn't wait till today to see it in full sun and wow did it pop. Just enough to set it off but when you see a flicker you can't find the flake.
I'm going to put this flake in the clear for the whole car, both colors. never tried this before since this is only the second car I painted the first was my 88 mustang a few years ago.
 

Attachments

  • pnt1.JPG
    pnt1.JPG
    115.6 KB · Views: 127
  • pnt2.JPG
    pnt2.JPG
    163.2 KB · Views: 126
So I've been working on the pin striping around the truck and I must say it was very time consuming but I'm 95% complete and I'm very happy with the way it came out. I think it will really show nice when the paint is on the truck. The two colors in the stripe are going to be the color of the truck, yellow and dark green. the green doesn't show well in the photo because it's pretty a dark color. The upper portion of the truck above the line will be yellow and below the line will be dark green. I still have the small section that transitions around rear of cab to the bed to stripe.
This week I will be painting the inner door frames, edge around the hood and the inside of the bed. I think I can do all this outside since most of it is vertical and I don't worry to must about junk getting in the paint. I haven't set up my "paint booth" yet in the garage yet. Things are moving along now.
 

Attachments

  • strp1.JPG
    strp1.JPG
    108.8 KB · Views: 128
  • strp2.JPG
    strp2.JPG
    93.5 KB · Views: 137
  • strp3.JPG
    strp3.JPG
    140.9 KB · Views: 136
  • strp4.JPG
    strp4.JPG
    71.7 KB · Views: 132
  • strp5.JPG
    strp5.JPG
    91.6 KB · Views: 143
  • strp6.JPG
    strp6.JPG
    125.4 KB · Views: 123
I like it. Is that paint? Fantastic job if it is!
 
yes, thats all hand taped and painted with air brush. Almost 12 hours time of taping, painting, drying, untape, retape do it over again. but I think it's worth the trouble. I tell my wife all the time while working on this project that a lot of the time and effort and extra work is all self inflicted, LOL But that's what it's all about. thanks for looking
 
Well I'm 1/2 way there. Put some color on today and it came out great. Color ereally looks good next to the pin striped lines. Going to do the bottom half dark green tomorrow. The flakes look awesome in the sun light!
 

Attachments

  • PNT3.JPG
    PNT3.JPG
    161.5 KB · Views: 115
  • PNT4.JPG
    PNT4.JPG
    137.1 KB · Views: 120
  • PNT5.JPG
    PNT5.JPG
    183.4 KB · Views: 117
  • PNT6.JPG
    PNT6.JPG
    135.1 KB · Views: 116
Gonna have to lower it once your done paint to close up that wheelgap for a better stance.

It's coming along nicely though, good job.
 
Gonna have to lower it once your done paint to close up that wheelgap for a better stance.

It's coming along nicely though, good job.
Actually the rear tires are 2" taller than stock. The Edge had a 3" lift from the factory and I like the look. thanks for looking.
 
Pretty awesome build man. Can't wait to see it with that big old bird catcher scoop sittin on top of that hump on the hood. I never knew Hoosiers has tread. Thought they were slicks. They look better than the M & H Racemasters on the back of my Lightning on 12.5 inch rims. But I sure wouldn't want to get caught out in the rain in it!

I'm against lowering as well. People keep telling me to lower my L. Nope, not happening! Your truck looks good like that.

Motor is next, going to cut and buff the paint before installing all the extra stuff.
Picked those tires up from a street stock dirt track racer who crashed his car and was parting it out. Not DOT approved for street use but I figure if he can drive 35 minutes at over 100 mph slamming and sliding around week after week it should be ok for some limited street use. We'll see. I'm looking for some 15" wide dot street tires but not for almost $300 each.. Thanks for looking.
 

Sponsored Ad


Sponsored Ad

TRS Events

Member & Vendor Upgrades

For a small yearly donation, you can support this forum and receive a 'Supporting Member' banner, or become a 'Supporting Vendor' and promote your products here. Click the banner to find out how.

Recently Featured

Want to see your truck here? Share your photos and details in the forum.

Ranger Adventure Video

TRS Merchandise

Follow TRS On Instagram

TRS Sponsors


Sponsored Ad


Sponsored Ad


Amazon Deals

Sponsored Ad

Back
Top